Fuji FinePix 4700Fuji packs a 2.4 million pixel "SuperCCD" sensor and 2400 x 1800 images into an ultra- compact digicam!<<Operation & User Interface :(Previous) | (Next): Image Storage & Interface>> Page 9:Camera Modes & MenusReview First Posted: 10/7/2000 |
Camera Modes and Menus
Record Mode: Activated by flipping the record/playback mode switch to the red camera symbol, this mode provides the following exposure modes to choose from:
 Night Scene: Accessed by turning the mode dial to the moon and star position, this mode sets up the camera for capturing subjects at night, such as cityscapes. In this mode, the only exposure control you have available is over the flash operating mode. Pressing the Menu button accesses the manual focus option.
 Landscape: Accessed by turning the mode dial to the mountain symbol, this mode sets the focus at infinity for capturing far away subjects and scenery. Flash mode is automatically controlled if the flash head is popped-up. No exposure or focus control is provided.
 Portrait: Accessed by turning the mode dial to the portrait symbol, this mode sets focus and aperture for full frame portraits. You have control over flash mode when the flash is popped up, but no other exposure or focus control.
 Auto: Accessed by turning the mode dial to the red camera symbol with an 'A', this mode puts the camera in charge of everything, including the flash. You can pop the flash up, but can't choose any modes other than "auto".
 Manual: Accessed by turning the mode dial to the red camera symbol with an 'M', this mode gives you control over white balance, flash intensity and mode, ISO, exposure compensation, sharpness, metering mode, manual focus, and whether or not you get a preview (essentially everything except explicit aperture and shutter speed) through the following menu:
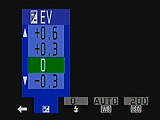
- Exposure Compensation: sets the exposure compensation from -1.5 to +1.5 EV in 0.3 EV increments.
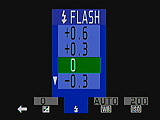
- Flash Brightness: sets the flash brightness level from -0.6 to +0.6 EV in 0.3 EV increments.
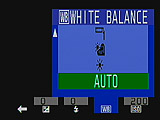
- White Balance: sets the camera's white balance to Auto, Daylight, Cloudy, Daylight Fluorescent, Warm White Fluorescent, Cool White Fluorescent or Incandescent.
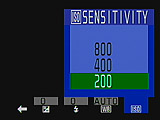
- ISO: sets the camera's sensitivity level at 200, 400 or 800.
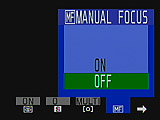
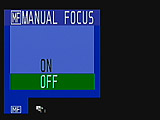
- Manual Focus: turns the manual focus option on or off.
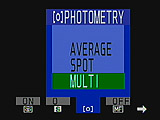
- Metering Mode: sets the camera's exposure metering system to Average, Spot or Multi.
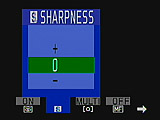
- Sharpness: adjusts the image sharpness to High (+), Normal (0) or Low (-).
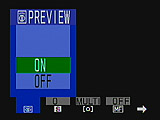
- Preview Display: turns the preview display function on or off.
- Exposure Compensation: sets the exposure compensation from -1.5 to +1.5 EV in 0.3 EV increments.
- Continuous Shooting: Accessed by turning the mode dial to the multiple camera symbol, this mode lets you take up to three consecutive exposures at approximately 0.2 second (!) intervals (depending on SmartMedia space and the amount of image information to be recorded). In this mode, the camera is in control of exposure and flash is completely unavailable. Pressing the Menu button accesses the manual focus feature.
- Manual Focus: turns the manual focus option on or off.
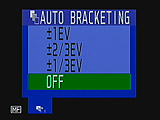
- Auto Bracketing: sets the auto bracketing feature to +/- 1/3, 2/3 or 1 EV increments or Off.
- Manual Focus: turns the manual focus option on or off.
- Movie: Accessed by turning the mode dial to the movie camera symbol, this mode allows you to record short movies with sound (recording length depends on the size of the SmartMedia card) at about 10 frames per second. Flash is unavailable and image size is set to 320 x 240.
- Setup: Accessed by turning the mode dial to the SET position, this mode allows you to change various camera settings through the following menu:
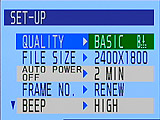
- Quality: sets the compression ratio to Fine, Normal or Basic.
- File Size: sets the number of pixels recorded to 2400 x 1800, 1280 x 960 or 640 x 480.
- LCD Monitor: specifies whether or not the LCD monitor comes on when the mode switch is set to Record mode.
- Auto Power Off: sets the time for the auto power off function to two minutes, five minutes or off.
- Frame Number: specifies whether or not the frame numbering is renewed with each new SmartMedia card or is continuous.
- Beep: sets the volume of the camera's beep sound to High, Low or Off.
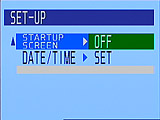
- Startup Screen: selects whether a recorded image is displayed on the LCD screen when the camera is switched on.
- Date/Time: sets the camera's internal date and time.
- Quality: sets the compression ratio to Fine, Normal or Basic.
Playback Mode: Accessed by sliding the mode switch to the playback symbol, this mode allows you to review captured movies and images with the following menu options:
- Still Images Playback Menu
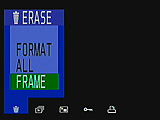
- Erase: erases a single image, all images, or formats the SmartMedia card.
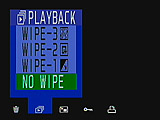
- Playback: sets the automatic playback and the type of transition between each image (Oblique, Swirl or Mosaic wipes).
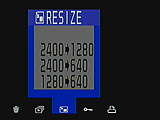
- Resize: resizes captured images from 2400 to 1280, 2400 to 640 or 1280 to 640 image sizes. (An interesting option for crunching images to save memory space in the field.)
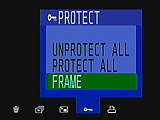
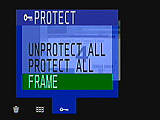
- Protect: protects individual or all images, also unprotects all images.
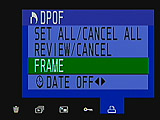
- DPOF: sets up images for printing to DPOF standards (sets date, number of prints, etc.).
- Erase: erases a single image, all images, or formats the SmartMedia card.
- Movie Image Playback Menu
- Erase: erases the selected frame, all frames or formats the SmartMedia card.

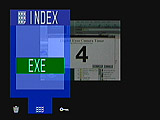
- Create Index: creates a 25 image index of selected movie frames for viewing the content of a movie without playing it back. As noted earlier, the index created is saved on the SmartMedia card as a separate image file, so it can be recalled at any time, or offloaded to your computer. (Very slick feature, useful for seeing the contents of a movie at a glance.)
- Protect: protects individual or all images, also unprotects all images.
- Erase: erases the selected frame, all frames or formats the SmartMedia card.
![]()

Follow Imaging Resource: