Sony Cyber-shot DSC-F707Wow! 5 megapixels, a super-sharp lens, Hologram AF, NightShot, NightFraming and more! Killer technology, great photos from Sony!<<Shutter Lag & Cycle Time Tests :(Previous) | (Next): Camera Modes & Menus>> Page 8:Operation & User InterfaceReview First Posted: 08/20/2001 (Full production model update 11/20/2001) |
Operation and User Interface
The F707 packs a lot of camera controls into a relatively small space, given the camera's small body size. The bounty of external controls may seem a bit much at first, but we always appreciate having as much external control as possible, rather than having to scroll through menu items. Given our experience with the F505 and F505V models, we quickly adapted to the F707's control layout. The Mode dial on top of the camera controls the main exposure mode, while things like Flash mode, Macro mode, White Balance, Exposure Compensation, etc. are all controlled via small buttons, either on the rear panel or along the side of the lens barrel. The Command dial, located in front of the Shutter button, allows you to quickly adjust aperture and / or shutter speed without accessing a menu system. We also liked the controlled actuation of the optical zoom control, with its slow or fast zoom operation. Overall, camera operation is smooth and efficient, with an easy-to-navigate LCD menu system and a user interface that doesn't require too much downtime to learn. You may spend a few minutes reading through the manual, but once you get the hang of things, the user interface is quite intuitive.
Our only complaint is with the Set button in the center of the Four-Way Arrow pad. This has always been a somewhat tricky control to implement on Sony cameras, because it must be pushed "exactly" the right way to set a menu selection. We've found that it could take several attempts before we achieve our goal, and many of these attempts lead to accidentally pressing one of the arrow buttons instead. We'd like to see this fine-tuned so that it's more responsive to the user. (Some variance in our experiences here at IR with the camera: Two of us had no problem with the Arrow Pad, one of us was ready to throw the camera through a window. We guess "your mileage may vary" in this respect.)
Control Enumeration
Shutter Button: Located on the right side of the top panel, on a sloped ridge that angles down toward the front of the camera, this button sets focus and exposure when pressed halfway. Fully depressing the button fires the shutter. When the Self-timer is enabled, fully depressing the Shutter button kicks off the 10-second countdown.

Exposure Compensation Button: Adjacent to the Shutter button, this button instantly highlights the exposure compensation adjustment on the LCD screen. Once highlighted, the exposure compensation is adjusted by turning the Command dial (below). A second press of the button removes the highlight.
Command Dial: Directly in front of the Shutter and Exposure Compensation buttons, this black, notched dial controls various exposure settings in any Record mode. In Aperture Priority, Shutter Priority, and Manual exposure modes, it controls exposure compensation, aperture, and / or shutter speed settings. Turning the dial scrolls through the available settings, while a quick press of the dial selects the setting for adjustment (highlighting it in yellow on the LCD screen). Once the setting is selected, it can be adjusted by turning the dial forward or backward.

Manual Focus Adjustment Ring: Encircling the end of the lens barrel, this notched ring adjusts the focus when the camera is in Manual focus mode.

Open Battery Compartment Switch: Located on the right side of the camera (as viewed from behind), this sliding switch unlocks the compartment door, revealing the battery and Memory Stick compartments.

Power Switch: Located underneath the Mode dial on top of the camera, pushing this switch forward turns the camera on and off.
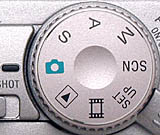
Mode Dial: Sitting on top of the Power switch, this notched dial controls the camera's operating mode. Choices are Program AE (green camera icon), Shutter Priority, Aperture Priority, Manual, Scene, Setup, Movie, and Playback modes.
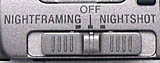
NightShot / NightFraming Switch: To the left of the Mode dial, this switch activates either the NightShot or NightFraming modes, for low-light and no-light shooting and framing.

Four Way Arrow Pad: Situated in the top right corner of the camera's rear panel, this rocker pad has four arrows, one pointing in each direction (up, down, left, right). In any record mode (except Movie), the Up arrow controls the Flash mode, cycling between Auto, Forced, and Suppressed. The Left arrow controls the Quick Review function, which provides a quick playback of the most recently captured image. The Right arrow activates the Macro shooting mode, and the Down arrow activates the Self-Timer mode.
In Playback mode, the Right and Left arrows scroll through captured images. The Up and Down arrows control the playback volume. When an image has been digitally enlarged, pressing the center of this button returns to the normal view.
In all camera modes, the arrow keys navigate through settings menus, highlighting menu options. Pressing the center of the pad confirms menu selections.

Menu Button: To the left of the Four Way Arrow pad is the Menu button, which activates and deactivates the settings menus in all camera modes (except for Setup mode, which automatically displays the menu upon entering the mode).

Index Button: Adjacent to the Menu button on the left, this button pulls up a nine-image index display in Playback mode. Pressing the button a second time activates an information display for the thumbnail image selected, reporting the main exposure information. A third press returns to the normal, single-image display.

Display Button: Located to the right of the viewfinder eyepiece, this button controls the on-screen information display in all camera modes (except Setup mode).
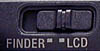
Finder / LCD Switch: Just above the top left corner of the LCD monitor, this switch controls the location of the viewfinder display, placing it in either the viewfinder eyepiece or on the LCD monitor.
Diopter Adjustment Dial: Positioned directly above the viewfinder eyepiece, this dial adjusts the viewfinder to accommodate eyeglass wearers.

White Balance Button: Located on the left side of the lens barrel (as viewed from behind), this button cycles through the available White Balance settings: Auto, Outdoor, Indoor, and One-Push.

One-Push Button: Just below the White Balance button, this button sets the One-Push white balance setting, based on a reading from a white card held in front of the lens.
Metering Button: Directly to the left of the White Balance button, this button cycles through the Multi-Pattern, Center-Weighted, and Spot metering options.

AE Lock: The next button to the left of the Spot Metering button, this button locks the exposure reading until it's pressed again, or until the Shutter button is pressed.
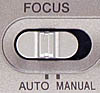
Focus Switch: Next in line beside the AE Lock button, this sliding switch alternates between Auto and Manual focus modes.
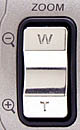
Zoom Control: The final control in the series on the left side of the lens barrel, this rocker button controls the optical and digital zoom in any Record mode. In Playback mode, this button controls the digital enlargement of captured images, as much as 5x.

Follow Imaging Resource: