The Imaging Resource
Quick Review
Ricoh RDC-i700 Image Capturing Device
|
|||||||||||||||||

|
|||||||||
Introduction
Though Ricoh's past contributions to digital imaging are not widely touted, this primarily business-based communications company has gone a long way toward expanding the boundaries of digital capture. Consistently delivering ground breaking new technology and innovative digital features with its imaging products, Ricoh has significantly influenced the course of consumer-based digicam design and functionality. In 1996, Ricoh introduced the RDC-1, the first "multimedia" camera to combine still image digital capture with video and audio recording. Since then, subsequent models have incorporated updated "QVGA" QuickTime movies with sound, memo recording, time-lapse photography, and Web-cam broadcast capabilities. Ricoh's objective? To bridge the gap between the corporate business environment and digital imaging communications. The RDC-i700 is Ricoh's latest incarnation of the ultimate "image capturing device," a business productivity tool incorporating high-quality digital photography with advanced networking capabilities, wireless Internet access, e-mail and fax modem connectivity, and integrated data management tools. It also happens to function well as a "creativity tool," whenever you want to take a break from all that e-mailing and data management.
Camera Overview
The RDC-i700 fulfills Ricoh's vision of digital imaging for the 21st century corporate environment. Designed to look and operate as much like a handheld computer as a point-and-shoot digital camera, the i700 provides resources for capturing, editing, and distributing high-quality images over the Internet; as well as text generation; file management and storage; e-mail capabilities; fax transmission; even direct uploads of images directly to internet FTP sites. Its rather large, rectangular body takes a little getting used to as an image capture device (i.e.: camera), but once the images are loaded onto one of three possible storage media, you can sit it down squarely on your desktop, readjust the (very) large 3.5-inch LCD screen for more comfortable viewing, and immediately get to work on editing, cataloging, and transmitting your work to its intended destination. A small stylus pen is stored conveniently near the LCD monitor for use in selecting touch-screen options, picking out keyboard letters, or sketching notes and annotations over captured images. And while the i700 has all the dials, buttons, and levers you'll find on any conventional digital camera, it is almost completely operable through the touch-screen menu system. We're not usually big fans of menu-driven cameras, but the i700 offered a welcome break from the tedious button-pushing routine, and actually made us smile. . . especially once we ventured into the very cool Edit menu.
We have to say though, that the RDC-i700 is really best viewed in exactly the way Ricoh bills it: As an "Image Capturing Device", rather than a "Camera". It's really more of a portable image-capture & manipulation computer system than a "camera" as we'd normally think of it. Accommodating these functions brings bulk, cost, and complexity beyond what you'd normally expect from a digital camera. If you need the communications capability the i700 offers (and have the telecommunications degree to get it all working), there's literally nothing like the i700 on the market. Nothing. Buy it. On the other hand, if all you care about is snapping attractive high quality digital photos in an uncomplicated fashion, you can find all you need in a pure camera costing hundreds of dollars less.
Ricoh has divided the RDC-i700's broad range of digital functions into three basic (somewhat overlapping) categories:
Image Capture
The RDC-i700 provides high-quality digital image capture via a 3.34-megapixel CCD and 7.3 - 21.9mm 3x optical zoom lens (equivalent to a 35-105mm lens on a 35mm camera). In addition to standard still image capture, the camera's Mode dial offers motion picture recording (with sound), continuous shooting, text recording, e-mail, and voice memo recording. Other shooting options include time-lapse photography, macro mode, auto-bracketing, self-timer, timed exposures (up to 8 seconds), and a number of special functions such as monochrome (B&W and sepia), soft mode, and signature imprinting, just to name a few. If you're working out of the office or carrying a laptop computer on the job, you can connect the i700 to a Macintosh or Windows computer and use your system's Web browser to adjust camera settings, view images full-size, and operate the i700 from the desktop. Once your images are captured, the i700's extensive on-screen editing capabilities allow you to crop, resize, rotate, and save the changes as new files, leaving the original files intact. You can also pencil in handwritten notes and annotations right over the image, type out accompanying text memos, and overlay voice notations.
Internet Communication
Insert a modem or wireless phone card into the RDC-i700 and you can dial up your e-mail account, log onto the Internet, and surf the Web with Ricoh's built-in browser. Images can be transmitted as e-mail attachments or as individual files using the camera's Quick Send feature (full size images or one of five low-resolution settings for speedier delivery). If you want to be really high-tech, you can use one of the provided templates to convert your images to HTML files and upload them directly to your website. Or, you can bypass the Internet altogether by installing Ricoh's dial-up server software on your home or office PC and transmit your images directly to the computer hard drive. Need to fax a document? Photograph it in Text mode and fax it right from the camera. You can even receive e-mailed images from other sources. (The RDC-i700 supports several brands of modem cards, as well as Nokia GSM Cellular and TDK LAN (local area network) cards.)
Data Management
While many digital cameras provide image management software, Ricoh has taken "management" a step further by creating a virtual assistant for tracking images in-camera. The JOB Navi function provides Microsoft Word and Excel templates that enable you to build an Image Capture Guide List on your PC (Windows only), listing all of the photographs required for a specific job. Once created, you can download the Guide List to the i700's onboard memory, check off the photos as you take them, and make sure you complete the job without any important omissions. When you download the captured images to your computer, they'll automatically link back to the source files -- a great feature for people who have to organize hundreds of images at a time. You can also create in-camera folders for viewing images in Playback mode according to subject.
Basic Features
- 3.34-megapixel CCD with nine image quality modes

- Optical viewfinder
- 3.5-inch (Big!) rotating color LCD display
- All glass 3x zoom lens (equivalent to 35-105mm)
- Digital zoom (3.2x) in low-resolution mode
- Built-in flash
- CompactFlash and PCMCIA Card removable storage, 8MB CF card included
- 8MB Internal memory
- USB or Serial computer connection
- Rechargeable Li-Ion battery pack with charger
- Optional AC adapter
- Two software CDs with USB and TWAIN drivers, Apple QuickTime 4, RDC-i700 Explorer Plug-In (Win) and Mounter (Mac), Direct transmission program, and Image Capture Guide List tool (Win).
Special Features
- Touch-screen key pad with stylus
- Motion picture recording
- Continuous (sequential) Shooting mode
- Interval (time-lapse) recording
- Timed exposures up to 8 seconds
- Macro (close-up) lens adjustment
- White balance (color) adjustment
- Exposure compensation (lighten / darken) control
- Auto bracketing feature
- Self-timer option for delayed shutter release
- Slide show playback feature
- On-screen image editing and annotation
- NTSC video cable for viewing images on a TV
- Direct digital printing on DPOF compatible printers
- E-mail and Quick Send functions
- Voice memo recording
- Text recording
- Web browsing
- HTML document templates
- Faxing capabilities
- Remote image upload
- Data management
Recommendation
Clearly the RDC-i700 is designed for the photographer on the go. If your interest
is only in making high-quality digital images, this camera provides a lot of
extra features you won't need, and for a pretty steep price tag, at that. However,
if you're doing movie location scouting (a natural!), or shooting real estate
photos, construction sites, or accident scenes, the i700 can be fine-tuned to
serve as a truly mobile studio -- right down to the wireless transmission of
images back to the home office. Are these features available using your own,
carefully designed system? If you carry a laptop on the job, absolutely. But
if you don't want to lug around the extra weight, the price is right at only
$1,200 list. We don't recommend this camera for the casual shooter. However,
its high-tech features may very well be a glimpse of consumer imaging to come,
just like the original RDC-1 was back in 1996. The i700 is one of those things
that's probably of little interest unless you need its special capabilities.
If you need it though, you need it bad, and there's literally nothing like it
anywhere else in the market.
Design
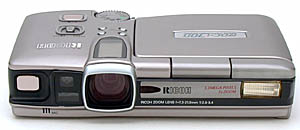
The Ricoh RDC-i700 doesn't look anything like a conventional camera. It has a flat, rectangular body that measures 6.2 (L) x 3.7 (W) x 1.3 inches (H), or 157 x 93 x 33mm, and weighs approximately 18 ounces with the battery installed. While not in use, the 3.5-inch LCD monitor is stored face down on top of the camera. When opened, it rotates vertically to face just about any direction, or tilts backward about 45 degrees. You can even turn the monitor completely around and lay it back down on top of the camera with the screen facing up. (Since this covers many of the key camera controls, it would be most appropriate for image playback, networking, or communications.) The case is a mixture of heavy duty polycarbonate and anodized aluminum, with dark gray and silver highlights, and a widely scattered collection of external controls. Though it can be used to shoot manually (i.e.: without the monitor turned on), its dynamics are not very well suited to manual control. The viewfinder is clear and sharp, and zooms along with the lens, but its side positioning causes more of a parallax problem than a viewfinder that is stacked on top of the lens. (The image will be shifted to the left a bit relative to what you see in the viewfinder.)
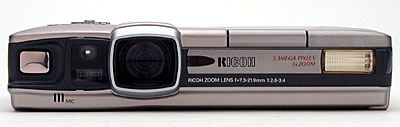
The front of the camera is long and narrow, with one of two shutter release buttons on the far left; an AF (autofocus) window next to it that houses the viewfinder window, autofocus, and autoexposure sensors; and a 3x optical zoom lens (equivalent to a 35-105mm) embedded deep within the camera body. Just to the right of the lens is the Self-Timer countdown LED lamp, on the far right is the built-in flash, and on the very bottom edge, between the shutter button and AF window, is the microphone for recording audio clips.
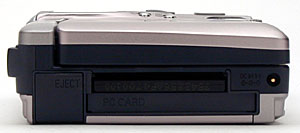
The left side of the camera houses the CompactFlash card slot across the top, and the PC card slot underneath (for PC cards, modem cards, or SmartMedia cards with a PC adapter). To the left of these two slots is a set of covered eject buttons that fold down flat into their compartment until you're ready to use them. On the far right edge is the DC In power supply terminal.
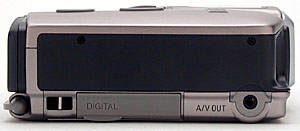
The camera's right side is relatively plain, with one of two neck strap eyelets on the far left, a digital connection slot (covered by a light gray plastic cover) in the middle, and an A/V Out terminal on the far right. All of these items are barely visible along the bottom of the panel.
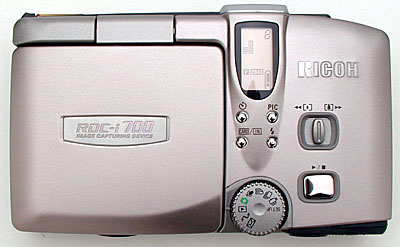
The top of the camera is where all of the key controls are located. On the far right side, starting from back to front, is the Mode dial, with a full complement of Recording modes (see Functions below). Diagonally to the right of the Mode dial is the main Shutter button, and above that is the Zoom lever. To the left of the Zoom lever is a cluster of four small buttons that control (starting at top left, moving clockwise): Self Timer, Picture resolution (PIC), Flash mode, and Card / In button (selects either CompactFlash or In-camera memory storage). In front of the four buttons, sitting right on top of the camera's lens barrel, is a small LED screen that displays critical information such as the number of remaining images, battery power, storage, and the image quality / resolution setting.
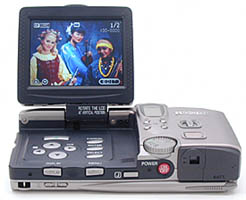

Covering nearly two-thirds of the top surface area, the (huge) 3.5-inch LCD monitor is on the left side. It lifts up just like a laptop computer monitor, and it can be programmed to turn on the camera automatically, activating the screen as it powers up. What distinguishes this from your typical laptop monitor, however, is that it swivels a full 360 degrees when it's in the vertical position, and dips back slightly when it's facing toward the back, so you can look at the screen from above eye level. (Over the head/over the shoulder shots, anyone?) A downside of the huge monitor though, is that it doesn't seem to be as bright (or possibly as anti-reflective) as the smaller screens on many other digicams we've worked with, meaning it's all but useless in full sunlight. The large LCD screen also means that the i700 eats battery power at a furious rate when the monitor is in use. We strongly recommend at least one extra battery. Inside the monitor bed is a set of arrow buttons, two of which double as Exposure Compensation (EV) and White Balance (WB) adjustments, a Macro button, and three command buttons: Cancel, Enter, and Select. The beauty of these controls is that, with the exception of the Macro, EV, and WB buttons, you never have to lay a finger on them, because the entire menu system is touch-screen operated -- just like a PDA. The small gray stylus pen slips into an almost invisible holder on the back side of the camera, within easy reach of the user.
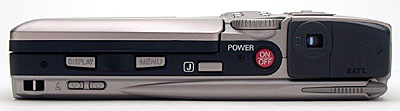
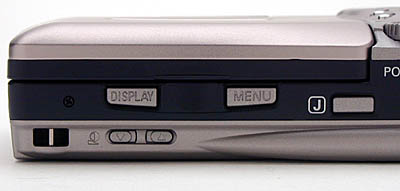
The back of the camera is also long and narrow, but it packs a lot of features into its limited surface area. On the left is the second neck strap eyelet. To the right is a set of two arrow buttons for adjusting the LCD contrast, and above them, two larger buttons -- Display and Menu -- that hang over the back edge of the monitor bed (so they can be accessed with the monitor opened or closed). The button next to them, marked "J," activates the camera's virtual assistant, known as JOB Navi. The main power button (red) sits under the Mode dial, and the optical viewfinder sits to the right. Finally, on the far right edge is the battery compartment door, which due to the small size of the dedicated Li-Ion battery pack, is relatively small.

The bottom surface of the camera is fairly smooth, with only a small tripod screw hole on the right side, and a nearly invisible diopter adjustment dial in the back right corner, directly under the stylus pen holder. (We worry a little about the off-center tripod mount. It's pretty far toward the edge of the camera, and there's quite a bit of mass in the camera body that will hang off the tripod head. We'd suggest using only tripods with fairly large mounting plates with the i700, to minimize stress on its tripod socket.)
Camera Operation
Camera Operation is the most intriguing aspect of the RDC-i700's design. While we originally scoffed at the idea of having a touch-screen interface on a consumer digital camera, it didn't take long to win us over. (Editor's note: Dave still scoffs a bit, but it is kind of fun.) The monitor is large, measuring 3.5 inches diagonally, so there's plenty of room for big and bright menu options to tap with your finger or the stylus pen provided. (In the interest of keeping the surface clean, we recommend using the stylus). As soon as we picked up the pen and started poking around, we realized how much we had detested pushing all those buttons (and didn't even know it!). Tapping a screen is faster, causes less wear and tear on the fingers, and even "looks" more refined. You can control just about every camera function through the LCD monitor, except those listed below under "External Controls." Of course, it has to be a two-handed operation, and frequently requires setting the camera down on a flat surface.
For its networking and Internet capabilities, the i700 provides a touch-screen keyboard for typing in addresses, phone numbers, and memos. It's a relatively slow way to communicate, but it gets the job done. If you're in a hurry, you can use the Pen Memo feature to write your message out by hand. There are no special letters to learn, the camera's software simply takes what you write on-screen, smoothes it out a little, and reproduces it exactly as you wrote it in a TIFF file. (Note that this isn't the handwriting-recognition-based approach used by PDAs, these are fairly low-resolution bitmaps of whatever you jotted down.) The Memo function (see Edit mode below) is also handy for editing images. Select the PenMemo / Image option and you can draw right on the picture -- write a note, draw a circle, or put an X through an unwanted item -- a great way to communicate your needs to an art director. The tool palette next to the image gives you a choice of three line widths and 15 colors, with an eraser to fix mistakes before they're saved. One gripe we had about the touch-screen doodling though, was that edit mode shrinks the active area of the picture down to perhaps only half of the total screen area. This makes for awfully cramped drawing and writing. It'd be nice if you could zoom the image while you're drawing on it, but we didn't find any such function on the i700.
The RDC-i700 also incorporates many non-imaging menu functions, such as networking, Internet access, and database management. For a computer savvy user -- one who is used to setting up e-mail accounts, creating Web pages, or exchanging data with FTP sites -- this may not be at all intimidating, but for the majority of users there is going to be a long learning curve for this sort of activity. (Verified by the fact that the camera comes with not one, but three, user manuals, totaling over 450 pages.) However, the manuals are all well written, and they assume "zero" knowledge at the outset, so with enough time and effort, you should reach expert level without any problem. The following is a list of external controls and a breakdown of the various menu functions.
External Controls
![]()
Power Button: Located on the back panel, next to the optical viewfinder, this bright red button turns the camera on and off.

Mode Dial: Directly above the Power button, the Mode Dial allows you to choose one of nine camera operating modes: Setup, Motion Picture, Continuous Shooting, Text, Voice Memo, Still Picture, Play, PC, and Communication. (See descriptions and menus below.)

Main Shutter Release: Located on top of the camera near the Mode Dial, this button fires the shutter to record an image, movie, or sound clip. It also doubles as a "Release" button to confirm some menu options.

Sub Shutter Release: Located on the front of the camera, this button offers another option for firing the shutter.

Zoom Lever: On top of the camera, next to the Main Shutter Release, the Zoom lever controls the 3x optical zoom lens. At 640 x 480-pixel resolution, the Digital Zoom kicks once you zoom past maximum telephoto. Digital Zoom provides an additional 1.3, 1.6, or 3.2x enlargement, but with a noticeable deterioration in image quality inherent with all Digital Zoom functions.

Picture Button: One of four small buttons next to the Zoom lever used to change image resolution and compression quality level. There are nine possible combinations: 2,048 x 1,536 pixels at Fine, Normal or Economy compression ratios; 1,024 x 768 pixels at Fine, Normal, or Economy compression ratios; and 640 x 480 pixels at Fine, Normal, or Economy ratios. Settings are displayed on the small LED panel located on top of the camera.

Flash Button: One of four small buttons next to the Zoom lever used to control Flash settings. Options include: Flash Off, Auto, Forced Flash, and Slow Synchro (blinking icon). Settings are displayed on the small LED panel and the large LCD display.

Self-Timer Button: One of four small buttons next to the Zoom lever used to activate the camera's Self-Timer. Once activated, pressing the Shutter button starts a 10-second countdown, during which the red Self-Timer lamp on the camera's front panel glows steadily for eight seconds and blinks for the last two seconds before firing the shutter. When engaged, the Self-Timer clock icon is displayed on the small LED panel and the large LCD display.

Card / In Button: One of four small buttons next to the Zoom lever used to select the storage memory into which your images will be stored. Options include: CF Card (CompactFlash), PC Card, and In (8MB internal memory). Settings are displayed on the small LED panel and the large LCD display.

Macro Button: Located on the Operation panel underneath the LCD monitor, the Macro button adjusts the camera lens to focus on close-up subjects. Macro shooting range is approximately 0.4 to 9.4 inches (1 to 24cm). When engaged, the Macro flower icon is displayed on the small LED panel and the large LCD display. (Note: Flash does not work in Macro mode.)

Exposure Compensation (EV) / Left Arrow Button: Located on the Operation panel underneath the LCD monitor, the EV button adjusts the brightness of an image from +2 to -2 exposure equivalents (EV) in one-half-step increments. When activated, it brings up an EV bar with plus and minus buttons that can be controlled on-screen with the Stylus pen, or with the up and down arrow buttons. Settings are displayed on the small LED panel and large LCD monitor if the full Information display is on-screen.

White Balance Mode / Right Arrow Button: Located on the Operation panel underneath the LCD monitor, the White Balance (WB) button is used to select one of five WB settings: Auto, Daylight, Overcast, Tungsten, and Fluorescent light. When activated, it brings up a WB menu with icons that can be selected on-screen with the Stylus pen, or with the up and down arrow buttons. The selected setting is displayed on the large LCD monitor.

Up and Down Arrow Buttons: Located on the Operation panel underneath the LCD monitor, these two buttons are used to manually scroll through on-screen menu options.

Select Button: Located on the Operation panel underneath the LCD monitor, the Select button is used to manually select or "highlight" a setting in one of the on-screen menu displays.

Enter Button: Located on the Operation panel underneath the LCD monitor, the Enter button is used to manually "confirm" a selection in one of the on-screen menu displays.

Cancel Button: Located on the Operation panel underneath the LCD monitor, the Cancel button is used to cancel out of an on-screen menu or submenu.

Display Button: Located on the Operation panel underneath the LCD monitor, the Display button is used to change the information display on the LCD monitor. Options include: A limited information display across the top of the screen with the Zoom range bar on the right, an expanded information display that adds those items already shown on the smaller LED screen, no information display (just the image), and no LCD display at all.

Menu Button: Located on the Operation panel underneath the LCD monitor, the Menu button turns the on-screen menus on. To exit a menu, you have to use the manual or touch-screen Cancel buttons.
![]()
"J" Button: Located next to the power button on the back side of the camera, the "J" button activates the camera's virtual assistant JOB Navi Guide List, which enables the photographer to tag individual images, so they can be sorted into specific job folders once they are downloaded to a computer.
![]()
Contrast Adjustment Buttons: These two arrow buttons are hidden on the camera's back panel, just under the Display button. They are used to adjust the brightness or contrast of the LCD monitor.
Mode Menu Options
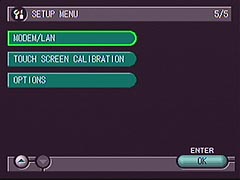
Setup Mode: Changes and verifies camera settings. Unlike most digital cameras, the Setup menu is more than two-thirds dedicated to Internet communications and database management functions. For example, you can store e-mail addresses, set FTP and modem connection protocols, and organize storage folders.
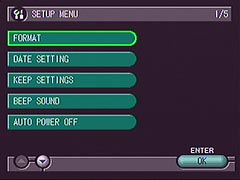 Format: Select CF Card, PC Card, or Internal Memory
- Date Setting: Set up Home Date and Time, Destination Date and Time, Date to be Used, and Date / Time Format
- Keep Settings: Lists all camera settings (Focus, Flash, WB, etc.) and allows you to keep settings On or Off each time the camera is powered down.
- Beep Sound: On or Off
- Auto Power Off: Sets power off time in minutes for Camera and LCD monitor
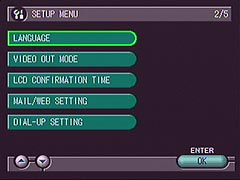 Language: Japanese, English, German, French
- Video Out Mode: NTSC or PAL
- LCD Confirmation Time: 0, 1, 2, or 3 seconds
- Mail / Web Setting: Type-in fields for Mail, Template, Web, and Mail / Web Dial-Up
- Dial-Up Setting: Lists telephone numbers for dial-up settings
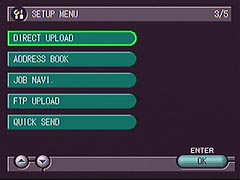 Direct Upload: Type-in fields for Direct Upload.
- Address Book: Lists e-mail addresses.
- JOB Navi: Edit or Delete Guide List settings.
- FTP Upload: Type-in fields for FTP upload.
- Quick Send: Type-in fields for Quick Send settings.
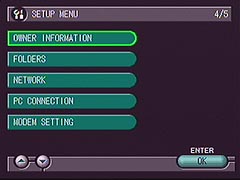 Owner Information: Type-in fields for Owner's Name, Address, Telephone, Birthday, and Company.
- Folders: Lists storage media and folders.
- Network: Type-in fields for network settings
- PC Connection: Type-in fields for PC connection settings
- Modem Setting: Selection and type-in fields for Modem settings.
 Modem / LAN: Choose Modem or LAN setup.
- Touch Screen Calibration: Used to calibrate touch screen.
- Options: Power On or Off when LCD is open; Initialize All Settings option
Motion Picture Mode: Allows you to record QuickTime movies with sound. Resolution is 320 x 240 pixels captured at 15 frames per second. The recording time is determined by the space available on your media card. The number of remaining minutes is displayed in the upper right corner of the LCD monitor and LED display. The Movie menu has very limited options:
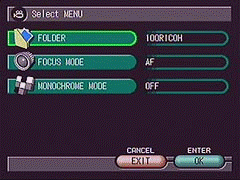 Folder: Destination folder
- Focus Mode: Autofocus or Manual
- Monochrome Mode: B&W and Sepia
Continuous Shooting Mode: Records multiple single-frame images as long as you hold down the Shutter button. The maximum number of images depends on the available memory and the resolution quality of the images. For example, you can take five consecutive images at the highest resolution and quality setting (2,048 x 1,536 pixels, Fine) and you can take up to 164 consecutive images at the lowest resolution and quality setting (640 x 480 pixels, Economy). Menu options are as follows:
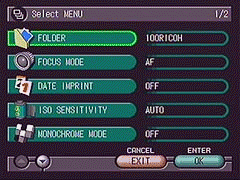 Folder: Destination folder
- Focus Mode: Autofocus or Manual
- Date Imprint: On or Off
- ISO Sensitivity: Auto, 200, 400
- Monochrome Mode: B&W and Sepia
- Soft Mode: On or Off
Text Mode: Setting used to copy written or printed documents. Files are recorded as high-contrast TIFF files with no gradations between black and white. You can add a voice memo to the picture or fax it over a phone line directly from the camera. Menu settings:
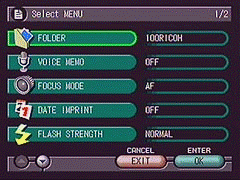 Folder: Destination folder
- Voice Memo: On or Off
- Focus Mode: Autofocus or Manual
- Date Imprint: On or Off
- Flash Strength: Normal or Soft
- ISO Sensitivity: Auto, 200, 400
- Brightness Control: Dark, Medium Dark, Medium, Medium Light, and Light
- Interval Mode: Interval Timer Setting in Hours, Minutes, and Seconds
Voice Memo Mode: This setting enables you to record standalone voice memos. The available recording time is displayed in the upper right corner of the LCD monitor and LED panel, and is based on the amount of memory available on your media card. The menu has only one option, so we didn't bother to record a screen shot for it:
- Folder: Destination folder
 Still Picture Mode: This setting records basic still digital images, with a number of special functions to enhance your shooting capabilities. In this mode, you can cycle the viewfinder contents between three different levels of information display and "off." The screen shot here shows the most information laden display. The menu options are fairly extensive, offering the maximum number available among all of the Recording modes:
- Folder: Destination folder
- Voice Memo: On or Off
- Focus Mode: Autofocus or Manual
- Date Imprint: On or Off
 Flash Strength: Normal or Soft
- ISO Sensitivity: Auto, 200, 400
- Auto Bracket: On or Off
- Redeye Reduction: On or Off
- Non-Compressed Mode: On or Off
- Monochrome Mode: B&W and Sepia
- Interval Mode: Interval Timer Setting in Hours, Minutes, and Seconds
- Soft Mode: On or Off
- Time Exposure Mode: Off, 1 Sec, 2 Sec, 4 Sec, and 8 Sec.
- Signature Mode: No Signature, Stored Name, Stored Image
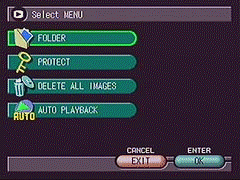
Playback Mode: The Playback mode can read Still Picture, Text, Voice Memo, Motion Picture, or Continuous Shooting files, and displays them on the LCD monitor for review. With Still Picture and Motion Picture files, you can scroll through captured images using the up and down arrow buttons on the camera's control panel, or you can touch the up and down arrows on the LCD touch screen with your finger or the accompanying stylus pen. The source of the file (CompactFlash card or Internal memory) is displayed in the upper left corner of the screen, the capture mode in the top center, and the picture number is shown in the upper right corner. You can also bring up the image quality, file size, and the date and time the image was recorded by pressing the camera's Display button once (pressing it twice eliminates all on-screen information except the image).
 Folder: Destination folder
- Protect: Locks image to prevent accidental erasure
- Delete All Images: Option to cancel or delete all images by pressing the Shutter (Release) button
- Auto Playback: Brings up Play button with option to select intervals of 1 to 99 seconds, and Loop Play: Yes or No >
Edit mode: The Edit button, displayed in the lower right corner of the LCD while in Playback mode, allows you to make a variety of changes and enhancements to recorded images. Certain recorded files, such as Voice memo and Motion Pictures will have no edit capabilities (or different edit capabilities), but they will all have a Delete option when placed in Edit mode. You can activate this option by touching the on-screen button with the stylus or pressing the Enter button. The Still Image Edit menu and on-screen buttons provide the following options:
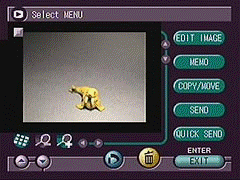 Edit Image: Adjust Cropping, Change Size, Rotate R90 degrees, Rotate L90 degrees
- Memo: Create Keypad Memo, Voice Annotation, Pen Memo, or Pen Memo w / Image
- Copy / Move: Copy or Move image; Select Item or Folder; To CF card, PC Card, or Internal Memory; Folder List
- Send: E-mail, Direct Upload, or Fax
- Quick Send: Provides area to input e-mail address and Send button.
- Delete: On-screen button with option to cancel. Press Shutter Release button to complete the action.
- DPOF: On-screen button that tags an image for printing on a DPOF-compatible device. Options include the number of prints, Index Print sheet, or Cancel Print Order.
- Magnify Image: On-screen button enlarges the review image up to 2.7x.
- De-Magnify Image: On-screen button reverses image enlargement.
- Index Display: On-screen button brings up an index display of thumbnail images labeled with Record mode and file number.
Communication Mode: The Communication mode enables the user to send e-mails, transmit images, send faxes, access the Web, or upload to an FTP server. Internet functions are listed in the following menu:
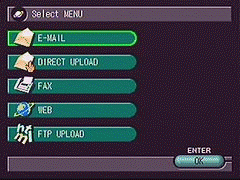 E-Mail: Send setting provides typing fields to enter address, title, attachment, and message; Inbox checks incoming mail; Sent Messages lists previously sent mail; Draft brings up list of saved e-mail draft messages.
- Direct Upload: Brings up typing fields to enter Dial-Up information, Telephone No., Server, and Destination Folder.
- Fax: Send Fax typing field and List of Sent Faxes.
- Web: With communication card installed, brings up log-on protocol for Internet access.
- FTP Upload: Brings up typing fields to enter Dial-Up information, Telephone No., Server, Destination Folder, Location, and FTP File.
- Ricoh RDC-i700 user reviews on PriceGrabber.com
- Ricoh RDC-i700 user reviews on PC PhotoREVIEW
Sample Pictures
See our sample pictures and test analyisis here.
Specifications
See the specifications sheet here.
Recommended Accessories
- Larger memory card (at least 16MB)
- AC Adapter
- Extra rechargeable Li-Ion battery
- Modem or cellular card
Conclusion
The Ricoh RDC-i700 is nothing if not unique. It combines aspects of computer and camera into a one-of-a-kind hybrid. As such, it's a bit of a jack of all trades, master of none. It takes good 3 megapixel photos, but you'll find camera-only products that beat it on image quality. It has powerful communications capabilities, but you can obviously do a lot more with a laptop. Combine the two functions though, and there's literally nothing on the market that can compete with it for truly mobile visual communications. As we said at the outset, if you just need a three megapixel camera, you can do better for less money with a dedicated digital still camera. The huge LCD/touchscreen is a beguiling feature that we found quite entertaining, but not enough on its own to justify the price. On the other hand, if you need a visual telecommunicating system, you need an i700 bad. There's literally nothing else like it. Buy it.

Follow Imaging Resource: