Pentax *ist-DPentax's first d-SLR is a winner, with good color, low noise, and excellent "hand feel," all in a compact body.<<Viewfinder :(Previous) | (Next): Exposure & Flash>> Page 5:OpticsReview First Posted: 03/30/2004 |
Optics
| Free Photo Lessons | |
|
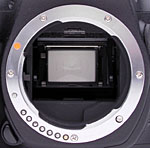 The *ist D features a Pentax K lens mount, which is compatible with a wide range of Pentax lenses. Optical specifications, such as aperture range and focal distances, will vary greatly depending on the lens attached. However, the *ist D offers a sophisticated AF system, which uses 11 points across the frame to determine focus. Nine points are arranged in the center of the frame in a three-by-three array, with two additional points on each side of the array. You can leave the AF area selection up to the camera, or manually select a specific point. The Auto setting of the dial leaves AF point selection under auto control. To manually choose an AF point, turn the Focus Selector dial (surrounding the Four-Way Arrow Rocker button) to the "SEL" position. You can then use the arrow pad to change the selection. The selected AF point is highlighted by a red LED overlay in the viewfinder, but I found that the highlight illumination is a little dim if you're shooting a bright subject, and on my eval unit at least, the location of the highlights was shifted up a little relative to the viewfinder screen. A third position on the Focus Selector dial places the AF point at dead center. An AF button on the rear panel acts as a focus lock, locking the focus independently of the exposure until the Shutter button is pressed.
 In my tests, I was surprised by how well the *ist D could achieve focus lock in very dark conditions. While the AF speed slows significantly at low light levels, I found that my test unit of the *ist D could routinely focus at light levels as low as 1/4 foot-candle, and sometimes focus as dark as 1/8 foot-candle, without using its focus-assist illuminator, and with a lens with a maximum aperture of f/4.0. (This is a pretty impressive performance, 1/4 foot-candle corresponds to an exposure time of 8 seconds at f/2.8 and ISO 100.)
As noted, the *ist D does have an AF illuminator, which will let it focus in complete darkness. It actually uses a burst of very brief pulses from its flash unit for the AF-assist lighting, which gives it a very good working range. The only problem is, the AF-assist illumination is only available when the flash is enabled, so on the face of it, it looks like you couldn't use it for available-light photography. There is a workaround available though, as long as your subject will cooperate and stay in the same place for a few seconds. The trick is to pop up the flash, half-press the shutter button to trigger the AF mechanism and AF-assist light, then release the shutter button, switch the focus control on the camera's body to "manual," and finally fire the shutter. That's all a little convoluted, but it does at least give you a way to take advantage of the AF assist for available-light shooting.
The *ist D's front-panel Focus Mode switch puts the camera into either Manual, AF Single, or AF Continuous modes. In Manual mode, you adjust the focus using the focus ring on the lens. AF Single mode sets the focus when the Shutter button (or AF button) is halfway pressed, while AF Continuous mode adjusts focus constantly whilst the shutter button is pressed. Continuous mode is good for moving subjects, as it "tracks" a subject using a predictive AF algorithm.
Sensor Cleaning!
Everyone understands that lenses sometimes get dust on them and need to be cleaned, and there are a lot of lens-cleaning cloths, solutions and other accessories on the market that work well. BUT, what do you do when your sensor gets dusty? Dust specks on the sensor tend to show up when shooting at very small apertures, appearing as dark blobs on your images. They're distracting at best, a terrible nuisance at worst, if you end up having to retouch every image to rid of them.
Most of us are naturally leery about the idea of poking around inside the delicate innards of our d-SLRs to wrestle with recalcitrant dust specks. Gently blowing the sensor surface (actually, the surface of the anti-aliasing filter) with compressed air gets rid of some dust, but there's invariably a lot that just stays stuck, no matter what. So what do you do?
If you've got dust specks on your sensor (and sooner or later you will), you're going to need to clean it. There are a lot of products out there intended to address this need, but a distressing number of them work poorly (if at all), and many are grossly overpriced. Advertising hype is rampant, with bogus pseudo-scientific jargon and absurd product claims run rampant. And prices - Did I mention prices? How about $100 for a simple synthetic-bristle brush?
So how do you know what product to use?
We don't pretend to have used everything currently on the market, but can tell you about one solution that worked very well for us. The "Copper Hill" cleaning method is straightforward and safe, and in our routine usage here at Imaging Resource, highly effective. Better yet, the products sold by Copper Hill Imaging are very reasonably priced. Best of all, Nicholas R (proprietor of Copper Hill) has put together an amazingly detailed tutorial on sensor cleaning, free for all.
Sensor cleaning is one of the last things people think about when buying a d-SLR, but it's vital to capturing the best possible images. Take our advice and order a cleaning kit from Copper Hill right along with your d-SLR, so you'll have it close at hand when you need it: You'll be glad you did!
(Other than a few backlinks on their site, we receive no promotional consideration from Copper Hill. We just think their sensor cleaning products are among the best on the market, and like their way of doing business. - We think you will too. Check them out.)
Reader Comments! --> Visit our discussion forum for the Pentax *ist-D!

Follow Imaging Resource: