Nikon D100Nikon ups the ante with 6 million pixels, superb color and resolution, at a 'bargain' price!<<Optics :(Previous) | (Next): Shutter Lag & Cycle Time Tests>> Page 6:Exposure & FlashReview First Posted: 5/31/2002 |
Exposure
|
Just like the original D1 and D1x models, the D100 gives you a tremendous amount
of exposure control and multiple options that can get quite involved. Available
exposure modes include Program AE, Manual, Aperture Priority, and Shutter Priority
modes with shutter speeds from 1/4,000 to 30 seconds available, as well as a
Bulb setting for longer exposures. A very nice touch is that, while in Program
AE mode, you can rotate the Main Command dial to select different combinations
of aperture and shutter speed settings than those normally chosen by the autoexposure
system. (That is, if the automatic program would have chosen 1/125 second and
f/5.6, you could instead direct the camera to use 1/60 at f/8 or 1/30 at f/11,
to get greater depth of field.) This is a very handy option for those times
when you need some measure of increased control, but still want the camera to
do most of the work for you.
An interesting feature when using Manual exposure mode is the electronic analog
exposure display visible in the optical viewfinder data readout. This shows
the amount an image will be over- or underexposed, based on the settings you
have selected, and helps you find the best exposure for the subject.
ISO sensitivity ranges from 200 to 6,400, adjustable by setting the Mode dial
on “ISO” and turning the Main Command dial to change the setting.
The 3,200 and 6,400 values appear as “Hi-1” and “Hi-2” in
the display. A Noise Reduction mode in the settings menu reduces fixed-pattern
image noise when shooting at the higher sensitivity settings at longer exposure
times. White balance modes include Auto (useful from 4,200K to 7,000K), Incandescent
(set to about 3,000K), Fluorescent (4,200K), Direct Sunlight (5,200K), Flash
(5,400K), Cloudy (6,000K), Shade (8,000K), and Preset (which allows you to manually
adjust the white value by using a white card or object as a reference point).
All white balance settings are adjustable from -3 to +3 units on an arbitrary
scale by turning the Sub-Command dial (on the front of the hand grip) with the
Mode dial set to the White Balance option (with the exception of the Preset
option, which is not adjustable). Higher values correspond to a decrease in
the camera's white point, in degrees Kelvin (meaning the images become "cooler"
in appearance). This is a very nice feature, as I often wish I could use one
of a camera's standard white-balance settings, but tweak it to be just a bit
warmer or cooler than the default. To be sure, some experimentation would be
required to familiarize yourself with the impact of these "tweaked"
white balance settings, but having them available is a definite plus. The table
below shows approximate white point temperatures in degrees Kelvin for the various
adjustments in each of the major white balance settings.
| Camera Display--> | -3 | -2 | -1 | 0 | 1 | 2 | 3 |
| Direct Sunlight | 5600 | 5400 | 5300 | 5200 | 5000 | 4900 | 4800 |
| Shade | 9200 | 8800 | 8400 | 8000 | 7500 | 7100 | 6700 |
| Overcast | 6600 | 6400 | 6200 | 6000 | 5800 | 5600 | 5400 |
| Incandescent | 3300 | 3200 | 3100 | 3000 | 2900 | 2800 | 2700 |
| Fluorescent | 7200 | 6500 | 5000 | 4200 | 3700 | 3000 | 2700 |
| Flash | 6000 | 5800 | 5600 | 5400 | 5200 | 5000 | 4800 |
The D100 has three metering options: 3D Matrix, Center-Weighted, and Spot.
The 3D Matrix setting integrates exposure information from a large number of
areas across the frame (useful when brightly colored or very dark subjects occupy
a significant portion of the frame) with distance information from the microchip
in D- and G-series lenses. The result is much more accurate metering response
than more conventional center-weighted. Center-Weighted metering measures light
from the entire frame but places the greatest emphasis on a circular area in
the center. Spot metering is pretty self-explanatory, taking a reading from
the dead center of the image (best when using the AE Lock function).
In my testing, I found the D100's metering to be very accurate, although it
significantly underexposed some of my outdoor test shots when I was shooting
contrasty subjects with strong highlights under direct sun. This may have been
a prototype issue, or may have been a result of my own lack of familiarity with
the camera. I'll recheck this aspect of the D100's performance when I receive
a production model to test.
The D100's Exposure Compensation adjustment lightens or darkens the overall
exposure from -5 to +5 exposure equivalents (EV) in one-third step increments,
in all exposure modes. An Auto Bracketing feature takes three shots of the same
subject with varying exposure values determined by either the photographer in
Manual mode or by the camera in all other modes. Exposure settings for bracketing
can vary from -2 to +2 EV (values are added to the already chosen exposure compensation
value), with step sizes of one-third, one-half, or one EV unit, and the bracketing
biased toward either underexposure, overexposure, or centered around the main
exposure value. Through the Custom Settings menu, the Bracketing function can
also be set to adjust white balance or flash exposures only. (By default, both
ambient and flash exposures are bracketed.) On a more mundane level, the D100
has a self-timer feature that allows you to set the time interval anywhere from
two to 20 seconds, and is activated by fully pressing the Shutter button.
A carryover from the D1 series, the Anti-Mirror-Shock Mode delays the exposure
until after the mirror shock subsides (intended times when the camera is on
a tripod). Set through the Custom Settings Menu, the default setting exposes
the image as soon as the shutter is released. Activating Anti-Mirror-Shock exposes
the image a fraction of a second after the shutter is released, giving time
for vibrations from the mirror actuation to damp out before the shutter opens.
The D100 also offers Sharpness, Tone Compensation (Contrast), and Hue adjustments,
accessed through the Shooting menu. I was impressed with the Tone Compensation
option's Custom setting, which accepts downloaded tone curves from a computer,
although as of this writing I haven't had a chance to experiment with it personally
yet. (If no curve is downloaded, the Custom setting defaults to the Normal setting.)
I'm particularly interested in the custom tone compensation option because I
felt the D100's default tone curve was rather too contrasty for my taste, and
didn't have a long enough "tail" on it in the highlight areas. (I
preferred to leave the camera set to use its built-in "low contrast"
tone setting most of the time.) By creating and loading a custom tone curve,
I could adapt the camera to more closely match my personal preferences.
The Hue adjustment offers arbitrary adjustments from –9 to +9 in increments
of three, with zero being the default setting. Raising the Hue setting above
three results in a stronger yellow cast in the image, causing reds to become
orange. Alternatively, lowering the Hue setting below three introduces a blue
cast, which consequently changes red to purple. A Color Mode setting in the
Shooting menu lets you capture images in sRGB or Adobe RGB color.
When reviewing images on the LCD monitor, you can call up a histogram and a
highlight function to give you a complete readout on the exposure. This is a
useful tool to examine your exposure in the camera instead of waiting to download
images and then deciding to reshoot. As I noted in my discussion of these features
in the Viewfinder section of this review, I'd like to see the Highlight function
be a little more restrained in its reporting of overly-strong highlights.
Continuous Shooting Mode
The D100's Continuous Shooting mode supposedly captures 2.5 frames per second
(as many as nine consecutive shots), depending on the amount of image information
and available CompactFlash space. In practice, I clocked it at 2.88 fps, a respectable
clip. Once the nine frame limit is reached, the camera is unable to record any
more photographs until at least one of the images is transferred from the buffer
memory to the memory card. As the photos transfer, the number of available consecutive
photographs displays in the viewfinder and on the status display panel when
the Shutter button is halfway pressed.
| What's up with RAW? | |
|
Flash
 Built
into the D100 is a pop-up flash unit, which operates in one of five modes: Front-Curtain
Sync, Red-Eye Reduction, Red-Eye Reduction with Slow Sync, Slow Sync, and Rear-Curtain
Sync. Front-Curtain Sync fires the flash at the beginning of the exposure, with
every shot. Red-Eye Reduction mode fires flashes the (very bright) autofocus
assist lamp before the main flash exposure, to reduce the Red-Eye Effect in
shots of people. Red-Eye Reduction with Slow Sync works in a similar fashion,
but combines the flash with a slower shutter speed for night portraits. (This
reduces the harsh effect of nighttime flash shots, allowing more of the ambient
illumination into the picture.) Slow Sync mode works with shutter speeds as
slow as 30 seconds to preserve color in night shots. Finally, Rear-Curtain Sync
fires the flash at the end of the exposure, producing light trails behind moving
subjects. In all flash modes, the flash fires with every exposure. Closing the
flash disables it completely. A Flash Compensation button on the camera's back
panel adjusts the overall brightness of the flash from –3 to +1 EV in one-third-step
increments.
Built
into the D100 is a pop-up flash unit, which operates in one of five modes: Front-Curtain
Sync, Red-Eye Reduction, Red-Eye Reduction with Slow Sync, Slow Sync, and Rear-Curtain
Sync. Front-Curtain Sync fires the flash at the beginning of the exposure, with
every shot. Red-Eye Reduction mode fires flashes the (very bright) autofocus
assist lamp before the main flash exposure, to reduce the Red-Eye Effect in
shots of people. Red-Eye Reduction with Slow Sync works in a similar fashion,
but combines the flash with a slower shutter speed for night portraits. (This
reduces the harsh effect of nighttime flash shots, allowing more of the ambient
illumination into the picture.) Slow Sync mode works with shutter speeds as
slow as 30 seconds to preserve color in night shots. Finally, Rear-Curtain Sync
fires the flash at the end of the exposure, producing light trails behind moving
subjects. In all flash modes, the flash fires with every exposure. Closing the
flash disables it completely. A Flash Compensation button on the camera's back
panel adjusts the overall brightness of the flash from –3 to +1 EV in one-third-step
increments.
The D100's internal flash is fairly powerful, with a guide number of 11 meters
or 36 feet at ISO 100. - That's a bit of an odd (albeit standard) rating, given
that the minimum ISO on the D100 is 200. At ISO 200, the corresponding guide
number would be 15.5 meters or 51 feet. (!) This means that an f/2.8 lens will
give you an effective range of 18.2 feet, an impressive distance for an on-camera
flash. At the same time, the angular coverage of the flash is enough to cover
the field of view of a 28mm lens on a 35mm film camera. - Applying the D100's
focal length multiplier ratio of 1.5, that translates to a coverage area adequate
to handle a 19mm lens.
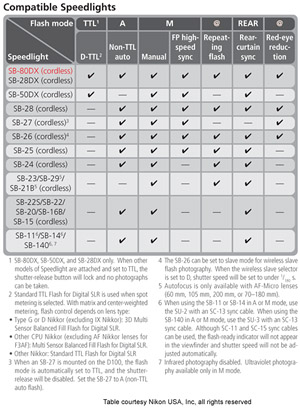
Also included on the D100 is an external flash hot shoe, just behind the pop-up
flash compartment. The hot shoe accommodates Nikon accessory flash units, as
well as a wide range of third party flashes. The range of flash sync modes remains
available for compatible flash units. Different Nikon speedlights offer different
features when used on the D100. The table below (again use by courtesy of Nikon
USA, Inc.) shows the features available when using various Nikon speedlights
with the D100.
3D Matrix Flash Metering
I don't think I've commented much on Nikon's fill-flash metering system before, but it's a significant technology that deserves particular mention. The "3D" aspect of the Nikon metering system is that it uses subject distance information from the lens (only available with lenses that contain CPUs) to guide its exposure decisions. This is particularly key with flash exposures, because flash illumination falls off quite strongly as the subject gets further from the camera. I was reminded of how well 3D Matrix Flash Metering worked when I was playing with the D100, using its onboard strobe for fill illumination while shooting outdoors. What particularly impressed me was that I really didn't have to give a second thought to balancing the flash with ambient lighting. - I snapped a few test shots to see how much fill I wanted, deciding that a flash exposure compensation of about -2EV was giving me the level I wanted. I set that level of flash compensation, set the flash to "fill" mode, and that was it! I literally never had to think about the flash again, and the camera just kept churning out dozens of perfectly-exposed photos, under lighting that ranged from direct sun to deep shade and everything in between.
This is really a case of technology working perfectly in the service of creativity. The camera just quietly does its job, so you can focus on composition, color, interacting with your subjects, etc. It doesn't remove the creative decisions of how you want to light your subject, it simply removes the technical legerdemain from the equation. It won't by any means turn a duffer into a pro photographer, but it'll certainly take an average shooter a long ways in that direction.
Reader Comments! --> Visit our discussion forum for the Nikon D100!

Follow Imaging Resource: