The Imaging Resource
Quick Review
Sony Cyber-shot DSC-P51 Digital Camera
 |
Camera QuickLook | |
| Review Date | 2/20/2002 | |
| Revision Date | 5/16/2002 | |
| User Level | Novice | |
| Product Uses | Family / Travel / Special Events | |
| Digicam Design | Point and Shoot | |
| Picture Quality | Good, 2-megapixel CCD | |
| Print Sizes | Up to 8x10 | |
| Availability | May, 2002 | |
| Suggested Retail Price | $280 | |
Introduction
|
||||||||||
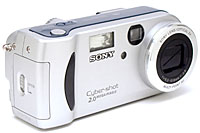
Sony has clearly been a dominant player in the entire digicam market for a number of years now. - And for good reason: Their cameras offer excellent features and performance, good build quality and great picture quality. They currently offer no fewer than five distinct lines of cameras, spanning an incredible range of features, price, and performance. In their "Compact" line, they've now added a new, zoom-equipped two megapixel model, the DSC-P51. (This is the "little brother" to their new three megapixel P71 model.) With a non-telescoping 2x optical zoom lens and compact design, the P51 is comfortably pocket-sized, offering two megapixel resolution in a package that's both portable and comfortable in the hand. (I find the slightly elongated case design easier to hold than some ultra-compact digicams yet its thin profile means it's still easy to slip in a pocket.) A range of creative options let you shoot in a wide variety of conditions, while its auto-connect USB connection (on Windows Me, 2000, XP, and Mac OS 8.6 or higher), makes downloading images easy. Read the review below for the details, but if you're looking for a compact and highly functional two megapixel digicam, the Sony DSC-P51 deserves serious consideration.
Camera Overview
With a nearly identical size and style as the DSC-P71, the Sony Cyber-shot DSC-P51
is portable and compact enough to travel just about anywhere (even underwater
with Sony's optional Marine Pack camera housing). The DSC-P51's small size gives
it shirt pocket appeal, and it should fit into most small purses and hip packs.
A wrist strap secures the camera to your wrist when shooting. The compact design
includes a shutter-like, built-in lens cover which conveniently slides open
whenever the camera is powered on, though the static lens does not telescope
from the camera body. The DSC-P51's 2x, 6.3-12.6mm zoom lens (equivalent to
a 42 - 84mm lens on a 35mm film camera) features automatic focus control, with
several fixed focus settings available as well as an adjustable focus area.
The 2-megapixel CCD produces moderately-high resolution, print quality images,
as well as lower resolution images better suited for e-mail purposes. Combine
this with the ease of automatic shooting, special Scene modes, and the creative
Picture Effects menu, and the DSC-P51 is an excellent choice for novice consumers
who want to take pictures and not waste time worrying about the exposure.
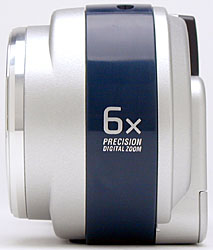
The DSC-P51 is equipped with a 2x, 6.3-12.6mm lens, with a focus distance ranging from approximately 1.64 feet (0.5 meters) to infinity (no Macro mode is available). In addition to automatic focus control, the DSC-P51 offers a range of fixed focus settings through the Record menu, as well as Center AF and Multi AF focus area options. An AF illuminator lamp on the front of the camera helps the camera focus under low light levels. A 3x Precision digital zoom option increases the DSC-P51's zoom capabilities to 6x, though we always remind readers that digital zoom often decreases the overall image quality because it simply enlarges the center pixels of the CCD image. That said, we've always experienced good, sharp results from Sony's Precision digital zoom. For composing images, the DSC-P51 offers a real-image optical viewfinder and an approximate 1.8-inch, color LCD monitor with full information display.
Exposure is automatically controlled on the DSC-P51, great for novices who want to keep things simple. An On/Off button on top of the camera powers the camera on, and a Mode dial on the back panel allows you to select between Scene, Automatic, and Movie exposure modes. Within Scene mode, you can select Twilight, Twilight Portrait, or Landscape "scenes." Both Twilight modes optimize the camera for low-light shooting, and Landscape mode captures broad vistas of scenery. Though the camera controls aperture and shutter speed, the Record menu offers White Balance, Exposure Compensation, ISO, Record Mode (Normal or E-mail), Sharpness, Flash Level, Picture Effects, Focus, and image quality and size settings. Under the Picture Effects setting, you can record images in black and white or sepia monotones, or select the Solarize or Negative Art options. The DSC-P51's flash operates in Forced, Suppressed, Auto, Red-Eye Reduction, and Slow-Sync modes. A Spot Metering button provides a more precise metering option for high-contrast or off-center subjects.
In Movie exposure mode, the camera captures either 320 x 240-, or 160 x 112-pixel resolution moving images (without sound) for as long as the memory card has available storage space, with an available HQX quality setting. The DSC-P51 also offers Clip Motion and Multi Burst modes. Clip Motion records a series of 10 images to be played back as an animation sequence, a feature we've enjoyed on previous Cyber-shot digicams. Multi Burst mode captures an extremely rapid burst of images, which are played back as a single movie (giving a slow-motion effect when played back), and offers three frame interval rates. A Self-Timer mode provides a 10-second delay between the time the Shutter button is pressed and the camera actually takes the picture, great for self-portraits.
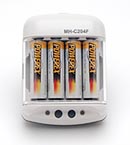
The DSC-P51 stores images on Sony Memory Sticks, available separately in capacities as large as 128MB (a 16MB card ships with the camera). The camera uses two AA batteries for power, but only NiMH rechargeable batteries are recommended. - No Lithium, alkaline, manganese, or NiCd need apply! A set of two rechargeable NiMH AAs and a battery charger are included with the camera, so you needn't worry about the restrictions on the battery type. (But definitely *do* immediately purchase a pair or two of high-capacity NiMH cells to have as spares.) The optional AC adapter is also useful for preserving battery power when reviewing and downloading images. The DSC-P51 features a Video Out jack, for connecting to a television set, and a USB jack for downloading images to a computer. A software CD is loaded with Pixela Image Mixer software and USB drivers, which facilitates image downloading and organization.
Basic Features
- 2-megapixel CCD.
- Real-image optical viewfinder.
- 1.8-inch color LCD monitor with backlight option.
- Glass, 2x 6.3-12.6mm lens. (Equivalent to a 42-84mm lens on a 35mm camera)
- 3x digital zoom.
- Automatic exposure control.
- Maximum aperture of f/3.8.
- Shutter speeds from 1/500 to 2 seconds.
- Built-in flash.
- Memory Stick card storage. (16 MB card included)
- Power supplied by two AA NiMH batteries or optional AC adapter.
- Pixela Image Mixer software and USB drivers included for both Windows and Mac platforms.
Special Features
- Movie mode with MPEG Movie, Clip Motion, and Multi Burst options.
- Continuous movie recording in all modes, even MPEG EX. (No buffer limits.)
- Scene mode with Twilight, Twilight Portrait, and Landscape preset modes.
- 10-second Self-Timer for delayed shutter release.
- Picture Effects menu with Black-and-White, Sepia, Negative Art, and Solarize effects.
- White balance (color) adjustment with five modes.
- Sharpness adjustment.
- E-mail (320 x 240-pixel) record mode.
- Spot metering option.
- Sensitivity setting with three ISO equivalents and an Auto setting.
- Five fixed focus settings.
- Adjustable autofocus area.
- DPOF (Digital Print Order Format) compatibility.
- USB cable for connection to a computer (driver software included).
- NTSC video cable for connection to a television set.
- High-capacity NiMH batteries and charger included(!)
Recommendation
The P51 is a very workmanlike entry in the "full feature but inexpensive"
two megapixel arena. Like the rest of the smaller-sized Sony Cyber-shot line,
the DSC-P51 comes across as a well-built, compact digicam. It offers point &
shoot simplicity, but with enough advanced features to let you take photos in
otherwise challenging situations. (Low light, fast action, etc). The 2-megapixel
CCD delivers enough resolution for any use from printing (up to about 8x10 inches)
to distributing via e-mail, and its compact design makes it a good candidate
for travel. Overall, the P51 should be a good choice for anyone wanting a capable,
portable camera that's easy to use, but with enough flexibility to handle a
range of conditions. - Its ease of use and portability make it a good "family"
camera, without resorting to a "dumbed down" camera with limited capabilities.
Design
Small and compact, the DSC-P51 has an almost identical outline to the three
megapixel DSC-P71 model. Its sleek, smooth design is free from any major protrusions
apart for the lens, which protrudes less than a half-inch from the camera body.
With approximate dimensions of 5.0 x 2.3 x 1.85 inches (127 x 58 x 47 mm), the
DSC-P51 is just small enough for shirt pockets, most purses, hip packs, etc.
Thus, we can see the DSC-P51 tagging along on hikes, flea market trips, or any
outing.
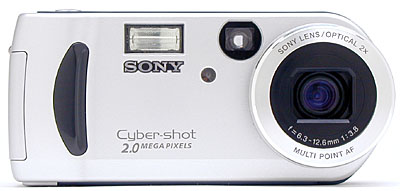
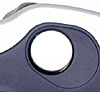
The front of the DSC-P51 is rounded on the lens side, following the shape of the lens barrel and reinforcing the smooth design style. A shutter-like, retractable lens cover protects the lens whenever the camera is powered off, sliding quickly out of the way when the camera is turned on. The lens doesn't telescope out from the body, so startup and shutdown are very quick. Also on the front panel are the flash, optical viewfinder window, and AF Illuminator lamp. A small handgrip provides a secure finger rest when holding the camera, but is small enough that you'll probably want to keep the wrist strap securely in place while shooting.
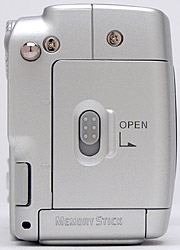
The battery compartment is on the right side of the camera, as viewed from the back. A sliding plastic door protects the compartment, and features a latch that prevents it from accidentally flying open while shooting. Just above the compartment is the wrist strap attachment eyelet. You can also see the Memory Stick compartment door from this view, which opens from the bottom of the camera.
The opposite side of the camera is featureless, curving slightly to accommodate the lens.

The DSC-P51's top panel is fairly smooth and flat, featuring the Shutter and Power buttons, both of which barely protrude from the camera's surface.
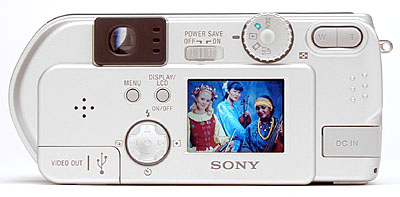
The remaining camera controls are on the back panel, along with the optical viewfinder eyepiece, LCD monitor, speaker, and connector jacks. Three LED lamps next to the optical viewfinder report camera status, such as when focus is set or the flash is charging. Next to the optical viewfinder eyepiece is the Power Save on/off switch. The Mode dial and Zoom rocker control dominate the top left corner of the back panel, while the Menu, Display, and Four Way Arrow pad flank the left side of the LCD monitor. The small speaker plays only camera sounds, as the camera does not record audio with its movies. In the lower left corner, beneath a tethered plastic door, are the Video Out and USB connector jacks. The DC In jack is on the opposite side, beneath a more flexible plastic flap. Also on the right side is a set of raised bumps, which provide a thumb grip when holding the camera in shooting position.
 In
record mode, the LCD monitor optionally displays just the subject, the subject
plus an information overlay, or nothing at all. (That is, the LCD may be turned
off.)
In
record mode, the LCD monitor optionally displays just the subject, the subject
plus an information overlay, or nothing at all. (That is, the LCD may be turned
off.)
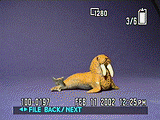 In
playback mode, the LCD display can show the captured images with or without
an information overlay, a thumbnail index showing multiple images at once,
or detailed information regarding the exposure parameters for a given image.
You can also zoom in on the recorded images in playback mode, helpful for
checking framing or focus.
In
playback mode, the LCD display can show the captured images with or without
an information overlay, a thumbnail index showing multiple images at once,
or detailed information regarding the exposure parameters for a given image.
You can also zoom in on the recorded images in playback mode, helpful for
checking framing or focus.
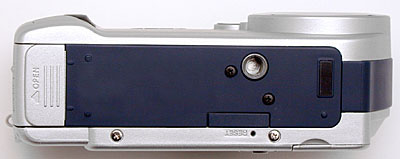
The DSC-P51 has a flat bottom panel, which holds the metal tripod mount and Memory Stick slot. (Kudos for the rugged metal tripod socket, many cameras use plastic here.) The Memory Stick compartment door slides open to reveal the card, which pops outward when pushed slightly. I was glad to see that the space between the tripod mount and Memory Stick slot allows you to change out the card even when mounted to a tripod (and the side-access battery compartment is a nice bonus too). I was glad to see enough space between the tripod mount and Memory Stick slot to let you change the card even when mounted to a tripod. (The side-access battery compartment is a plus as well). That said, I did notice that the off-center tripod mount left the camera slightly tilted on my tripod head, making more difficult to level the camera body exactly. Given the very portable nature of the DSC-P51 though, I don't think this will be much of an issue for most users.
Camera Operation
The DSC-P51's user interface is very straightforward, with only a few external controls and a very concise LCD menu system. For standard point-and-shoot operation, the most basic features (flash, spot metering, and zoom) have external controls, while settings like White Balance, Exposure Compensation, etc. are adjusted through the menu. The Mode dial allows you to quickly set the camera's operating mode, with just a quick turn to one of five settings. When it is necessary to enter the LCD menu system, you'll find it simple to navigate, as each setting appears as a subject tab at the bottom of the screen. The arrow keys of the Four Way Arrow pad scroll through each selection, and the OK button in the center of the pad confirms any changes. It shouldn't take much more then half an hour to an hour to become familiar with the camera setup, as it's fairly intuitive and nearly identical to other Sony Cyber-shot models.
External Controls
![]()
Power Button: Placed unobtrusively on the camera's top panel, this button turns the camera on and off.
Shutter Button: Located on the far right of the top panel, this button sets focus and exposure when halfway pressed, and fires the shutter when fully pressed.

Power Save Switch: Adjacent to the right side of the optical viewfinder eyepiece, this sliding switch turns the Power Save function on or off. (Power Save appears to do several things. It sets the camera to shut off more quickly after a period of inactivity, turns off the continuous autofocus action, so the lens only autofocuses when the shutter button is half-pressed, and dims the backlight on the LCD display slightly.)
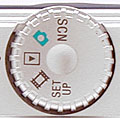
Mode Dial: This ridged dial is on the camera's rear panel, and offers the following settings:
- Scene: Allows the user to select one of three Scene modes (Twilight, Twilight Portrait, and Landscape).
- Automatic Record: Places the camera in Record mode, with the user able to adjust all exposure features except for shutter speed and aperture.
- Playback: Replays captured still images and movie files, with options for image management and printing.
- Movie: Records silent, moving images, for as long as the Memory Stick has space. Also accesses Clip Motion and Multi Burst modes when either of those options is activated through the Set-Up menu.
- Setup: Displays the Setup menu, for changing camera settings.

Zoom Toggle: Located in the top right corner of the back panel, this rocker switch controls the optical and digital zoom in any record mode.
In Playback mode, this button controls the digital enlargement of captured images and accesses the index display mode as well as a detailed information display. (The "T" side zooms in, the "W" side zooms out. Zooming out from the normal-sized single image view brings up an index display of tiny "thumbnail" images.)

Menu Button: Situated to the right of the speaker, this button displays or dismisses the settings menu in any Record mode or in Playback mode.

Display/LCD Button: Just adjacent to the Menu button, this button controls the LCD monitor's display mode. In both Record and Playback modes, the button cycles through the image and information displays, and turns the LCD monitor on and off.
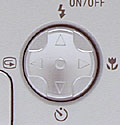
Four Way Arrow Pad: Below the Menu and Display buttons, this rocker control features four arrow keys and navigates through any settings menu. The center of the pad acts as the "OK" button to confirm menu selections.
In Automatic Record mode, the up arrow controls flash mode, cycling through Auto, Forced, and Suppressed modes (it only activates Slow-Sync in Twilight Portrait mode, and no flash modes are available in Twilight or Movie modes). The down arrow activates the Self-Timer option, while the right arrow controls the Macro mode. The left arrow calls up a quick review of the most recently-captured image.
In Playback mode, the left and right keys scroll through captured images on the memory card. When an image has been enlarged, all four arrow keys move around within the enlarged view.

Battery Compartment Latch: Tucked in the center of the battery compartment door, this button unlocks the door, allowing it to slide outward.
Camera Modes and Menus
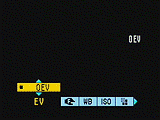 Record
Mode: In this mode, the camera captures standard still images, controlling
aperture and shutter speed. Pressing the Menu button displays a menu shown
below. (This menu is actually overlaid on the viewfinder view, I've just shot
it with the lens blocked, to produce a smaller GIF animation here.):
Record
Mode: In this mode, the camera captures standard still images, controlling
aperture and shutter speed. Pressing the Menu button displays a menu shown
below. (This menu is actually overlaid on the viewfinder view, I've just shot
it with the lens blocked, to produce a smaller GIF animation here.):
- Exposure Compensation: Lightens or darkens the exposure from -2 to +2 exposure equivalents (EV) in one-third step increments.
- Focus: Changes the focus area to Multi AF or Center AF, or selects from a range of fixed focus settings (0.5, 1.0, 3.0, or 7.0 meters, or Infinity).
- White Balance: Adjusts the color balance for Auto, Daylight, Cloudy, Fluorescent, or Incandescent light sources.
- Spot Metering: Turns on Spot Metering or shuts it off.
- ISO: Sets the camera's sensitivity to Auto, or to 100, 200, or 400 ISO equivalents. - Use ISO 200 or 400 for action shots, where you need a faster shutter speed to freeze the action. Higher ISOs produce "noisier" images though.
- Image Size: Sets the image size to 1,600 x 1,200; 1,600 - 3:2 aspect ratio (matches the standard 4x6 print size); 1,280 x 960; or 640 x 480 pixels.
- Quality: Sets the JPEG compression level to Fine or Standard.
- Mode: Changes the recording mode to Normal or E-Mail (records a 320 x 240-pixel image in addition to one at the selected image size).
- Flash Level: Adjusts the flash intensity to Normal, Low, or High.
- Picture Effects: Applies creative effects like Solarize, Black and White, Sepia, or Negative Art, or turns Picture Effects off.
- Sharpness: Adjusts the overall image sharpness in arbitrary units from -2 to +2.
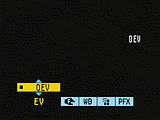
 Scene
Mode: This record mode offers three preset "scene" modes, for
shooting in specific situations. Flash, zoom, Macro, and Self-Timer modes
are all available, though flash mode is limited in some cases, and Macro isn't
available when in Landscape scene mode. Menu options are virtually identical
to those in normal Record mode, except the ISO option isn't present. Pressing
the Menu button displays the following options:
Scene
Mode: This record mode offers three preset "scene" modes, for
shooting in specific situations. Flash, zoom, Macro, and Self-Timer modes
are all available, though flash mode is limited in some cases, and Macro isn't
available when in Landscape scene mode. Menu options are virtually identical
to those in normal Record mode, except the ISO option isn't present. Pressing
the Menu button displays the following options:
- Scene: Selects between Twilight, Twilight Portrait, and Landscape "scenes." Twilight allows much longer exposure times than does the normal shooting mode, but disables the flash. Twilight Portrait combines longer exposures with the flash. ISO options aren't available, but the Twilight modes apparently boost ISO to 200 automatically. Landscape apparently just sets the camera's focus to infinity. (I confess to not being sure why you'd need this, the autofocus lens could just focus on distant objects normally.)
- Exposure Compensation: Lightens or darkens the exposure from -2 to +2 exposure equivalents (EV) in one-third step increments. Needed to get correct exposures for scenes that are light or dark overall. (E.g., beach/snow scenes, etc.)
- Focus: Changes the focus area to Multi AF or Center AF, or selects from a range of fixed focus settings (0.5, 1.0, 3.0, or 7.0 meters, or Infinity).
- White Balance: Adjusts the color balance for Auto, Daylight, Cloudy, Fluorescent, or Incandescent light sources.
- Image Size: Sets the resolution size to 1,600 x 1,200; 1,600 (3:2 aspect); 1,280 x 960; or 640 x 480 pixels.
- Quality: Sets the JPEG compression level to Fine or Standard.
- Mode: Changes the recording mode to Normal or E-Mail (records a 320 x 240-pixel image in addition to one at the set resolution size).
- Flash Level: Adjusts the flash intensity to Normal, Low, or High. (Flash is only available in Twilight Portrait scene mode though, not Twilight or Landscape.)
- Picture Effects: Applies creative effects like Solarize, Black and White, Sepia, or Negative Art, or turns Picture Effects off.
- Sharpness: Sets the overall image sharpness in arbitrary units from -2 to +2.
 Playback Mode: This mode lets you review captured images on the memory card, erase them, protect them, set them up for printing, etc. When playing back movie files, you can also opt for "queue" playback, which plays back the movie file more rapidly, several frames at a time, to help you find a particular portion you're interested in. Pressing the Menu button displays the following options:
- Delete: Erases the current image. There is an option to cancel the operation.
- Protect: Write-protects the currently image, or removes protection.
- Print: Marks the current image for printing on a DPOF device, or removes the print mark.
- Slide: Enables a slide show of all images captured on the Memory Stick. You can control the interval between each image as well as whether or not the slide show repeats.
- Resize: Resizes the current image to one of the available resolution sizes.
- Rotate: Rotates the current image 90 degrees clockwise or counterclockwise.
- Divide: Divides movie files into segments, providing a very basic editing tool you can use to "trim" your movies to just the portion you want to keep.
 Movie Mode: Records short movie clips without sound, for as long as the Memory Stick has available space. (This ability to record indefinitely, up to the limits of the memory card size (even in HQX mode) is a new feature on this latest generation of Cyber-shot cameras.) If set through the Set-Up menu, this mode can also record Clip Motion or Multi Burst frames. Clip motion is a unique feature that assembles up to 10 successive images into a multi-frame animated GIF file. MultiBurst mode captures 16 small images very rapidly, saving them as a single 1280x1024 image. MultiBurst images play back sequentially on the camera, but appear as a single image when viewed on your computer. The LCD menu system offers the following options:
- Exposure Compensation: Lightens or darkens the exposure from -2 to +2 exposure equivalents (EV) in one-third step increments.
- Focus: Changes the focus area to Multi AF or Center AF, or selects from a range of fixed focus settings (0.5, 1.0, 3.0, or 7.0 meters, or Infinity).
- White Balance: Adjusts the color balance to Auto, or for Daylight, Cloudy, Fluorescent, or Incandescent light sources.
- Image Size: Sets the movie resolution size to 320 x 240 (HQX); 320 x 240; or 160 x 112 pixels in MPEG Movie mode. In Clip Motion mode, offers Normal (160 x 120 pixels) or Mobile (80 x 72 pixels) sizes. In Multi Burst mode, offers frame intervals of 1/7.5, 1/15, or 1/30-second.
- Picture Effects: Applies creative effects like Solarize, Black and White, Sepia, or Negative Art, or turns Picture Effects off.
 Set-Up Mode: The following three-page Set-Up menu automatically displays when entering this mode:
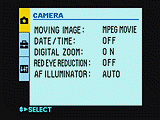
- Camera:
- Moving Image: Sets the Movie recording type to MPEG Movie, Clip Motion, or Multi Burst.
- Date/Time: Controls the date and time display, options are Day & Time, Date, or Off.
- Digital Zoom: Turns the 2x digital zoom on or off.
- Red-Eye Reduction: Enables the Red-Eye Reduction flash (which will fire with all flash modes), or turns it off.
- AF Illuminator: Puts the AF Illuminator into Auto mode, or simply turns it off.
- Set-Up 1
- Format: Formats the Memory Stick, erasing all files (even protected ones).
- File Number: Specifies whether file numbering resets with each new Memory Stick or continues in a series.
- Language: Changes the camera's menu language to English or Japanese.
- Clock Set: Sets the camera's internal clock.
- Set-Up 2
- LCD Brightness: Adjusts the LCD display brightness level to Normal, Bright, or Dark.
- LCD Backlight: Controls the LCD backlight feature, setting it to Normal or Bright.
- Beep: Controls the camera's beep sound, setting it to Shutter, On, or Off.
- Video Out: Specifies the camera's Video Out signal as NTSC or PAL.
- USB Connect: Places the USB connection into PTP or Normal modes.
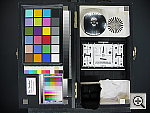
See my sample pictures and detailed analysis here. The thumbnails below show a subset of my test images. Click on a thumbnail to see the full-size photo.

|

|

|
|
|
|
|
|
|
|
|
|
|
|
|
|
|
|
|
|
|
|
|


Specifications
See the specifications sheet here.
Picky Details
Information on shooting speed, battery life, etc. can be found here.
Test Results
Because our evaluation unit was a very early prototype, I didn't shoot
a full series of test images, and Sony has asked that I not show any samples
here on the site. I did, however, test the resolution, macro performance,
and viewfinder accuracy, with the results shown here.
- Color: The DSC-P51 showed good color in most of my testing. Skin
tones were good, with just a slight ruddiness, and white balance was quite
good under a wide variety of shooting conditions. The main objection I had
to its color handling was a tendency toward yellowish greens, particularly
in new foliage. (That is, greens with a lot of yellow in them to begin with
ended up looking very yellow in my testing.) That said, the colors
on the MacBeth chart in my Davebox target came out just about right, with
accurate hue and good saturation. Overall, good to very good color, with
the exception of the new-foliage greens.
- Exposure: The P51's exposure was pretty accurate under most lighting
conditions, generally requiring less manual exposure compensation than other
cameras I've tested. (Only +0.3 EV in the outdoor portrait test for instance,
where most cameras require +0.7 or more.) It generally did a good job of
holding onto highlight detail, even in very harsh lighting, apparently thanks
to its high-resolution A/D converter.
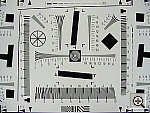
- Resolution: The P51's resolution is about typical among good-quality
two megapixel cameras I've tested. It's photos should be good for making
prints as large as 8x10 inches, with good sharpness.
- Closeups: The DSC-P51 performed well in the macro category, capturing
a minimum area of 3.5 x 2.6 inches (89 x 67 millimeters). Resolution was
high, with great detail in the coins, brooch, and dollar bill. Details were
soft in all four corners, but fairly sharp in the center of the frame. It
overexposed my test shot slightly, washing out the color, but the color
balance was pretty accurate. I also noticed a little barrel distortion from
the lens, from its full wide-angle position, but it's less than many cameras
show in their macro shots. A good performance overall.
- Night Shots: The DSC-P51 only accesses its longer shutter speeds
in Twilight mode, which automatically disables the camera's variable ISO
option. Twilight mode also automatically applies a negative exposure compensation,
so you need to adjust the exposure with the manual exposure compensation
adjustment. (The negative compensation would help with typical night scenes,
where pools of light would be overexposed if the camera paid too much attention
to all the dark areas. The automatic exposure reduction of Twilight Mode
is what you'll want for shooting typical night scenes, but isn't
what you want for typical indoor photography.) The net of all this is that
the P51 doesn't perform too well in the low-light shooting category. In
my tests, the camera captured bright, clear images at light levels only
as low as about two foot-candles (22 lux). The target is visible but dim
at the one foot-candle light level (11 lux), and could arguably be used.
Since average city street lighting at night is equivalent to about one foot-candle,
you'd need the flash for anything darker, and will only just be able
to use it at all in normal outdoor city night scenes.
- Viewfinder: The optical viewfinder proved to be rather tight, showing
only 81 percent of the final image area at both wide-angle and telephoto.
Surprisingly, the LCD monitor was also a little tight, showing approximately
91 percent frame accuracy at wide-angle, and approximately 93 percent at
telephoto. I normally prefer LCD monitors to be as close to 100 percent
accuracy as possible, so the P51 comes up a little short in this department.
- Optical Distortion: Optical distortion was lower than average at
wide-angle, where I measured an approximate 0.54 percent barrel distortion.
(Average is about 0.8 percent, but frankly even 0.54 percent is too high,
IMHO.) The telephoto end fared slightly better, as I measured an 0.38 percent
pincushion distortion. Chromatic aberration was fairly low, showing about
three or four pixels of very light coloration on either side of the target
lines, although there was a moderate amount of "coma" that softened
the edges of the res target elements in the far corners of the image. (Chromatic
aberration is visible as a slight colored fringe around the objects at the
edges of the field of view on the resolution target.)
- Battery Life: The DSC-P51's battery life was surprisingly good for a camera that uses only two AA-cell batteries. Worst-case run time (capture mode with LCD monitor on) was a very respectable 140 minutes, stretching to 220 minutes with the LCD turned off. I still strongly recommend picking up a couple of extra sets of high-capacity NiMH batteries, but you'll be able to run longer than usual with the P51. (See my Battery Shoot-out article for the latest information which batteries do best in digicams.)
In the Box
Here's what's included in the box with the DSC-P51 (at least in the US - other
countries will have their own bundle configurations):
- Wrist strap.
- 16 MB Memory Stick.
- USB cable.
- NTSC video cable.
- Two AA NiMH batteries with charger.
- Software CD.
- Instruction manual and registration card.
- Large capacity Memory Stick.
- Additional AA rechargeable batteries.
- AC adapter.
- Small camera case.
Recommended Software: Rescue your images!
Just as important as an extra memory card is a tool to rescue your images when
one of your cards fails at some point in the future. I get a lot of email from
readers who've lost photos due to a corrupted memory card. Memory card corruption
can happen with any card type and any camera manufacturer, nobody's immune.
A surprising number of "lost" images can be recovered with an inexpensive,
easy to use piece of software though. Given the amount of email I've gotten
on the topic, I now include this paragraph in all my digicam reviews. The program
you need is called PhotoRescue, by DataRescue SA. Read our review of it if you'd like, but download the program now,
so you'll have it. It doesn't cost a penny until you need it, and even then
it's only $29, with a money back guarantee. So download PhotoRescue for
Windows or PhotoRescue for
Mac while you're thinking of it. (While you're at it, download the PDF
manual and quickstart
guide as well.) Stash the file in a safe place and it'll be there when you need
it. Trust me, needing this is not a matter of if, but when... PhotoRescue
is about the best and easiest tool for recovering digital photos I've seen.
(Disclosure: IR gets a small commission from sales of the product, but I'd highly
recommend the program even if we didn't.) OK, now back to our regularly
scheduled review...
 About
Batteries
About
Batteries
Time for my standard battery tirade: I've gotten so many emails about power
issues for digicams, that I'm now inserting this standard notice in the reviews
of all AA-powered cameras on our site: Don't even *think* about using alkaline
AA batteries in a digicam! Despite their being packed in the box with many
cameras, they simply don't have the juice to handle typical digicam demands.
Big kudos to Sony for including a very high capacity set of AA NiMH cells with
the P51, as well as a nice little charger. Do yourself a favor though, and get
a couple of extra sets of high-capacity NiMH AA cells, and always keep one set
charged and ready to go while the other is in the camera. The Sony batteries
appear to be of very good quality, so you could just get another set or two
of them, or try a couple of sets of the new (as of this writing, in early 2002)
Maha 1800 mAh PowerEx brand cells from Thomas
Distributing. (In my battery testing, these new Maha 1800s are currently
running at the top of the chart for useful capacity.) There's nothing more frustrating
than running out of battery power in the middle of an outing. Spend the money
on good-quality batteries and you'll be glad you did.
Conclusion
As I said at the outset, the DSC-P51 is a very "workmanlike" two megapixel
camera. It offers a nice assortment of features and good image quality in a
compact, competitively-priced package. Build quality looks very good, as I've
come to expect from Sony. The automatic exposure control and Scene modes make
shooting in most situations easy, even for novices, while the optional exposure
settings provide some flexibility for more advanced users. All in all, a nice
fit for novice users looking for an easily portable digicam with a good set
of features.

Follow Imaging Resource: