Casio EXILIM PRO EX-P6006.0 megapixels, a Canon 4x zoom lens, and a host of features.<<Shutter Lag & Cycle Time Tests :(Previous) | (Next): Camera Modes & Menus>> Page 8:Operation & User InterfaceReview First Posted: 07/30/2004 |
Operation and User Interface
The EX-P600's user interface is one of the most unique I've seen, with an optional graphic display on the LCD monitor that reports the camera's focus and exposure information. The graphic display is sporty, conjuring up images of video racing games and flight simulators, but perhaps a bit more than what the average photographer needs. (Although I really liked the unique 3-channel histogram display, and found myself wishing I could have the histogram without all the "cockpit" silliness along with it.) The standard LCD display is also quite useful, reporting a host of camera settings as well as the exposure information. In either display mode, you can use the multi-functional Four-Way Arrow pad to make many of the basic exposure settings without delving into the LCD menus. When you do need the LCD menu system, it's actually quite straightforward, organized as a series of menu tabs. This layout lets you quickly skip to the options you need without sifting through pages of menu options. Once you get the hang of things, the control layout is fairly intuitive. The graphic display is fun and creative, but not very efficient for normal operation.
Control Enumeration
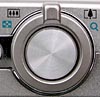
Zoom Lever: On top of the camera, surrounding the shutter release, the Zoom
Lever controls the optical and digital zoom in all exposure modes.
In Playback mode, the zoom lever switches between Index view, normal image display, and playback zoom, and controls the amount of playback zoom applied.
Shutter Button: Located in the center of the Zoom control, the Shutter button sets focus and exposure settings when pressed halfway and triggers the shutter when fully pressed.

Power Button: To the left of the Shutter button and Zoom control, the
Power button turns the camera on and off.
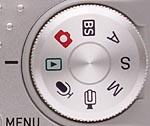
Mode Dial: In the top right corner of the camera's rear panel is the Mode
Dial, which controls the camera's main operating mode. Choices are Playback,
Snapshot, BESTSHOT, Aperture Priority, Shutter Priority, Manual, Movie, and
Audio modes.

Focus Button: To the right of the optical viewfinder, this button cycles
between Macro, Infinity, Manual, and Normal AF modes.

Flash / Calendar Button: To the right of the Focus button, this button controls
the Flash mode in all still capture modes. Pressing it cycles through Auto,
Suppressed, Flash On, and Red-Eye Reduction modes.
In Playback mode, this button displays captured images on a graphic calendar, letting you easily see which were captured on which date.

Continuous Shutter / Auto Bracketing Button: The top button in a series
lining the left side of the LCD monitor, this button accesses the available
Continuous Shutter modes, as well as the camera's Auto Bracketing modes.

AE Lock Button: Just below the Continuous Shutter / Auto Bracketing button,
this button locks the exposure setting in any record mode.

EX / Erase Button: Directly below the AE Lock button, this button short
cuts to a limited exposure menu in Record mode, with the following options:
- White Balance: Sets the white balance to Auto, Daylight, Cloudy, Shade, Incandescent, Warm White Fluorescent, White Fluorescent, Flash, or Manual.
- ISO: Adjusts the sensitivity to 50, 100, 200, or 400 ISO equivalents, or to an Auto setting.
- Metering: Selects the metering mode from options of Spot, Center-Weighted, or Multi.
- AF Area: Sets the AF area to Free, Spot, or Center.
In Playback mode, this button displays the Erase menu, which lets you delete a single image or all files.
![]()
Menu Button: On the right side of the LCD monitor, this button displays
the settings menu (and dismisses it) for any camera mode.
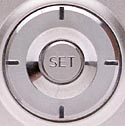
Four-Way Arrow Pad and Set Button: This multi-directional toggle button
surrounds a single "Set" button, and controls many of the camera's
operations. In all capture modes except Manual, the left and right arrow buttons
increase or decrease the exposure compensation setting. (You can change the
function of the left and right keys through the Setup menu, though.) In Aperture
or Shutter Priority exposure modes, the up and down arrow buttons select either
the exposure compensation or the selected exposure variable for adjustment,
while the right and left buttons change the settings. In Manual mode, the up
and down arrows move the selection between the aperture and shutter speed settings,
and the right and left buttons again change the settings. In BESTSHOT mode,
the Set button enables you to select one of the 25 available scene modes, selectable
via the right and left arrows.
In Playback mode, the left and right arrows move forward or backward through the pictures stored on the card. All four are used to scroll around the zoomed image in Zoom Playback mode.
In the LCD menu system, the arrow buttons navigate through menu screens and select settings. The Set button in the center of the pad confirms menu selections.
![]()
Display Button: Just off the lower right corner of the LCD monitor, this
button cycles through the available LCD display modes, including the graphic
interface in capture mode.

Self-Timer / Remote Control Button: Located in the lower right corner
of the rear panel, this button accesses the two and 10-second Self-Timer modes,
Triple Self-Timer mode, as well as the Remote Control mode.

Preview Button: Calls up the previously-captured image on the screen and
enables most Playback-mode functions.

Follow Imaging Resource: