Canon PowerShot Pro1New level of sophistication takes over the top spot in the PowerShot line.<<Operation & User Interface :(Previous) | (Next): Image Storage & Interface>> Page 9:Camera Modes & MenusReview First Posted: 05/14/2004 |
Camera Modes and Menus
The Pro1 has a single Mode dial on the bevel between the back and top panel, which controls the exposure mode. A second Power lever controls whether the camera is in Record or Playback mode. Within Record mode, the Mode dial sets the exposure mode to either Movie, Stitch-Assist, Night Scene, Landscape, Portrait, Auto, Program AE, Shutter Priority, Aperture Priority, Manual, or Custom (C1 & C2).
Record Menu (Red): With the exception of the Auto exposure mode and most of the Image Zone exposure functions, the Record menu provides virtually identical options for all exposure modes. These menus are accessed by depressing the Menu button once while in a Shooting mode. Following are the available settings:
 Flash
Sync: Syncs the flash with the first or second curtain. (That is, just
after the shutter first opens, or just before it closes. Second-curtain sync
is needed when shooting flash photos of moving objects in conjunction with
long shutter speeds, in order to make the "motion trails" of the
subjects follow the subjects, rather than appearing to stretch in front of
them.)
Flash
Sync: Syncs the flash with the first or second curtain. (That is, just
after the shutter first opens, or just before it closes. Second-curtain sync
is needed when shooting flash photos of moving objects in conjunction with
long shutter speeds, in order to make the "motion trails" of the
subjects follow the subjects, rather than appearing to stretch in front of
them.)
- Slow Synchro: Turns Slow Synchro flash mode on or off.
- Red-Eye Reduction: Activates the camera's Red-Eye Reduction flash mode, which reduces the occurrence of Red-Eye in portraits.
- Flash Pop-up: Determines whether the flash is allowed to pop up automatically. With the function off, flash will only pop up when the flash button is pressed. When closed, the "no flash" symbol is displayed in the viewfinder and status LCD.
- Continuous Shooting: Specifies whether normal Continuous Shooting or High Speed Continuous Shooting modes are available via the Drive setting. (High Speed mode gives faster frame rates, but with fewer shots possible in each sequence.)
- Self-Timer: Sets the duration of the self-timer countdown to two or 10 seconds.
- Wireless Delay: Sets the duration of the self-timer when used with the remote control. Times are zero, two, or 10 seconds.
- Spot AE Point: Establishes the area the Spot metering system bases its exposure on, either from the center of the frame or from the currently selected autofocus area point.
- ND Filter: Flips the ND filter in or out. If enabled, the ND filter cuts the incoming light by a factor of eight (three f-stops). The ND filter is handy for closeup flash work, or for enabling wider apertures or longer shutter times under bright shooting conditions.
- MF Point Zoom: Determines whether or not the focusing point is magnified in the LCD display when manual focus is adjusted. (Note that the MF point follows any AF point you may have selected with the FlexiZone feature.)
- AF Mode: Determines when the autofocus mechanism operates. Single autofocus sets focus whenever the Shutter button is pressed halfway. Continuous autofocus adjusts the focus continuously, any time the camera is in a record mode.
- Digital Zoom: Turns digital zoom on or off.
- Converter: Tells the camera which lens adapter is attached to the camera. The camera restricts the range of its zoom lens accordingly.
- Review: Sets the Quick Review time duration, with options ranging from 2 to 10 seconds, in one-second increments. You can also disable the Review function.
- Color Space: Switches between Standard (sRGB) and Adobe RGB, which can accurately represent a broader range of colors, but which requires editing and printing application software that supports the different color space.
- Reverse Display: Sets whether the image is reversed horizontally when the LCD is faced forward.
- Super Macro: Turns Super Macro mode on, enabling closer shots. Super Macro only works when the lens is within set to wider focal lengths.
- Intervalometer: Activates Interval shooting mode, letting you capture a series of images at specific intervals. Intervals can range from 1 to 60 minutes, with a maximum of 100 shots in a series.
- Save Settings: Saves the currently selected menu settings for subsequent recall in the C1 or C2 camera modes.
Setup Menu (Orange): The Setup menu provides universal camera control options that remain the same in both Shooting and Replay modes. This menu is accessed by depressing the Menu button once and then scrolling to the right with the Four-Way Arrow pad. Following are the available settings:
 Mute:
Turns the camera's sound On or Off.
Mute:
Turns the camera's sound On or Off.
- Volume: Adjusts the volume of the system sounds individually. Volume options, which are selected by pressing the Left and Right Arrow keys, are on a scale of one to five, and Off. Items include Start-up, Operation, Self timer, Shutter, and Playback volumes. (secondary screen)
- LCD Brightness: Adjusts the brightness level of the LCD monitor to Normal (small sun) or Bright (large sun).
- Power saving: Activates or deactivates the camera's automatic shutoff feature, sets separate display shutdown time, from 10 seconds to 1 minute. (secondary screen)
- Date / Time: Sets the camera's internal clock and calendar. (secondary screen)
- Format: Formats the CompactFlash card, deleting all images saved on the card (even write-protected ones). (secondary screen)
- File Number Reset: Resets file numbering with each new card. (The default is to continue the numbering sequence across multiple cards, to prevent accidental overwriting of image files when they're copied to a computer.)
- Auto Rotate: Designates whether the camera automatically rotates vertically-oriented shots in the LCD monitor during playback.
- Distance Units: Sets the focus measurement to read out in either meters or feet.
- Language: Changes the Pro1's menu language to one of 12 language
options. (secondary screen)
- Video System: Sets the video output signal to NTSC or PAL.
My Camera Menu (Purple): The third menu available in any Record mode, this
lets you customize the camera's start-up screen, sounds, etc. Each setting offers
three choices already programmed into the camera (Canon screen, scenic view,
or bird image), but you can also load your own images and sounds. I guess some
folks may find this amusing, but I really don't understand Canon's expending
the engineering resources to put this sort of thing in a camera for the serious
amateur. I mean, do any of the Pro1's prospective buyers really care about having
their cameras play a different startup sound or tune?
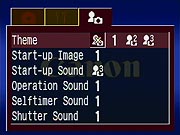 Theme:
Selects the theme for each My Camera setting item, adjusting all of the following.
Theme:
Selects the theme for each My Camera setting item, adjusting all of the following.
- Start-Up Image: Selects which image appears at camera start-up.
- Start-Up Sound: Sets the sound that plays at camera start-up.
- Operation Sound: Specifies the noises played when the Four-Way Arrow pad is pressed, or any button other than the Shutter button.
- Self-Timer Sound: Sets the noise for the Self-Timer beep.
- Shutter Sound: Sets the shutter noise.
Play Menu (Blue): This menu is only available in the Replay mode. It allows you to scroll through captured images; erase, protect, and rotate them; or set them up in a slide show or for printing on a DPOF compatible device. The Play menu offers the following selections:
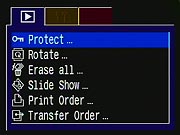 Protect:
Write protects the currently displayed image from accidental deletion, except
by card formatting.
Protect:
Write protects the currently displayed image from accidental deletion, except
by card formatting.
- Rotate: Rotates captured images 90 to 270 degrees clockwise.
- Erase All: Erases all images from the CompactFlash card. (secondary screen)
- Slide Show: Automatically plays images in a slide show format. You can choose to include all images on the card or one of three Program selections. You can also set the Play Time (amount of time between images) from three to 30 seconds or Manual; and turn the Repeat function on or off. (secondary screen)
- Print Order: Sets up images for printing on a DPOF compatible device. Options include Standard or Index prints, the number of copies, Date Stamp On or Off, and File Number On or Off. (secondary screen)
- Transfer Order: Selects images to be transferred with email software, when the camera is connected to a computer.

Follow Imaging Resource: