Canon PowerShot S10Canon packs 2 megapixels and a 2x optical zoom into the smallest digicam yet!<<Optics :(Previous) | (Next): Shutter Lag & Cycle Time Tests>> Page 6:Exposure & FlashReview First Posted: 12/5/1999 |
Exposure
We experienced fairly good exposure control on the S10, and liked the variety of capture options available. Automatic remains relatively straightforward while Manual gives you control over both exposure compensation (EV) and white balance. We found the Image capture mode helpful for many shooting situations, since it provides preset exposure settings for landscapes, night scenes, etc., although we were a bit puzzled by the exact function of some of them. Some were obvious, such as "slow shutter", which sets the autoexposure system to choose smaller apertures and longer shutter speeds. Likewise, "fast shutter" does the opposite, preferring larger apertures and higher shutter speeds. Night Shot mode apparently pairs longer exposure times with use of the onboard strobe, to produce flash exposures with better-lit backgrounds. We really aren't sure what "Landscape" mode does though, unless it involves some of the other image adjustments the camera is capable of, such as sharpening or contrast adjustment. Another plus is the Stitch Assist mode, which helps you compose panoramic shots (said shots to be subsequently merged with the included PhotoStitch software).
ISO is adjustable under the Gain option in the record menu, with options of zero (ISO 100), +1 (ISO 200) and +2 (ISO 400). Although you don't have any control over shutter speed or aperture settings, the S10 offers shutter speeds from two to 1/1,000 seconds and aperture ranges from F/2.8 to F/8.0. These specifications should translate into a usable lighting range of EV 4 to EV 21, using our previous terminology, or 0.13 to 16,000 foot-candles (1.4 to 175,000 lux) In actual tests, we found the camera somewhat less sensitive than this, producing usable images down to light levels of 1 foot-candle (11 lux). This should be adequate for nighttime photography under bright streetlights or indoors at malls, etc. Strangely enough, the +1 and +2 ISO settings didn't extend the low light capability to lower illumination levels. These settings appear to only be useful for permitting higher shutter speeds in otherwise adequately lit environments.
Flash
The S10's flash offers four modes of operation (Auto, Red-Eye Reduction, On and Off) and ranges from 6.7 inches to 10.8 feet (17cm to 3.3m) in wide angle and 6.7 inches to 7.5 feet (17cm to 2.3m) in telephoto. Auto lets the camera do all the work and is available in all shooting modes except Stitch Assist. Red-Eye Reduction emits the standard pre-flash before firing the full flash and is only available in Manual and Image capture modes. The On setting means that the flash always fires, available in all modes except for Automatic capture. The Off setting means that the flash never fires. All flash modes are accessed by pressing the Flash button on the back of the camera until the appropriate icon appears on the status display. An excellent feature is that the flash metering is actually performed through the lens, not via a separate sensor on the front of the camera. It's therefore more likely to be accurate, particularly as the lens zooms from wide angle to telephoto.
Digital Telephoto
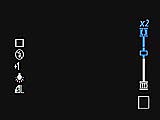
We found the continuous digital telephoto operation interesting-Through some trickiness with the optical zoom lens, it zooms smoothly through the full zoom range. It's also relatively simple to access. Once the lens is at the maximum optical telephoto setting, keep pressing the up arrow to continue into the digital zoom. The digital zoom will engage, and the lens will rack back to the wide angle setting. The net result is that you're about where you were in terms of effective focal length, but now with the optical zoom at the wide angle end of its range. As you continue to zoom in, the optical zoom does the work, eventually ending up at its 2x setting, producing a total zoom ratio of 4x. If you continue to hold down the telephoto zoom control, the entire process will repeat again, this time with the digital zoom engaged at a 4x magnification ratio. Press on the bottom of the rocker toggle (wide-angle zoom button) to pull back out. Zoom status is displayed in an optional overlay (it can be switched off), in the form of a vertical "zoom bar" on the right hand side of the LCD monitor. (In the photo above right, the zoom is midway through the 2x digital zoom range.) You can disable the digital zoom by hitting the Menu button in Automatic, Manual and Image capture modes. Once in the record menu, select the Digital Zoom option and select either On or Off. It's also important to note that the digital zoom is only available when the LCD monitor is in use.
Keep in mind that "digital zoom" is very different from the zoom effect provided by the optical zoom lens: So-called digital zoom only increases the apparent magnification by cropping into the image, essentially throwing away information from the periphery of the CCD. Thus, as the digital zoom ratio increases, the resolution decreases in direct proportion. With a 2 megapixel digicam like the S10, digital zoom is actually fairly useful when shooting at lower resolution settings, since you don't need the full sensor resolution then anyway. (The S10 interpolates the digital tele images back up to whatever pixel size you have the camera set to: At smaller sizes, less interpolation is involved, producing a smaller but sharper image.)
Self-Timer
In all four capture modes, the Self-Timer is accessed by pressing the Self-Timer/Continuous button on the back of the camera (just beside the Flash button). After the shutter button is fully pressed, the self-timer indicator will flash slowly on the front of the camera for the first eight seconds and then accelerate for the remaining two ( a total of 10 seconds). To cancel the mode, just hit the Self-Timer button again or turn the camera off. Since the self-timer is activated by its own control button, you can use it in conjunction with macro mode, a very desirable feature for avoiding camera shake when you're using a tripod.
Macro
The S10's Macro function allows you to capture images from 4.7 to 18 inches (12 to 46 cm) away. Macro is accessible in all four capture modes by pressing the Macro button, indicated by the traditional flower symbol. A tiny LED next to the optical viewfinder lights orange when the shutter button is halfway pressed in Macro mode. The mode is just as easily canceled by hitting the Macro button a second time.
Continuous Mode
The S10 will shoot continuously at approximately 1.7 images per second, depending on the amount of space on the CompactFlash card (the interval increases as the space fills up). In this mode, the camera shoots continuously until the shutter button is released. Access the function in either Manual or Image capture modes by pressing the Self-Timer/Continuous button until the Continuous Shooting icon appears on the status display. Cancel it the same way.

Exposure Compensation
When shooting in Manual, Image or Stitch Assist capture modes, the S10 gives you some control over exposure compensation. The +/-/WB button pulls up the settings bar, where you use the right and left arrow buttons to select an EV value from -2 to +2. You can dismiss the menu by pressing the Set button and the shutter button can be pressed at any time to capture an image. Note that the setting remains the same, even if the mode dial is turned (the +/- icon will appear in the status display with the EV value).

White Balance
The same +/-/WB button calls up the white balance settings bar, also adjustable with the right and left arrow keys. Five white balance options are available: Auto, Daylight, Cloudy, Tungsten and Fluorescent. The white balance option is available in Manual, Image and Stitch Assist capture modes only. Like exposure compensation, this setting remains in effect even after the mode dial is turned. The WB symbol also appears in the status display.
Metering
You can choose between spot and center weighted metering on the S10 (in Manual mode only) by pressing the Set button and using the right and left arrow buttons to select the option. Center weighted metering takes an average reading of the entire image, weighting the value of the light at the center of the viewfinder more heavily. Spot metering measures the light from the very center of the field only and is best for backlit subjects.
Gain, Contrast and Sharpness
We mentioned the Gain setting earlier, which controls ISO. In the record menu, you have the option of zero (100 ISO), +1 (200 ISO) and +2 (400 ISO). The higher ISO values are best for darker situations and fast shutter speeds, but produce more image noise. In the same menu, you can also adjust the contrast and sharpness settings. On both settings, '-' means low, zero is normal and '+' is high, all adjustable via the right and left arrow buttons. A number of cameras offer sharpness adjustments and several now provide ISO options, but the contrast adjustment is fairly uncommon.
Reader Comments! --> Visit our discussion forum for the Canon PowerShot S10!

Follow Imaging Resource: