Canon PowerShot S30A new shape, sleek design, direct support for a Canon inkjet printer, and three megapixels of resolution!<<Shutter Lag & Cycle Time Tests :(Previous) | (Next): Camera Modes & Menus>> Page 8:Operation & User InterfaceReview First Posted: 10/1/2001 |
Operation and User Interface
The PowerShot S30's user interface is straightforward and should present a relatively short learning curve if you read over the Camera User Guide. We generally prefer to see external access to as many exposure controls as possible, and the S30 provides a fair amount of control without resorting to the LCD menu. The buttons are somewhat spread out, so you'll likely have to operate the camera with two hands when adjusting settings or using the Manual Focus, however, the Zoom and Multicontroller buttons are directly adjacent to the Shutter button, so you can easily shoot one-handed in most situations.
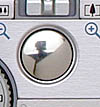
Shutter Button: Located on the right side of the camera's top panel, when the Shutter button is halfway depressed, it sets focus and exposure, and when fully depressed, it trips the shutter release. In Self-Timer mode, fully depressing the Shutter button triggers a 10- or 2-second countdown before the shutter is released.
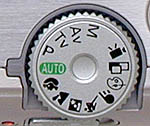
Mode Dial: To the left of the Shutter button, this notched dial is used to select the camera's shooting modes. Olympus divides these functions into three categories: Auto, Image Zone, and Creative Zone. The options are as follows:
![]()
Auto: The camera controls everything about the exposure, except for Flash and Macro modes, and image size and quality settings.
Creative Zone
 Program AE (P): Places the camera in control of shutter speed and lens aperture, while you maintain control over everything else (i.e., white balance, ISO, metering, exposure compensation, flash, etc.).
 Aperture-Priority AE (TV): Allows you to set the lens aperture from f/2.8 to f/8.0 (depending on the zoom setting), while the camera controls the shutter speed. In this mode, you maintain control over all other exposure variables.
 Shutter-Speed Priority (AE): Allows you to control the shutter speed settings from 1/1,500 to 15 seconds, while the camera controls the aperture. All other exposure settings are available.
 Manual (M): Provides complete control over all exposure settings, including shutter speed and lens aperture.
Image Zone
 Portrait: Uses a large aperture setting to blur the background and keep the primary subject in sharp focus.
 Landscape: Employs a small aperture setting to keep both the background and foreground in focus.
 Night Scene: Uses slower shutter speeds and flash to even out nighttime exposures. The slow shutter speed allows more ambient light to be recorded in the low-light areas, while the flash freezes the subject. The Red-Eye reduction mode can be used with this exposure mode to eliminate red-eye in night portraits.
 Fast Shutter: Uses fast shutter speeds to stop action and maintain sharp focus on moving subjects.
 Slow Shutter: Uses slow shutter speeds to blur fast-moving subjects.
 Color Effects: Adjusts color mode with four choices: Vivid color, Neutral color, Sepia tone, or Black-and-White.
 Stitch-Assist: Allows you to record a series of images, either horizontally, vertically, or in a clockwise, 360-degree pattern, to be "stitched" together into one large image or panorama on a computer.
 Movie: Records up to 30 or 120 seconds of moving images with sound, at approximately 15 frames per second.

Zoom Lever: Located in front of the Shutter button, the Zoom lever extends the lens to maximum telephoto range when pushed to the right, and returns the lens to maximum wide-angle when pushed to the left. When Digital Zoom is engaged, pushing the Zoom Lever past maximum telephoto starts the Digital Zoom. In Replay mode, the Zoom lever magnifies the on-screen image when pushed to the right and returns it to normal magnification when pushed to the left.
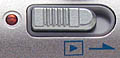
Replay Button: Beneath the Mode dial, the Replay button automatically puts the camera in Replay mode from any Shooting position. When the lens cover is closed, pushing the Replay button to the right turns on the camera in Replay mode. Pushing the button a second time turns off the Replay function.
Multicontroller: Located in the top right corner of the back panel, the Multicontroller operates similarly to the round arrow pads found on other digital cameras. The left and right arrows press down on either end in a conventional manner, while the up and down buttons operate by rotating the cylindrical-shaped control up and down. Pushing down on the center accesses the camera's Set button. We found the "set button" option a little hard to access sometimes, as the camera kept wanting to select an arrow direction instead. (We like the control and its location, but a little more work on its ergonomics would be a good idea.)

Menu Button: The top button on the right of the LCD monitor is the Menu button, which calls up the Record, Setup, My Camera, and Replay menus on the LCD display in all camera modes. A second press of the Menu button cancels the menu display.

Display Button: Just beneath the Menu button, the Display button controls the LCD monitor's display mode. In Record mode, this button turns on the image display with the first press, activates the information display with the second press, and cancels both with the third press. In Replay mode, the button cycles through the captured image information displays.

Macro / Jump Button: Left of the optical viewfinder is the Macro / Jump button, which accesses the Macro function when the camera is in Record mode. In Replay mode, it pulls up the "jump bar." When the jump bar is displayed, the right and left arrow buttons jump either nine images forward or nine images backward.
![]()
Flash / Index Display Button: Positioned in the very top left corner of the back panel, this button cycles through the Red-Eye Reduction (Auto), Auto, Red-Eye Reduction (Flash On), Flash On, and Flash Off flash modes. In playback mode, this button displays up to nine images at a time, in a thumbnail index format, on the LCD screen.

Exposure Compensation (EV) Button: The top button on the left of the LCD menu, this four-function button scrolls through four shooting adjustments: Exposure Compensation, White Balance, Flash Exposure Compensation, and Auto Exposure Bracketing (AEB). When set on Exposure Compensation (press the button one time), you can use the right and left arrow buttons to control the exposure compensation from -2 to +2 EV in one-third-step increments. The White Balance setting (press two times) lets you choose the white balance value from Automatic, Daylight, Cloudy, Tungsten, Fluorescent, Fluorescent H, Flash, and Custom. Flash Exposure Compensation (press three times) works similarly to the standard exposure compensation function, by adjusting the flash intensity from -2 to +2 EV in one-third-step increments. Finally, the AEB mode allows you to take a series of three images at different exposure variations.
![]()
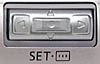
Manual Focus / Delete Button: Located beneath the EV button, the Manual Focus / Delete button activates the Manual Focus if held down in Record mode. In Replay mode, this button is used to bring up the Delete menu on the LCD monitor.
![]()
Metering / Audio Button: Just below the Manual Focus / Delete Button button, this control places the camera in Evaluative Light Metering, Center-Weighted Averaging, and Spot AE Point metering modes when the camera is in Record mode. Pressing this button in Replay mode allows you to record up to 60 seconds of sound with individual images.

Follow Imaging Resource: