The Imaging Resource
Quick Review
Konica Minolta DiMAGE X31 Digital Camera
 |
Camera QuickLook | |
|
By |
|
|
Review
Date |
9/7/2004 | |
|
User Level |
|
|
|
Product Uses |
|
|
|
Digicam Design |
|
|
|
Picture Quality |
Moderate, 3.2-megapixel CCD | |
|
Print Sizes |
4x6 to 8x10 inches | |
|
Availability |
Now | |
| Suggested Retail
Price (At introduction) |
$199 | |
|
||||||||||
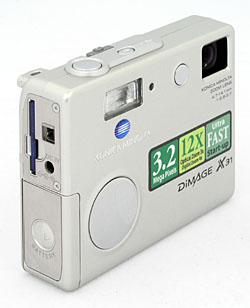
The Minolta DiMAGE X31 is one of the latest in Minolta's line of subcompact DiMAGE X models, using a unique "folded" lens design to achieve a remarkably compact form factor and very fast startup times. Minolta really turned heads when they introduced the original DiMAGE X, now nearly three years ago. A two-megapixel camera in the form of a square block of metal, just barely over three-quarters of an inch thick, the DiMAGE X was an immediate hit, as popular as a fashion statement as it was for its status as a go-anywhere, shoot-anytime digital camera. The X20 was the first affordable version of this popular camera, reducing the price by enclosing the same mechanism in a plastic body. While the metal versions of the X-series have gone as high as 5 megapixel, the X31 is the first resolution bump at the low end, now to 3.2 megapixels.
Continuing with the vertical, "folded" lens design that made Minolta's DiMAGE Xt and Xg so popular, the DiMAGE X31 features a similarly small and thin body, though it is a little bit thicker than the metal models. It has a redesigned menu system that's a bit more user-friendly for novices, brought over from the X20 and X21. (Although I personally prefer the menu layout used in the other members of the "X" line.). Measuring 3.4 x 2.6 x 0.9 inches (86 x 67 x 24 millimeters) and weighing just 6.1 ounces (174 grams) with the battery and SD memory card, the DiMAGE X31 is one of the smaller digicams on the market. With the extremely compact design and lack of significant case protrusions, there's no excuse for leaving it behind, as it can tag along in even the smallest shirt pocket, or be quickly tucked into an evening bag or pants pocket. The unique "folded" optical design means that there's no wait for a lens to telescope out of the body when the camera is powered up, resulting in very fast startup and shutdown times. The sleek design includes a built-in lens cover that conveniently slides out of the way whenever the camera is powered on, eliminating any concern over misplacing a lens cap. The 3x zoom lens and fully automatic exposure control makes the camera easy to use yet versatile enough for most common applications. The 3.2 megapixel CCD produces enough resolution images for making sharp prints as large as 8x10 inches, or slightly softer ones as large as 11x14, as well as lower resolution images better suited for email and other electronic use.
The DiMAGE X31 has a 3x, 4.7-14.1mm lens, the equivalent of a 36-108mm lens on a 35mm camera. The autofocus covers a range from 3.9 inches (10 centimeters) to infinity. There's no separate macro mode, but the 3.9-inch close-focusing combined with a telephoto lens setting produces really excellent macro performance. Depending on the lens zoom position, the maximum aperture ranges from f/2.8 to f/3.7. In addition to the optical zoom, the DiMAGE X31 offers a 1.1 to 4.0x digital zoom, in varying increments from 0.1 to 0.3x. (Although I always remind readers that digital zoom always decreases the overall image quality because it simply enlarges the central pixels of the CCD's image.) The 1.5-inch, color TFT LCD monitor has an anti-reflection coating, and features an information display. In Playback mode, images can be enlarged up to 6x, as an aid to checking critical focus and framing.
Exposure is automatically controlled at all times, with only a few exposure options available. An On/Off button on top of the camera powers the camera on, and a Mode switch lets you select between Record and Movie modes, with a Playback button for quick image review. Thanks to the all-internal lens design, there's no need to wait for the lens to extend before you can shoot, so startup times are very short (Konica Minolta claims a 1.0 second startup time, although I measured it at more like 1.6 seconds, still pretty fast.) Most exposure options are controlled through the LCD's on-screen menu system, which offers very straightforward navigation and a new interface to make it even more user-friendly than previous models. (Although I have to say that I personally preferred the standard tabbed-menu layout of the earlier user interface design.) That said, you can program the rear-panel left and right arrow keys to control either flash mode, exposure compensation, or white balance, etc, without needing to enter the menu system to do so. Shutter speeds range from 1/500 to four seconds, although the chosen value is not reported to the user. Exposure Compensation is adjustable from -2 to +2 exposure equivalents (EV) in one-third-step increments. Sensitivity is automatically set between ISO 50 and 200, depending on the current light level; it cannot be adjusted manually. White Balance is adjustable through the settings menu, with options for Auto, Daylight, Cloudy, Incandescent, and Fluorescent light sources. The DiMAGE X20's built-in flash operates in Auto, Red-Eye Reduction, Forced, Suppressed, or Night Portrait modes.
In addition to the basic exposure options, the DiMAGE X31 also offers a few extra shooting modes, accessed through the settings menu. A Portrait mode selects larger lens apertures to reduce the camera's depth of field so the subject appears in focus in front of a slightly blurred background, placing more emphasis on the subject. In Movie exposure mode, the camera captures either 320 x 240-pixel or 160 x 120-pixel resolution moving images without sound, with duration limited only by the size of the memory card. A Self-Timer mode provides a 10-second delay between the time the Shutter button is pressed and when the camera actually takes the picture, allowing you to get into your own shots. For shooting fast action subjects, the DiMAGE X31's Continuous Advance mode captures a rapid series of images when you hold down the Shutter button, much like a motor drive on a traditional 35mm camera. Provided that there's enough space remaining on the memory card, the camera can capture up to three large/fine images, or up to 30 small/economy mode ones before having to pause to write the image data to the memory card. Details like image size and shutter speed can affect the shooting interval, but it averages approximately 0.8 frames per second. A Multi Frame mode captures a series of nine thumbnail images, which are then arrayed in a single image in a 3x3 format. Unlike the X20, the X31 has no microphone, and so cannot record voice memos.
The DiMAGE X31 stores its images on an SD memory card, and an 16MB card accompanies the camera. (The camera also works with MMC cards, which used to be less expensive, but these days, SD cards are generally more available and cheaper.) The X31 has a Favorites option for saving up to 10 favorite images in the camera's internal memory, and an Image Pasting tool which lets you insert a portion of a live frame over a captured image. Connection to a host computer for image download is via USB. The DiMAGE X31 is a "storage-class" device, which means that it doesn't require any separate driver software for Windows 2000 and XP, or for Mac OS 8.6 and later; just plug it in and it appears on the computer as a hard drive. The camera utilizes two AA-type batteries for power, either alkaline or NiMH. A set of alkaline batteries comes with the camera, but I highly recommend picking up a set or rechargeable NiMH batteries and keeping a spare set freshly charged at all times. See my Battery Shootout page to see which batteries currently on the market are best, read my review of the Maha C-204F charger, to see why it's my longtime favorite. The optional AC adapter is also useful for preserving battery power when reviewing and downloading images, or when viewing images and movies on a television, via the supplied A/V cable.
Basic Features
- 3.2-megapixel CCD.
- 1.5-inch color TFT LCD monitor with anti-reflection coating.
- Glass, 3x, 4.7-14.1mm lens, equivalent to a 36-108mm lens on a 35mm camera.
- As much as 4.0x digital zoom.
- Automatic exposure control.
- Shutter speeds from 1/500 to four seconds.
- Maximum aperture f/2.8 to f/3.7, depending on lens zoom position.
- Built-in flash.
- SD/MMC memory card storage, 16MB card included.
- Images saved as JPEG files.
- Power supplied by two AA-type batteries or optional AC adapter.
- DiMAGE software and USB drivers included for both Windows and Mac platforms.
Special Features
- Movie mode without sound.
- Continuous Advance and Multi Frame shooting modes.
- Portrait mode with self-framing mirror.
- 10-second Self-Timer for delayed shutter release.
- White balance (color) adjustment with five modes.
- Five color adjustment settings.
- Special framing and side-by-side picture modes.
- DPOF (Digital Print Order Format) compatibility.
- PictBridge compatibility.
- Integrated USB and Video cable for connection to a television set.
Recommendation
The DiMAGE X31 is relatively small and compact. Its fully automatic exposure
control will suit novices and others interested in point-and-shoot operation,
although the user does have a few options for brightening or darkening the image,
or adjusting the color balance. The 3.2-megapixel CCD delivers images with enough
resolution to make sharp 8x10 prints, and lower resolution options for email
purposes. The DiMAGE X31's tiny size makes it a natural for "anywhere/anytime"
photography. With its point-and-shoot appeal and ease of use, the DiMAGE X31
could be a good choice for novice users who simply want to take good pictures
without getting too involved in the technicalities. The X31 is also a relative
bargain, with "street" prices as low as $150 as I write this in early
September, 2004. The low price does bring with it some limitations though, notably
that its autofocus system needs a fair bit of light to operate reliably. (It's
fine in typical indoor shooting situations, but has trouble outdoors after dark.)
Likewise, its images tend to get noisy in dim lighting and when the flash is
in use. If you don't care about after-dark photography though, the X31 offers
good image quality and good capabilities for daytime shooting in a compact package
at a very attractive price.
Like others in the DiMAGE X line, the DiMAGE X31 has a thin, small case, perhaps not quite as thin as it seemed when we first reviewed the X20, because other cameras have become smaller and thinner since then. Its sleek, rectangular body shape and lack of protrusions make the DiMAGE X31 one of the most portable cameras on the market. Measuring just 3.4 x 2.6 x 0.9 inches (86 x 67 x 24 millimeters), the DiMAGE X20 fits just about anywhere, including the smallest of shirt pockets. Matching its diminutive size, the DiMAGE X20 is also very light weight at just 6.1 ounces (174 grams) with the batteries and SD memory card installed. The secret to the DiMAGE X31's compact design is its internally-mounted lens, which stretches vertically up the side of the camera rather than protruding from the camera's front. An internal prism reflects light from the subject down into the lens itself, almost like a periscope. The internal lens mounting also means that there's no wait for the lens barrel to extend when you power up the camera, making startup times very quick.

The front of the camera holds the lens window, flash, self-portrait mirror, and self-timer lamp. A shutter-like, retractable lens cover protects the lens window whenever the camera is powered off, sliding quickly out of the way when the camera is turned on. A circular, slightly raised finger grip provides what could be a more substantial grip than on previous models were it not so slippery.


On the right side of the camera (as viewed from the rear) is the exposed SD memory card slot, lining up beside the DC In power and AV/Digital jack. An indicator light just below the SD card slot lights whenever the camera accesses the card, letting you know not to remove the card. Below these is the battery compartment, protected by a sliding door.
The opposite side of the camera is featureless, with no connectors or controls on it at all. This view of the camera shows the decal that illustrates the clever lens design Minolta is so justifiably proud of, as well as a small indention marked with the maximum optical plus digital zoom. Be reassured though, that the label can be easily removed after purchase, to result in a very sleek, elegant case design.

The DiMAGE X31's top panel is sleek and smooth, with only a minor protrusion from the Shutter and Power buttons. A sliding switch is just behind both buttons, and places the camera into Record or Movie modes.

The remaining camera controls are on the back panel, along with the 1.5-inch color LCD monitor. At the top right corner is the neck strap attachment eyelet. The Five-way toggle is just below left, functioning just like a joystick. You press in on the joystick to accept selections. (The left and right motions of the toggle can be programmed to control one of a handful of exposure options as well.) To the left of the Five-way is the Menu button, which calls up and dismisses the LCD menu display. Just below it is the Playback button, which places the camera in Playback mode. To the menu button's left is the speaker for status beeps and sounds.

The bottom panel of the DiMAGE X31 reveals only the plastic, threaded tripod mount.
The DiMAGE X31's user interface is very straightforward, as the camera employs automatic exposure at all times. A simplified menu screen debuted with the X20, and continues with the X31, with a 3x3 array of menu options displayed like virtual buttons. The center "button" accesses the main mode menu, which is laid out more like a traditional list menu screen. The X31 has very few external controls, meaning you must call up the LCD menu to adjust most camera settings. This is somewhat cumbersome, but you can customize the right and left directions on the Five-way toggle to control either exposure compensation, flash, drive mode, or white balance, reducing your dependence on the menu system. In both capture and playback modes, the camera's main menu is divided into three pages, delineated by subject tabs at the top of the screen. The Mode switch lets you quickly switch between Movie and Record modes, while an external button accesses Playback mode. Considering the camera's automatic exposure control and limited user options, most users should be able to become familiar with the camera's operation in half an hour or less. (Experienced users may not even need to crack the manual.)
Record-Mode Display
 In
Record mode, the LCD monitor displays the subject with a minor amount of overlaid
information, indicating flash, white balance, drive mode, the current size/quality
setting, and number of images that can be stored on the remaining memory card
space at the current size/quality. Pressing and holding the center OK button
(up and down arrow key) cancels and recalls the information display. When you
half-press the Shutter button, a small dot appears in the lower right-hand corner
of the LCD indicating whether the camera is focused (white dot) or not (red
dot), and a "shaking hand" symbol appears above the focus dot if the
shutter speed is slow enough that you'll need to be careful not to jiggle the
camera during the exposure.
In
Record mode, the LCD monitor displays the subject with a minor amount of overlaid
information, indicating flash, white balance, drive mode, the current size/quality
setting, and number of images that can be stored on the remaining memory card
space at the current size/quality. Pressing and holding the center OK button
(up and down arrow key) cancels and recalls the information display. When you
half-press the Shutter button, a small dot appears in the lower right-hand corner
of the LCD indicating whether the camera is focused (white dot) or not (red
dot), and a "shaking hand" symbol appears above the focus dot if the
shutter speed is slow enough that you'll need to be careful not to jiggle the
camera during the exposure.
Playback-Mode Display
 In
Playback mode, the default image display shows the most recently captured image,
with an information overlay showing the resolution and quality setting used,
the date and time of capture, the file number, and the sequence number of the
image among those currently stored in the memory card. With an image displayed
full-screen, pressing the zoom control in the "T" direction zooms
in on the image up to a maximum magnification of 6x. At any magnification level,
pressing the "OK" button (pressing the center of the Five-way joystick)
switches you to scrolling operation, in which the left/right buttons and the
T/W control let you scroll around the magnified image. Pressing the center of
the T/W lever again returns you to zoom operation. Zooming out all the way from
the enlarged view and then pressing the "W" side of the zoom control
once more calls up a nine-image index display. The screen shot above right shows
all the available display options in playback mode.
In
Playback mode, the default image display shows the most recently captured image,
with an information overlay showing the resolution and quality setting used,
the date and time of capture, the file number, and the sequence number of the
image among those currently stored in the memory card. With an image displayed
full-screen, pressing the zoom control in the "T" direction zooms
in on the image up to a maximum magnification of 6x. At any magnification level,
pressing the "OK" button (pressing the center of the Five-way joystick)
switches you to scrolling operation, in which the left/right buttons and the
T/W control let you scroll around the magnified image. Pressing the center of
the T/W lever again returns you to zoom operation. Zooming out all the way from
the enlarged view and then pressing the "W" side of the zoom control
once more calls up a nine-image index display. The screen shot above right shows
all the available display options in playback mode.
External Controls
![]()
Power Button: Located to the left of the Shutter button on the top panel, this button turns the camera on and off.

Shutter Button: Directly to the right of the Power button, this button sets focus and exposure when pressed halfway, and fires the shutter when fully pressed.

Mode Switch: Just behind the Power and Shutter buttons, this control puts the camera into Still capture or Movie modes.

Five-way controller: Located in the top right corner of the back panel, this new integrated controller handles all manner of navigation duties depending on the mode. In any settings menu, the Five-way is used to navigate through menu choices. In Record mode, moving left and right activates the Exposure compensation; this can be set to modify other aspects, including white balance, flash mode, and drive mode. It can also be turned off. In Playback mode, moving the toggle left and right scrolls through images. Moving the toggle up and down in Record mode zooms in and out, and zooms in and out of an image when in Playback mode. Pressing down on the Five-way acts as an "OK" button, and when zoomed in in Playback mode, it switches to Scroll mode, which allows the image to be explored by moving the toggle left, right, up, or down. In Record mode, pressing and holding this center button for a few seconds dismisses and recalls the information overlay.
![]()
Menu Button: Directly to the left of the Four-Way controller on the rear panel, this button calls up the settings menu in both Record and Playback modes.

Playback Button: Beneath the Menu button, this button activates
Playback mode (or returns to Record mode).
Camera Modes and Menus
Still-Image Record Mode: In normal Record mode, the camera captures still images. The Record menu is displayed by pressing the Menu button. The main menu screen features nine virtual buttons to access the most commonly-used exposure options, with a central button to access the main mode menu:
- Initial Menu Screen (items listed from left to right, starting from
the top)
 Color:
Adjusts the camera's color mode, though soft focus is also included here.
Options are Color, Black and White, Sepia, Posterization, and Soft Focus.
Color:
Adjusts the camera's color mode, though soft focus is also included here.
Options are Color, Black and White, Sepia, Posterization, and Soft Focus.
- Portrait: Turns the Portrait preset mode on or off.
- Special FX: Selects among four options, three of which impose a graphical frame onscreen. The first is an oval, the second mimics a 35mm filmstrip, the third a chalk border. The fourth option is called Side-by-side. It puts the camera into a special mode that allows capture of two images side-by-side. The subsequent image appears as one file.
- Flash Mode: Sets the flash to operate in Auto, Red-Eye Reduction, Fill Flash, Cancel, or Night Portrait (slow-sync setting) modes.
- Menu: Displays the main mode menu, described below.
- Drive Mode: Sets drive mode to Single, Self-Timer, Continuous, or Multi Frame.
- White Balance: Adjusts the overall color balance of the scene. Options include Auto, Daylight, Cloudy, Tungsten, and Fluorescent.
- Exposure Compensation: Increases or decreases the overall exposure from -2 to +2 EV in one-third-step increments.
- Image Size/Compression: Adjusts the image resolution to 2,048 x 1,536 / Fine; 2,048 x 1536 / Standard; 1,600 x 1,200 / Standard; 1,280 x 960 / Standard; or 640 x 480 / Standard.
- Record Menu 1
 Control
Function: This menu item lets you change the function controlled
by the left/right keys on the camera's rear panel. Options include Flash
Mode, Exposure Compensation (default setting), Drive Mode, White Balance,
and Off .
Control
Function: This menu item lets you change the function controlled
by the left/right keys on the camera's rear panel. Options include Flash
Mode, Exposure Compensation (default setting), Drive Mode, White Balance,
and Off .
- Auto Reset: If enabled, resets most of the camera's settings to their default values whenever the camera is turned off.
- Date Imprint: Enables the imprinting of the current date or date
and time in small white characters, in the lower right-hand corner of
each image. Off by default, options include YYYY/MM/DD, or MM/DD/hr:min.
- Record Menu 2
 Digital
Zoom: Enables or disables the digital zoom function.
Digital
Zoom: Enables or disables the digital zoom function.
- File # Memory: If set to On, the camera continues naming files sequentially from memory card to memory card. If Off, the camera resets file numbering with each new card.
- Folder Name:
You can have the camera name the folders it stores its images in on the
memory card using either the camera's standard scheme, or by Date. (The
latter being a handy way to keep track of photos you've shot over a period
of time.)
Movie Mode: This mode allows you to record movies without sound. Pressing the menu button displays the following options. (Sorry, no screen shot.)
- Color: Adjusts the camera's color mode. Options are Color, Black and White, Sepia, and Posterization.
- Image Size: Selects the size of images recorded in movie files. Options are 320 x 240 (the default) or 160 x 120.
- White Balance: Adjusts the overall color balance of the scene. Options include Auto, Daylight, Cloudy, Tungsten, and Fluorescent.
- Exposure Compensation: Increases or decreases the exposure from -2 to +2 EV in one-third-step increments.
- Setup: Accesses the camera's Setup menu, described further on.
Playback Mode: This mode allows you to review captured images on the memory card, erase them, protect them, set them up for printing, etc. Pressing the Menu button displays the following options:
- Initial Menu Screen
 Slide
Show: Initiates a "slide show" of images stored on the X20's
memory card.
Slide
Show: Initiates a "slide show" of images stored on the X20's
memory card.
- Play Favorites: Allows playback of only the photos marked as Favorites.
- Lock: Write-protects the displayed image, preventing it from being manipulated or erased (except via card formatting). An option also exists to Unlock images.
- Rotate: Rotates the image 90 degrees clockwise or counter-clockwise.
- Menu: Pulls up the main Playback menu, described below.
- Delete: Erases the current frame from the memory card.
- DPOF: Allows you to select images for direct printing from the camera.
- Add to Favorites: Copies the displayed image into the Favorites folder.
- Email Copy: Makes a smaller copy of an image for convenient emailing.
- Playback 1
 Delete:
Erases the current frame, all frames, or marked frames from the memory
card.
Delete:
Erases the current frame, all frames, or marked frames from the memory
card.
- Lock: Write-protects specific images or all images, preventing them from being manipulated or erased (except via card formatting). An option also exists to Unlock images.
- DPOF Set: Sets images for printing on an output device supporting the Digital Print Order Format (DPOF) standard. Options are to mark the current frame, all frames, marked frames, or to cancel the print orders for all images.
- Date Print: Sets camera to print date on images as they are captured.
- Index Print: Sets up a DPOF order for an index print showing all images on the memory card.
Setup Mode: This mode lets you adjust various camera options and settings. Pressing the Menu button displays the following options:
- Setup 1
 LCD
Brightness: Allows user to adjust LCD brightness levels.
LCD
Brightness: Allows user to adjust LCD brightness levels.
- Format: Formats the SD card, erasing all files, including protected ones.
- Reset Default: Resets the camera settings to their defaults.
- Language: Changes the menu language to English, Japanese, German, French, Chinese, or Spanish.
- Setup 2
 Audio
Signal: Optionally change or disable the beep sound that occurs whenever
a button is pressed.
Audio
Signal: Optionally change or disable the beep sound that occurs whenever
a button is pressed.
- Focus Signal: You can select your choice of two standard focus sounds, or turn the focus sound off.
- Shutter Signal: Turns the shutter signal on or off.
- Power Off: Sets the camera to automatically shut off after 1, 3, 5, 10, or 30 minutes of inactivity.
- Setup 3
 Date/Time
Set: Sets the camera's date and time.
Date/Time
Set: Sets the camera's date and time.
- Date Format: Choose between three different date formats used for monitor displays and date imprinting. Options are YYYY/MM/DD, MM/DD/YYYY, and DD/MM/YYYY.
- Video Output: Choose between NTSC or PAL video timing for the video output.
- Transfer Mode: Through its USB interface, the DiMAGE X31 can appear as a drive on a computer, or it can be attached to a PictBridge-enabled printer.
In the Box
Packaged with the DiMAGE X31 are the following items:
- Hand strap.
- USB cable.
- 16MB SD memory card.
- Two AA-type alkaline batteries.
- DiMAGE software CD.
- Operating manual and registration card.
- Large capacity SD memory card.
- Set of rechargeable NiMH batteries and charger.
- AC adapter.
- Small camera case.
Recommended Software: Rescue your Photos!
Just as important as an extra memory card is a tool to rescue your images when
one of your cards fails at some point in the future. I get a lot of email from
readers who've lost photos due to a corrupted memory card. Memory card corruption
can happen with any card type and any camera manufacturer, nobody's immune.
A surprising number of "lost" images can be recovered with an inexpensive,
easy to use piece of software though. Given the amount of email I've gotten
on the topic, I now include this paragraph in all my digicam reviews. The program
you need is called PhotoRescue, by DataRescue SA. Read our review
of it if you'd like, but download the program now, so you'll have it.
It doesn't cost a penny until you need it, and even then it's only $29, with
a money back guarantee. So download PhotoRescue
for Windows or PhotoRescue
for Mac while you're thinking of it. (While you're at it, download the
PDF manual and quickstart guide as well.) Stash the file in a safe place and
it'll be there when you need it. Trust me, needing this is not a matter of if,
but when... PhotoRescue is about the best and easiest tool for recovering
digital photos I've seen. (Disclosure: IR gets a small commission from sales
of the product, but I'd highly recommend the program even if we didn't.)
OK, now back to our regularly scheduled review...
About Batteries
(Well, not quite "back to our regularly scheduled review..) - I've gotten
so many emails about power issues for digicams, that I'm now inserting a standard
notice in my reviews of all AA-powered cameras: Don't even *think* about
using alkaline AA batteries in a digicam! Despite their being packed in
the box with many cameras, they simply don't have the juice to handle typical
digicam demands. Spend the $35-40 or so it takes to get a set (or two) of high-capacity
NiMH rechargeable batteries and a good charger! The few dollars up front will
save you literally hundreds of dollars in the long run, not to mention the hassle
of wimpy batteries running out in the middle of the action. Buy two sets of
batteries too, so one can always be in the charger, ready to go, and so have
two sets available for longer excursions. Check out my Battery
Shootout page for the latest in actual, measured performance of various
AA batteries. Read. - Read my review
of the Maha C-204F charger, to learn why it's my longtime favorite.
See the specifications sheet here.
Information on shooting speed, battery life, etc. can be found here.
Sample Pictures
See the full set of my sample pictures and detailed analysis here. The thumbnails below show a subset of my standard test images. Click on a thumbnail to see the full-size photo.
For a more pictorial set of photos, see our Photo Gallery for the X31. (There's only a few photos there as I write this, we should be able to get some more posted in another week or so, once the local weather clears.)

|

|

|
| |
|
|
|
|
|
|
| |
|
|
|
|
|
|
| |
|
|


In keeping with my standard test policy, the comments given here summarize only my key findings. For a full commentary on each of the test images, see the Dimage X31's "pictures" page.
As with all Imaging Resource product tests, I encourage you to let your own eyes be the judge of how well the camera performed. Explore the images on the pictures page, to see how the X31's images compare to other cameras you may be considering.
Not sure which camera to buy? Let your eyes be the ultimate judge! Visit our Comparometer(tm) to compare images from the Dimage X31 with those from other cameras you may be considering. The proof is in the pictures, so let your own eyes decide which you like best!
- Color: Good color, slight oversaturation. Good handling of incandescent lighting, but not when flash is used. Under daylight shooting conditions, the X31 produced good to very good color, and did better than average with incandescent lighting, using its Incandescent white balance setting. Like many consumer cameras, the X31's color tends to be a little oversaturated, but not to an excessive degree. The biggest color problem I had with the X31 was that its flash exposures were drastically affected by the strong incandescent room lighting in the Indoor Portrait test.
- Exposure: Generally accurate exposure, a slight tendency to underexpose, and fairly high contrast. The X31 had a slight tendency to underexpose its shot, both under normal studio lighting and outdoors, but the amount of underexposure was pretty slight. Like most cameras I test, it underexposed the very high-key outdoor portrait shot at the default setting, but an average amount of positive exposure compensation brightened the exposure. However, contrast was frequently quite high, and midtones dark. Indoors, the camera required an average amount of positive exposure compensation, though flash exposures were pretty dim. The X31 had no trouble distinguishing the subtle pastel tones on the Q60 target of the Davebox, despite the high contrast, but shadow detail was rather limited.
- Resolution/Sharpness: Slightly below average resolution for a 3-megapixel camera. The X31 performed a little below average for its 3.2-megapixel class on the "laboratory" resolution test chart. It started showing artifacts in the test patterns at resolutions as low as 500 lines per picture height, in both horizontal and vertical directions. I found "strong detail" out to at least 1,000 lines, however. "Extinction" of the target patterns occurred around 1,350 lines.
- Image Noise: Average image noise in daylight, but noisy shadows and high noise in dim lighting and with the flash. With well-lit subjects, the X31's images show image noise in the good-to-average range. The camera's limited dynamic range tends to produce more noise in shadow areas though, and noise increases significantly when the light drops very much at all. Particularly when the flash is used, the camera's automatic boosting of the ISO (to improve flash range) leads to rather noisy images.
- Closeups: Really excellent macro capability. The Macro category is where the X31 really stood out, capturing a minimum area of only 0.84 x 0.63 inches (21 x 16 millimeters). Resolution was very high, showing a lot of fine detail in the dollar bill. However, the corners were quite soft, the softness extending a fair amount into the frame. (Soft corners are unfortunately a fairly common malady in digicam macro modes, caused by curvature of field in the lens optics.) The X31's flash almost throttled down somewhat for the macro area, but was still too bright. -- Plan on using external lighting for your closest shots.
- Night Shots: Not really usable for low light shooting. Good brightness, but autofocus can't handle low light levels at all. The X31 produced bright images as low as 1/8 foot-candle (1.3 lux), but its autofocus system couldn't focus properly even at the 1 foot-candle (11 lux) level that's the brightest I shoot at for this test. At all the low-light levels from 1 foot-candle on down, the images were too blurry to be usable. That's a shame, as the X31's exposure system is easily up to the challenge.
- Viewfinder Accuracy: A very accurate LCD monitor. The X31's LCD monitor proved very accurate, showing approximately 97 percent accuracy at wide angle, and about 98 percent at telephoto. Given that I like LCD monitors to be as close to 100 percent accuracy as possible, the X31's LCD monitor performed well here.
- Optical Distortion: Very high barrel distortion, though low pincushion. Low (good) chromatic aberration. Optical distortion on the X31 was a good bit higher than average at the wide-angle end, where I measured approximately 1.2 percent barrel distortion. The telephoto end fared much better, as I measured approximately 0.2 percent pincushion distortion. Chromatic aberration was fairly low, showing about four or five pixels of faint coloration on either side of the target lines. (This distortion is visible as a very slight colored fringe around the objects at the edges of the field of view on the resolution target.) The corners of the resolution-chart image were fairly sharp, but I did see a fair bit of softness in the corners of images of more distant subjects.
- Shutter Lag and Cycle Time: Good shutter response and startup times, but sluggish shot to shot cycle times. Like many subcompact digicams, the X31 wouldn't be your first choice for sports or other fast-paced action. That said though, its shutter lag is actually quite decent, actually faster than the majority of cameras on the market today. Startup time is very good as well, thanks to its internal zoom lens, which means you don't have to wait for the lens to telescope out when you turn it on, before you can shoot. The most noticeable limitation when dealing with rapid action is its sluggish 4.3 second time between shots in single-shot mode. Overall, not bad for a subcompact digicam, and better than most in terms of shutter lag, but probably not a first choice for sports and other action.
- Battery Life: Good battery life for a camera powered by two AA cells. Still, buy a couple of sets of strong batteries and a good charger though. With a worst-case run time of 98 minutes using "standard" 1600 mAh batteries (expect just over two hours with the best modern NiMH cells), the X31's battery life is pretty good, particularly given that it runs on only two AA cells. I do strongly recommend though, that you purchase at least two sets (a total of four batteries) of high-capacity NiMH rechargeable batteries though, as well as a good-quality charger. Check out my Battery Shootout page for the latest in actual, measured performance of various AA batteries. - Read my review of the Maha C-204F charger, to learn why it's my longtime favorite.
| Free Photo Lessons | |
|


Follow Imaging Resource: