The Imaging Resource
Quick Review
Konica Minolta DiMAGE Z2 Digital Camera
 |
Camera QuickLook | |
|
Review Date |
|
|
|
User Level |
|
|
|
Product Uses |
|
|
|
Digicam Design |
|
|
|
Picture Quality |
|
|
|
Print Sizes |
4x6, 5x7, 8x10 inches | |
|
Availability |
Now | |
|
Suggested Retail Price (At time of introduction) |
$449 | |
Introduction
|
||||||||||
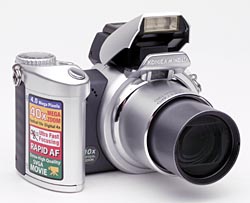
Looking much like a shrunk-down version of a 35mm "big lens" SLR, Konica Minolta's DiMAGE Z2 offers the benefit of full 10x optical zoom and full manual exposure control in a fairly compact, very user-friendly package. Measuring a mere 4.3 x 3.05 x 3.15 inches (110 x 78 x 80 millimeters) and weighing 14.9 ounces (423 grams) with the batteries and SD memory card inserted, the DiMAGE Z2 is quite compact for such a long-zoom camera, but still a bit too chunky for a shirt pocket. It should fit into larger coat pockets, purses, and backpacks without trouble though. A neck/shoulder strap comes with the Z2, for more secure portability. Covered in silver and charcoal-gray plastic body panels, the Z2's body is built around the large lens barrel. A substantial handgrip provides a solid hold, but the rest of the camera is fairly compact. A plastic lens cap protects the telescoping lens, but tethers to the camera body to prevent it from being accidentally lost. The Z2 features a 4.0-megapixel CCD, which produces high resolution images for making sharp prints as large as 8x10 inches, as well as lower resolution images better suited for email distribution. With its range of exposure options, 10x optical zoom, and high resolution CCD, the Z2 is a versatile and capable performer.
The DiMAGE Z2 is equipped with an impressive 10x, 6.3-63mm lens, the equivalent of a 38-380mm lens on a 35mm camera. This represents a range from a moderate wide-angle to a very substantial telephoto. This lens replaces the 5.8-58mm lens used on the Z1 - the effective focal lengths being identical due to the Z2's slightly larger sensor size - and is not quite as bright at telephoto as that lens was. Maximum aperture ranges from f/2.8 to f/3.5, depending on the lens zoom setting. Focus is specified as ranging from 1.6 feet (0.5 meters) to infinity in normal mode, with a macro setting ranging from 3.9 to 47.2 inches (10 to 120 centimeters). There's also a Super Macro setting, which gets as close as 1.6 inches (4 centimeters) for really impressive closeups. In practice, I found that the camera would focus down to close to the "Macro" range even with the Macro option disabled, at least at the wide angle end of the zoom range. At the telephoto end of the lens' range, minimum focusing distance seemed to be about four feet, regardless of the Macro setting. Though the DiMAGE Z2 normally judges focus from a large area in the center of the frame, a Spot AF mode is also available, which determines focus from one of three possible spot-AF hotspots, arranged across the middle of the frame. To activate Spot-AF mode, press and hold down the center button of the arrow pad in any non-movie capture mode. Once Spot-AF mode is selected, you can use the left and right buttons of the arrow pad to select the specific spot area you want to use.
The Z2 offers a manual focus setting, as well as a Full-time AF mode which continuously adjusts focus whether the shutter button is pressed or not. (This may be helpful in tracking moving subjects, but doesn't reduce shutter lag with stationary subjects.) In addition to the optical zoom, the DiMAGE Z2 offers as much as 4x digital zoom. (I always remind readers though, that digital zoom inevitably decreases the overall image quality because it simply enlarges the central pixels of the CCD's image.) For composing images, the DiMAGE Z2 offers a 1.5-inch LCD monitor, as well as a smaller, electronic optical viewfinder LCD display that actually uses the same LCD display, flipped up to face the inside of the camera instead of the rear panel. The Mode switch on the camera's rear panel determines which display is active, and the full information and image displays are available on both (including the LCD menu). The LCD is quite sharp, and during manual focusing, the central portion of the display is magnified by about 3x, as a further aid to determining optimum focus.
As noted, the Z2 is quite unusual, in that it actually uses the same LCD screen for both eyelevel and rear-panel displays. When the eyelevel viewfinder is enabled, an internal mirror/shutter mechanism simply blocks the rear-panel viewing port and directs the LCD's image to the eyepiece. I'm not sure of the rationale behind this, but it's possible that the mirror/shutter arrangement costs less than would a second, tiny LCD screen to handle the eyepiece independently. In any event, the approach seems to work well enough.
For eyeglass wearers, the Z2's eyelevel viewfinder is a bit of a mixed bag. It has a dioptric adjustment with a fairly broad adjustment, at the "nearsighted" end of its range accommodating even my own 20/180 vision. On the downside though, the eyepiece has a fairly low eyepoint, making it hard to use while wearing glasses. (I could see the entire frame with my own glasses on, but had to press the eyeglass lens right up against the eyepiece, something I'd prefer not to do, for fear of scratches.)
When it comes to exposure, the DiMAGE Z2 offers a wide range of options, controlled by the Exposure Mode dial on top of the camera. Main exposure modes include Auto, Program AE, Aperture Priority, Shutter Priority, and Manual modes, with five preset Scene modes and a Movie mode available as well. In Auto mode, the camera handles everything, leaving only the zoom, drive mode, etc., for the user to worry about. Program AE mode keeps the camera in charge of aperture and shutter speed, but allows the user to adjust all other exposure settings. Aperture and Shutter Priority modes provide partial manual control, letting the user adjust one variable while the camera selects the other. Finally, in Manual mode, the user has complete control over the exposure. Aperture settings range from f/2.8 to f/8, with the actual maximum and minimum values depending on the lens zoom position. Shutter speeds range from 1/1,000 to 15 seconds in Manual and Shutter Priority modes, with a true time-exposure setting permitting exposures as long as 30 seconds. (Maximum exposure time in Program AE and Aperture Priority modes is four seconds, and two seconds in Auto and Digital Subject Program modes.) The true time-exposure option on the Z2 is a very unusual and welcome feature on a digital camera. Most digicams with long-exposure options have a "Bulb" mode, in which the shutter is kept open as long as you hold down the shutter button. The disadvantage of this approach is that the need to keep your finger on the shutter button often causes camera shake that can blur the final images. With a true time-exposure mode though, you press the shutter button once to open the shutter, and then again to close it. With the camera mounted on a tripod, the momentary minor jiggling as you press the shutter button to open the shutter dies away quickly, allowing very sharp images with very long exposures. Kudos to Konica Minolta for implementing this feature, one that I wish other camera makers would adopt. For longer exposures, the Z2 features a Noise Reduction setting (optionally activated through the Setup menu), which uses dark-frame subtraction to reduce image noise resulting from long exposure times. In addition to the various automatic, semi-automatic, and manual conventional exposure modes, the five Digital Subject Program modes include Night Portrait, Sunset, Landscape, Sports Action, and Portrait modes, for shooting in common, yet sometimes challenging, situations. Night Portrait allows use of the flash in conjunction with longer exposure times for more even illumination, Sunset mode sets white balance to "daylight" and biases the exposure to produce saturated colors in sky shots, Landscape mode uses a small aperture to produce greater depth of field, Sports Action mode biases the exposure system toward faster shutter speeds, and Portrait mode uses a larger aperture to decrease depth of field, slightly blurring the background behind the primary subject.
By default, the Z2 employs a Multi-Segment metering system, which reads multiple areas throughout the frame to determine the exposure. Through the Record menu, however, you can opt for Spot or Center-Weighted metering modes. The right and left arrow keys on the camera's back panel control the Exposure Compensation, adjusting it from -2 to +2 exposure equivalents (EV) in one-third step increments. Light sensitivity is adjustable to ISO values of 50, 100, 200, or 400, with an Auto setting as well. White Balance is also adjustable through the settings menu, with options for Auto, Daylight, Cloudy, Incandescent, Fluorescent, and Flash light sources, as well as a Custom setting for manually adjusting the color balance with a white card. The Record menu also offers Sharpness and Contrast adjustments, as well as a Color setting with Natural, Vivid, Black and White and Sepia color options. The DiMAGE Z2 features a built-in, pop-up flash, which operates in Auto, Red-Eye Reduction, Fill-Flash, Suppressed, or Slow-Sync modes. An adjustment in the Record menu lets you control the intensity of the flash, from -2 to +2 EV. You can also attach a more powerful flash unit, via the external flash hot shoe on the camera's top panel. The flash connection is proprietary to Konica Minolta accessories, including the Maxxum Flash 2500, 3600HS, and 5600HS units, but an adapter unit is available (albeit nearly impossible to find at retail) that provides a standard PC-style sync connector.
In Movie exposure mode, the camera captures 800 x 600, 640 x 480, 320 x 240, or 160 x 120-pixel resolution moving images with sound - about the highest movie resolution of any digital still camera, although file sizes will be correspondingly larger than at lower resolutions. The recording time per segment varies as a function of the image size and frame rate you've chosen, as well as with the speed of the memory card you're using. With garden-variety SD cards, maximum recording time is about 30 seconds at 800 x 600, 15 frames/second, and about 50 seconds at 640 x 480, 30 frames per second, and limited only by available memory card space at all lesser combinations of image size and frame rate. With a fast memory card though (I tested with a Lexar 32x SD card), movie length is limited only by card capacity, regardless of the resolution and frame rate selected. - Very impressive. You have an option for Standard or Night movie modes, and can set the frame rate to either 15 or 30 frames per second (with the exception of the 800 x 600 pixel resolution, which is limited to 15 frames per second only). In movie mode, you can zoom digitally at the 320x240 and 160x120 image sizes (but not at the 640x480 size). Unusually, while the lens can't normally be zoomed while recording to prevent noise from the lens motor from affecting the sound track, you can override this with a menu option. I'd like to see more manufacturers take this approach - some users may find that the noise captured by the microphone is less objectionable than being limited to digital zoom, particularly in loud environments where the lens noise may not be a factor. The camera's Self-Timer mode provides a 10-second delay between the time the Shutter button is pressed and the time that the camera actually takes the picture, allowing you to get into your own shots.
For shooting fast action subjects, the DiMAGE Z2's Standard and Ultra High Speed (UHS) Continuous Advance modes capture a rapid series of images while you hold down the Shutter button, much like a motor drive on a traditional 35mm camera. UHS mode captures up to 15 frames at the 1,280 x 960 resolution at a rate of 10 frames/second, while Standard mode captures frames at about 1.75 frames per second. (Konica Minolta claims 2.5 frames/second, but my consistently came in at 1.75 fps.) The actual frame rate and maximum number of images in a series will depend on the resolution setting, subject matter, and the amount of available memory space. Besides the normal Continuous Advance modes, the Z2 offers a feature called "Progressive Capture," which begins continuously acquiring images when you press and hold down the shutter button, but only saving the last few captured when you finally release the shutter button. At maximum resolution, standard Progressive Capture will save the last five images captured, while UHS Progressive Capture will save up to the last twelve 1280x960 images captured. Progressive capture is very helpful for capturing fast action, when you don't know exactly when the critical moment will arrive. (Great for those like myself whose reflexes are slowing as we age!) The Z2's action-capture capabilities are further enhanced by its shorter than average shutter lag times, ranging from 0.59 seconds at wide angle to 0.82 seconds at telephoto. (And its prefocus shutter delay is a blazing 0.09 seconds.) Also available is an Auto Exposure Bracketing mode, which captures three consecutive frames at different exposure settings, varying by 0.3, 0.5, or 1.0 EV steps.
The DiMAGE Z2 stores its images on SD memory cards, and a 16MB card accompanies the camera. (The camera also works with MMC cards, which used to be slightly less expensive, but which have now for the most part disappeared from the market.) I highly recommend picking up a larger capacity card right away, so you don't miss any important shots. (These days, a 128 MB card represents a good tradeoff between capacity and cost.) Connection to a host computer for image download is via USB. The DiMAGE Z2 is a "storage-class" device, which means that it doesn't require any separate driver software for Windows 2000 and XP, or for Mac OS 8.6 and later. The camera utilizes four AA-type batteries for power, and a set of single-use alkaline batteries accompanies the camera. While the Z2 offers better than average battery life, I as always recommend picking up at least two sets of high-capacity rechargeable NiMH batteries and a good charger, and keeping a set freshly charged at all times. Click here to read my "battery shootout" page to see which batteries currently on the market are best, or here for my review of the Maha C-204F charger, my longtime favorite. The optional AC adapter is also useful for preserving battery power when reviewing and downloading images, or when viewing images and movies on a television, via the supplied A/V cable.
Many of our readers will be familiar with the earlier DiMAGE Z1 model, so I put together the following major feature comparison between the DiMAGE Z1 and the DiMAGE Z2.
| Feature | DiMAGE Z2 | DiMAGE Z1 |
| Branding | Konica Minolta | Minolta |
| Sensor Size | 1/2.5" | 1/2.7" |
| Sensor Resolution (total pixels) | 4.2 megapixel | 3.3 megapixel |
| Sensor Resolution (effective) | 4.0 megapixel | 3.2 megapixel |
| Maximum Image Size | 2,272 x 1,704 pixels | 2,048 x 1,536 pixels |
| Maximum Movie Size | 800 x 600 pixels | 640 x 480 pixels |
| Movie Clip Length | Limited only by card space, given a fast enough memory card (A 32x Lexar card worked fine for me) | 30 seconds at 640 x 480, 30fps (other resolutions vary) |
| Movie Optical Zoom | Can be enabled through menu | No |
| Movie Digital Zoom | Available at all resolutions | Available at 320 x 240 pixels or lower only |
| Movie Audio | On at all times | Can be disabled via menu |
| Movie Editing | Yes, can crop start and end of movie, and save as new file | No |
| Focal Length | 6.3 - 63mm 38-380mm effective |
5.8 - 58mm 38-380mm effective |
| Maximum Aperture | f/2.8 (wide) f/3.7 (tele) |
f/2.8 (wide) f/3.5 (tele) |
| Lens Branding | APO GT Lens | None |
| Focus Modes | Single, Continuous, Manual | Auto, Manual |
| Focus Lock Signal | Can be changed to one of two sounds or disabled | Fixed |
| DPOF Date Printing | Yes | No |
| PictBridge support | Yes | No |
| Other | Grey panel with silver Konica Minolta wording on front of flash housing. Konica Minolta logo on top of pop-up flash. DC In port has silk-screened graphic showing connector polarity next to it. | Silver panel with Minolta logo on front of flash housing. DC In port has silk-screened "DC IN" text next to it. |
- 4.0-megapixel CCD.
- Electronic optical viewfinder (EVF).
- 1.5-inch color TFT LCD monitor with anti-reflection coating.
- 10x, 6.3-63mm lens, equivalent to a 38-380mm lens on a 35mm camera.
- 4x digital zoom.
- Automatic, Program AE, Aperture Priority, Shutter Priority, and Manual exposure modes, plus five preset Digital Subject Program modes.
- Shutter speeds from 1/1,000 to 15 seconds, with a "Time" setting for exposures as long as 30 seconds.
- Maximum aperture f/2.8 to f/3.7, depending on lens zoom position.
- Built-in flash with five modes.
- External flash hot shoe for Konica Minolta accessory flash units.
- SD/MMC memory card storage, 16MB card included.
- Images saved as JPEG files.
- Power supplied by four AA-type batteries or optional AC adapter.
- DiMAGE Viewer, and ArcSoft VideoImpression software, and USB drivers included for both Windows and Mac platforms.
Special Features
- High resolution Movie and Night Movie modes with sound recording. (800x600 movie mode is very unusual)
- Optical Zoom can optionally be used in Movie mode (but is clearly audible in recorded movies)
- Standard and Ultra High Speed Continuous Advance shooting modes.
- Progressive Capture mode for capturing images before you release the shutter.
- Auto Exposure Bracketing.
- 10-second Self-Timer for delayed shutter release.
- Voice Memo mode for recording captions.
- White balance (color) adjustment with seven modes, including a manual setting.
- Adjustable ISO with four sensitivity settings and an Auto mode.
- Noise reduction setting for long exposures.
- Multi-Segment, Center-Weighted, and Spot metering options.
- Spot and Full-time AF modes.
- Color, Sharpness, and Contrast adjustments.
- USB Direct-Print and PictBridge capability.
- A/V cable for connection to a television set.
- USB cable for connection to a computer (driver software included).
Recommendation
With its 10x optical zoom lens, full range of exposure
control, fairly compact size, and excellent movie- and continuous-capture modes,
the DiMAGE Z2 is a full-featured yet surprisingly affordable long-zoom digicam.
Though the camera features full manual exposure control, its simplified user
interface and available automatic and "scene" modes make it very approachable
for less-experienced novices who want to gradually learn more about digital
photography. A 4.0-megapixel CCD delivers good quality images, with enough resolution
to make sharp 8x10 prints, with lower resolution options available for email
and other electronic uses. The Z2 is compact enough for travel, especially for
a long-zoom model, and has enough exposure features to handle just about any
situation. The Z2 would make a great choice for anyone looking for a long-zoom
digicam with ample features, but at an affordable price.
Konica Minolta's DiMAGE brand name carries with it a tradition of quality and technological innovation, covering an array of digital cameras designed to suit a wide range of experience levels and price points. The newest addition to the pack is Konica Minolta's DiMAGE Z2. The Z2 offers a strong feature set, pared down only moderately from those of Konica Minolta's higher-end models like the new A2, but still offering a full range of exposure control, and a long-ratio 10x zoom lens, with an easy to learn user interface, all at an affordable price. Compared to the DiMAGE Z1, changes in the Z2 include a higher resolution and slightly larger sensor, a new APO GT lens (the same effective focal lengths, but slightly smaller maximum aperture at telephoto), PictBridge direct printing support, and Konica Minolta branding, in line with the recent merger of Konica Corp. and Minolta Co. Ltd. Shaped like a miniaturized 35mm SLR, the Z2's body is essentially identical to that of its predecessor. Made up mostly of the lens, and a tall, stylized hand grip, the two-toned, plastic body is sleek and sophisticated, and sports only a few external controls. Measuring 4.3 x 3.05 x 3.15 inches (110 x 78 x 80 millimeters), the DiMAGE Z2 is a little too bulky for shirt pockets, but should slip into larger coat pockets and purses without trouble. The camera's plastic body helps keep the weight down, despite the large 10x zoom lens, weighing in at 14.9 ounces (423 grams) with the batteries and SD memory card. A neck strap accompanies the camera for easy toting, but I'd recommend picking up a small camera case to protect the matte-silver finish of the plastic body panels when traveling.
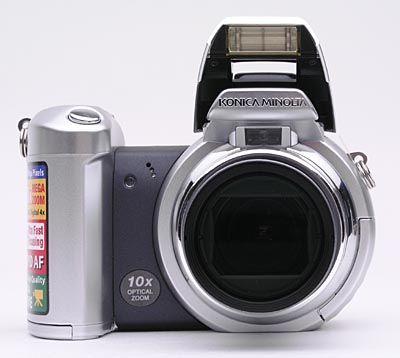
The front of the Z2 is dominated by the large lens and handgrip. When powered on, the lens extends just under an inch from the camera front. A plastic lens cap clamps onto the lens for protection, and tethers to the camera body with a small strap. A set of filter threads around the inside lip of the lens barrel on the body of the camera accommodate Konica Minolta's accessory lenses via an accessory adapter. Konica Minolta's optional accessory lenses extend both the camera's wide angle and telephoto capabilities. Also on the front panel are the flash sensor (just below the pop-up flash compartment), microphone, and Self-Timer LED lamp. A substantial handgrip provides a firm hold on the camera, with plenty of room for your fingers to curve around the grip. While it offers plenty to grab onto, the handgrip is also small enough to be comfortable for users with smaller hands.
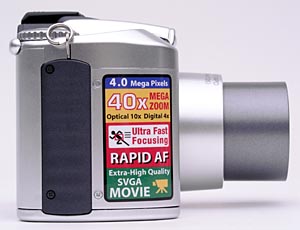
The right side of the Z2 (as viewed from the rear) is blank apart from a black decorative plastic strip and one of the neck strap attachment eyelets.
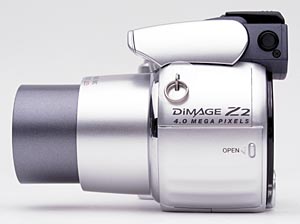
The opposite side of the camera is curved to echo the shape of the lens barrel, and features the second neck strap eyelet, just above the memory card compartment. A sliding door protects the memory compartment, sliding forward to reveal the SD memory card slot. The camera's USB connector terminal is also located inside this compartment. Also visible on this side of the camera is the diopter adjustment dial for the viewfinder eyepiece.
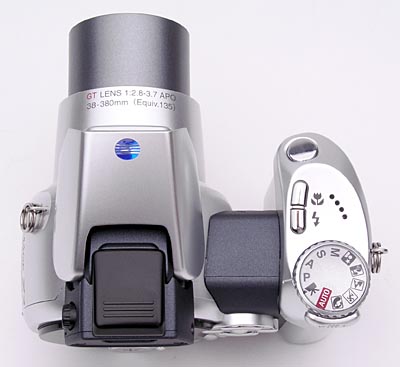
On the DiMAGE Z2's top panel is the pop-up flash compartment and external flash hot shoe, as well as the Shutter, Macro, and Flash buttons. The pop-up flash does not have a release mechanism. Instead, you simply pull up the flash from both sides (which automatically places the flash into Auto mode). A four-hole speaker grille and the camera's Exposure Mode dial are also located on top of the camera.

The remaining camera controls are on the rear panel, along with the electronic optical viewfinder (EVF) eyepiece and 1.5-inch color LCD monitor. Curving around the right side of the LCD monitor are the Four-Way Arrow pad and Menu, Quick View/Erase, and Information buttons. The Power button and Mode dial are just beneath the LCD monitor. Tucked in the lower right corner of the rear panel is the camera's DC In connector jack. At the very top of the right side is the Zoom lever.
I mentioned the unusual design of the Z2's EVF earlier, that uses the same LCD screen as for the rear-panel display. Despite its odd design, the scheme seems to work pretty well, as the EVF is bright and has pretty good resolution. My one complaint about it is that the eyepiece optics have a rather low eyepoint, which means that eyeglass wearers will find themselves pressing the viewfinder eyepiece tightly against the lenses of their glasses, in order to see the full frame. The EVF does have a dioptric adjustment knob with a fairly wide range of adjustment though, so you may be able to use the EVF without your eyeglasses on. (I'm quite nearsighted, at 20/180 or so, and the dioptric control could almost completely compensate for my uncorrected vision.)
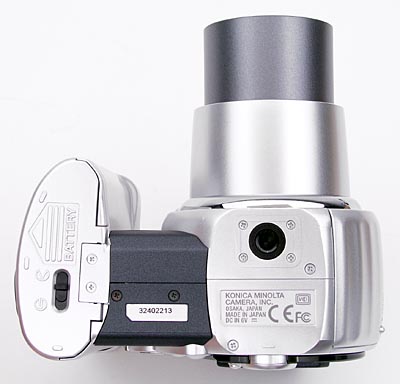
The Z2's bottom panel is fairly flat, with a plastic threaded tripod mount under the lens (a good position for people interested in panoramic photography), and the battery compartment at the base of the handgrip. The tripod mount is just far enough away from the battery compartment to allow quick battery changes while working on a tripod. I always appreciate this, given the amount of studio work I do, and am glad that the battery and memory card slots are both accessible while working on a tripod. A sliding latch locks and unlocks the battery compartment door, to prevent it from accidentally popping open while shooting.
With only a handful of external camera controls and a well-organized LCD menu system, the DiMAGE Z2's user interface is straightforward and easy to grasp. The Mode dial on the rear panel controls the camera's main operating mode (as well as whether the LCD display's image is routed to the rear panel or the EVF eyepiece, image playback only being possible on the LCD), while the Exposure Mode dial sets the level of exposure control you have. Though only a few exposure options can be controlled externally, the Z2's efficiently laid out LCD menu system is easy to understand and relatively quick to navigate. Each menu is divided up into pages with tabs at the top of the screen, so you can quickly scan each page without scrolling through a long list of options. Given the camera's straightforward setup and user-friendly design, most users should be able to operate the camera right out of the box, referring to the manual only for more complex operations.
 Record-Mode Viewfinder Display: In record mode, you can choose to display
an information overlay on the LCD screen, or dismiss it for an unobstructed
view of your subject. Information shown includes camera mode, exposure mode,
flash status, exposure compensation (if a compensation adjustment has been made),
white balance setting (if something other than "Auto" is selected),
image size and quality setting, drive mode (single, continuous, movie, etc),
and number of shots remaining on the memory card. If the information overlay
is enabled, aperture and shutter speed are reported when the Shutter button
is halfway pressed. An optional histogram overlay can be enabled from the record-mode
menu system. In Auto mode, a set of icons appears across the top of the screen,
to indicate that automatic scene mode selection is active.
Record-Mode Viewfinder Display: In record mode, you can choose to display
an information overlay on the LCD screen, or dismiss it for an unobstructed
view of your subject. Information shown includes camera mode, exposure mode,
flash status, exposure compensation (if a compensation adjustment has been made),
white balance setting (if something other than "Auto" is selected),
image size and quality setting, drive mode (single, continuous, movie, etc),
and number of shots remaining on the memory card. If the information overlay
is enabled, aperture and shutter speed are reported when the Shutter button
is halfway pressed. An optional histogram overlay can be enabled from the record-mode
menu system. In Auto mode, a set of icons appears across the top of the screen,
to indicate that automatic scene mode selection is active.
 Playback-Mode Viewfinder Display: In playback mode, the Information button
cycles between the image display only, the image with a limited information
display, and an index display of the images on the memory card. Image information
includes the file number, image number in the captured series, date and time,
and the file size and quality settings. Pressing the up-arrow key on the Four-Way
arrow pad calls up a histogram display showing the distribution of brightness
values in the image, along with detailed exposure information. You can also
zoom in up to 6x to check fine details, focus and framing, and can scroll the
enlarged viewing window around the full image using the camera's arrow keys.
(Sorry, playback histogram and zoomed playback screens aren't included in the
screen shots above.)
Playback-Mode Viewfinder Display: In playback mode, the Information button
cycles between the image display only, the image with a limited information
display, and an index display of the images on the memory card. Image information
includes the file number, image number in the captured series, date and time,
and the file size and quality settings. Pressing the up-arrow key on the Four-Way
arrow pad calls up a histogram display showing the distribution of brightness
values in the image, along with detailed exposure information. You can also
zoom in up to 6x to check fine details, focus and framing, and can scroll the
enlarged viewing window around the full image using the camera's arrow keys.
(Sorry, playback histogram and zoomed playback screens aren't included in the
screen shots above.)
External Controls

Shutter Button: Angled down slightly on the camera's top panel, this button
sets focus and exposure when pressed halfway, and fires the shutter when fully
pressed.
![]()
Macro Button: Behind the Shutter button on the top panel, this
button controls the macro focus mode, cycling between normal AF, Macro, and
Super Macro modes.

Flash Button: Following the Macro button, this button cycles through the
available flash modes in any Record mode. Options include Auto, Red-Eye Reduction,
Fill Flash, Suppressed, and Slow-Sync.
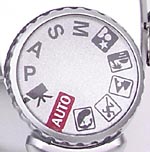
Exposure Mode Dial: Sitting atop the back edge of the handgrip, this ribbed dial selects the camera's exposure mode with the following options:
 Auto:
Puts the camera in charge of all the exposure variables, including aperture
and shutter speed. The user controls only flash mode, zoom, macro mode,
and file size and quality settings.
Auto:
Puts the camera in charge of all the exposure variables, including aperture
and shutter speed. The user controls only flash mode, zoom, macro mode,
and file size and quality settings.
 Movie:
Indicated on the Exposure Mode dial by a black film camera icon, this mode
records moving images with sound.
Movie:
Indicated on the Exposure Mode dial by a black film camera icon, this mode
records moving images with sound. Program
AE (P): This mode puts the camera in control of aperture and shutter
speed, the user retaining control over all other exposure variables.
Program
AE (P): This mode puts the camera in control of aperture and shutter
speed, the user retaining control over all other exposure variables. Aperture
Priority (A): Here, the user controls the aperture setting, while
the camera selects the best corresponding shutter speed.
Aperture
Priority (A): Here, the user controls the aperture setting, while
the camera selects the best corresponding shutter speed. Shutter
Priority (S): The opposite of Aperture Priority mode, this mode lets
the user choose the shutter speed setting while the camera selects the lens
aperture.
Shutter
Priority (S): The opposite of Aperture Priority mode, this mode lets
the user choose the shutter speed setting while the camera selects the lens
aperture. Manual
(M): This mode provides complete user control over the exposure.
Manual
(M): This mode provides complete user control over the exposure. Night
Portrait: Marked on the Exposure Mode dial with an icon of a person
with a star above them, this mode sets up the camera for capturing portraits
in low-lit situations. Because the camera is using a slower shutter speed
here, a tripod is recommended for the best results.
Night
Portrait: Marked on the Exposure Mode dial with an icon of a person
with a star above them, this mode sets up the camera for capturing portraits
in low-lit situations. Because the camera is using a slower shutter speed
here, a tripod is recommended for the best results. Sunset: Indicated by a beach scene with a setting sun on the Exposure Mode dial, this mode adjusts the white balance system to preserve the warm colors of a sunset without compensating for them. It also biases the exposure system to produce a slight underexposure, to prevent the sky colors from being washed out.
 Landscape:
This mode is indicated by an icon of a pair of mountains with a person in
front on the Exposure Mode dial. Here, the camera uses a smaller lens aperture,
so that both the background and foreground will be in sharp focus.
Landscape:
This mode is indicated by an icon of a pair of mountains with a person in
front on the Exposure Mode dial. Here, the camera uses a smaller lens aperture,
so that both the background and foreground will be in sharp focus. Sports
Action: Marked on the Exposure Mode dial by an icon of a running
person, this mode uses faster shutter speeds to "freeze" fast-paced
action.
Sports
Action: Marked on the Exposure Mode dial by an icon of a running
person, this mode uses faster shutter speeds to "freeze" fast-paced
action. Portrait:
An icon of a woman's head indicates this mode on the Exposure Mode dial. In
Portrait mode, the camera employs a larger lens aperture setting, which decreases
the depth of field. This produces a sharply focused image of the subject,
in front of a slightly blurred background.
Portrait:
An icon of a woman's head indicates this mode on the Exposure Mode dial. In
Portrait mode, the camera employs a larger lens aperture setting, which decreases
the depth of field. This produces a sharply focused image of the subject,
in front of a slightly blurred background.
![]()
Zoom Control: Crowning the top right corner of the rear panel,
just beneath the Exposure Mode dial, this two-way rocker button controls the
optical and digital zoom in Record mode. In Playback mode, this button controls
the playback zoom setting, digitally enlarging the image as much as 6x.

Four-Way Arrow Pad and OK Button: Roughly centered on the camera's rear
panel, this set of five buttons serves as the camera's main navigational tool.
The four exterior buttons navigate through settings menus, moving the selection
up, down, left, or right. The center button acts as the "OK" button,
to confirm any changes. In Manual exposure mode, the right and left keys adjust
the aperture setting, while the up and down keys change the shutter speed.
In Aperture and Shutter Priority modes, the up and down keys adjust the available
exposure variable, while the right and left keys adjust Exposure Compensation.
In Program AE mode, the right and left keys adjust the Exposure Compensation
as well. In Manual Focus mode, the up/down arrow keys adjust the focal distance
of the lens. Since the Manual Focus keys are the same as those used for Shutter speed in Manual exposure mode, in this mode the center button switches back and forth between the up/down arrow keys being used to adjust Manual Focus or Shutter speed.
In Playback mode, the right and left arrow keys scroll through captured images. The up arrow key calls up or dismisses a display screen showing a histogram of brightness values within the image, as well as detailed exposure information. The down arrow rotates the image counter-clockwise in 90-degree increments. When an image has been enlarged, all four keys pan the view.
![]()
Menu Button: Directly below the down arrow key and the first in a series
curving around the LCD monitor, this button calls up the settings menu in
both Record and Playback modes.
![]()
QuickView / Erase: Below the Menu button, this button activates
the QuickView image display in Record mode, which allows you to check the
most recently captured image.
In Playback mode, this button displays the Single Image Erase menu, which lets you erase the currently displayed image.
![]()
Display (i+) Button: The final button in the series curving around the
LCD monitor, this button controls the LCD display. In Record mode, pressing
this button toggles the image information display on and off.
In Playback mode, pressing the Display button displays or dismisses a limited information display. A third press switches to an index display of thumbnail images for rapidly reviewing photos in the camera, while a fourth press returns to the normal display.

Power Button: Located in the center of the Mode dial beneath the LCD monitor,
this button turns the camera on and off.
Mode Dial: Encircling the Power button on the rear panel, this dial sets the camera's operating mode and viewfinder display location. Options are Record EVF, Record LCD, and Playback LCD.

Diopter Adjustment Control: Tucked on the side of the viewfinder
eyepiece, this tiny, notched dial adjusts the viewfinder display to accommodate
near- or farsighted users.
Camera Modes and Menus
Record Mode: In Record mode, the camera can capture still images, with a range of options available through the settings menu. The Exposure Mode dial sets the exposure control mode, while the LCD menu provides the following exposure options (some options are not available in all modes):
- Record 1
 Drive
Mode: Sets drive mode to Single, Self-Timer, Continuous, Progressive,
or Bracketing.
Drive
Mode: Sets drive mode to Single, Self-Timer, Continuous, Progressive,
or Bracketing.
- Image Size: Adjusts the image resolution to 2,272 x 1,704; 1,600 x 1,200; 1,280 x 960; or 640 x 480 pixels. In Movie mode, resolution options are 800 x 600; 640 x 480; 320 x 240; and 160 x 120 pixels.
- Quality: Specifies the JPEG compression level for still images. Options are Fine, Standard, or Economy.
- Frame Rate: (Movie mode only.) Sets the movie recording frame rate to 15 or 30 frames per second.
- Optical Zoom : (Movie mode only.) Turns the camera's optical zoom on or off. Note that the noise from the zoom motor is clearly audible in recorded movies, unless the ambient sound level is quite high. It's is nice to be able to choose to use the if its noise doesn't concern you though.
- White Balance: Adjusts the overall color balance of the scene. Options include Auto, Preset (Daylight, Cloudy, Incandescent, and Fluorescent), Custom Set (manual adjustment), and Custom Recall.
- Key Function: Assigns a function to the Flash key. Options are Flash Mode, Drive Mode, White Balance, Focus Mode, and Color Mode.
- Movie Mode: (Movie mode only.) Sets the movie recording mode to either Standard or Night Movie. (Night Movie mode uses slower shutter speeds to cope with dim lighting conditions, but as a result will produce blurred images of quickly moving objects.)
- Record 2
 Focus
Mode: Selects either Single, Continuous, or Manual focus control.
Focus
Mode: Selects either Single, Continuous, or Manual focus control.- Color Mode: (Movie mode only.) Chooses whether the camera records images in Natural Color, Vivid (highly saturated) Color, Black and White, or Sepia tones.
- Full time AF: Turns the Full time AF option on or off. If on, the camera adjusts focus continuously whenever the camera is in a capture mode.
- Flash Mode: Sets the flash mode to Auto, Red-Eye Reduction, Fill, Fill with Red-Eye Reduction, or Slow Sync modes.
- Flash Compensation: Adjusts flash power from -2 to +2 exposure equivalents (EV).
- Metering Mode: Designates how the camera meters the exposure. Options are Multi-Segment, Center-Weighted, and Spot.
 Record
3
Record
3
- Sensitivity: Sets the camera's sensitivity to Auto, or to 50,100, 200, or 400 ISO equivalents.
- Digital Zoom: Turns the 4x digital zoom on and off. (Digital zoom only engages after the lens has been zoomed all the way to its max telephoto.)
- Color Mode: Chooses whether the camera records images in Natural Color, Vivid (highly saturated) Color, Black and White, or Sepia tones.
- Sharpness: Adjusts the in-camera image sharpening. Options are Normal, Hard, and Soft.
- Contrast: Controls the level of image contrast, with choices of Normal, High, and Low.
Playback Mode: This mode allows you to review captured images on the memory card, erase them, protect them, set them up for printing, etc. Pressing the Menu button displays the following options:
- Playback 1
 Delete:
Erases the current frame, all frames, or marked frames from the memory
card.
Delete:
Erases the current frame, all frames, or marked frames from the memory
card.
- Format: Formats the SD/MMC memory card.
- Lock: Write-protects the current image, all marked images or all images, preventing them from being manipulated or erased (except via card formatting). An option also exists to Unlock images.
- Edit Movie: Lets you crop the start and/or end of movies, preview changes, and save the results as a new file (with the option to delete the old file afterwards). (This option is only enabled if the currently selected image is a movie file.)
- Copy: Lets you copy either the current image, or all marked images, from one Secure Digital card to another, via the camera's internal memory. You are prompted to change the card at the appropriate point.
- Playback 2
 Slide
Show: Enables an automated slide show of all the images saved on
the memory card.
Slide
Show: Enables an automated slide show of all the images saved on
the memory card.- Slide Show Playback: Specifies which images are played back in the slide show, either All Frames or Marked Frames. (The Marked Frames option lets you "mark" frames for playback.)
- Slide Show Duration: Determines the interval length between images, from one to 60 seconds.
- Slide Show Repeat: Sets whether the slide show repeats after the last image or not.
- Playback 3
 DPOF
Set: Allows you to set up images for subsequent printing on a DPOF (Digital
Print Order Format)-compliant output device. You can select individual images,
marked images, or all images on the card for printing. You can also cancel
print settings.
DPOF
Set: Allows you to set up images for subsequent printing on a DPOF (Digital
Print Order Format)-compliant output device. You can select individual images,
marked images, or all images on the card for printing. You can also cancel
print settings.
- Date Print: Turns the Date Print function on or off. If on, a DPOF printer will print the date on all images in the current print order.
- Index Print: Turns the Index Print function on or off. If on, a DPOF printer will print an index page of all images on the memory card.
- Email Copy: Makes a low-resolution copy of the selected image. You can make copies of either the current image alone, or of multiple images you've marked separately. Email copy images are stored in a separate "EM" folder on the memory card. (This is a fairly rare and very handy option, although I somewhat prefer Sony's implementation of it, in which the camera will can be set to automatically make email-sized copies of all images as they're captured.)
- Email Copy Image Size: Sets the Email Copy size to 640 x 480 or 160 x 120 pixels.
Setup Mode: The following Setup menu options are accessible through both the Record and Playback menu screens, as a separate tab on the far right:
- Setup 1
 LCD
Brightness: Adjusts the brightness of the LCD display, with 11 steps
of brightness adjustment possible.
LCD
Brightness: Adjusts the brightness of the LCD display, with 11 steps
of brightness adjustment possible.
- Power Save: Sets the camera to shut itself off after 1, 3, 5, or 10 minutes of inactivity.
- Instant Playback: Turns the Instant Playback function on or off, which displays an image immediately post-capture. If enabled, the review time can be set to two or 10 seconds.
- Lens Accessory: Specifies whether the Wide Converter lens accessory is in use.
- Language: Changes the menu language to Spanish, French, German, French, English, or Japanese.
- Setup 2
 File
# Memory: Specifies whether file numbering starts over when a card
is reformatted, or a new card is inserted, or whether the numbering continues
sequentially regardless of card status.
File
# Memory: Specifies whether file numbering starts over when a card
is reformatted, or a new card is inserted, or whether the numbering continues
sequentially regardless of card status.
- Folder Name: You can have the camera name the folders it stores its images in on the memory card using either the camera's standard scheme, or by Date. (The latter being a handy way to keep track of photos you've shot over a period of time.)
- Noise Reduction: Turns Noise Reduction on or off. If on, Noise Reduction is automatically enabled at slower shutter speeds.
- Date Time Set: Sets the camera's internal calendar and clock.
- Date Imprint: Turns the date imprint function on or off, overlaying
the date on captured images when enabled.
- Setup 3
 Reset
Default: Resets all camera settings to their defaults.
Reset
Default: Resets all camera settings to their defaults.
- Audio Signals: Turns the camera's beep sounds on or off. You can select between a beep sound or a click sound.
- Focus Signal: Turns the camera's focus sounds on or off. You can select between a long single beep or short double beep sound.
- Shutter FX: Specifies the sound the shutter makes when the Shutter button is pressed, or disables the shutter sound.
- Volume: Sets the playback volume to 1 (low), 2, or 3 (high).
- Setup 4
 Video
Output: Selects the video signal timing as either NTSC or PAL.
Video
Output: Selects the video signal timing as either NTSC or PAL.- Transfer Mode: Selects either Data Storage or PictBridge USB
transfer modes.
In the Box
Packaged with the DiMAGE Z2 are the following items:
- Neck strap.
- Lens cap with strap.
- Accessory shoe cap.
- AV cable.
- USB cable.
- 16MB SD memory card.
- Four single-use AA alkaline batteries.
- DiMAGE Viewer v2.3.3 (Windows / MacOS) CD-ROM.
- ArcSoft VideoImpression V2 (Windows only) CD-ROM
- Operating manual and registration card.
- Large capacity SD memory card. (These days, 128MB is a good tradeoff between cost and capacity.)
- Two sets of rechargeable AA batteries and battery charger.
- AC adapter.
- Small camera case.
Recommended Software: Rescue your images!
Just as important as an extra memory card is a tool to rescue your images when
one of your cards fails at some point in the future. I get a lot of email from
readers who've lost photos due to a corrupted memory card. Memory card corruption
can happen with any card type and any camera manufacturer, nobody's immune.
A surprising number of "lost" images can be recovered with an inexpensive,
easy to use piece of software though. Given the amount of email I've gotten
on the topic, I now include this paragraph in all my digicam reviews. The program
you need is called PhotoRescue, by DataRescue SA. Read our review
of it if you'd like, but download the program now, so you'll have it.
It doesn't cost a penny until you need it, and even then it's only $29, with
a money back guarantee. So download PhotoRescue
for Windows or PhotoRescue
for Mac while you're thinking of it. (While you're at it, download the
PDF manual and quickstart guide as well.) Stash the file in a safe place and
it'll be there when you need it. Trust me, needing this is not a matter of if,
but when... PhotoRescue is about the best and easiest tool for recovering
digital photos I've seen. (Disclosure: IR gets a small commission from sales
of the product, but I'd highly recommend the program even if we didn't.)
OK, now back to our regularly scheduled review...
About Batteries
Over the years, I've gotten so many emails about power issues for digicams,
that I now insert a standard notice in my reviews of AA-powered cameras: Don't
even *think* about using alkaline AA batteries in a digicam! Despite their
being packed in the box with many cameras, they simply don't have the juice
to handle typical digicam demands. Spend the $35-40 or so it takes to get a
set (or two) of high-capacity NiMH rechargeable batteries and a good charger!
The few dollars up front will save you literally hundreds of dollars in the
long run, not to mention the hassle of wimpy batteries running out in the middle
of the action. Buy two sets of batteries too, so one can always be in the charger,
ready to go, and so have two sets available for longer excursions. Check out
my Battery Shootout
page for the latest in actual, measured performance of various AA batteries.
- Read my review
of the Maha C-204F charger, to learn why it's my longtime favorite.
Information on shooting speed, battery life, etc. can be found here.
See the specifications sheet here.
See our sample pictures and detailed analysis here. The thumbnails below show a subset of our test images. Click on a thumbnail to see the full-size photo.

|

|

|
| |
|
|
|
|
|
|
| |
|
|
|
|
|
|
| |
|
|


For those readers interested in a set of less "standardized" photos from the Z2, we've assembled a "gallery" of more pictorial images shot with the Z2.
Test Results
In keeping with my standard test policy, the comments given here summarize only my key findings. For a full commentary on each of the test images, see the DiMAGE Z2's "pictures" page.
As with all Imaging Resource product tests, I encourage you to let your own eyes be the judge of how well the camera performed. Explore the images on the pictures page, to see how the DiMAGE Z2's images compare to other cameras you may be considering.
Not sure which camera to buy? Let your eyes be the ultimate judge! Visit our Comparometer(tm) to compare images from the DiMAGE Z2 with those from other cameras you may be considering. The proof is in the pictures, so let your own eyes decide which you like best!
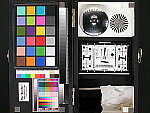
- Color: Good color, slightly prone to oversaturating reds though. The Z2 produced good color throughout my testing, although its auto white balance tended to leave a slight warm cast in the images, and it was a little prone to oversaturation, particularly with red tones. Its affinity for reds showed up most strongly in the Outdoor Portrait pictures, where Marti's skin tones were a little reddish-orange, and in the DaveBox test, where the red swatch was a little over-bright. (Strong blues tended to oversaturate slightly as well.) Indoors, its Auto white balance setting had a hard time with the strong yellow cast of household incandescent lighting, but its Incandescent and Manual white balance options did very well. Overall, I felt that the Z2's color was good, clearly within an acceptable range, but would prefer to see a bit more neutral white balance, and a more restrained response in the red portions of the spectrum. (That said, I'd still put its color in the upper 20% of cameras currently on the market.)
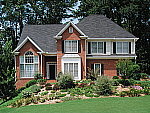
- Exposure: Better than average exposure accuracy, somewhat high native contrast helped somewhat by the low-contrast setting. The Z2's exposure system performed well in most cases, though it had a tendency to produce high contrast. Outdoors, the camera required quite a bit less than average positive exposure compensation under the high-key lighting, and the camera's contrast adjustment did even out the exposure somewhat, although I would have liked to see more impact from the low-contrast setting. Indoors, the camera required slightly less than average positive exposure compensation as well, producing good exposures both with and without the flash. Despite slightly high contrast, the Z2 had no trouble distinguishing the subtle pastel tones on the Q60 target of the Davebox. Shadow detail was typically good, though the camera had a limited dynamic range on the outdoor house shot.
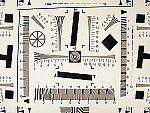
- Resolution/Sharpness: Very good resolution on the laboratory target, 1,200 lines of "strong detail," but some softness in more natural images. The Z2 performed very well on the "laboratory" resolution test chart. It started showing artifacts in the test patterns at resolutions as low as 800 lines per picture height vertically, and around 650 lines horizontally. I found "strong detail" out to 1,200 lines in both directions. "Extinction" of the target patterns didn't occur until about 1,400 lines. While it did very well on the laboratory target though, I felt that other shots of more "natural" subjects were a bit on the soft side. Still plenty of detail to make great-looking 8x10 prints, but the difference between its res-chart performance and its more ordinary images was more evident than I'd have expected.
- Image Noise: Moderate noise at ISO 50 and 100, high at 200, very high at 400. Surprisingly good noise levels on long exposures though. The latest round of 4-megapixel digicams seem to have similar noise behavior, no doubt to a shared sensor. The Z2 is characteristic of the lot, with noise that's visible but moderate at its lowest ISO settings, but that becomes obvious at ISO 200 and rather distracting at ISO 400. I'd really like to see less noise in its images at low ISO settings, but for most users it won't become an issue until ISO 200. Surprisingly though, image noise on long exposures under dim lighting actually isn't bad. The Z2 won't be your first choice for normal shooting at high ISO (a small strike against it for "sports" usage, where the higher ISO would permit faster shutter speeds), but for low ISOs in the daytime and long exposures at night, most people will likely find its results acceptable.
- Closeups: Really excellent macro capability, but flash is blocked by the lens at closest approach. The Z2 performed very well in the macro category, capturing a minimum area of only 1.43 x 1.07 inches (36 x 27 millimeters). Resolution was very high, and detail was strong in the dollar bill. Details were soft in the coins and brooch from the close shooting distance (not the camera's fault, depth of field is naturally very shallow when shooting this close), and were slightly soft in the dollar bill as well. There was a lot of softness in the corners on the left side of the frame, a not uncommon limitation of digicams' ultra-macro modes, caused by curvature of field in their lenses. The position of the Z2's flash directly above the lens results in a dark shadow in the lower portion of the frame, so plan on using external lighting for your closest shots.
- Night Shots: Very good low-light performance, with good exposure and focus even at the darkest light levels. Surprisingly low noise for such long exposures, color balance is a little warm. A very usable EVF at low light levels, and one of the only true "time" exposure options I've seen on a digicam. The Z2 produced clear, bright, usable images down to the 1/16 foot-candle (0.67 lux) limit of my test, at all four ISO settings. (At ISO 50, the exposure was somewhat dim at the lowest light level, but you could arguably still use the image.) The Z2's auto white balance system produced warm color casts under the dim lighting, with decreasing color cast as the light level increased. The Z2's Noise Reduction system did a reasonable job of suppressing image noise, though noise was still present. Compared to the results from the camera under daytime light levels though, the image noise in long exposures was really surprisingly low. The Z2's LCD/electronic viewfinder is usable at light levels quite a bit darker than average (down to the limits of my low-light test), and the Z2 is also unique for having one of the only true "time" exposure modes I've seen on a digicam. (On the Z2, with the time exposure option in Manual exposure mode, you press the shutter button once to open the shutter, and again to close it. Most digicams have a Bulb mode, which requires that you hold the shutter button down to keep the shutter open.) The Z2 also managed to focus almost all the way down to the limits of my test, even without an autofocus-assist light. Very impressive.
- Viewfinder Accuracy: A very accurate electronic viewfinder, and nearly perfect LCD monitor. The Z2's optical viewfinder was very accurate, showing 96 percent frame accuracy at wide angle, and about 97 percent at telephoto. (Very good results for an optical viewfinder!) The LCD monitor was also very accurate, showing about 99+ percent accuracy. The two displays actually use the same LCD, the difference in accuracy most likely simply being a minor difference in the cropping and/or optics as the LCD flips up into its "EVF" position. Given that I like LCD monitors to be as close to 100 percent accuracy as possible, the Z2's LCD monitor does very well here (as does the EVF, for that matter).
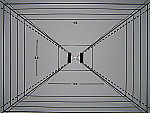
- Optical Distortion: Very low geometric distortion, very little corner softness, moderately low chromatic aberration. Optical distortion on the Z2 was quite a bit lower than average at the wide-angle end, where I measured approximately 0.3 percent barrel distortion. The telephoto end fared very well also, as I couldn't find even a full pixel of pincushion or barrel distortion. Chromatic aberration is moderate, showing several pixels of color on either side of the target lines, but the color itself not being as strong as on many long-zoom cameras. (This distortion is visible as a very slight colored fringe around the objects at the edges of the field of view on the resolution target.)
- Shutter Lag and Cycle Time: Full-autofocus shutter lag faster than average, very fast prefocus lag, good shot to shot speed. Overall, the Z2 is a pretty fast camera, surprising for a long-zoom model. It's full-autofocus shutter delay ranges from 0.59-0.82 seconds, prefocus lag is a blazing 0.09 seconds, and full-resolution single-shot cycle time averages about 1.8 seconds. Better yet, it has a variety of continuous-shooting and movie-mode options that make it one of the better cameras on the market for capturing action.
- Battery Life: Very good battery life, but still plan on buying a couple of sets of high-capacity NiMH cells and a good charger. Despite a fairly high resolution CCD and a fast processor, the Z2 showed very good battery life, with a worst-case run time of three and a half hours. (This number is based on standard 1600 mAh AA cells, modern higher-capacity cells will do even better.) Regardless of the Z2's long battery life though, I still strongly recommend that you purchase several sets of high-capacity NiMH AA cells and a good charger to go along with them. To see which NiMH cells are best, see my battery shootout page. Read my review of the Maha C-204F charger, to learn why it's my longtime favorite.
| Free Photo Lessons | |
|

Related Links
More Information on this camera from Megapixel.net:
Konica
Minolta DiMAGE Z2, Konica
Minolta Digital Cameras, Digital
Cameras

Follow Imaging Resource: