|
(Review first posted 9/5/2001) |

 |
|
Professional-quality scans |
|
|
2900 dpi resolution | |
|
|
36-bit color depth | |
|
|
USB interface | |
|
|
Amazing "Digital ICE" dust & scratch removal | |
|
|
New Digital "ROC" and "GEM"
correct for faded negatives and film grain automatically.
|
Note - For those readers already familiar with Nikon's Super Coolscan 4000 ED...
(NOTE - This is the second in a series of three reviews of Nikon scanners. We've previously reviewed the Super Coolscan 4000 ED, a model that's nearly identical to the Coolscan IV ED that's the subject of this review. The two reviews are therefore nearly identical, in terms of scanner operation, etc. The main differences between the units are 12 bit A/D for the IV vs 14 bit for the 4000, 2900 vs 4000 dpi resolution, and no "multi-sample scanning" for the IV. Although much of the review will be identical, we've presented all the details here (rather than referring readers back to the review for the Super Coolscan 4000 ED), so this review would stand on its own. If you're already familiar with the Super Coolscan 4000 ED's features and user interface, you may want to just skip down to the test results section, and/or look at our sample images from the Coolscan IV ED.)
Manufacturer Overview
Nikon was arguably the first company to really figure out the bizarre color qualities of color negative film, as seen in their first film scanner, released something on the order of a decade ago. (This point might be subject to some argument, but the original Nikon film scanner was the first that we personally saw that could consistently create good-looking scans from a variety of color negative film emulsions.) From that early position, they continued to innovate, and have consistently maintained a commanding position in the high end pro/prosumer scanning market. Back in mid-1999, their Super Coolscan 2000 was one of the first slide/film scanners that we reviewed at the Imaging Resource. At the time, the LS2000 (the actual model number) represented the state of the art in desktop film scanning, and large numbers were sold to photo enthusiasts and pro photographers alike. Now, Nikon's raised the bar again, with a complete series of new scanners, ranging from a more purely consumer model (the Super Coolscan IV ED, the subject of this review), through the new Super Coolscan 4000 ED, to the high-end, medium format Super Coolscan 8000 ED. As we'll see below, while the Coolscan IV ED is aimed at a more "prosumer" market than the higher-end models, it's no slouch when it comes to image quality or powerful scanning controls. Read on for all the details...
Highlights
The new Coolscan IV ED incorporates a number of enhancements very similar to the Super Coolscan LS-4000 model, with a few exceptions (namely, 36-bit color depth as opposed to 42-bit, USB instead of FireWire, and no multi-sampled scanning). Here's a list of some of the key features of the Coolscan IV ED:
- Uninterpolated scanning resolution to 2900 dpi, interpolated to 4000 dpi
- USB interface, with drivers and software for Mac or Windows
- New Scanner Nikkor ED high-resolution lens, using extra-low dispersion glass
- 12-bit digitization
- Digital ICE scratch/dust removal technology
- Digital ROC for color restoration of old, faded negatives
- Digital GEM for grain reduction without loss of image detail
- Sophisticated color management system supports ICC profiling
 The Basics
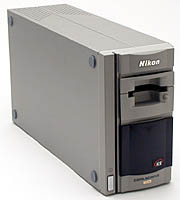
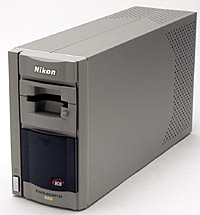
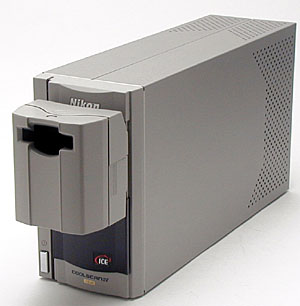
The Coolscan IV ED is a compact desktop package that can operate in either of two orientations. Most users will likely operate the unit standing upright, in which case it takes up about as much desktop real estate as a thick book. At 3.66 x 6.65 x 12.4 inches (93 x 169 x 315 millimeters), and approximately 6.7 pounds (3 kilograms), it should fit easily on even a crowded desktop.
The Coolscan IV ED is a USB connected device, and comes with both Mac and PC driver software in the box with the unit. The maximum resolution of the Coolscan IV ED is 4000 dpi, resulting in a maximum image size of 3,654 x 5,646 pixels when scanning 35mm film, although the maximum optical resolution (the resolution determined by the number of CCD pixels and scan area) is 2900 dpi. This contrasts with 4000 dpi true optical resolution of the Super Coolscan 4000ED, and 2700 dpi with the previous Super Coolscan LS-2000.
The Coolscan IV ED comes equipped out of the box for scanning both 35mm slides and film strips. An APS adapter and 35mm strip film adapter are available as accessories. All adapters can be "hot swapped," in that they can be changed without powering-down the scanner or requiring any special operations in software. In practice, we found this a very useful feature, as we could switch between slides and negatives very rapidly, without interrupting our workflow.
"Bit depth" is an important characteristic of digital scanners, affecting both color accuracy and tonal density range. At 12-bits per channel, the Coolscan IV ED is a top-of-the-line device, although some scanners (such as the Super Coolscan 4000 ED) now offer 14-bit digitization. Nikon doesn't rate the maximum optical density of the Coolscan IV ED, but it's obviously lower than the 4.2 claimed for the 14-bit Super Coolscan 4000 ED. As we'll see in the test results, the Coolscan IV does a pretty workmanlike job with very dense film, but clearly isn't in the same category as its "big brother" the 4000ED.
The scanner uses three color LEDs to illuminate the film, a design unique to Nikon, as far as we know. The LEDs have very well-controlled light characteristics, and aren't subject to the fading of conventional color filter materials. The LED light source is also somewhat collimated (the light waves travel in relatively straight lines), which produces very sharp scans, but also has a tendency to emphasize scratches, dust, and film defects. The unique "Digital ICE" technology (see below) gives the Coolscan IV some unusual technology for dealing with dust and scratches, though. (In fact, based on other scanners we've seen that also use Digital ICE, we think the Nikon LED-illuminated approach may have some distinct advantages when it comes to defect removal.)
Documentation for the Coolscan IV ED is quite extensive and, to the best of our recollection, a good bit more convenient than what shipped with the earlier LS-2000. Both scanners include a very complete manual on the CD, in Adobe Acrobat(tm) format, but the Coolscan IV ED also includes a roughly 100 page printed version as well. The printed manual is complete enough and well enough written that we really found little need to venture into the electronic version. (Kudos to Nikon, we really appreciate not having to spend time printing out an electronic manual!)
(Some of)The Details
While its aimed more at the amateur/"prosumer" market than at professional photographers, the Coolscan IV ED is by any measure a very sophisticated product. We'll cover its features in detail, but thought it worth calling attention to a few of the Coolscan IV ED's key features at the top of the review. Overall, there's no question that the Coolscan IV ED sets a high standard for desktop scanners in the sub-$1,000 category. Here are a few of the key points:
2900 dpi Resolution
While there are a number of scanners now on the market sporting 4000 dpi resolution, the 2900 dpi of the Coolscan IV ED is better than the best of what was available as little as 18 months prior to its release. While 4000 dpi models do indeed extract a bit more information from a piece of film, the 2900 dpi produced by the Coolscan IV is pretty doggone high, by any measure. You can compare its scans with those of the Super Coolscan 4000 ED and other 4000 dpi scanners on this site, but we think you'll agree that the differences are more subtle than dramatic. For the "prosumer" user, the 2900 dpi of the Coolscan IV ED is probably more than ample. Combining this with the Coolscan IV's "Digital GEM" grain-management technology and the new ED (extra-low dispersion glass) optics, and the result is a very noticeable improvement over Nikon's former top of the line scanner, the LS-2000. Not bad: Performance substantially better than the previous state of the art pro-model scanner, only at "prosumer" prices. (To see this for yourself, download the cropped full-resolution images of the "Musicians" slide for both the LS-2000 and Coolscan IV ED, and play with them a bit in Photoshop. The differences in sharpness and detail are really quite evident.)
"Digital ICE"
Nikon's "Digital ICE" (for Image Correction Enhancement, licensed from aptly-named Applied Science Fiction) defect-removal solution is truly one of the most amazing innovations in scanner technology we've ever seen. Under optimal circumstances, it can completely remove scratches, dust, and fingerprints from a slide or negative, while leaving the underlying image untouched! This was so amazing, we had to try it ourselves, so we deliberately damaged a negative and smudged it with fingerprints and dirt. (We literally dropped it on a linoleum floor and walked on it!) Even with this extreme level of damage though, the results were pretty astonishing.
Initially, Nikon and Applied Science Fiction were deliberately a little vague about how ICE works, but the technology is now well-known: It works by shining an infrared light through the film's emulsion, using the resulting scan information to create a "defect channel" showing where the dust and scratches are. The infrared light passes right through the layers of most color print or slide film, but is blocked by dust or scratches. (Note that this technique doesn't work with Kodachrome or black & white film, as those emulsions are either entirely or largely opaque to infrared light. The Coolscan IV ED can scan those film types just fine, but the Digital ICE defect-removal won't work.) The scanner and its associated firmware/software then interpolates the surrounding image information to "fill in the gaps" shown by the defect channel.
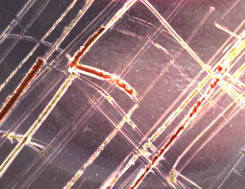
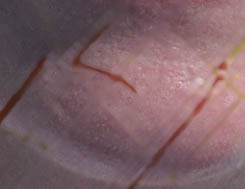
The result is little short of amazing: At any given resolution level, it produces a slight softness in the image relative to an unadjusted scan, but the overall result is incredible. On a negative as deeply scratched as our test sample below, the process can't completely eliminate all evidence of damage, particularly at higher resolutions. The photos below show the Coolscan IV ED's Digital ICE capabilities, at the Normal and Fine settings.
 |
 |
|
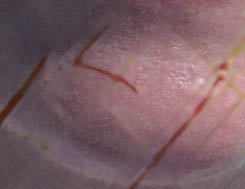
These shots show a *VERY* badly scratched original (above), the effect of Digital ICE in "normal" mode (upper right), and in "fine" mode (lower right). "Fine" mode seems to work a bit harder to eliminate small defects, but has a much greater effect on subject detail. |
 |
In practice, we found the ICE technology very effective, at least on the film emulsions we tested. (Again, note that it doesn't work with Kodachrome or black & white film.) At any given resolution level, it produces a slight softness in the image relative to an unadjusted scan, but the overall result is incredible! (There is an automatic sharpening function included in the "Clean Image" options in Nikon Scan, but you'll want to experiment with it a bit. We found the built-in sharpening fairly effective for lower-resolution scans, but still preferred the unsharp masking in Photoshop, as it gave us much more control over how the sharpening was applied.)
On a negative as deeply scratched as this one, the process can't completely eliminate all evidence of damage, particularly at higher resolutions. The images in the example above were scanned at maximum resolution. You'll note that there are still a number of minor blemishes left in the image, and the deepest scratches that penetrated into the film base are still fairly evident. What you're left with though, is an image that can be much more easily cleaned up with manually. - There's now plenty of relatively undisturbed image area to work with.
Overall, it would be hard to overemphasize the impact the Digital ICE technology can have in a production scanning environment: The tendency is to focus on extreme damage of the sort we've shown here (because that makes for the most dramatic illustrations), but in practice, you're much more likely to encounter random dust specks that require tedious "spotting" to clean up. After working with it, we're convinced that Digital ICE can completely eliminate the need for this operation, at the savings of countless hours in production shops. Even for amateur users, multiply a good 10-20 minutes per dirty slide by the hundreds of slides and negatives you'd like to scan and archive, and you'll quickly appreciate what Digital ICE can mean. (Our personal scanner is a now-aging Super Coolscan 2000. - We just leave Digital ICE enabled for any film scans we do. The tiny softening of the image is more than offset by the beautiful, clean scans we get.) We have to say that this is one of the most truly useful innovations we've seen to date in scanner technology, capable of saving literally hours of retouching for each damaged image it recovers!
Digital ROC & GEM
In addition to the "Digital ICE" feature, the Coolscan IV ED adds
two other technologies, "Digital ROC" and "Digital GEM."
ROC stands for "Recovery of Color," and it does an incredible job
of extracting the original color information from badly faded color negative
film. We're afraid you'll have to take our word for this a bit: We didn't have
suitable film to test this with ourselves, but we've seen any number of samples
from both Nikon and other reviewers that demonstrate its capabilities.
 |
|
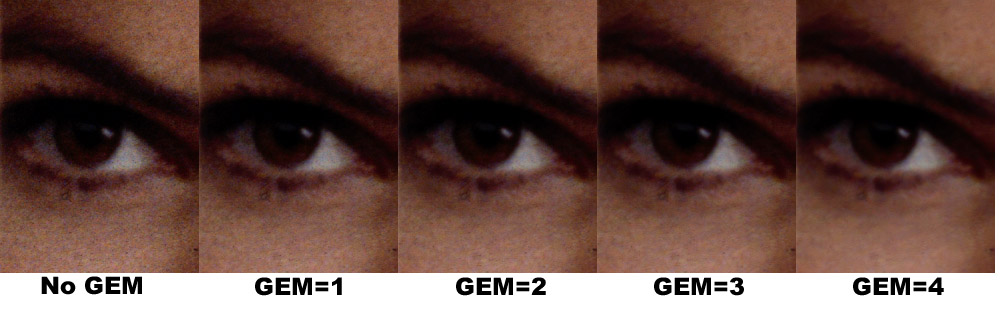
This is a reduced- size series of crops from a maximum-resolution (4000dpi) scan of an Ektachrome "Q60" target on a Super Coolscan 4000ED scanner. The grain pattern is slightly less apparent on the lower-resolution Coolscan IV ED, so the effect wouldn't be as dramatic. It does still work though. (Truth be told we got a bit lazy here, couldn't flog ourselves into duplicating an illustration we'd already made...) Click on the image to see the effect of GEM at full size. True to Nikon and Applied Science Fiction's claims, it does indeed appear to do a good job of removing grain without significantly affecting image detail. |
GEM stands for "Grain Equalization and Management," and is a technology to remove the effects of film grain, without affecting image sharpness. We were a little suspicious of the claim that image detail wasn't affected, as it sounded a little too much like magic. As you can see from the samples above though (click on the image for a full-sized view), it really does seem to do a pretty good job. The test image here is the familiar "Q60" test slide from Kodak, which is imaged on Ektachrome slide film. This is a fairly fine-grained emulsion, and the image itself has to be at least one generation down from whatever the original image was. Thus, the sharpness of the subject could be questioned, relative to the size of the grain artifacts. (It would be interesting to test GEM on some higher-speed film, where the grain structures would be larger relative to the detail in the image.) Still, even allowing for the limitations of the test, the results are quite impressive.
Analog Gain Control
Underexposed slides or dense negatives are a challenge for any film scanner: With so little light coming through the film, the electronics have a hard time measuring it, and "noise" from the sensor often swamps the signal coming from the image. Approaches for dealing with this range from using analog-to-digital converters (the "measuring" component) with greater bit depth, to designing lower-noise electronics. Both of these approaches add substantial cost though, and the Coolscan IV is already an excellent performer in these areas.
Instead, Nikon took several different approaches to improving performance for high-density subjects. One of the most basic enhancements was to recognize that simply increasing the brightness of the light source would increase the amount of light making it through to the sensor. This is accomplished via the somewhat mis-labeled "analog gain control" function, which increases or decreases the brightness of the LEDs providing the illumination. (This is another welcome carryover from the earlier LS-2000 and the Super Coolscan 4000 ED design.) While this increases overall brightness and depth into the shadows (on slides, that is: in the highlights on negatives), the less-dense areas of the film can suffer from a light overload. Thus, this control's usefulness will depend somewhat on the particular image being scanned. It will be most useful on film or slides that are dark overall.
|
|
The "analog gain" control can be very useful for teasing out details from deep shadows and dark, plugged-up slides or negatives. You need to watch the histogram display in the "Curves" window though, to be sure you don't lose important highlight detail in the process. |
Scanning our "Train" image on the Coolscan IV, we actually found little need for the Analog Gain adjustment. While the shadow detail would have benefitted from it, we found we couldn't boost the controls much at all without losing highlight detail. It's possible that the default gain setting on the Coolscan IV is more sensitive than that on the original LS-2000. Whatever the case, the controls are there, and would surely be useful on film that was more uniformly dense. (For instance, slide film that was underexposed overall, or color negative film that was severely overexposed.)
Optional APS Film and 35mm Batch Scanning
The Coolscan IV supports flexible batch-scanning of APS and 35mm film strips, a real benefit if you're using some of the more time-consuming options such as Digital ICE and/or multi-sample scanning! The process is quite straightforward, but not terribly well-documented: After scanning the thumbnail previews, select those needing adjustment, and set the scanning parameters as you normally would. Once you've made all your adjustments, select the images you want to scan by doing a control left-click in Windows, or a command-click with the Mac on the corresponding thumbnails. This will select multiple thumbnails without deselecting those you've already chosen. When all have been selected, click scan to proceed. Nikon Scan will ask you where to store the images and what to call them. It will take the file name you give it, and name successive scans "name1," "name2," etc.
Color Management
Most low-end scanners give you no choice about the "color space" the
scan is performed in, simply making some broad assumption about the sort of
monitor you're using, and how it is set up. By contrast, Nikon Scan 3 and the
Coolscan IV provide a choice of a wide range of color spaces, and screen gamma
settings of 1.8 and 2.2 (the default gammas for Windows and Macintosh monitors,
respectively). With the color management option enabled, Nikon Scan also supports
the full ICC-standard workflow: The software chooses an input profile based
on the scanner model it detects, uses the one of the offered color spaces as
the "edit" profile, and allows you to specify a monitor profile for
accurate screen display. (You'd develop your own monitor profile using any of
a number of available profiling applications.) The chart below (courtesy Nikon
USA Inc) shows the colorimetric parameters for the standard edit color spaces
offered.
For professional applications, ICC profiles and a robust color-management system are essential for repeatable color and an efficient workflow. Since we don't have any methodology for evaluating color-management systems, we didn't experiment with Nikon Scan's color management options. (Nikon also points out in their manual that the color management system both slows the scanning process and dramatically increases memory requirements.) When we tested the original LS-2000, we simply left the Nikon CMS turned off. With the Coolscan IV, we left it on, and used the Apple RGB color space setting, with our (uncalibrated) monitor set to a gamma of 2.0 and white point of 6500 K. We're not really equipped to delve deeply into CMS systems here, but did note that the scans we obtained with the Apple RGB setting were much more color-accurate and didn't lose detail in highly-saturated colors the way scans in the sRGB system did. For critical professional work, the Coolscan IV's full support of the ICC workflow is an important feature.
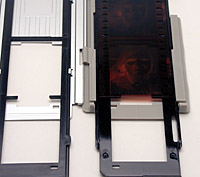
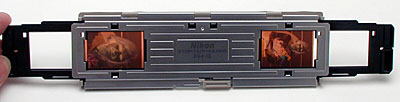
Film Handling
The Coolscan IV comes with three film holders, one for mounted 35mm slides,
one for loose strips of 35mm film, and a third "clamshell"-style adapter
for handling badly-curved strips of film via the slide adapter.
The various film adapters plug into a long cavity in the front of the unit. The accessory APS film adapter and the SA-21 film strip feeder have electrical plugs on their back that carry power and signals between the film transport and the scanner itself. As mentioned earlier, the various media adapters can be plugged and unplugged with impunity at any time the Coolscan IV isn't actually scanning: The scanner and driver software automatically recognize which adapter is currently in use.
The SA-21 film strip feeder can handle strips of film from two to six frames long. The Nikon manual cautions against attempting to feed film strips that are excessively curved, although the SA-21 appears to be very forgiving in this respect. The SA-21 can handle film curved side to side by as much as six millimeters. Lengthwise, the SA-21 can handle film curled into rolls larger in diameter than 30 millimeters. For film that's curved more in either direction, use the FH-3 clamshell adapter. Ragged edges or torn film perforations will also cause problems. In our own use, we had no film feeding problems whatsoever.
 |
 |
 |
|
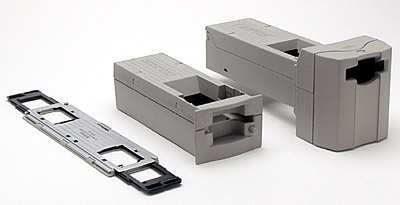
Nikon's FH-3 clamshell film holder deserves special mention, thanks to its construction and ease of use: It did an excellent job handling badly-curled negatives, and was a noticeable improvement over the design of the already-excellent FH-2 that preceded it: In our experience, clamshell holders of this sort are often awkward to use with curled negatives, but we had no such problem with the Nikon version. The Nikon device is a composite of metal and plastic, with the structural support and latching mechanism provided by the metal parts, and the actual film registration by the plastic pieces. Where the Nikon holder differs significantly from others we've used is that the film guides take the form of two continuous ridges in the plastic that run the entire length of one half of the clamshell assembly. Thus, you simply lay the film between the guides, and are assured that it will properly align as you close the holder, even if the piece of film consists of only a single frame. Other holders we've used employ alternating ridges and recesses on both sides of the clamshell. This can make it difficult to keep the film aligned as the clamshell closes, particularly if the piece of film is short. The FH-3's design uses heavier plastic in the film guides, making them more rigid, and also provides a more pronounced recess for the film to lay in, further easing the mounting of badly curved film strips.
The MA-20 35mm mounted-slide feeder couldn't be much simpler: It's basically a passive chunk of plastic that plugs into the scanning aperture, with a slot to manually push the slide into, and a button to press to manually eject the slide when you're done: Not much to go wrong there!
(Disclaimer: The next paragraph is based solely on information collected from Nikon's published materials, since we didn't have access to the device in question for this review.)
The IA-20 APS film adapter plugs into the scanner in much the same way as the 35mm film strip adapter, projecting from the front by the same couple of inches. APS cartridges are simply dropped into the front of the unit, and the software will scan "thumbnail" representations of the entire roll of film in about 80 seconds (for 25 frames - longer and shorter rolls will vary proportionately in their pre-scan times).
System Interface and Included Software
As we mentioned earlier, the Coolscan IV is a USB-based scanner. Included software consists of the Nikon Scan software drivers (along with Photoshop and TWAIN drivers). No photo-editing application is included, since most purchasers of a Coolscan IV are likely to already own one (or two). We'll talk more about the Nikon Scan software below, but two facts deserve mention at the outset: First, the software is very memory intensive. Thankfully, memory has gotten dirt cheap lately, so you can afford to buy plenty. When we last checked, 256 megabyte DIMMs could be had for (well) under $100. Buy one. Finally, our overall observation about Nikon Scan 3 is that it's exceptionally powerful, but can also require a fair bit of patience to use to its fullest. If you can get by with the (surprisingly accurate) one-click automatic adjustments it provides in several areas, you'll be able to scan pretty quickly. Once we got into the deeper parts of the software though, our throughput dropped markedly. In fairness, in some instances, we were really pushing the scanner to its limits, and the results were worth a fair bit of pain. At other times though, we were just manipulating the curves and controls to achieve a particular color balance, and the process seemed to take quite a bit longer than should really have been necessary. Overall, a bit of a mixed blessing: Incredible power, but a fair bit of effort required to make use of it.
Operation and User Interface
Wow! This is going to be a big section! Like the LS-4000 before it, the Coolscan
IV has one of the richest user interfaces we've ever seen in a desktop scanner.
The extent of control it provides over the scanning process is unmatched, but
this flexibility comes at some cost in terms of the learning curve associated
with it. (And in terms of the number of words and pictures we'll need here to
describe it all to you.) Stay with us, we'll try to fit it all in! (We'll resort
to a more terse presentation of some of the features, based on heavy use of
screen shots. Hopefully, this will make the information easier to scan through,
while keeping the word-count to a reasonable level!)
Overview
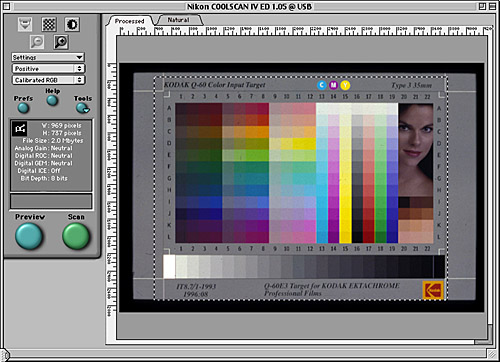
All scanner operations are controlled from the main window of the Nikon Scan
application. The system of "drawers" used to organize scanning controls
in Nikon Scan 2 has been replaced with the much more convenient and intuitive
tool palette shown below. We'll step through the various operations in roughly
the order one would encounter them during normal scanning.
Normal Operating Sequence
As we step through the myriad functions of the various control panels and interface screens, it would be easy to get lost in a maze of features, and end up with little actual idea of how the scanner and software actually work. To counter this, we present here a very basic outline of the sequence of operations, with links to the appropriate parts of the more-detailed operating description. Our hope is that this will concisely convey a sense of how the scanner works, while still allowing for the excruciating detail we're known for. Herewith the sequence:
- Launch application or acquire module
- Insert film strip
- Pop open thumbnail drawer, if film strip or APS feeder (Main control panel)
- Select thumbnail (Main control panel)
- Preview scan (Main control panel)
- Set cropping and resolution (Scan size palette)
- Tonal adjustment (Curves and levels palette)
- Color correction (Color balance palette)
- Scan it! (Main control panel)
Main Control Panel Overview
Given the unusual number of parameters and controls that Nikon Scan incorporates, the user interface was a significant challenge for the program's designers: How to effectively display the huge number of controls without using-up all the available "real estate" on the computer screen? In the prior version of Nikon Scan, Nikon used "drawers" that slid out to reveal groups of controls. We weren't keen on this interface initially, but warmed up to it a fair bit. In Nikon Scan 3, Nikon's gone to a separate tool palette window, that displays a list of available control groupings, each of which expands into an inline window when you click on its heading.
 |
|
The main control panel, showing an image preview. The "tools" button pops up the separate Tools Palette window, which provides access to the various scanning controls. |
Other than the missing "drawers" interface, the new main control panel looks much like the old one. It isn't the primary information display you'll use during scanning, but does display some status information, such as scan type (negative/positive), color space (Grayscale, Calibrated RGB, CMYK). Basic information on scanner settings is provided, including the current crop size in pixels, final file size, and settings for certain key features. A color readout appears in the pane under the settings information when your cursor is over the image. The detailed crop size and color information readouts that appeared here in Nikon Scan 2 have now been moved to a tool palette window.
When you're scanning from a film strip or APS adapter, a popout "drawer" appears just off the upper righthand corner of the tool display in this view, that lets you select the frame of interest, and which shows thumbnails of all the frames in the strip which you've preview-scanned.
Across the top of the panel, a double row of buttons provides the following functions: Eject media, autofocus (two options), zoom out, zoom in, and auto-contrast adjust. The autofocus process may be conducted at a user-selected point in the image, by holding down the option key on the keyboard (the ALT key on PCs?) when clicking on the button, and then clicking on the desired point within the preview window.
We encountered one rather annoying bug with these settings: The film type setting insisted on setting itself back to "Positive" whenever we inserted a new piece of film into the scanner. It took a fair bit of back & forth wrestling with the software and user interface before we finally managed to do a batch scan of a strip of negatives.
The main control panel contains six named buttons. Here are their functions:
- Prefs - brings up the preferences window (more on this later).
- Help - calls up the help system.
- Tools - displays the Tool Palette window.
- Preview - normally (if option is set in preferences) prescans image, auto-adjusts exposure, and displays in preview window for cropping or manual tonal/color adjustment.
- Scan - performs full-resolution scan, incorporating any manual exposure, color, or tonal adjustments.
Variable Preview Size!
This was a feature we liked a great deal on the earlier Nikon Scan 2 -- the ability to resize the preview area to take in as much screen real estate as you have available. In professional applications, proper setting of highlight and shadow points based on pixel-value readouts can be critical. The small, fixed-size preview images employed by many low-end scanners can make it difficult or impossible to select the exact area you want to take a brightness/color reading from. In Nikon Scan, you can take advantage of professional-sized monitors, by expanding the preview window to the edges of the screen. Note though, that doing so greatly increases preview scan times, because the software automatically scans at a resolution appropriate to the size of the preview window you're using.
Preferences Window
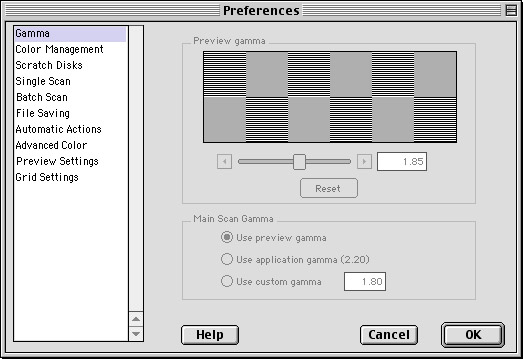
Accessed via the "pref" button on the main control panel, the preferences window (shown below) allows you to control many of the most basic scanning characteristics. Most of the settings here fall into the "set it and forget it" category, as you won't need to change them frequently. It is accessed via the "pref" button on the main control panel, mentioned earlier. When this button is clicked, the window at right appears. Five different tabs select different scan parameters to adjust. The five tabs and their associated controls are described below. This window defaults to the "gamma" adjustment screen shown when opened.
 |
|
The "Preferences" control panel contains infrequently-accessed "set it and forget it" controls. It opens to the last-accessed screen by default. |
- Gamma - For adjusting the output "gamma" values used in displaying preview images and in making the final scan. (To drastically oversimplify, gamma is a measure of how "light" or "dark" midtone brightness is relative to the ends of the tonal scale. This is a fairly important adjustment, particularly for a device that may be used on either Macintosh or Windows platforms, which have significantly different default gamma settings.)
- Color Management - As mentioned earlier, the Coolscan IV supports a very sophisticated "color management" system, allowing it to be calibrated to different display or output devices. The Color Management preferences allow you to choose ICC-standard color profiles for the preview, main scan, and CMYK output respectively. NOTE that messing around with the color management settings can significantly alter up your images! Unless you know what you're doing, leave these settings at the factory defaults. (On the other hand, if you *do* know what you're doing, the provided CMS seems to be very capable.) ANOTHER NOTE: The color management system is very powerful, but is also a huge consumer of system resources. If you find scans running excessively slowly, or the scanning software requiring massive amounts of memory, try turning the color management system off entirely.
- Scratch Disks (Mac)/File Locations (Windows) - Due to its high resolution and great bit depth, scans made with the Coolscan IV can be huge, often larger than your system memory would support directly. To accommodate such large amounts of data, Nikon Scan uses hard drive space for "scratch memory," to hold pieces of the image data on a temporary basis. This panel lets you specify which of your hard drives you want the application to use for this purpose. (Note that, while Nikon Scan uses virtual memory to swap data out to a scratch disk, you'll see significantly higher performance if you can just give it all the RAM it needs. - With RAM now selling at well under $100 for a 256 MB DIMM, we strongly recommend giving Nikon Scan a couple of hundred megabytes of its own.)
- Single Scan - You can set Nikon Scan to automatically perform certain tasks such as autofocus and exposure before making a preview, or automatically preview images whenever film is inserted into the scanner. In standalone mode (eg, not the Photoshop plug-in), you can also have it perform a variety of options after the scan, such as saving the scanned images directly to disk. The Single Scan window governs these settings when you scan images one at a time. Prescan options include autofocus, autoexposure for positive film, and autoexposure for negative film. Post-scan options include automatic file saving, or ejection of the film.
- Batch Scan - Sets the same pre- and post-scanning options as the Single Scan window, but for those times when you're scanning multiple images on a filmstrip. Additional batch-only options cover logging of the scanning progress to a file, error handling, and how to handle file saving between separate scans.
- File Saving - The file saving setup window lets you select the default file format and compression setting (if applicable), and the creator code (on Macs) for the saved files. In operation, a file naming settings window appears when you initiate a batch scan, letting you set file name prefixes, suffixes, the number of digits used to distinguish between the files, and the starting number to use in the file naming.
- Automatic Actions - This window controls whether or not the scanner will automatically do a preview scan whenever film is inserted into either a single or multiple-image adaptor, and how many thumbnails to create on multi-image strips of film. It also determines whether an autofocus operation should be performed whenever the focus point is changed.
- Advanced Color - Useful for prepress scanning (where color balance may shift as a function of output density), this window lets you set custom white, gray, and black points in RGB, CMYK, or grayscale color spaces.
- Preview Settings - This is where you can either gain or lose large amounts of time in your use of the Coolscan IV! Nikon Scan 3 lets you decide whether you want various operations to be performed on the preview scans as well as on the final ones. Options here include autoexposure, autofocus, Digital ICE, and whether or not to cache the preview image when used with the MA-20 slide mount adapter. The manual says that autoexposure and autofocus are only performed on one preview per frame, but our eval unit insisted on doing it *every time* we did a fresh preview scan on a piece of film. Turning off the autoexposure/autofocus options shortened our preview scan times from nearly a minute to only 20 seconds. (!)
- Grid Settings - You can optionally display an alignment/cropping grid over the preview image, to assist in setting cropping boundaries. This window lets you control the dimensions, spacing, and marking of that grid.
Pop-out "Tool Palette" menus
Finally, we get back to the actual scanning controls! As mentioned earlier, there are no fewer than 10 sub-windows on the "Tool Palette" window, each offering a range of controls. They're generally arranged in the order in which you would encounter them during the normal scanning process. Here's what they all are:

Layout Tools
The first Tools palette controls the general setup of the scan. Buttons here let you change the image's orientation, move the preview window around (if it's too big to fit into the available screen area, select a cropping tool, zoom in on an already-scanned image (standalone mode only), set the focus point for autofocus operations, rotate the image in 90 degree increments, either right or left, and flip the image, either horizontally or vertically. (In Nikon Scan 2, many of these functions appeared in the main scan window.)
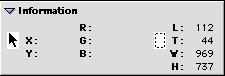
Information
This is more info that used to appear in the main scanning window. The X and Y coordinates are the current cursor location in pixels, The two sets of red, green, and blue (RGB) values are the raw scan data, and the values after any curves, color, or other adjustments are applied. The four numbers on the right are the coordinates of the left top corner of the current cropping window, and its width and height, both in pixels.
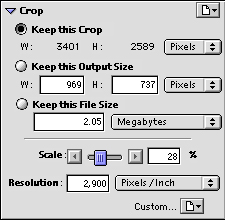
Crop
This menu controls the scan size and resolution. At first contact, this window was a little confusing, but we pretty quickly got the hang of it. With the "Keep this Crop" button checked, the W/H readout will be in pixels, at maximum scanner resolution. Once you've selected the area you want, you can set its size by simply typing in the desired final width or height into the appropriate box under "Keep this Output Size", and the Scale slider will respond as needed. If you're scanning to a fixed output size in pixels, you can check the "Keep this Output Size" box, and the final dimensions of the file will remain fixed, with the crop area in the main scan window sizing up or down proportionately as you drag its borders. What we found very confusing was the "Pixels per Inch" indicator in the bottom of the window. It only applies to the resolution that's recorded in the *output* file, not in the resolution that the scan is actually done at. The output resolution becomes significant when the image is pasted into a document that associates an output resolution with it, but for most purely photographic purposes, you'll be able to ignore it.
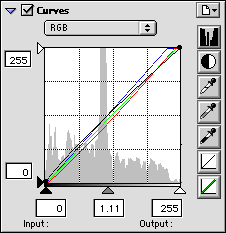
Curves
This window is the one we found ourselves using most often for adjusting the tonal balance of our scans. It displays the tonal content of the image in a histogram window, with the graph indicating how many pixels in the image have each brightness value. This is an interface familiar to us from Photoshop, and is our preferred method of making tonal adjustments in images. (The one feature we found lacking is one available only in the Macintosh versions of Photoshop: The ability to see what parts of the image are "blowing out" to pure white or "plugging" to solid black in response to the settings of the white/black point sliders.) This control in Nikon Scan is interesting though, in that it combines histogram controls with a tone curve, either of which may be manipulated from the same control panel.
You can choose to adjust the tonal balance in the image either automatically or manually. The "auto" button seems to do a pretty fair job of setting highlight, shadow, and gamma values, but we usually found ourselves manipulating the controls manually, to achieve best results. As in Photoshop, the black point slider sets a minimum brightness value for the image: Any pixel values below this level will be set to zero. Likewise, the white point slider sets the maximum brightness value: Any pixel values above this level will be set to 255. Values in between the extremes are stretched to cover the range specified. The "gamma" slider in the middle controls how the midtone values are mapped from input to output, by setting the brightness value the program will map to a 50% gray. Thus, sliding the gamma control to the right will darken the image, while sliding it to the left will brighten it.
For tricky images, you can add control points to the "gamma" curve simply by clicking anywhere in the histogram/gamma grid: A point will be added wherever you click, and the curve adjusted to pass through the new point. This provides very fine control over input/output tonal mapping, which experienced users can take advantage of to make optimal use of the available tonal range.
You can also operate on each of the color channels separately with the curves-levels controls, simply by clicking on the channel menu button (the one that says "RGB", at the top of the window), and pulling down to select the specific color channel you're interested in. This feature can be very useful for working with images that have color casts or unusual lighting.
Finally, Nikon Scan provides eye dropper controls for setting white, gray, and black points directly from the preview image. This is probably the fastest method, and simultaneously removes most color casts from your images. All in all, a very handy interface!
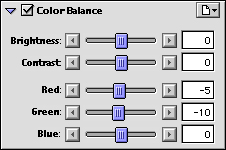
Color Balance
As a simpler alternative to the curves-levels window, the "Color Balance" option provides fairly rudimentary controls to adjust the brightness, contrast, and color balance of the image as a whole. (In grayscale scanning mode, only the brightness and contrast sliders will appear.) These controls work exactly as you would expect, but in our experience are of limited value for obtaining professional results. Nonetheless, they can be a quick way to make overall image adjustments, and may be the fastest way to process large numbers of noncritical scans.

Unsharp Mask
This is a new addition to Nikon Scan, and more or less duplicates the operation of the unsharp masking control in Photoshop. We've seldom (never?) seen this capability in scanner software, and it's a welcome addition: It makes it feasible to scan for publication (printed output) as a one-step process, without having to pass through Photoshop or another application as part of your workflow. Not shown here is the pulldown menu on the right (it pops up out of the second button down from the top right corner) that lets you choose what color channels you want to apply the unsharp masking to. The one limitation is that it only supports the primary colors in its channel selections (red, green, blue, cyan, magenta, yellow), not the derived luminance channel that can be so handy in critical sharpening operations. (Don't through away your copy of Photoshop just yet.)
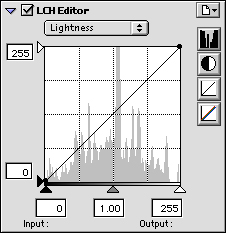
LCH Editor
All of the preceding discussion is based upon the RGB or CMYK color space options: In Hue/Saturation/Level color space, the curves-levels controls work quite differently.
Quite frankly, we didn't experiment much with the HSL controls in Nikon Scan, but they appear to offer very powerful tools for selectively correcting colors in an image. In particular, the Hue channel control lets you shift a specific color to a different one, without affecting other colors in the image. For instance, you could change a red flower to a yellow one, without affecting blue or purple flowers. However, any other red objects in the input image would also be shifted to yellow as well.
This HSL control is unique among the scanners we have tested to date (August, 2001), and appears to be an exceptionally powerful tool, albeit one that could require a bit of learning to use to its full effectiveness. We regret not being able to cover it in greater detail here, but frankly it's beyond the scope of even one of our reviews! (If a reader wanted to write a detailed explanation of how he/she uses this function though, we'd be happy to post it separately, on a linked page.)
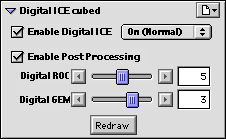
Digital ICE Cubed
This is control central for Digital ICE, ROC, and GEM, described earlier. Digital ICE (the dust/scratch remover) has two settings, normal and fine. Fine is for use with very small defects, but affects image sharpness more. ROC (Recovery of Color) and GEM (Grain Equalization and Management) each have a range of settings, from 0 to 10 for ROC, 0 to 4 for GEM, both in arbitrary units. We found little need to mess with the ICE setting, but did observe that the range of adjustment in GEM was useful. (We didn't have any suitably faded negatives to experiment with ROC on.)

Analog Gain
As described earlier, the analog gain settings actually control the brightness of the LEDs that illuminate the film. This is a pretty powerful control for pulling detail out of extreme shadows, and appears to offer a much greater range than the same control on the LS2000.
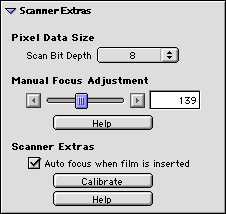
Scanner Extras
This is the menu that controls scanning depth and manual focus adjustments. Here's what the different controls do:
- Pixel data size - Choices are 8- or 12-bit, referring to the bit depth of the R,G, and B color channels.
- Manual focus adjustment - We found the Coolscan IV's automatic focus to be very effective, especially when using the option that allows you to select a specific (preferably high-detail) portion of the image to focus on. To focus manually, you adjust the slider on this menu, then observe the results in the preview window. One of the things we complained about on the LS-2000 is now fixed: Numeric feedback on the control. -- Often, for really critical focusing, you need to take multiple scans and then look back to see which was the sharpest. The numeric indication of focus position helps make small adjustments accurately. We normally find little reason to adust manual focus, but as it happened, the Coolscan IV' s optics had a really difficult time with the thick glass of our USAF resolution target. The glass apparently refracted the light oddly and prevented the autofocus system from getting a good "lock" on it. Manual focus got the job done, but we thought our hair would go gray while we were making the dozen or so scans it took us to finally home in on the best result. (But then too, we're particularly finicky about that slide, since it's an awfully important measurement of a scanner's ultimate resolving power.)
- IX-240 Crop Choices (IA-20 module only) - This option only appears when the IA-20 adapter for APS film is present. It allows you to set the initial cropping in the preview/crop area to suit photos made at the three APS aperture settings of "classic," "wide," and "panorama."
Performance
The extraordinary power of the Coolscan IV leads to a fairly complicated set of controls (as seen above), but Nikon's new scanning software does a good job of segregating functions into logical groups, making it easy to keep track of where you are and what you're adjusting. Tweaking the scanning controls manually to get the "perfect" scan proved pretty time-consuming (depending on how fanatical we got about getting things exactly right, it could be very time-consuming!), but the results were well worth it, especially on "problem" slides. For more ordinary tasks, the automatic adjustment button on the "curves" control panel made one-click adjustments that were surprisingly accurate: In many cases, many minutes of fine-tuning and manual tweaking produced results only marginally better than the one-click curves adjustment. If you can stay within the range of control afforded by the automated options in Nikon Scan 3, the Coolscan IV ED is a very efficient scanner to work with. If you find that you need to delve into the "deeper" parts of the software's capabilities though, things can slow considerably.
We found that it was essential to turn off many of the preview options in the scanning software, in order to get good throughput. You can have the scanner autofocus, perform auto exposure, and apply Digital ICE and multi-sample scanning to the preview images it shows you prior to the main scan itself. These options will give you a much more accurate preview, and can be essential when working with difficult pieces of film. They come at a very high cost though, stretching preview scan times to more than a minute in many case. (And much more than a minute if you enable the multi-sample option.)
As tedious as we found some of the scanner's more esoteric options though, it's hard to overstate the value of the Digital ICE defect-removal feature in a production environment: It'll literally save you hours of retouching time that would otherwise be spent removing dust specs and minor scratches from your scans. Depending on the labor rate you choose to value such time at, Digital ICE could literally pay for the entire scanner investment in one large job.
|
|
|
| Preview (no AF/AE, no clr mgmt) |
|
| Preview (AF/AE, Nikon clr mgmt) |
|
| Preview w/Digital ICE (no AF/AE) |
|
| Preview, w/ Digital ICE, ROC, GEM |
|
| Full-Res scan, no ICE, ROC, GEM |
|
| Full-Res scan, w/Digital ICE |
|
| Full-Res scan, w/ICE, ROC, GEM |
|
| Full-Res scan, 12-bit, no ICE, ROC, GEM |
|
Scanning Results
For a full analysis of the results we obtained with the Nikon Coolscan IV ED, check our sample pictures page for it. - You'll find a full analysis of each of our standard test scans there, as well as the sample images themselves. For now, a brief summary of what we found:
The Nikon Coolscan IV ED really delivers a surprising level of scan quality, and a high degree of sophistication and control via the latest Nikon Scan 3 software. About all that really separates it from its "big brother" the Super Coolscan 4000 ED is lower resolution (2900 vs 4000 dpi), 12-bit vs 14-bit A/D, and the lack of multi-sample scanning. These are all worthwhile features, but the Coolscan IV ED delivers exceptional results at a much lower price point. Overall, we found it had excellent color rendition and dynamic range. Its software is somewhat complex though, so expect a learning curve with it if you're a scanning novice. That said, the level of control the software provides is really exceptional. The Digital ICE dust-removal technology works very well in eliminating typical dust and small scratches, potentially saving a huge amount of time that would otherwise be required for spotting and retouch. (Do note though, that Digital ICE doesn't work with black & white or Kodachrome film, due to the opacity of those emulsions to IR light.)
As noted, the Nikon Scan 3 software interface can be a little intimidating, and getting the best scanning throughput requires some common sense about disabling autofocus and the advanced scan features like Digital ICE during preview scans. You can make fairly dramatic tonal and color adjustments without needing to repeat the preview scan though, so overall throughput is pretty decent.
Despite its only being a 12-bit scanner, the Coolscan IV ED did a very good job with our ultra-dense "Train" image, producing results markedly superior (IOHO) to those from some 14-bit units. Very impressive! This year's Coolscans seem to have unusually "quiet" electronics, meaning there's very little image noise in the deep shadows. This really gets the most out of whatever level of digitizing accuracy is available. - A good case in point why scanner purchasers shouldn't focus entirely on A/D bit depth in deciding which scanner to buy.
The Coolscan IV ED also did a very good job in the resolution and sharpness department. While it's true that (some) 4000 dpi scanners can extract more usable detail from the film than a 2900 one, Nikon's new ED optics seem to have had a noticeable impact on sharpness: We felt that the images produced by the Coolscan IV ED were noticeably better than ones from last year's Super Coolscan 2000. (In fact, the Coolscan IV is superior in almost every respect to the earlier 2000, a unit that sold for considerably more money.)
Overall, we liked the Coolscan IV ED quite a bit. We'd like to see some sort of a simpler user interface for a more "prosumer" oriented scanner, but in fact found ourselves liking Nikon Scan 3 more, now that we'd spent some more time both with it, and with lesser programs on other scanners. While it takes a bit more time to master Nikon Scan than some packages, the results are well worth it: You really have the tools you need to get the best possible scan from every image. Given a choice between higher complexity or not having the tools you need to control the scanner properly, we'll take the more complex software any day. Overall, the Coolscan IV ED looks like an excellent choice for a serious amateur, or pro with more limited scanning requirements than would dictate the Super Coolscan 4000 ED. Image quality was first rate, and Nikon Scan 3 is both powerful and straightforward to use, once you learn to use it.
There's a lot more to say about the details of the test scans we captured, and we say it all on the sample pictures page. Check it out! This is an impressive little scanner, and a very good deal to boot, at current (June, 2001) market prices.
The Bottom Line
The Nikon Coolscan IV ED delivers a surprisingly high level of performance for a 12-bit scanner. Excellent electronics produce better results than some 14-bit devices, and the sharp ED optics make the absolute most of the 2900 dpi resolution. With a sub-$1,000 price point, the Coolscan IV ED is an excellent value. At its price point, it's really a no-excuses digitizing tool.