Sample Images for
Minolta Dimage Scan Elite II Film & Slide Scanner
![]()
| A word about our scanner testing philosophy: Some publications
have taken the position of scanning everything using the scanner's default
settings, believing this to be most fair, neutral methodology. The problem
with this approach is it may show unacceptable results for an otherwise
perfectly usable scanner. (Most users are willing to engage in some tweaking
of the scanning parameters to get the best result.) For my part, I believe
the most accurate representation of real-world performance is to allow
for a reasonable level of twiddling of the scan parameters. In the interest
of objectivity though, I also show scans performed with default settings,
to provide a completely neutral reference point. Also note that all images here have been JPEG compressed for compatibility with 'web browsers. This will degrade image quality somewhat, but I used a very conservative compression setting ("9" or "10"in Photoshop) to minimize this. |
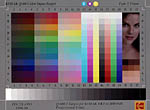
 "Musicians
II" image: The main image here
was scanned at 1285 x 856 pixels, and minor tonal adjustments were made,
using the tone curve controls. (Mainly adding a little red to the image,
since the auto adjust left the default scan a little cold-looking.) Here
is a version scanned with the Dimage Scan Elite II's
default settings, which shows somewhat heavy midtones and a rather cool
cast. "Musicians
II" image: The main image here
was scanned at 1285 x 856 pixels, and minor tonal adjustments were made,
using the tone curve controls. (Mainly adding a little red to the image,
since the auto adjust left the default scan a little cold-looking.) Here
is a version scanned with the Dimage Scan Elite II's
default settings, which shows somewhat heavy midtones and a rather cool
cast.
(NOTE that this is NOT the identical "Musicians" image as used in my digital cameras tests! It's very similar, but the models are different, and the digital-camera version is a couple of reproduction generations removed from this particular version.)
|
|||||||||||
|
In the main text of this review, I commented that the DSEII's implementation of the Digital ICE defect and dust-removal technology didn't seem to do quite as complete a job at removing scratches from badly damaged film. This slide shows that it works very well for routine dust though, as my aging slide has now accumulated a fair bit of grundge on it, despite my efforts to keep it clean, and the careful cleaning I've subjected it to from time to time. This image shows the results of the DSEII's Digital ICE system. While the DSEII's implementation of Digital ICE is a little less thorough with deep emulsion scratches, it also produces virtually no loss of sharpness in unaffected areas of the scan, as can be seen here. This level of dirt is pretty typical of what you'd find when dealing with older film in a production environment. If this were a job for pay, Digital ICE would have saved me a good 20 minutes or more of careful spotting in Photoshop.
|
|||||||||||
 Kodak
Royal Gold 25 "House" detail clip: This is a detail
clip from the same negative used to produce the original "house"
poster for my digital camera tests. (Now superseded by one shot on 4x5 transparency
film.) It was shot on Kodak Royal Gold 25 film (sadly, no longer manufactured),
which is extremely fine-grained, but which has very different color characteristics
from most normal color negative films. Most scanners I've worked with have
difficulty with RG 25's color balance, and the DSEII fell prey to this.
The default scan was quite washed out and flat,
and the color was rather bluish. A few tweaks in the Curves control panel
(well, more than a few, actually) extended the tonal range and cleaned up
the color significantly, producing this scan . Kodak
Royal Gold 25 "House" detail clip: This is a detail
clip from the same negative used to produce the original "house"
poster for my digital camera tests. (Now superseded by one shot on 4x5 transparency
film.) It was shot on Kodak Royal Gold 25 film (sadly, no longer manufactured),
which is extremely fine-grained, but which has very different color characteristics
from most normal color negative films. Most scanners I've worked with have
difficulty with RG 25's color balance, and the DSEII fell prey to this.
The default scan was quite washed out and flat,
and the color was rather bluish. A few tweaks in the Curves control panel
(well, more than a few, actually) extended the tonal range and cleaned up
the color significantly, producing this scan .
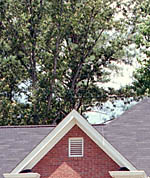
The DSEII again surprised me with this negative - There's some sort of emulsion defect on it, either very tiny chemical flecks or microscopic voids in the emulsion. Whatever the cause, raw scans usually show a scattering of tiny white spots across the image. Scanners with highly collimated light sources (LED illuminators, for example) tend to accentuate the defects, while scanners with diffuse light sources tend to obscure them. The DSEII uses a diffuse light source, but as noted above, has no trouble extracting very fine detail. On this shot though, it did a pretty good job of hiding the white spots, despite the fact that it pulled out a lot of detail. Engaging Digital ICE completely removed the specks, as seen here, but had the effect of introducing artifacts around areas of sharply varying tonality. - Note the dark flecks that appear around the louvers of the gable vent. (I've seen this on other scanners as well, although I don't know that I've commented on it previously.) Finally, I used this slide to play with the built-in Unsharp Masking capability of the DSEII, producing this scan with the USM set to 150%. (As noted in the main review, I'd really like to see some sort of a preview capability on the USM control - As far as I can tell, the only way to see the effect it's having is to do another scan and view the results. Definitely a nuisance if you're trying to figure out a new setting for it.)
|
|||||||||||
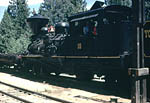
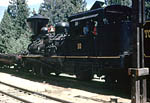
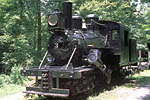
"Train" Shot (Extreme shadow detail): This slide is an extraordinarily tough test of scanner dynamic range: The slide contains areas of moderately bright highlight, but the shadows are exceptionally dense. This is indeed a very tough piece of film, and the Dimage Scan Elite handled it pretty well. Compared to other scanners in its general price category (the Nikon Coolscan IV, for instance), it showed very low random noise, but much more streaking than I'd like to have seen. I've also recently begun paying attention to lens flare, usually visible around the very bright areas peeking through underneath the locomotive. I first became aware of flare as a characteristic to watch for when I examined the scans from the Dimage Scan Multi Pro, and noticed how much better that scanner was in this respect than others I'd tested. (I'd been assuming that the flare I'd been seeing in all the scans was on the slide from the camera lens, rather than produced by the scanner. The DSMP convinced me otherwise.) The DSEII on the other hand produces about the same level of lens flare as I've come to expect from desktop scanners: Not perfect, but no worse than average, either.
One thing I've noted in working with this slide is that it's often very
difficult to achieve a good color balance right out of the scanner when
making such extreme tonal adjustments like this. This proved to be somewhat
the case with the DSEII's software, as the best scan I could manage with
it (the main scan for the category, seen above) was a little greenish
in the shadows. The image above right shows the results
after I'd played with the tone curves in Photoshop a little. More
neutral, and deep shadow detail a bit more visible. (But the streaks are
more prominent as well.)
I mentioned the DSEII's 16 bit and multi-sample scanning above. I did a couple of scans of this slide in 16 bit mode, one normally, the other with 16x multi-sample scanning turned on. I didn't notice any noise improvement simply from the 16 bit scan by itself, but the 16x multi-sample scanning did greatly reduce the random image noise, although the streaking actually seemed to be accentuated. I also noticed that color and tone curve adjustments I'd developed in 8-bit mode produced slightly different results when switching to 16-bit scanning, with the 16-bit image coming out much warmer-toned. (The image above left was scanned in 16-bit mode with the same settings as were used for the first 8-bit scan above. The image above right was scanned at 16 bit with those settings, and then adjusted in Photoshop after the fact.) Overall, the DSEII did pretty well with this tough subject, at least for such an inexpensive scanner. If Minolta could eliminate the streaking I saw in the deepest shadows, they'd have a real world-beater, regardless of price.
|
|||||||||||
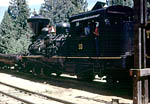
"New Train" Shot (Extreme shadow
detail): As the name suggests, this is a new
"train" shot. I made it because the old shot was a one-of-a-kind
slide, meaning I'd be stranded if it ever got lost or damaged. I shot
a full roll of photos (with exposure bracketing) of another locomotive,
so I'd have spares for the future. I'll gradually transition over
to this new slide, but in the near term, I'll scan both targets for
backward compatibility with previous reviews.
Overall, I found pretty similar results with this slide, low noise but some streaking, although the streaking here was much less pronounced than in the original Train slide above. Here again, I did an 8-bit scan, a 16-bit one, and a 16-bit one with 16x multisampling, and also Photoshop-adjusted each one for best results. This time around, the streaking that was so evident in the original Train slide above was much less evident. The 16x multi-sample scanning also made a huge difference in the noise levels in the deepest shadows. Overall, it was a very good performance. The table above right has links to examples of each scan I did.
|
|||||||||||
|
Here, I did a scan with the DSEII's default settings,
then tweaked the tone curve a bit to correct the reddish cast the scanner's
autoadjust left in the image, producing the image
you see at right.
|
|||||||||||
|
|
|||||||||||
|
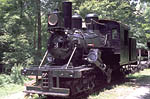
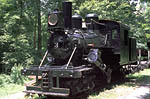
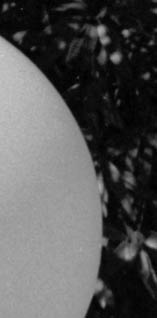
Black/White Negative Target: I've had a lot of requests to look at black/white scans with the scanners I test, and I finally got around to shooting some Tri-X to play with. What I found with the DSEII matched my experience with the Dimage Scan Multi Pro (the first scanner I tried this with), and agreed with what I've heard from casual emails with others in the digital photo community: To get the best results from a black/white negative scan, scan it as a positive, possibly even as a color transparency, then invert the results in Photoshop or another imaging program. The film I scanned here is rather "thin", with not a lot of density to it, especially (!) in the dark foliage. I scanned it three ways with the DSEII: First as a b/w negative, then as a b/w positive, finally as a color transparency. - The latter two I inverted in Photoshop to produce black/white positives. The results were interesting, to say the least. The table below holds cropped samples of these scans. (Click on any image to see a full-sized version.)
The two positive-scanned images are fairly similar: Perhaps just a bit better tonality and detail in the dark shadow areas from the one scanned as an RGB image, but it's close to a toss-up. The sample scanned as a negative has a much harsher tonal curve though, and loses a lot of detail in the deep shadow areas. What's significant here is that there appeared to be no setting in the scanning software that allowed me to recover the shadow detail when scanning in negative mode: The darkest areas of the image were pushed all the way to black, no matter what. (So it isn't just a matter of my having chosen different tone adjustments for the two positive-scanned versions.) As noted above, I've heard in casual emails that film scanners often do a poor job with black & white negatives, but this was the first time I'd managed to check it out for myself. The good news though, is that scanning the b/w negs as positives brought out significant detail in portions of the negative that appeared to the naked eye to hold very little image information at all.
|
|||||||||||
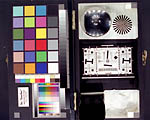
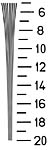
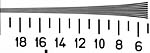 WG-18
Resolution Target Horizontal Clip: (2820 dpi) WG-18
Resolution Target Horizontal Clip: (2820 dpi) The full ISO-12233 resolution target (which I've been calling the "WG-18" target, since that's what it was called before the ISO approved it as an international standard) is very large (see below), so I cropped-out these clips to show the scanner resolution on this familiar target. There are two different targets here. The 35mm one was shot on Kodak Technical Pan black & white negative film. This film is extremely fine-grained, with perhaps the highest resolution of any commercially-available 35mm emulsion. The target was shot with a Nikon 50mm, f1.4 lens (a notably sharp lens), at an aperture of f8. Thus, while not a "laboratory" grade target, this represents about as much detail as you'll ever see in a conventional 35mm film image. The downside of this target is that the Tech Pan emulsion is a little "thin," lacking density. It is thus difficult to set scanners properly to produce adequate contrast to separate the finest details without losing critical information. The results on this film version of the ISO-12233 test target generally support the conclusions I'd drawn on my more "natural" tests - the DSEII shows very high resolution. In this test, the scanner cleanly resolved to 1600 lines per picture height, with some detail visible all the way to 1800 lines. Very impressive.
|
|||||||||||
|
|
|||||||||||
| Full-Size ISO-12233 ("WG-18")
Resolution Target For the real masochists, here's the full-size ISO-12233
target, scanned at the maximum resolution of 2820 dpi. A side note: I didn't
explicitly set up a test for frame coverage by scanners, but this ISO-12233
shot goes right to the edges of the 35mm frame, and I found that the DSEII
stops just short of the full frame, both horizontally and vertically. The
amount it misses isn't much though: About 2.5% of the frame height, and
1.7% of the frame width. The DSEII was also pretty sharp from corner to
corner - There's a little softness in the corners of the frame, but not
bad.
WARNING: This JPEG expands into a 29.5
megabyte file, which will almost certainly crash your browser if viewed
directly! To view it, you must first download it directly to your hard
drive (right-click in Windows, click & hold in Mac Netscape), then
open it in an image-editing application. Here
is the link to the RAW JPEG IMAGE. (No surrounding HTML file,1.7 megabyte
download.)
|
|||||||||||
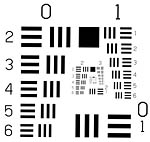 USAF
1951 Resolution Target: (Elderly technoids only ;-) Old-line lens
and film testers will be well-familiar with the "USAF 1951" resolution
test target. (1951 is the year it was created, giving you an idea of what
we mean when we say "old-line".) This was scanned at the maximum
2820 dpi from a laboratory-grade target (chrome on glass slide) before being
cropped down, and generally gives an excellent view of the scanner's ultimate
capabilities. On this target, the DSEII Showing a cleanly resolved view
of group 5, element 5, both horizontally and vertically, at 50.8 line cycles/mm
(1290 line pairs/inch). The short extent of the USAF pattern targets doesn't
permit the sort of visual interpolation our eyes do naturally on the more
extended ISO-12233 pattern. As a result, the USAF target generally gives
much more conservative resolution numbers. USAF
1951 Resolution Target: (Elderly technoids only ;-) Old-line lens
and film testers will be well-familiar with the "USAF 1951" resolution
test target. (1951 is the year it was created, giving you an idea of what
we mean when we say "old-line".) This was scanned at the maximum
2820 dpi from a laboratory-grade target (chrome on glass slide) before being
cropped down, and generally gives an excellent view of the scanner's ultimate
capabilities. On this target, the DSEII Showing a cleanly resolved view
of group 5, element 5, both horizontally and vertically, at 50.8 line cycles/mm
(1290 line pairs/inch). The short extent of the USAF pattern targets doesn't
permit the sort of visual interpolation our eyes do naturally on the more
extended ISO-12233 pattern. As a result, the USAF target generally gives
much more conservative resolution numbers. |


Back to Minolta Dimage Scan Elite II Scanner Review