UNSHARP MASKING MADE EASY
nik Sharpener Pro 2.0
-- More Than Finely Honed
Editor
The Imaging Resource Digital Photography Newsletter
Review Date: July 2005
When we reviewed the initial release of Sharpener Pro in Nov. 2000, we were already big fans of Photoshop's unsharp masking filter. And that review (http://www.imaging-resource.com/SOFT/NS/NS.HTM) discusses unsharp masking in general, if you need a refresher course.
But since we became acquainted with Sharpener, we've printed no inkjet or dye sub photo nor published any Web site image from Seybold or Macworld without it. There are few utilities than can go five years without an update, but Sharpener is one of them.
The world of digital imaging has evolved enormously in five years, however. And Sharpener's latest release catches up by providing a Raw Presharpening filter and 16-bit mode. It goes a good bit further, however, by incorporating Sharpener Selective, based on a concept we first saw in Dfine, nik multimedia's noise reduction utility we reviewed in our Aug. 8, 2003 issue. Sharpener Selective lets you apply its sharpening filters to your image by (drum roll) brushing them on with your image editing application's brushes.
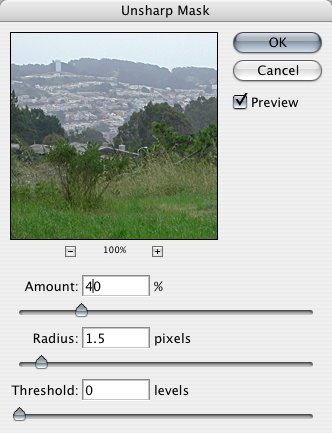 |
| Photoshop's USM Just for reference |
There's a lot to this impressive product. As we said nearly five years ago, it doesn't just make it easy to do unsharp masking, it makes it easy to optimize it. And there are few tasks that will improve your images more than sharpening them correctly. So let's dive in.
PRODUCT DESCRIPTION | Back to Contents
There are two editions of nik Sharpener. The $169.95 Inkjet Edition and the $329.95 Complete Edition.
There's actually an intelligent difference between the editions. Which edition you need depends on how you are going to output your images.
The affordable Inkjet Edition gives you everything you need to make your own inkjet prints, including the Raw Presharpening and Display filters. Inkjet filters start with a general purpose filter and add optimized filters for Canon, HP, Epson and Lexmark printers.
The Complete Edition adds filters for photo labs and prepress work, including Fuji Pictrography, Lab Photographic, Halftone and Photographic/Dye Sub.
We'll quibble with the inclusion of the Photographic/Dye Sub filter in only the Complete Edition. We think that should be in both packages, given the popularity of 4x6 dye sub photo printers. Try the Display filter instead.
SYSTEM REQUIREMENTS | Back to Contents
Sharpener Pro consists of a set Photoshop plug-ins and a Photoshop automation tool that run under Windows 98/ME/NT/2000/XP or Macintosh OS 10.2.4 through 10.4.x.
Sharpener Pro is compatible with image editing applications that can run Photoshop plug-ins, including: Adobe Photoshop 5.5 through CS2, Photoshop Elements 1 through 3.0, PhotoDeluxe and Photoshop LE; Corel Paint Shop Pro and Photo-Paint; Microsoft Digital Image Pro; Jasc Paint Shop Pro; and Ulead PhotoImpact.
Sharpener Selective is compatible with Photoshop 5.5 through CS2 and Photoshop Elements 1 through 3.0 only.
Additionally, you'll need at least 128-MB RAM (256-MB RAM recommended) and 60-MB disk space for the Complete Edition or 40-MB disk space of the Inket Edition. Windows requires at least 300-MHz Pentium (800-MHz recommended) while Mac OS requires a G3 (G4 recommended).
INSTALLATION | Back to Contents
The product ships on CD with an installer, an installation help file and a PDF user's guide.
The installer will copy the set of filters and the automation tool to the plug-in directory you select from its opening dialog box. Rather than accept the default location, we recommend you point the installer to the plug-ins folder of your image editing application.
You'll be asked your name and company name and, most importantly, the product key. We hunted around a while before we found the product key taped to the outside of the box. Which seems like a silly place to put it, since that makes it publicly available at retail. We suspect retail versions will hide it somewhere else, although it should be affixed to the CD envelope.
There are 126 items to install in the package, all of which go into one folder. Rather than run separate installs for each imaging application you use, you can create an alias or shortcut to the original installation and copy that to the plug-in folders of your other applications.
Version 2.0 includes several significant new features everyone will appreciate:
- Sharpener Selective. Paint, Erase, Fill and Clear buttons let you apply the Sharpener filters selectively to your image.
- Analysis Modes. Two overlay modes show you what will be sharpened and how much it will be sharpened.
- Advanced Panel. Set the amount of sharpening to the entire image or specific areas within the image using five sliders that control sharpening by color.
- Larger Preview. See more of the image and display before and after panels as well.
- 16-bit mode. You can now sharpen 16-bit channel images while you're making tonal and color corrections in RGB, CMYK, Lab or Grayscale color modes.
- Raw Presharpening. Enhance unprocessed Raw images, which are typically less sharp than their processed JPEG cousins.
RULES OF THE GAME | Back to Contents
Unsharp masking is not a trick for sharpening up blurry images. The trick for that is to reduce them. The smaller they are, the more focussed they look. No, unsharp masking's job is to make your image crisp as the air on an autumn afternoon.
But not until you've made every other edit to the image. Unsharp masking is always the last thing you do.
And, just to make it interesting, the optimum amount of sharpening depends not on the image but on the output device. Screen display, the Web, an inkjet printer, a continuous tone print, a halftone in a book all have different sharpening requirements. That makes it nearly impossible to evaluate your results by looking at the image on the screen. Optimum print sharpening often looks crunchy on screen but is undetectable on the page, for example.
You can use Sharpener 2.0 two ways:
- You can select the appropriate filter for your intended output from the Sharpener collection under the Filter menu, or
- You can use the Sharpener Selective tool to brush the effect set by one of those filters.
| The Display Filter. This image was resized for Web display. The Display filter, using Autoscan, offers one simple slide to vary the strength of the effect. Click image for a 100 percent view. |
 |
| 25 Pct. Strength. Ideal in our book. The distant tower is sharp but the sky picks up no noise. |
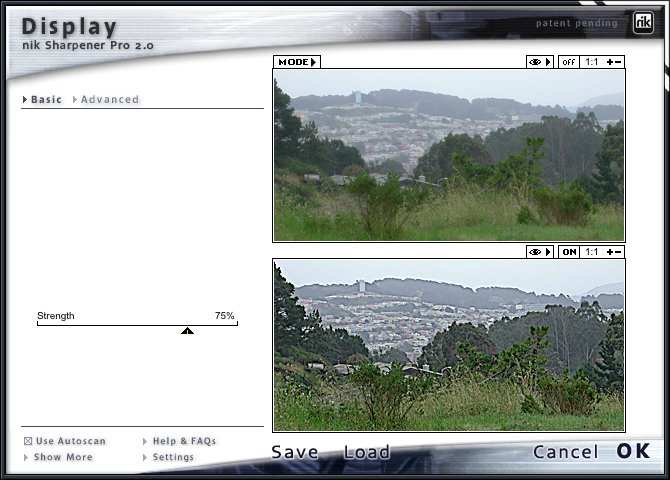 |
| 75 Pct. Strength. Way too much, but it illustrates Autoscan in action. Still no noise in the sky. |
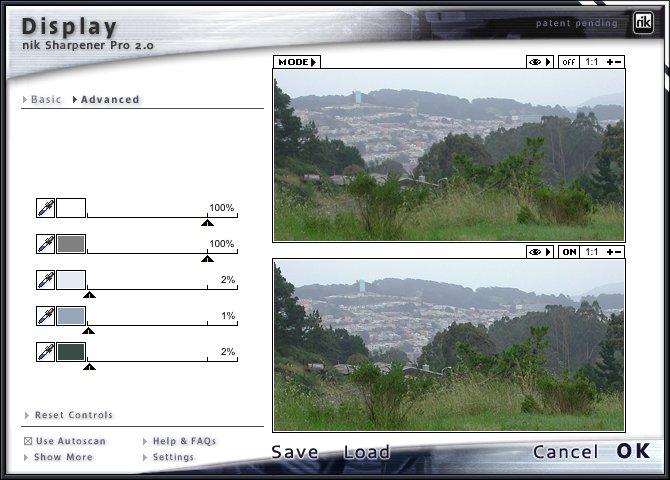 |
| The Advanced Tab. Here we've sampled the distant colors and darker trees to turn off sharpening in them. |
| Print Filters. This image was full size (which explains why it the unsharpened image looks blurry). Compare the Dye Sub filter to the Canon Inkjet filter to see the different options. Click image for a 100 percent view. |
 |
| Dye Sub Filter |
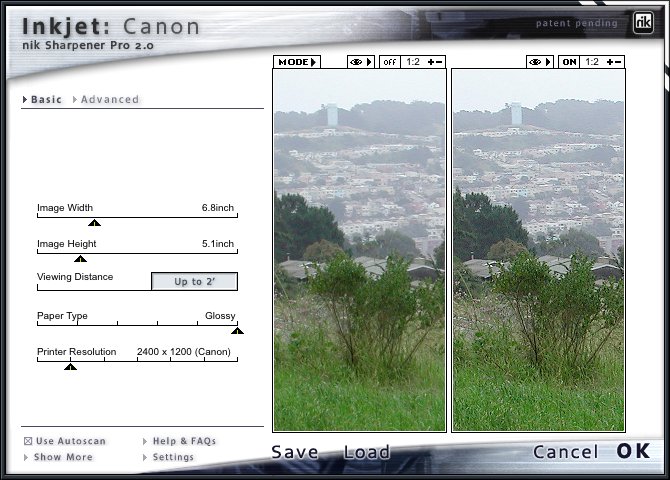 |
| Canon Inkjet Filter |
Sharpener 2.0's dialog box has a new skin and new control layout. Again much of this seems derived from Dfine, which is not a bad thing at all. Let's take the tour.
Basic/Advanced Tab. It may not look like a tab, but clicking Advanced takes you to the last stop on the tour (see below), while Basic displays the core controls, which essentially ask about your output device. Not everything on the following list of controls appears for every filter.
Image Width Slider. Sharpener picks this up from your image size settings as the final print width size. While it doesn't resize your image, it will adjust the sharpening to match any resizing you plan to do in the print dialog box.
Image Height Slider. Ditto. It's picked up from your image size settings and is adjusted to match output resizing.
Viewing Distance Slider. This usually neglected factor is critical. Walk up to a billboard sometime to see what we mean. Version 2.0 uses actual distances (in feet) but we did like the previous approach of Book/Small Box/Large Box/Small Poster/Large Poster. But actual distance is clearer. Just ask yourself if this image is meant to be viewed from your lap (as in a scrapbook), framed on a side table, framed on the wall, as a 10x14 print or a 13x19 print. Each requires different sharpening and this setting optimizes the sharpening for how far away you typically stand when you view this print.
Paper Type Slider. Yes, the paper itself affects the apparent sharpness. For Epson inkjets, as an example, this runs from textured papers to canvas to plain paper to matte to luster to glossy.
Printer Resolution Slider. Inkjets can print at several resolutions and here's where you tell Sharpener what you're up to. But if you don't see your resolution on the slider (which used to happen a lot with the prior version as inkjet resolutions outran the five year old filter), you can set a custom one in the Settings dialog box.
Use Autoscan Checkbox. The prior version used different filters for autoscanning or not autoscanning, but 2.0 let's you simply enable or disable this incredible, indispensible, fantastic option with a checkbox. Using it takes a bit longer, but we think it's nuts to turn it off. It's the intelligence behind Sharpener, distinguishing the unsharpened skin from the sharpened shirt. Especially appreciated in batch operations.
Show More Button. Click this to reveal the Quick Save Slots where you can customize and store settings. It also displays image information and your serial number.
Help & FAQs Button. Good stuff but you won't usually need it to get the job done. Very nice to have so handy, though.
Multiple Previews Button. The options are 1) single large preview, 2) two side-by-side landscape previews or 3) two side-by-side portrait previews. Each preview can be zoomed independently with sharpening turned on or off. So this goes a bit beyond Before & After (which you can see just by holding down the mouse button on the preview).
Analysis Mode Button. Three amazing choices: 1) no overlay, 2) a striped overlay in which the transparency of the stripes indicates the degree of sharpening applied to the underlying image and 3) a red mask in which the degree of sharpening is indicated by the intensity of the red mask with white indicating no sharpening. Patent pending, too.
| Analysis Mode. This full size image shows how we modified Autoscan's sharpening for this image by sampling colors in the distance and turning down their sharpening. The Analysis Mode button lets us see the results with one of two masks. Click image for a 100 percent view. |
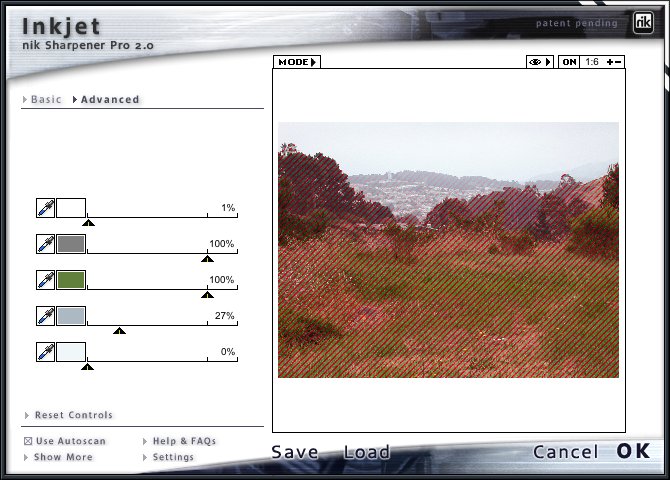 |
| The Striped Mask |
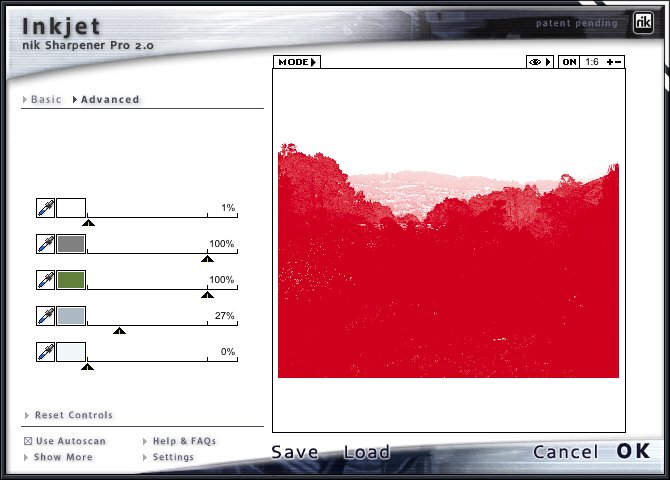 |
| The Opacity Mask |
Preview Toggle. Great for large single image previews. You can see the effect of the filter and the original by just clicking this toggle.
Zoom. While it defaults to Full View, you can toggle to the more useful 100 percent view by simply clicking on the ratio displayed. Otherwise use the plus and minus symbols to zoom in or out.
Save/Load Buttons. Yes, you can save your settings and load them later for similar images.
Cancel/OK Buttons. It wouldn't be a dialog box without these buttons.
Settings Button. This is what you click to store custom settings like printer resolution. But you can also use it to tell Sharpener if you are printing with four or eight inks or printing a quad tone.
 |
| Sharpener Selective. The floating window lets you brush sharpening onto your image with your software's brush tool |
Clicking on the Advanced Tab displays a set of five sliders and a Reset Controls button. The five sliders each have their own Eye Dropper tool to sample a color from the original image and a small box to identify the sampled color. You can adjust the degree of sharpening for any particular sample by moving the slider. This may sound like overkill, but it guarantees you will not sharpen your blue, blue skies. Very cool.
SHARPENER SELECTIVE | Back to Contents
Most geniuses would wrap things up after coding the filters and rush out to be fitted for their Nobel Prize tux. But nik took all this sharpening smarts and applied it to the brush mode of your image application.
Just call up the filter, set it and use Sharpener Selective's Paint option to brush the effect on at the opacity of your choice. Use the Fill option to apply the filter to any selection or the entire image if there's no selection.
And if you have a pressure sensitive Wacom tablet, Selective will respond to the pressure, too.
If you like the results, just click the Apply button. Or just Discard the whole thing.
The proof, of course, is in the print. But even our screen shots show how Sharpener can protect areas of your image from oversharpening and noise. And because it can analyze an image with Autoscan, adapting its sharpening process on the fly, it's just the thing for batch processing.
The Selective tool makes it possible to paint sharpening onto a portrait, say, so you can sharpen the eyes without exaggerating skin blemishes. And the new sharpening views in the Advanced tab show exactly what the plug-in is doing.
Yes, it's expensive. But sharpening is a hard game to play well. There are few plug-ins you would use on every image you print or display. This is one of them.