Essential landscape photography gear: The best cameras, lenses, tripods and more
posted Monday, December 20, 2021 at 3:00 PM EDT
Making great landscape photographs requires more than just a high-quality camera and lens. While you can capture beautiful images without high-end equipment, high-quality gear never hurts. Further, while you can capture stunning shots with a mobile phone, we're considering interchangeable lens cameras for this article.
We'll be discussing a range of equipment, photo-specific and otherwise. You don't need every piece of gear for every landscape situation, but having most of the equipment will undoubtedly offer photographers an extremely well-rounded kit and provide a solid foundation for aspiring landscape photographers.
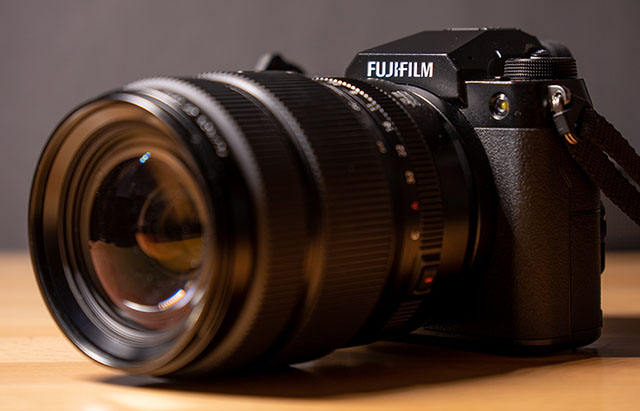
Camera: What kind of cameras are best for landscape photography?
When it comes to cameras, it's difficult to go wrong in 2021. However, that isn't to say that there aren't better choices for landscape photography. The qualities that make for great landscape cameras include:
- A high-resolution image sensor, optimally full-frame or larger
- Weather-sealed, or at least weather-resistant, camera body
- Accurate and reliable autofocus
- Good battery life
- Access to a wide range of high-quality lenses
- A lightweight camera body is a bonus
It's a substantial list. Fortunately, many cameras tick most of these boxes. The Sony A7R series, for example, fulfills all the above requirements. The Canon EOS R5, Nikon Z7 series and Z9, Panasonic S1R, Sony A7R IV and Sony A1, and Fujifilm GFX 100S and 50S II handle all these demands, too. This isn't an exhaustive list, and you'll notice that I haven't listed any DSLR cameras. That's not because DSLRs aren't well-suited to landscape photography – they are – but DSLRs are a bit of a dying breed, and the case for buying into a DSLR system in 2021 and beyond is a tough one. You also don't need the newest model of camera in most cases. Some newer cameras use the same sensor as older models but add bells and whistles that aren't necessary for landscape photography, such as faster shooting speeds, improved autofocus or better video specs. The sensor is critical to landscape photography, so you can sometimes save money by eschewing the latest and greatest and focusing purely on image quality performance.
Of course, you don't need a full-frame image sensor (or a medium-format one, in the case of the GFX series) to capture beautiful landscape images with rich detail. Cameras with APS-C sensors have some advantages, including smaller native lenses, often more compact camera bodies and lower price points. All else equal, you trade a bit of resolving power by opting for an APS-C camera. However, I've made great large prints from cameras with smaller sensors, such as APS-C and Micro Four Thirds cameras.
You also don't need to tick every one of these boxes to build a reliable landscape photography kit. If I had to prioritize traits from the above list, I'd consider a high-resolution sensor, a weather-sealed design, and lens selection as the three most important.
Lenses: What lenses are best for landscape photography?
While there's a lot of variety in terms of cameras suitable for landscape photography, there's even more selection when it comes to lenses. While you can capture landscape images with just about any lens available – I shot one of my all-time favorite landscape photos with a 400mm lens, for example – to keep this section somewhat structured, we're going to discuss more commonly-used lenses for landscape photography and talk about what makes them good for landscape lenses. Because there are so many different lenses for various camera systems, we're also going to be discussing lenses in general terms, like focal length, aperture, and general design features.
Let's start with the traditional landscape lens, the wide-angle lens. In terms of a full-frame lens, these are lenses covering a focal length of around 12mm to around 35mm. Think like a 12-24mm, 14-24mm, 16-35mm, 20mm, 24mm, 35mm, 24-70mm (especially at the wide end), etc. Many kit lenses also start in the wide-angle range. A lens with a wide field of view allows you to capture an expansive scene.
The upside to capturing a sweeping vista is obvious for landscape photography, but there are potential downsides. A large subject can look small if you're not very careful with compositional techniques, which can make a stunning mountain, for example, look less imposing. It's also challenging to compose a strong image when there's so much going on in a scene.
Nonetheless, a wide-angle lens is as much a staple of a landscape photography kit as any other lens. If there's a runner-up, it's a short telephoto lens. Think like a 70-200mm telephoto zoom. This focal length range allows you to bring a distant subject closer and create a more focused composition. It's not going to capture everything in a scene, but there are many times when less is more.
Other lenses can be useful for landscape photography, such as longer telephoto lenses. Occasionally, even a macro lens is useful, although most wide lenses can focus close enough to use interesting foreground elements in a landscape composition.
Other important traits to consider with lenses for landscape photography include a weather-sealed design, lightweight form factor and the ability to accept screw-on filters. This last one is more important than it may seem at first glance. While you can replicate the effect of neutral density and graduated neutral density filters using post-processing techniques, the impact of a circular polarizing filter must be applied at the time of capture using a real, physical filter. For some ultra-wide-angle lenses, including some incredible lenses, there's no way to screw in a filter. You can often find a third-party accessory for using large square or rectangular filters, resulting in a more expensive, more complicated kit. Some photographers accept this tradeoff. However, I urge anyone to think long and hard before discounting the need for a circular polarizing filter for landscape photography. More on that later.
For landscape photography, you typically stop down a lens (except for some night sky photography), so a fast aperture isn't necessarily a high priority. However, strong edge-to-edge sharpness performance is. Whereas for portrait photography, the focus is almost solely on your subject, and you don't necessarily care if the corners of the frame are sharp. Landscape images, on the other hand, regularly include edge-to-edge compositions. You don't want soft corners or a noticeable vignette. It is distracting. There are exceptions, of course, but as a rule, edge-to-edge performance matters more in landscape photography than with some other subjects.
Good lens build quality is important too. Much like an ideal landscape camera is weather-sealed, a workhorse landscape should be as well. You'll often be in adverse elements, and you want your gear to be up to the task. Damaged lenses are bad news.
Autofocus accuracy is important for landscape photography, and it never hurts when a lens offers a good manual focus experience, but other bells and whistles like lightning-quick autofocus and optical image stabilization are nice bonuses but not typically a strict requirement. After all, your subject is rarely moving, and you are typically using a tripod.
Summary: A good landscape lens, then, often has a wide field of view, but narrower lenses can also work very well for landscape photography. The lighter a lens, the better, but not at the expense of build quality, weather sealing or high-quality optics. You don't necessarily need autofocus at all, although an autofocus lens will be more useful for other types of photography, too.
Tripods: The unsung hero of landscape photography
I can't tell you the number of times I've been out capturing photos and seen someone with an expensive camera and pro-level lens affixed to a cheap, shoddy tripod. Now, when I say 'cheap,' I don't mean inexpensive. I mean poorly built. There are plenty of good tripods that don't cost an arm or leg, or three legs. However, there are as many, if not more, cheap tripods that are simply bad. I'm not going to name-drop bad tripods here, but please do your research for any tripod you're considering buying.
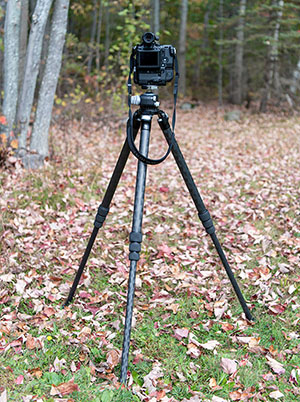
I will happily name drop tripod manufacturers that reliably make high-quality tripods, though. Really Right Stuff, Gitzo, Manfrotto, Peak Design, Vanguard, Benro, and 3 Legged Things make good tripods, just to name a few.
My advice is not to try to cut costs with your tripod. If a deal seems too good to be true, it usually is. You want a very sturdy tripod that is rated to handle more than the weight of your gear, is easily adjustable and, ideally, is lightweight. If a tripod is strong, compact when collapsed, and light? Awesome. If it's affordable? All the better. A great tripod will outlast just about any camera. If you're lucky, a high-quality, well-maintained tripod may last a lifetime.
I use a Really Right Stuff TVC-34L tripod with a ballhead. As you can read in my review, I like it because it's fast to adjust with twisting locks, it is made using carbon fiber so it's light, and it can be made very short by spreading out the legs or made quite tall by fully extending each section. It also stands up well to harsh weather and freezing temperatures. The ballhead is very easy to adjust, and the entire setup is fast and smooth. Now, it's an expensive setup, but its positive traits are available across tripods from other manufacturers at lower prices. It's also easy to take apart, so I can clean it up now and again and tighten pieces with a simple wrench. You should maintain your tripod, just as you care for and maintain your cameras and lenses.
Filters: Neutral density filters and polarizing filters are critical to landscape photography
For landscape photography, some types of filters are nice to have but aren't strictly required. But a circular polarizing filter? That's one you need.
Let's first consider the 'nice to have' category of filters. I put graduated neutral density filters and neutral density filters in this category. You can make great landscape shots without these filters, and you can semi-reasonably replicate the effect of the filters during post-processing. However, using a filter at the time of capture helps, and despite how far photo editing software has come, I routinely use glass filters when shooting landscapes.
Graduated neutral density filters have a dark area at the top that gradually fades to clear. You use this filter to help balance out the brightness in a scene. For example, the sky is often significantly brighter than the foreground at sunrise and sunset, at least in a photograph. The scene may look balanced to your eyes. Still, image sensors have significantly reduced dynamic range compared to our eyes, so you can end up with an image of a blown-out sky and a well-exposed foreground or a well-exposed sky and a very dark foreground. A graduated neutral density filter helps deal with this by darkening the 'bright' part of the scene, leaving the darker part untouched. Graduated neutral density filters come in a variety of styles and strengths. I like filters with a very soft gradation from dark to clear, as it's more flexible and will work for more scenes. I typically use a 0.9 to 1.5 strength filter. 0.9 strength is a good starting point, which is three stops of strength. It will be useful in many scenes.
There are also solid neutral density filters. These are the same strength across the entire filter and are used to slow down your camera's shutter speed. For example, if you're photographing water and want to make the water smooth, you either need to shoot at a very small aperture or in dark conditions. Or you can use a neutral density filter to reduce the amount of light that enters your lens. If you have a strong enough neutral density filter, you can even shoot long exposure photographs in the middle of the day, resulting in unique images with a lot of movement in the clouds and much smoother water. For example, Lee Filters makes a Stopper series of ND filters, including the Super Stopper, which reduces your shutter speed by 15 stops. Suppose you were shooting at 1/250s without a filter, the Super Stopper would increase your exposure time to two minutes. Make sure you find a good neutral density filter, though, as some filters can produce a noticeable color cast.
Now we come to circular polarizing filters. Where neutral density filters are simply about reducing the amount of light that gets to your image sensor, either in a specific part of the image area or the entire frame, a circular polarizing filter is more complicated. Circular polarizing filters control reflections on different objects, like glass, water, leaves and the sky, by filtering out certain light. A circular polarizing filter is rotated, and how you rotate it affects the type of light that makes it through the filter and enters your lens. Light vibrates at all angles, but a polarizing filter makes it such that only light vibrating at a certain angle makes it through the layers of polarizing glass. Reflected light vibrates differently, so you can essentially filter out reflected light using a polarizing filter.
We don't need to get into the weeds here, but you can probably tell that the effect of a circular polarizing filter is done at a fundamental level by a physical substance. It changes the type of light that makes it to your image sensor and dramatically changes the look of your photo in a way that cannot be replicated using photo editing software. While some effects of a polarizing filter, such as a darker blue sky, can technically be done digitally, you cannot change the photons that hit your sensor on your computer. Beneficial effects of a polarizing filter, such as clearer water or and more vibrant foliage, cannot be fully replicated on your computer. Yes, you can darken individual colors, but you cannot just flip a switch that reduces reflections and alters the light that entered the pixels on your image sensor.
If you buy just a single filter for landscape photography, make it a circular polarizing filter. It's instrumental. However, there are some things to think about when using a polarizing filter. If you're shooting with a wide-angle lens, a polarizing filter can make the sky look uneven, with some of it a dark blue and other areas lighter. This can look very unnatural. So, in some cases, it's helpful to capture two photos – using a tripod – with one having the polarization effect and the other image without the filter. You can then combine the polarized foreground, such as a body of water or foliage, with an unpolarized sky to avoid an unnatural-looking sky. The effect of a polarizing filter also isn't as strong when shooting directly toward the sun, so you may want to remove the filter in that situation.
Backpack or camera bag
You need a good way to store and carry your photography equipment. If you already have a backpack, you're probably good to go. But if you don't yet have a carrying solution and want to buy one well-suited for landscape photography, there are a few considerations.
You want a backpack or bag with good protection for your equipment. This means purchasing something with padded inserts or at least a thick exterior. I often like to set my backpack down when shooting, so having something made of a durable, water-resistant material that's easy to clean is important. Even if you plan to keep your bag on your person mostly, you still want something that's at least somewhat resistant to weather or comes with a waterproof covering you can put on when the weather gets harsh.
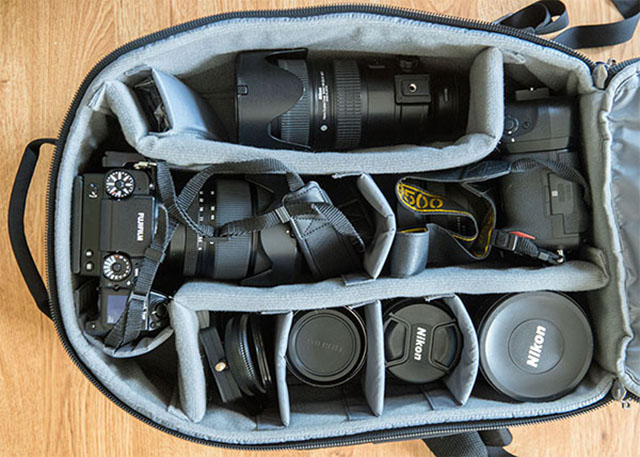
You also want to make sure that a backpack or bag is comfortable to wear for extended periods. Now, it's tough to know that ahead of time, but it's important to find gear with positive user reviews from verified customers. We occasionally review backpacks and bags here on Imaging Resource, too, and we've liked bags from a wide variety of manufacturers, including Think Tank Photo, Mindshift, Lowepro, Peak Design, Brevite, Shimoda, and more.
I use a Think Tank Photo Streetwalker Hard Drive V2 backpack most of the time. It's quite large, but it holds multiple camera bodies and lenses and has space for filters, memory cards, batteries, and a laptop or tablet. It also has tripod straps on the front. It's a fantastic backpack, and if you carry a lot of gear, it's a great choice. It also works great as a carry-on bag, which is a nice bonus. It's comfortable and has withstood a lot of harsh weather and abuse over the years.
Other gear and accessories: Extra batteries, memory cards, cleaning cloths and more
Beyond your camera, lens, tripod, filters and backpack, you also want extra batteries. While mirrorless cameras are amazing, they come up short in the battery life department, at least compared to DSLR cameras. An extra battery or two is a very worthwhile investment. Likewise, extra memory cards should be slipped into a backpack pocket, too. They take up little space, and you never know when you might need them.
I also keep a multi-tool handy in case I need to tighten something on my tripod or adjust a camera tripod plate. You also might get your gear wet, so a small towel to touch-dry extra water is good. While my gear is weather-resistant, I still prefer to keep it dry when possible. Similarly, keeping a few microfiber cloths handy to wipe down filters and lenses is important. It's very frustrating to have a dirty lens, and while a shirt can clean a lens, that's not the best way to treat expensive glass. (Full disclosure, I have done that when in a pinch).
While you don't need specific clothing or attire for landscape photography, you want something comfortable, and warm if you plan to be in colder conditions. You want to stay as comfortable and as dry as possible. You also want sturdy footwear, especially if you plan to hike. I often shoot in and around water, so I invested in a nice pair of waterproof boots with a grippy sole. Honestly, the Muck Boots I use might be one of the most important pieces of landscape photo gear I own, as they've allowed me to capture many different images safely and comfortably. Footwear is the unsung hero of landscape photography.
Preparation: The most important step might happen before you step out the door
Prep work is critical to landscape photography. While there's no substitute for in-the-field scouting, you can do an awful lot of preparation on a computer or smartphone. Of course, you need to keep an eye on the weather, and there are many great resources for that. Over many years, Accuweather.com has proven to be a reliable resource. The National Weather Service is also a great option for those in the US.
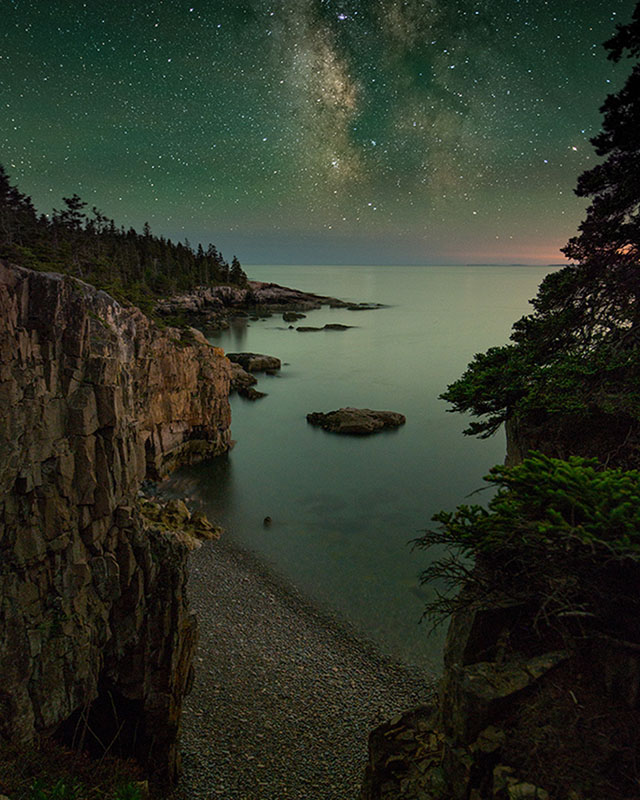
If you are going to shoot at night, keeping track of the moon phase and current celestial bodies is important. I like to use Sky Guide (free with in-app purchases) on my phone to keep track of all things night sky. For aurora forecasts, I visit Spaceweather.com. If you need help finding a dark sky for good night sky photography, DarkSiteFinder.com is an excellent resource.
For keeping track of the sunrise, sunset and the ever-important angle of the sun, The Photographer's Ephemeris ($9.99) is a fantastic app. You can pinpoint any specific location on Earth and view a ton of data. When shooting near the coast, I also need to know the tidal conditions, as those dramatically impact the look of many different locations. I like TideTrac ($4.99) for that, but like with weather and night sky conditions, there are many different websites and apps you can use.
I also keep a small notebook in my backpack for jotting down any ideas or notes in the field as I have them. I like to make small notes about certain locations. Perhaps a spot isn't great when I'm there, but it could be with certain conditions, so I make a note of that.

Wrapping up
I know that some of the information we've shared here may seem obvious. Still, hopefully, every beginner landscape photographer has picked up an idea or two about what they should have in their essential landscape photography kit.

My parting thought is this. You can capture great landscape photos at nearly any time in nearly any place, but it will be so much easier if you plan ahead and get out there before sunrise and stay out after sunset. Unfortunately, there's no explicit gear for that, although an alarm clock and caffeine may help. The best landscape photography conditions are rarely comfortable, and it's never easy waking up at 3 in the morning. However, it's worth it.