Phase One Capture One Pro 10 Review: A very powerful RAW processor and image editor
posted Monday, May 1, 2017 at 6:00 AM EDT
When photographers are looking for a RAW editor, there are a variety of choices and two of the most popular are Adobe Lightroom and Phase One Capture One Pro. I have been a longtime user of Adobe Lightroom, but I’ve always been interested in Capture One Pro after hearing many photographers talk about its excellent RAW processing capabilities. Phase One was kind enough to provide me a copy of Capture One Pro 10 to review.
This review is written in the context of someone who is not only new to Capture One Pro, but is used to a different RAW editor. For longtime Capture One Pro users looking for advice on whether it is worth upgrading to Capture One Pro 10, I will only be able to comment on Capture One Pro 10 as standalone software, although I will be sure to mention features that are new to 10 as I discuss them.
Key Features
- Capture One Pro 10 places a major emphasis on color, from its unique triple threat color balance tool to its color editor, there are lots of ways to control color in C1.
- There is a lot of control in the black and white conversion tool as well, showing that color doesn’t have all the fun.
- The software includes a lot of customization in terms of user interface and overall workflow.
- Asset management is important and Capture One includes many ways to manage, locate and filter your files.
- Local adjustments are easy and intuitive, meaning that you can perform a lot of edits within Capture One Pro. Of course, if you need to go to Photoshop, you can do so and quickly return the edited file back into C1 seamlessly.
- For sharpening and noise reduction, there are many sliders at your disposal. There is also a new output proofing mode to let you see what a sharpened output file will look like, which is particularly useful when processing images for web viewing.
- Tethered shooting. This is not something I use, but for studio photographers, Capture One Pro offers powerful tethered shooting tools.
What makes Capture One Pro 10 unique?
Capture One Pro 10 is fast – very fast. Even when working with large RAW files, the software allowed near-instant previews and real-time edits. In my personal workflow, the software proved capable of quickly handling everything I threw at it, which has not always been the case with other software.
C1 Pro 10’s RAW processing is well-regarded, and with good reason, as it is excellent. Its Color Editor and Color Balance tools are very good. They are intuitive and powerful. An aspect of how C1 handles color that I particularly enjoy is its Contrast slider, which does not affect saturation. Typically, when you adjust the contrast in an image, it adjusts the colors as well, forcing you to either deal with it or utilize a separate luminance-based adjustment – which C1 does right in its slider. While the result is not unique, the software’s simplicity here is noteworthy.
As you would find in Photoshop, Capture One Pro includes layer-based adjustments, which allows masking via gradients or brushes as well. It’s easy to make complex masks to localize adjustments in a non-destructive manner.
User Interface
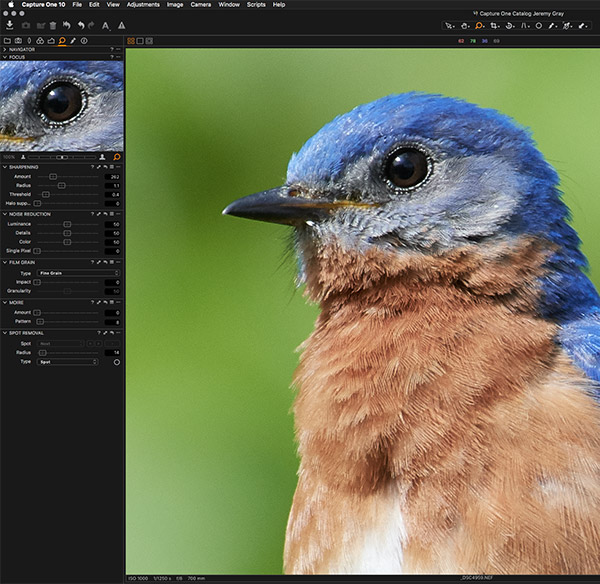
Capture One Pro 10 utilizes a singular user interface which is highly customizable. There are no separate modules within the software, but rather you manage and edit within the same window without the need to switch between different workspaces. This keeps things quick, but it also means that there can be an awful lot going on within your display. That’s where the customizing comes in.
Customizing your Workspace
The default arrangement worked very well for me. On the left side of the screen, there are numerous buttons, starting from “library” and then working its way through different editing tools. The area below the buttons fills out with various folders, graphs and/or sliders depending on what you are doing. A quick note on the sliders, you can slide them or enter specific numbers for all of them, which is great. Sliders work well much of the time, but it’s nice to be able to quickly enter precise numbers. You can also use the up and down cursor keys to make incremental changes to any sliders.
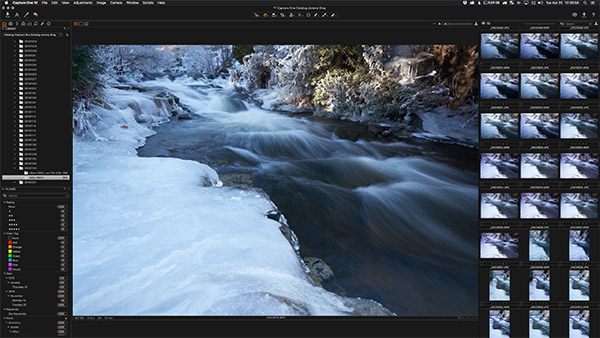
In the center of the workspace is your selected image. There is not much to say about this except that the software was quick to show selected files, zooming in and out is fast and the image renders quickly.
To the far right there is a grid of thumbnails for the folder you’re viewing. I found that by default the thumbnail view was too narrow, so I expanded it a bit. What’s nice about Capture One Pro is that you can customize the different panes and drag parts into different orders or add/remove parts of the workspace whenever you want. It’s easy to get the look and functionality you want.
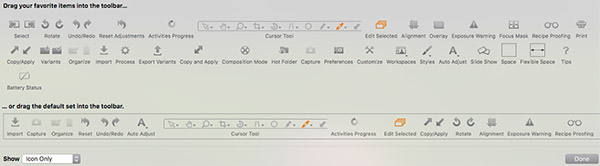
Across the top of the window is a toolbar. The default toolbar is pretty good, offering pretty much everything I wanted fast access to. I removed a couple items and added a few different ones. It is very easy customize the toolbar.
Catalogs versus Sessions
Capture One Pro offers two options to manage your images: catalogs and sessions. Sessions are unique to Capture One and offer a means for you to import and process RAW images and save edited versions alongside the originals. This is particularly useful when working tethered. A session is stored in multiple subfolders: Capture, Output, Selects and Trash. You can go through a set of images, say ones you captured on a particular day, and proceed through your standard workflow. This does not keep all your images together, but rather breaks them up into special groups. A catalog, on the other hand, can organize an entire library of images. You can move sessions to a catalog if you so choose and operate with a sort of hybrid combination workflow, but it is worth noting that you can only work from your system's folders when using Sessions.
Personally, I'm a big fan of a catalog-based system, but the great thing about Capture One Pro is that both sessions and catalogs are available to users.
Searching and Filtering
Capture One Pro offers powerful searching and filtering options. For example, I was looking for images shot at a certain aperture because I typically shoot images for focus stacked composites with my 24-70mm f/2.8 lens at f/8 whereas I shoot at f/11 or f/13 for a single frame of the same scene. I like to have options later, but it can make finding certain images after the fact a bit tricky. A few quick clicks in Capture One and I can view only images shot at f/8. You can refine your search by using multiple filters and the list of options as immense, as you can see in the screenshot below.
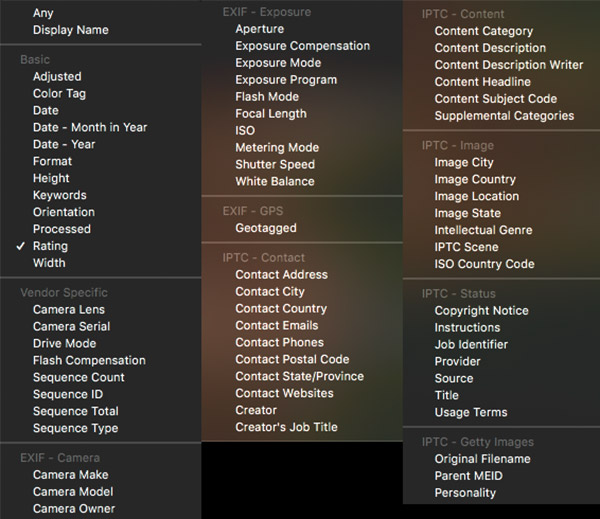
Image Editing
When I import RAW files – from a wide array of cameras – into Capture One Pro 10, they look good immediately. The software does a great job giving you an excellent starting point for your RAW files. I have not always found this to be the case with other RAW editors I’ve used, finding RAW files straight from the camera to look dull and washed out. Not so with Capture One Pro 10.
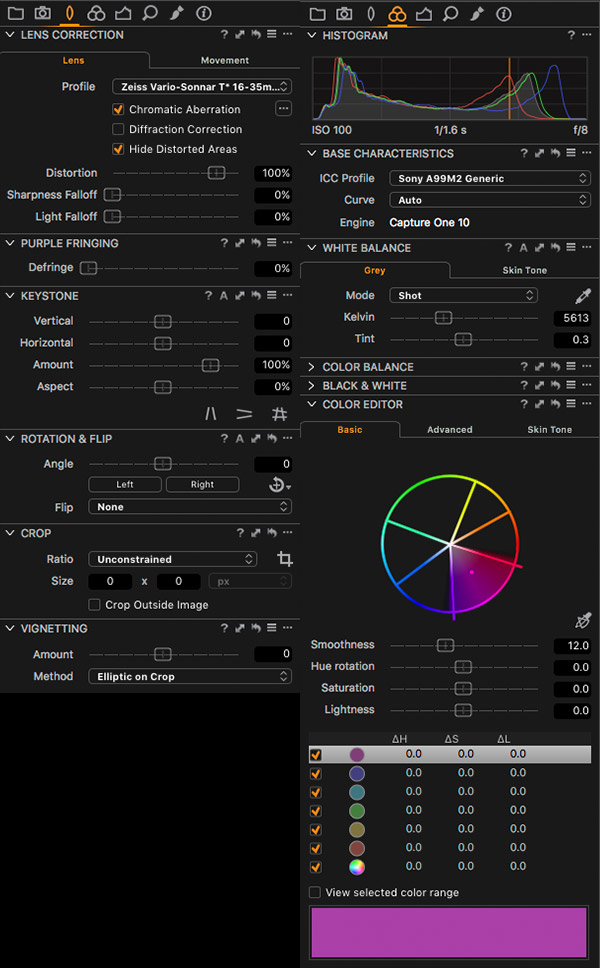
This is due in part to Phase One’s custom profiling of all of the more than 400 cameras they support. The team captures hundreds of images with different cameras, shooting a variety of scenes, and dials in their profiles to deliver the best possible RAW conversions. Obviously you are shooting RAW files so that you can bring the best out in your images during post-processing, but it’s nice to have the solid starting point that Capture One Pro provides. Plus you can customize how Capture One handles your RAW files with a variety of Film Curves, which I like a lot. These provide different overall looks to your images, such as one which one boosts contrast and another that increases shadow detail.
Shadow and Highlight Sliders
Speaking of shadow detail, the "High Dynamic Range" sliders (which are highlight and shadow sliders) in Capture One Pro 10 work very well. Individual results will vary depending on the file you're working with, but I was impressed with how natural the results were for both sliders and highlight slider in particular does a great job.

These sliders are also available for local adjustments, which is excellent, as I don't always want to reduce all the highlights in an image nor boost shadow detail universally.
Curves
Curves in Capture One work as expected. There is an RGB curve and separate Luma, Red, Green and Blue curves. There are some built-in preset curves you can select as well, including a useful one which places five points on the curve at equal distances to allow easy S-curve adjustments without requiring you to place the points manually. It's a small thing, but it's a helpful feature. There's also a color picker you can drop on your image to automatically place a corresponding point on the RGB curve.
Sharpening
Sharpening has undergone a big change in Capture One Pro 10. There is now a 3-step sharpening process: capture sharpening, creative sharpening and output sharpening. Capture sharpening includes "diffraction compensation" in the Lens Correction adjustments and it offers a subtle, yet effective, sharpening effect on images which lack a bit of detail due to lens diffraction. Some users might find that it doesn't quite make up for serious diffraction, but it does provide natural-looking results that don't introduce nasty artifacts, which is quite impressive considering what the software is working to achieve.
Creative sharpening includes sliders for amount, radius, threshold and a new fourth slider, halo suppression. Halo suppression basically reduces the odd artifacts that can appear around edges during sharpening giving your image an unnatural look. I personally like to sharpen my images with a subtle touch, but halo suppression allowed me to sharpen my images a bit further than usual without introducing unnatural edges and halos in the image. Another new creative sharpening feature for Capture One Pro 10 is that all four creative sharpening sliders are now available on individual adjustment layers. Adjustment layer sharpening was previously limited to amount.
Also, there is a new output sharpening mode with on-screen proofing. This is in the Process Recipes tool and it provides a real-time look at how your image will appear when exported with your selected sharpening process applied. This is great for seeing how images will look on the web, as often images can look a bit off when sharpened and viewed at smaller sizes.
Noise Reduction
Noise reduction in Capture One Pro 10 works well overall. You have control over four sliders: luminance, details, color and single pixel. Luminance, details and color work as you'd expect if you've worked with other RAW processors, but "single pixel" is noteworthy, especially for photographers who do a lot of long exposure work, particularly at high ISOs. It can take a long time to manually remove hot pixels from images, I've spent countless hours over the years removing pixels one by one and scanning my files at 100% to find those little red, green, blue and white pixels. With Capture One Pro, you don't need to deal with them manually, just slide "Single Pixel" up and the software will eliminate almost all of them, particularly the colorful ones. I did find that the software left behind some white pixels, but the amount of time and effort saved is still great.
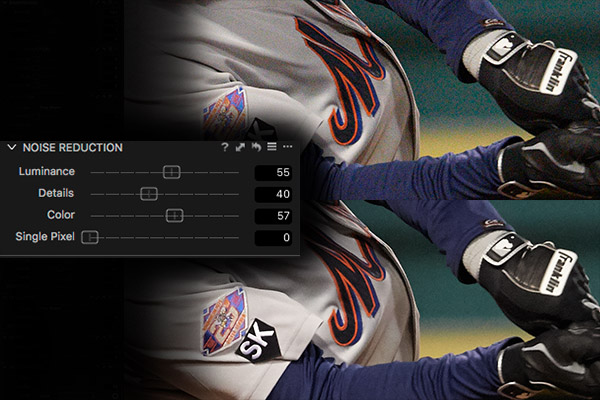
The noise reduction performance is certainly up there with some of the best. I have long been a proponent of the Nik Dfine plugin for removing noise, but Capture One Pro does a very good job as well. I did find that it was difficult to smooth out rough color areas in high ISO images in Capture One because the Color slider paints with too broad a brush, so to speak, and reduces overall color in the image too much. When dealing with noise reduction, there is certainly subjectivity involved because some people are okay with more noise and more detail, whereas others prefer as smooth an image as possible. Of course, it depends on the final application for the file as well as to how much noise is too much noise.
Overall, the standard noise reduction is quite good and allows you to dial in noise reduction to your personal preferences, but the star of the show is the Single Pixel noise reduction slider, which depending on what type of photography you do, could save you a lot of hassle during post-processing.
Color
In some Capture One Pro marketing materials, you will see things like "all about color." You have likely also heard about how great the color tools in the software are from photographer friends and colleagues. Honestly, nobody has oversold what Capture One can do with color. It's very impressive.
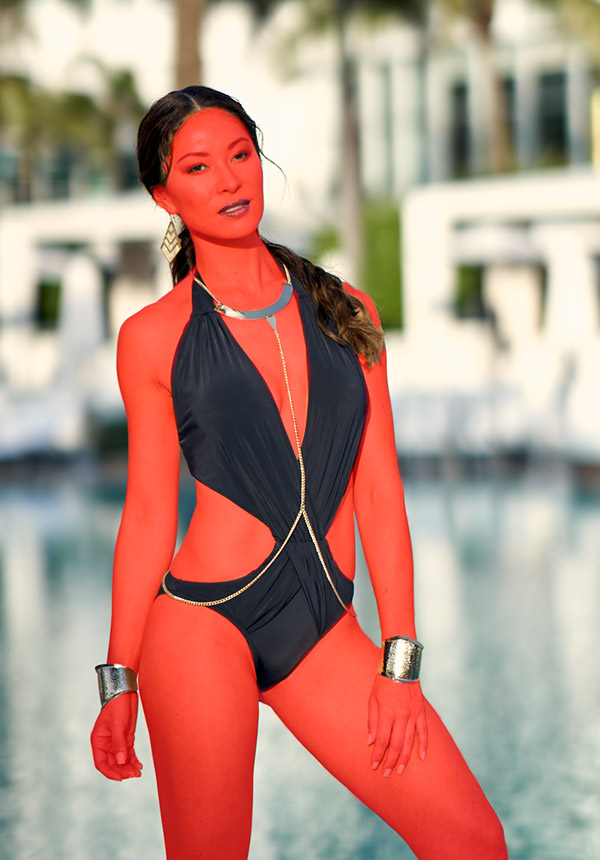
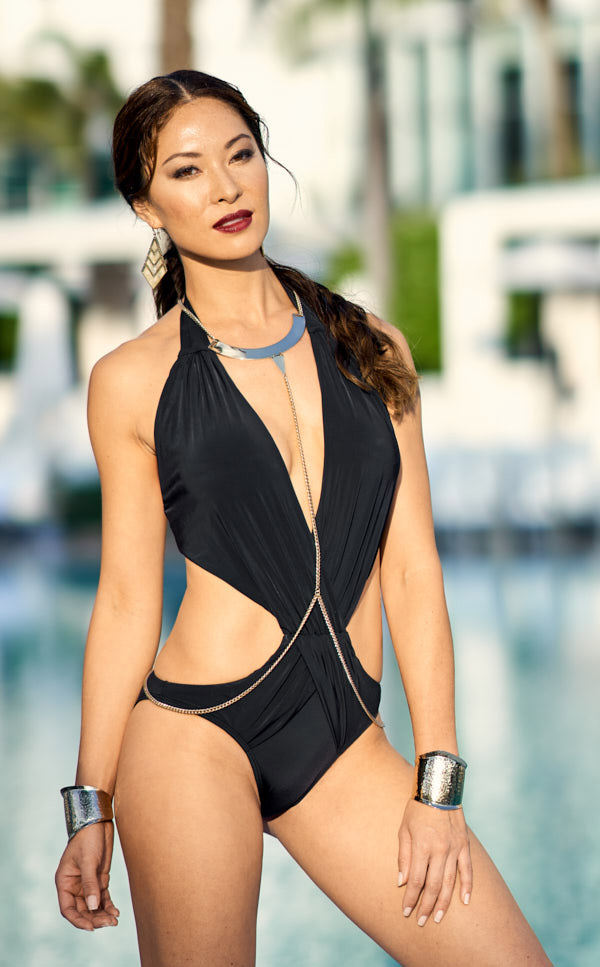
Let's start with white balance. There are grey and skin tone white balance tabs, both of which include a number of presets and also color picker tools. There is also auto white balance (accessed by clicking the 'A' at the top of the tool) which works very well. I was consistently impressed with the automatic results that Capture One provided for white balance and other tools.
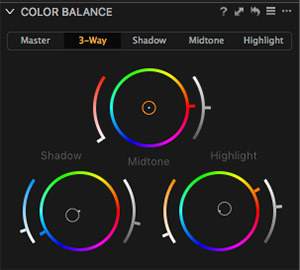
Moving on to Color Balance, this is where the software shines. There is a master selector but individual color wheels for shadows, midtones and highlights. Being able to quickly adjust the color tone of just highlights or shadows in an image is very powerful and allows you to quickly and easily control the overall tone of the image. You can also adjust lightness and saturation for each tone using this same tool.
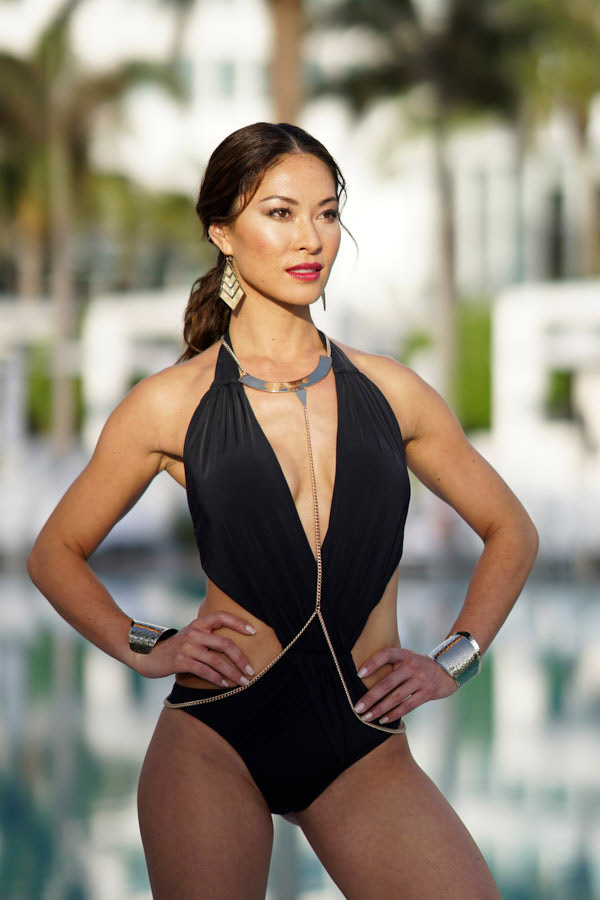
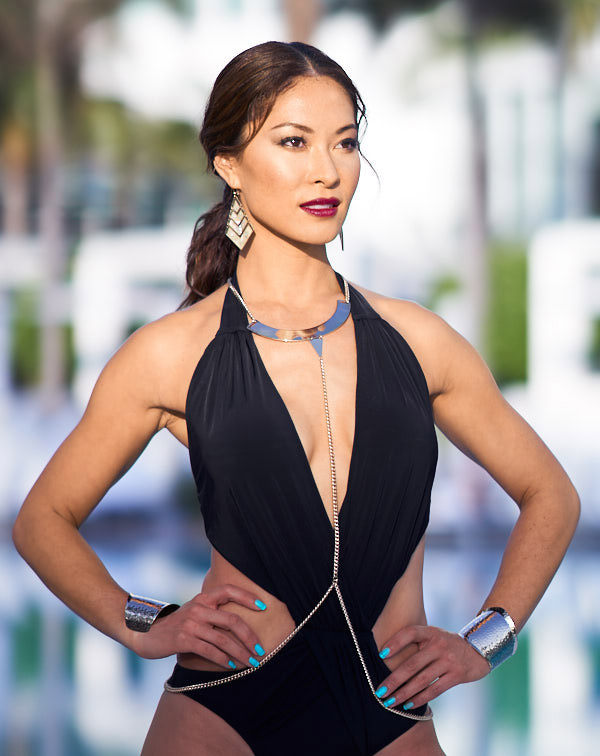
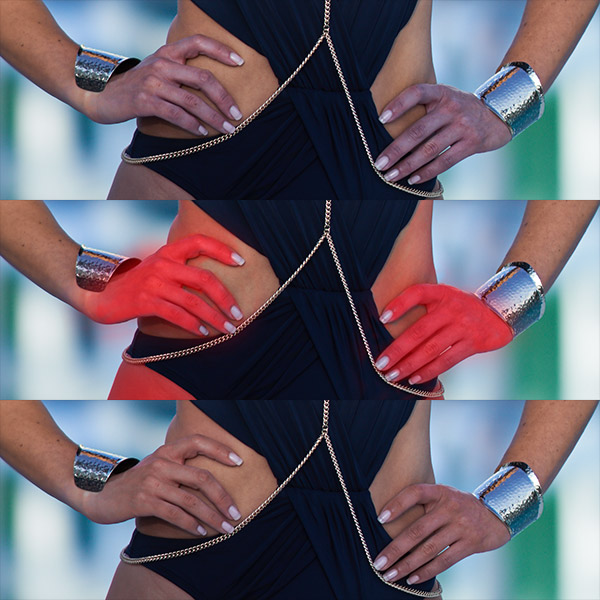
There are more color tools at your disposal here, including the Color Editor. In the Color Editor, which is also very useful when making local adjustments, you can make basic adjustments to six different colors, including smoothness, hue rotation, saturation and lightness. The advanced color tool allows you to pick and customize individual colors using a color picker and offers the same adjustments. Finally, there's a skin tone tab which you can use to make skin tones more uniform and adjust their hue.
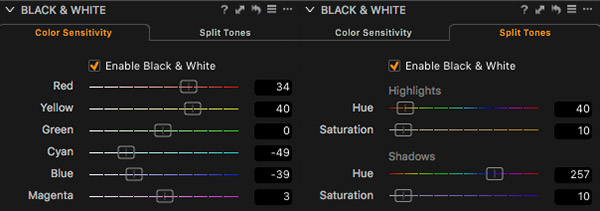
There is more to color adjustments than simply color images though, as the black and white conversion tool is also very powerful. It offers similar sliders to those you might find in Nik's excellent Silver Efex Pro plugin. Capture One lets you adjust individual color sensitivity for red, yellow, green, cyan, blue and magenta channels. Further, you can quickly create and fine-tune split toning.
Local Adjustments
Capture One offers layer-based local adjustments. While plenty for most uses, the software does top out at 16 layers, which may be a bit disappointing for photographers looking to extensively fine-tune their images within Capture One Pro. Personally, if I need to make that many tweaks, I’d take the image into Photoshop anyway, but it is worth pointing out the layer cap.
When using the masking brush, I was pleased to find that my Wacom tablet worked very well and that the software is optimized for Wacom tablet use. You can customize your brush with size, hardness, opacity and flow settings. Further, you can toggle on an airbrush option, whether you want to utilize pen pressure, link brush and eraser settings (very useful) or if you want to use the software’s auto mask functionality.
Regarding auto mask, I was at times very impressed with how well it worked while at other times I was surprised that it came up short. Even in areas with smooth and distinct lines, auto mask sometimes didn’t seem to function or just did a poor job. Other times, auto mask saved me a lot of time, so it was certainly a mixed bag. I would prefer that the software offered some feathering options to help prevent unnatural gradations and haloing when making certain adjustments.
I liked the ability to copy masks from one adjustment layer to the next and when used in conjunction with inverting masks and the ability to quickly fill in a mask when you make a solid outline around an area, Capture One Pro 10 offers a variety of useful ways to save time.
By tapping M, you can toggle viewing your mask, which by default is a bright red which works well most of the time. The masking brush performance was generally good, although when working on large files and making large brush strokes, the software occasionally slowed down and was slow to display my mask. The performance depends on whether you’re using auto mask as well, which I recommend turning off when you don’t need it, as otherwise you could get some surprising results and slower overall performance.
Performance
As with previous Capture One Pro updates, performance is an area of focus in the new version. The software runs smoothly and quickly overall, although I did find that it took up quite a bit of RAM when used. Further, it can take a long time to generate previews depending on how you have preview quality set (I set it to my native monitor width).
There's no question that Capture One Pro 10 is a highly-optimized, efficient piece of software although it's powerful and somewhat demanding, so check to make sure your system is well-suited for running the software by reviewing the minimum system requirements.
Tethering is a big part of Capture One Pro's appeal for studio photographers. I am not one of those photographers and wanted to dedicate more time to testing out the functionality, so I will cover this later in a separate Caffeine Priority article.
Price
Capture One Pro 10 is a powerful tool and the result of extensive development. The cost of Capture One Pro 10 is $300 for a single-user, three-seat license. You can also purchase Capture One Pro 10 as a subscription, which is $180 for 12 months or $25 per month for a 3-month subscription. There are a number of subscription options available, see here.
If you're upgrading from Capture One Pro 8 or 9, the price is just under $100 to upgrade to Capture One Pro 10. For more information on the new features in 10 and whether it's worth the upgrade for you, see the video below.
If you'd like to try Capture One Pro 10 for free, you can download a free trial here.
Capture One Pro is great, but no software is perfect. What needs improvement?
- While the spot removal tools in Capture One work generally well, there is not a great way to make more complex removals or fixes to images. For example, say you want to remove a stray hair, that’s simple in Photoshop. You could eventually get there using cloning in Capture One Pro, but it’s not nearly as powerful as what you can find in Photoshop. Granted, Capture One Pro isn’t meant to be a Photoshop replacement, but nonetheless I would like more powerful healing tools built-in.
- I’m a big fan of plug-ins. I use a variety of plug-ins within Lightroom, but Capture One Pro doesn’t support plug-ins.
- On a further note, I am not impressed that Phase One has thus far refused to support competing medium format cameras. As you may know, Phase One makes expensive, high-end medium format cameras and lenses. This has resulted in the company opting not to support competing cameras in Capture One Pro 10, including the new Fuji GFX. So while their camera support is extensive, if you are fortunate enough to shoot with a medium format camera such as the Pentax 645Z, Hasselblad X1D or Fuji GFX, your RAW files will not be officially supported unless Phase One changes their current position, which I certainly hope they do.
Conclusion
What I liked:
- Customizable user interface
- Powerful RAW editing
- Excellent camera profiles
- Great shadow/highlight recovery
- Extensive control over sharpening and noise reduction
- Fantastic control over color
- Capable local adjustments
- While not related to the software, Phase One offers excellent video tutorials and webinars for free online
What I didn't like:
- Somewhat steep learning curve
- Can take a long time to build full-size previews during import
- Uses a lot of system memory
- Auto masking comes up short at times
- Local adjustment brush sometimes slows down when making large selections
- Fairly expensive
- Does not officially support non-Phase One medium format cameras
While Capture One Pro 10 can take a while to learn, and I have a lot more to explore further as I continue to implement it into my workflow based on its quality and power. I've never seen RAW files look as good as they do in Capture One Pro. Their RAW processing engine is incredible. Further, the precise control you have over color in Capture One Pro 10 is second to none.
For the purposes of this review, I received a license for Capture One Pro 10 from Phase One. No other compensation was received.