


Overview
Canon PowerShot A630 Overview
by Mike Pasini
Hands-on Preview: 11/22/06
Full Review: 01/30/07
The Canon PowerShot A630 couples an 8.0-megapixel CCD imaging sensor with a 4x optical zoom lens that offers a 35mm-equivalent focal range of 35-140mm, a moderate wide-angle to a somewhat more generous telephoto than you'll find on most compact cameras. Maximum apertures vary from f/2.8 to f/4.1 across the zoom range. The A630's sensor yields an ISO range equivalent to 80 to 800, while shutter speeds from 1/2,500 to 15 seconds are possible.
Designed with ease of use in mind, the Canon A630 offers both a range of features that make it approachable to beginners, as well as the ability to exert more control over the photographic process. For the former category of users, there's a fully automatic mode, and a generous selection of thirteen scene modes. For the latter, you'll find Manual, and Aperture Shutter Priority exposures possible, plus preset, or manual White Balance, and three Metering modes. A VGA-or-below Movie mode captures videos at a maximum of 30 frames per second, for up to one hour (or one gigabyte) per clip.
The Canon A630's USB connection allows easy offload of images from the SD, or MMC card to a Mac, or PC -- and unlike some manufacturers who are still clinging to the older USB 1.1/2.0 Full Speed standard, Canon has adopted a much swifter USB 2.0 High Speed interface in the Canon A630. For users without a computer (or those who like to make quick prints without the hassle of touching their PC), you can bypass the extra step completely, and print directly from the PowerShot A630 to a Canon, or other PictBridge-enabled printer via the same fast USB connection.
Though it has a relatively large 2.5 inch LCD, Canon kept a real image optical viewfinder in the A630's design. Not only can optical viewfinders help to save battery life by turning off the LCD display, they're also useful when ambient light makes it tough to see many LCDs properly. Power comes from four AA batteries, and Canon includes single-use alkaline disposables in the product bundle. Also included with the Canon A630 is a not-so-generous 16MB MultiMediaCard. If you don't already have some, you'll want to purchase some rechargeable batteries, and a larger flash card along with the camera.
Canon PowerShot A630 User Report
It seems to me that if you can't find a Canon that matches your requirements, you just haven't looked very carefully. The Canon lineup is so rich with options it's often hard to tell one model from another. The Canon A630 might, for example, be easily confused with the A640, except it has an 8.0-megapixel sensor and doesn't support remote capture. Neither of which strike me as a problem. Especially when the savings amounts to $100.
Canon shares my opinion, it seems, because the manual for both models is identical. Or I should say the "manuals" because you need a set (the Basic, the Advanced, the Printing manuals). The A640 is black while the Canon A630 is silver, but the bodies are otherwise identical.
It's rather astonishing you can get so much camera for $300 these days -- especially considering its extensive exposure options. The Canon A630 is a classic.
Design. And there's some sweet stuff in these bodies, too. A large 2.5-inch LCD is always welcome, but these are what Canon calls Variable LCDs (articulated ones, that is, that swing out and rotate up or down so you can compose a shot with the camera over your head or down low). Canon has also included an optical viewfinder on the A630, which despite its approximate rendering of the scene is indispensable when the glare of the sun makes it impossible to see what's on the LCD. Although here again, having an LCD you can move independently of the lens means you can often eliminate that glare.
As with other A-Series Canons, the A630 has a grip you can get your hands on thanks to the four AA batteries it uses for power. Although it's substantial, the grip isn't too fat to keep the Canon A630 out of your pocket, although I tended to prefer to simply swing it from my wrist so it was ready for action.
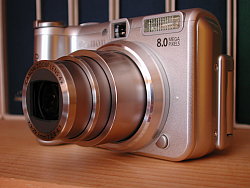
Front. Shows lens extension at full telephoto.
The Canon A630 doesn't cheat on exposure options either. There's green Auto for those times when you have other things on your mind, and Program when you want to have at least EV control over exposure. But there's also Shutter and Aperture Priority modes. And -- drum roll -- a full Manual mode as well. Add a Custom mode to save a special configuration and there's really little you can't do with this digicam.
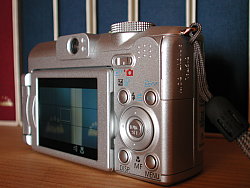
Back. LCD is hinged on the left, all the controls are right under your thumb on the right.
On the other end of the Canon A630's Mode dial, you have Movie, Panorama, and Special Scene modes. There's also the primary Scene modes: Portrait, Landscape, and Night Scene.
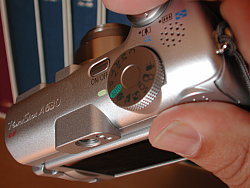
Grip. In shooting position, the camera is very comfortable to hold.
The controls and menu system have, by now, evolved into a package that's really comfortable to use once you learn how to play the game. In Auto, you don't worry about the buttons at all. In Program, just hit the Canon A630's EV button and change the exposure with the Left or Right arrow keys. Shutter and Aperture Priority modes use those arrow keys to adjust their values, too. Manual uses the EV button to toggle between aperture and shutter speed, both adjusted with those same arrow keys.
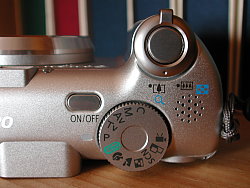
Top. The Mode dial behind the Shutter button is easily checked while you shoot. Note the alignment of the lens, viewfinder and eyepiece on the left.
In short, this is a well-design machine.
Display/Viewfinder. The 2.5-inch LCD is large by any standard but it only displays 115,000 pixels. The big news, however, is that you can swing the Canon A630's LCD out from the back of the camera and twist it up or down. You can even flip it back so it pops right back into the rear panel as if it were an ordinary LCD.
Once you've used an articulated LCD, you'll never want to be without one.
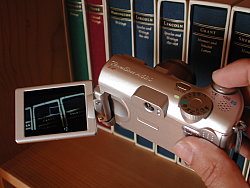
Articulated LCD. Beats putting your nose up against the back to see through the optical viewfinder.
To illustrate the amazing angles you can shoot from without even twisting your neck, I set the Canon A630's LCD so I could look down at it while the camera poked its nose into the corner of a bookcase where it could see a few titles in Macro mode. To shoot this shot with an ordinary LCD, you'd have to put your eyeball in line with the back of the camera. You'd be squatting, that is, with your head bent back.
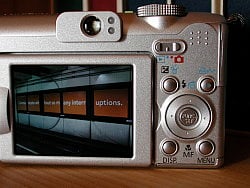
Articulated LCD. But you can fold it back to use like any other digicam.
More typically, you just want to shoot from a lower or higher angle than eye level. After all, everyone knows what things look like from eye level. But drop the Canon A630 down to floor level, angling the LCD up so you don't have to lie flat on the floor, and you'll get some marvelous shots of children at play in the low-rise world they inhabit. And when you're straining your neck to look over the crowd in front of you, just raise your arm with the Canon A630's LCD angled down to get an unobstructed shot from above.
On of my favorite photo tricks is to shoot at angles other than eye level. An articulated LCD makes this easy to remember and fun to do.
Performance. I'm sensitive to slow startups and reluctant shutdowns. They actually change my behavior. If they're really slow, I leave the camera behind. If they're annoyingly slow, I leave the power on and hope the thing wakes up from sleep fast. But I prefer to manage my battery life by shutting down when I won't be taking a shot for a while and turning the camera on just before I want to shoot.
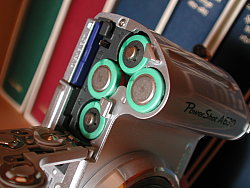
Battery/Card Compartment. Four AAs and an SD card.
The Canon A630 is, I'm happy to say, responsive enough that I can do that. I never seemed to miss a shot waiting for it to start up and I certainly never hesitated to shut it down for fear that starting it up again would take too long.
Shutter lag is increasingly a thing of the past and the Canon A630 is responsive here, too. I didn't happen to shoot any action shots with it, but from the time I decided to press the Shutter button and the actual trip of the shutter were not far from simultaneous.
Shooting. I took the Canon A630 on two outings. The first was a bike ride up Twin Peaks to shoot my usual cityscapes. It was an usually clear Fall day, so the A630 took some fabulous shots, among the best I've gotten there.
But one of the things I like to try up there is digital zoom. Canon's digital zoom isn't bad at all, a far cry from the old resamplings that led Dave to warn against ever using it. It may not be quite as satisfying as a few other companies manage (you can tell a digital zoom shot from a telephoto one), but don't feel like you have to avoid it.


Zoom. Four times optical, plus 4x digital.
Maybe it was the clearness of the air, but my shots of very distant objects came out much better than I'm used to. The Bay Bridge and the Golden Gate Bridge are usually disappointing. They're flat here (nothing Auto Levels can't fix in a mouse click) but they fill the frame with detail.
You see this particularly in the three-shot sequence that starts at wide angle and includes the rock wall right in front of me. There just happens to be an accommodating post right there that lets me steady the camera without hauling a tripod up the hill. From that same position, the next shot shows the full telephoto crop. And the last in the sequence shows full digital zoom. That's really quite a range at 16x (4x optical with 4x digital) and, as the bridge shots show, on a sunny day you don't need image stabilization to enjoy it.
The other shoot was a walk through the Berkeley on a warm spring afternoon. None of the street scenes enjoyed much reflection or setup time. It was turn and fire, turn and fire. The campus scenes are familiar shots to me but, again, I didn't linger.

Contrast. Nice range of tones, avoiding blown highlights and plugged up shadows.

Natural Color. Color was also very credible.
What's interesting to me about these is that despite the high contrast of the autumn light, I don't see the usual blown highlights and oversaturation common with many consumer digicams. They look very much like what I saw. And I didn't fiddle with the Canon A630. You'll notice these are all 0.0 EV.
Now that's a camera. You see a shot you like, you fire it up, compose the scene on the LCD and shoot. Take a second or two to review it, smile and shut it down as you continue on. See two or three things you like, leave it on, compose and shoot. When you get home, take a more careful look on your monitor and be even more pleased with the results. The Canon A630 knew what it was doing even when I didn't have time to check. I got great shots with little effort, all the time.
Basic Features
- 8.0-megapixel CCD delivering image resolutions as large as 3,264 x 2,448 pixels
- 2.5-inch color LCD monitor with 115,000 pixels and rotating, swivel design
- Real-image optical viewfinder
- Glass, 4x, 7.3-29.2mm lens (equivalent to 35-140mm zoom on a 35mm camera)
- 4x digital zoom
- Nine-point auto and manual focus modes, with adjustable AF point
- Auto-focus assist light
- Full Automatic, Program auto-exposure, Shutter Priority, Aperture Priority, and full Manual exposure modes, as well as three Scene modes, several Special Scene modes and Movie mode
- Manually adjustable aperture setting ranging from f/2.8 to f/8.0, depending on lens zoom position and shutter speed
- Shutter speed range from 1/2,500 to 15 seconds, depending on aperture
- Adjustable ISO from 80 to 800 equivalents, plus Auto and High Auto modes
- Built-in flash with five modes and flash compensation setting
- White Balance setting with eight modes, including a manual option
- SD Card memory storage, 16MB card included
- Power supplied by four AA batteries or optional AC adapter
- Canon Digital Camera Solution software version 29.0
Special Features
- Audio notes with still images
- Stitch-Assist mode for panoramic shots
- Continuous Shooting mode
- My Color mode for color adjustment
- Color swap mode
- Self-Timer mode with two- or 10-second delay, plus a Custom setting
- Custom Setting mode for saving frequently used settings
- DPOF and PictBridge printing compatibility
- Print/Share button for direct printing and image transfer
In the Box
The Canon A630 ships with the following items in the box:
- PowerShot A630 digital camera
- Wrist Strap
- USB Cable
- 16MB SD Memory Card
- AV Cable
- Four AA alkaline batteries
- Canon Digital Camera Solution Disk CD
- Manuals
Recommended Accessories
- Large capacity SD/MMC memory card. (These days, 512MB to 1GB is a good tradeoff between cost and capacity.)
- Small camera case for outdoor and in-bag protection
- Waterproof case
- Conversion lens adapter
- Wide Converter
- Tele Converter
- High power external flash
Conclusion
| Pro: | Con: |
|---|---|
|
|
It's easy to see why Canon PowerShots continue to be popular. Their design is user friendly and well-built, the pictures are great, and they're easy to shoot. The Canon PowerShot A630 continues in that tradition of dependability, sporting an 8.0-megapixel CCD, a very good quality 4x optical zoom lens, and a big 2.5 inch swiveling LCD screen. It offers everything from full automatic to full manual exposure control, with a healthy set of Scene modes thrown in to make it easy to bring back great-looking photos from what might otherwise be challenging situations. It has a great movie mode, and its superb lens delivers great sharpness across the frame. Thanks to its high-speed DIGIC-II processing chip, it's also very responsive, and its movie capability is impressive as well. Bottom line, like its brother the A640, the Canon A630 is a classic; just an excellent all-around digital camera, and an easy choice as a Dave's Pick.
Design
Canon A630 Design
A bit larger than palm size, the Canon A630 has an attractive plastic silver shell with chrome highlights. It doesn't pretend to be jewelry, though. It's a camera and proud to be one. The grip and lens predominate from the front and the LCD and controls dominate the back. Simple as that. At 11.85 ounces (336 grams) it is neither heavy nor light, and its measurements of 4.31 x 2.60 x 1.93 inches (109 x 66 x 49 millimeters) make it large, but it will still fit into larger coat pockets and purses. Given its grip and heft, you won't induce camera shake merely by pressing the Shutter button, as you do with featherweight digicams. But you won't need a massage after carrying it around all afternoon, either. It's a well-balanced design.

The front panel is composed of the grip on the left and the telescoping lens to the right. At the bottom right of the lens is a small Ring Release button that allows you to replace the silver ring around the lens with a lens adapter that can mount a conversion lens on the A630 body. At the top left of the lens is a grill of two small holes for the microphone. Almost directly above the lens is the viewfinder window, to the left of which is the AF-assist/Red-Eye Reduction/Self-Timer lamp. In the top right corner is the Flash.

The right side of the Canon A630 has a small chrome eyelet for the wrist strap at the top. Under that is the silver, flexible rubber cover to the USB, DC In and AV Out ports.

The left side of the Canon A630 has no functional parts except for the LCD hinge.

The Canon A630's top panel has the Shutter button, surrounded by the Zoom lever, on the top of the protruding grip. Behind those and to the right is the speaker grill. Just left and rear of that is the Mode dial with 12 shooting positions divided by Canon into three basic categories: Auto Exposure, Image Zone, and Creative Zone. The Power button is just left and forward of that.

The rear panel is dominated by the 2.5-inch LCD housing that flips away from the back. Once opened all the way, the LCD monitor can swivel around to face the front of the camera, or point toward the bottom panel. What's nice about this design is that you can turn the LCD monitor in toward the camera back and close it, thereby protecting it from scratches and smudges when you stash it in a pocket. The eye-level optical viewfinder features two LED lamps that report camera status. To the right of the LCD are the main controls. At the top, just left of the thumb grip, is the Mode switch (with Record or Playback options). Below that are the Exposure Compensation/Erase and Print/Share buttons. The larger control just below these is the navigator ring, which rocks up and down, left and right. The up button cycles through the Flash modes in Record mode, or displays the Jump menu in Playback mode. The down button cycles through the focusing modes of Macro, Manual, or Auto. The left and right buttons adjust parameters depending on the shooting mode. In the middle of the navigator is the Func./Set button that confirms menu choices and calls up the Function menu in Record mode. Below the controller are the Display and Menu buttons.

The bottom panel is flat with small feet to stabilize it when you set it down. The plastic tripod mount is in the center of the camera adjacent to the hinge of the battery/memory card compartment. A slide switch releases the catch on the cover to reveal the four AA batteries and memory card slot.
Canon A630 External Controls

Shutter Button: Positioned far forward on the camera's top panel, this
button sets focus and exposure when halfway pressed, and fires the shutter when
fully pressed.
Zoom Lever (see image above): Surrounding the Shutter button on the top panel, this lever controls the optical and digital zoom while in Record mode. In Playback mode, the wide setting displays a nine-image index display of all images on the memory card, and accesses a Jump function that lets you scroll through index display screens quickly. Alternatively, the telephoto position enlarges the currently displayed image as much as 10x, so that you can check on fine details. In any menu display with tabs, toggling the zoom left or right switches between tabs to the left or right of the currently selected tab.

Mode Dial: Also on the camera's top panel, this large, notched dial is used to select the camera's shooting modes. Canon divides these functions into three categories: Auto, Image Zone, and Creative Zone. The options are as follows:
 Auto: The camera controls everything about the exposure, except for Flash and Macro modes, image size, and quality settings. Shutter speeds range from 1/2,000 to 1/8 second in Auto mode.
 Program AE (P): Places the camera in control of
shutter speed and lens aperture, while you maintain control over everything
else (i.e., white balance, ISO, metering, exposure compensation, flash, etc.).
Shutter speeds range from 1/2,500 to one second.
 Shutter-Speed Priority AE (Tv): Allows you to control
the shutter speed settings from 1/2,500 to 15 seconds, while the camera controls
the aperture. All other exposure settings are available.
- Aperture Priority AE (Av): Allows you to set the
lens aperture from f/2.8 to f/8.0, while the camera controls the shutter speed,
over a range from 1/2,500 to 15 seconds. The maximum aperture depends on the
zoom setting, ranging from f/2.8 at the wide angle end to f/4.1 at the telephoto
position. In this mode, you maintain control over all other exposure variables.
 Manual (M): Provides complete control over all exposure
settings, including shutter speed and lens aperture. As with aperture-priority
mode, the maximum aperture varies with the zoom setting from f/2.8 at wide
angle to f/4.1 at telephoto. The fastest shutter speed varies with the aperture
and zoom setting:
- 1/1,250 at f/2.8-3.2 (wide) or f/4.1-4.5 (tele)
- 1/1,600 at f/3.5-4.0 (wide) or f/5.0-6.3 (tele)
- 1/2,000 at f/4.5 (wide)
- 1/2,500 at f/5.0-8.0 (wide) or f/7.1-8.0 (tele)
 Portrait: Uses a large aperture setting to blur the background while
keeping the primary subject in sharp focus.
 Landscape: Employs a small aperture setting to keep both the background,
and foreground in focus. (May use a slower shutter speed, so a tripod is recommended.)
 Night Scene: Uses slower shutter speeds, and flash to even out nighttime
exposures. The slow shutter speed allows more ambient light to be recorded
in the low-light areas, while the flash freezes the subject. The Red-Eye Reduction
mode can be used with this exposure mode to eliminate Red-Eye in night portraits.
 Scene: Accesses more specific preset shooting modes, including Night
Snapshot, Kids & Pets, Indoor, Foliage, Snow, Beach, Fireworks, Underwater,
Color Accent, and Color Swap. (Color accent lets you dim, or brighten a specific
color in the scene, while color swap lets you pick a color in the scene, and
another color you want to swap it with in your photos. The results can be
pretty bizarre, but could be a lot of fun if you're creatively-minded.)
 Stitch-Assist: Allows you to record a series of images, either horizontally,
vertically, to be "stitched" together into one large image, or panorama on
a computer.
 Movie: Records up to 640x480-pixel 30-fps moving images with sound
while space remains on the storage card.
 Auto: The camera controls everything about the exposure, except for Flash and Macro modes, image size, and quality settings. Shutter speeds range from 1/2,000 to 1/8 second in Auto mode.
 Program AE (P): Places the camera in control of
shutter speed and lens aperture, while you maintain control over everything
else (i.e., white balance, ISO, metering, exposure compensation, flash, etc.).
Shutter speeds range from 1/2,500 to one second.
 Shutter-Speed Priority AE (Tv): Allows you to control
the shutter speed settings from 1/2,500 to 15 seconds, while the camera controls
the aperture. All other exposure settings are available.
 Aperture Priority AE (Av): Allows you to set the
lens aperture from f/2.8 to f/8.0, while the camera controls the shutter speed,
over a range from 1/2,500 to 15 seconds. The maximum aperture depends on the
zoom setting, ranging from f/2.8 at the wide angle end to f/4.1 at the telephoto
position. In this mode, you maintain control over all other exposure variables.
 Manual (M): Provides complete control over all exposure
settings, including shutter speed and lens aperture. As with aperture-priority
mode, the maximum aperture varies with the zoom setting from f/2.8 at wide
angle to f/4.1 at telephoto. The fastest shutter speed varies with the aperture
and zoom setting:
 Portrait: Uses a large aperture setting to blur the background while
keeping the primary subject in sharp focus.
 Landscape: Employs a small aperture setting to keep both the background,
and foreground in focus. (May use a slower shutter speed, so a tripod is recommended.)
 Night Scene: Uses slower shutter speeds, and flash to even out nighttime
exposures. The slow shutter speed allows more ambient light to be recorded
in the low-light areas, while the flash freezes the subject. The Red-Eye Reduction
mode can be used with this exposure mode to eliminate Red-Eye in night portraits.
 Scene: Accesses more specific preset shooting modes, including Night
Snapshot, Kids & Pets, Indoor, Foliage, Snow, Beach, Fireworks, Underwater,
Color Accent, and Color Swap. (Color accent lets you dim, or brighten a specific
color in the scene, while color swap lets you pick a color in the scene, and
another color you want to swap it with in your photos. The results can be
pretty bizarre, but could be a lot of fun if you're creatively-minded.)
 Stitch-Assist: Allows you to record a series of images, either horizontally,
vertically, to be "stitched" together into one large image, or panorama on
a computer.
 Movie: Records up to 640x480-pixel 30-fps moving images with sound
while space remains on the storage card.

Power Button: To the left of the Mode dial, this button turns the camera on, or off.

Mode Switch: In the top right corner of the rear panel, this switch
selects between Record and Playback modes.

Multi-Controller Rocker Button: This four-way rocker button actuates
left, right, up, and down, simulating arrow keys to navigate through settings
menus. In Record mode, the left and right buttons adjust available exposure
settings, as well as manual focus, when enabled. The up button controls flash
mode, while the down button accesses Macro and Manual Focus modes. In Playback
mode, the left and right buttons scroll through captured images, while the up
button accesses the Jump menu. When an image has been enlarged, all four arrows
pan within the view.
Function/Set Button (see image above): In the center of the Multi-Controller, this button confirms menu selections. It also switches between available exposure adjustments in Manual mode. It also displays the following Function menu while in Record mode:
 ISO Speed: Sets the camera's sensitivity to Auto, or Auto Hi (except
in Manual), or to 80, 100, 200, 400, or 800 ISO equivalents.
- White Balance: Controls the color balance of images. Options are Auto, Daylight, Cloudy, Tungsten, Fluorescent, Fluorescent H, Underwater, and Custom (manual setting).
- Drive Mode: Accesses Continuous Shooting and High Speed Continuous Shooting modes, and the three Self-Timer modes (a two-, or 10-second delay, or the adjustable timer, which lets you program both the delay, from zero to 30 seconds, and the number of shots to be taken once the delay expires from one to 10).
- My Colors: Enables Vivid Color, Neutral Color, Sepia, Black-and-White, Positive Film, Lighter Skin Tone, Darker Skin Tone, Vivid Blue, Vivid Green, Vivid Red, or Custom Color picture effects. Custom effects include five-step adjustments for Contrast, Sharpness, Saturation, Red, Green & Blue hues, and Skin Tone.
- Flash Output: Adjusts the overall flash intensity from -2 to +2 EV in one-third step increments. In Manual mode, the flash fires only a single pulse, handy when you want to use the A630 with conventional slave triggers for external flash units.
- Metering System: Sets the metering mode to Evaluative, Center-Weighted Average, or Spot.
- Compression (Still): Quality options are Superfine, Fine, or Normal.
- Frame Rate (Movie): Sets movie frame rate to 30 or 15 frames per second.
- Resolution: Specifies the image resolution, and quality settings. Still image resolutions are 3,264 x 2,448, 2,592 x 1,944, 2,048 x 1,536, 1,600 x 1,200, and 640 x 480 pixels. Postcard mode also offers 1,600 x 1,200 pixel resolution but greys out a portion of the screen top, and bottom, showing the part of the image that won't fit on a standard 4x6 print. Wide Screen mode captures 3,264 x 1,832. Movie resolutions are 640 x 480 or 320 x 240 pixels.
 ISO Speed: Sets the camera's sensitivity to Auto, or Auto Hi (except
in Manual), or to 80, 100, 200, 400, or 800 ISO equivalents.

Exposure Compensation/Erase Button: Directly above left of the Multi-Controller,
this button lets you increase or decrease the exposure from -2 to +2 EV in one-third-step
increments in Record mode. Not available in either Auto or in Manual mode since
the user controls the exposure variables directly there. In Playback mode, it
displays the single-image erase menu.

Print/Share Button: To the right of the Exposure Compensation/Erase button, is the Print/Share button. When connected to a printer, or Windows computer, this button lights up, indicating that sync, or printing is one button away.
While the PowerShot A630 will work with any PictBridge-enabled printer, when connected to a Canon-brand printer, printing options are particularly robust. With a Canon-brand printer, options include print quality, selection of paper type, a range of paper sizes, and borderless, or bordered page layouts. You can also crop images for printing directly from the camera, to improve their composition. Finally, you can choose to have the camera boost the color saturation, and/or apply noise reduction to the image as it's printed.

Display Button: Below left of the Multi-Controller, and adjacent to
the lower right corner of the LCD monitor, this button controls the information
and image display modes in Record and Playback modes.

Menu Button: Left of the Exposure Compensation/Erase button, this button
calls up the settings menu in Record and Playback modes. It also dismisses the
menu screen, and backs out of menu selections.

Battery Compartment Latch: Nestled in the center of the battery compartment
door on the bottom of the camera, this sliding switch unlocks the door, so that
it can slide forward to open.

Lens Ring Release Button: Tucked under the lens on the camera's front panel, this button releases the lens ring. Once unlocked, the lens ring can then be turned, and removed to accommodate accessory lens kits.
Operation
Canon A630 Operation
While the Canon A630's user interface may seem a little strange at first approach,
it's easy to master. Things you set once (like sounds or instant review) are
accessed by pressing the Menu button in the lower right corner. Settings that
might change for a particular outing (like image size, ISO settings, etc.) are
accessed by pressing the Function button in the center of the navigator. Options
you might change from shot to shot have their own buttons, like EV, Flash mode,
Macro mode. The left and right arrow buttons are reserved for changing the value
of a setting. There's a Mode switch to toggle Record and Playback and a Mode
dial to select among Record modes. It's very efficient, once you learn your
way around. Give yourself an hour to do that and you'll be fine without the
manual.
 Record Mode LCD Display: In Record mode, the Canon A630's LCD reports various exposure settings, including camera modes, the resolution and quality settings, number of available images, etc. Half-pressing the Shutter button reports the aperture and shutter speed settings, in all modes except Manual. (Aperture and shutter speed are displayed continuously in Manual mode, whether the Shutter button is pressed or not.) Pressing the Display button cycles through the available display modes, including the image with no information, the image with information, and no display at all. Through the settings menu, you can enable a gridline or 3:2 aspect ratio display guide.
 Playback Mode LCD Display: In Playback mode, the LCD reports the image
sequence number on the card, resolution and quality setting, file name, and
the date and time of image capture. Pressing the Display button once calls up
an enhanced information display, with a histogram for checking the exposure.
A third press cancels the information overlay entirely. The A630 remembers your
preference, too. The telephoto side of the zoom toggle lets you zoom in on a
portion of the image, while the wide-angle side backs you out again, and lets
you step out to an index view of captured images, displayed as nine thumbnails
at a time. Zooming out one step past the point at which the index display appears
adds a jump bar to the bottom of the screen, letting you jump forward or back
nine images at a time, rather than scrolling from each image to the next individually.
(You can control the behavior of Jump mode by pressing the Jump button, or up
arrow, and adjusting the settings.)
Canon A630 Modes and Menus
Record Mode: Pressing the Menu button in Record mode pulls up the following options (not all options are available in all modes):
- AF Frame: Selects three different auto focus modes. AiAF
selects the focal point from one of nine focus areas arrayed in the display.
Center focuses on a small area in the center of the image. FlexiZone lets
you manually select to one of nine points of focus within the viewing frame.
- Digital Zoom: Controls the digital zoom, options are Standard (4x), 1.6x, 2.0x, or Off.
- Flash Sync: Selects whether the flash fires when the shutter opens (1st-curtain) or just before the shutter closes (2nd-curtain).
- Slow Synchro: When switched on, lets you use a slow shutter speed with the flash.
- Flash Adjust: Puts the flash under Automatic or Manual control, meaning that the Auto setting will automatically control flash power based on the exposure conditions.
- Red-Eye Reduction: Turns the Red-Eye Reduction pre-flash on or off, which works with all flash modes.
- Spot AE Point: Sets whether the exposure is measured either at the center of the image, or at the same point as the auto-focus focal point (AF Frame menu item above must be set to Center or Flexi-zone to access this option).
- Safety Shift: This menu item only appears in Aperture Priority or Shutter Priority exposure modes. If enabled, the camera will automatically correct the exposure if the value you've selected will result in a poor exposure.
- MF-Point Zoom: Turns the MF Point zoom option on or off.
If on, the center of the frame is enlarged on the LCD display for better viewing
while adjusting the manual focus.
- AF Assist Beam: Turns the AF Assist light on or off. If on, the light automatically illuminates in dark shooting conditions.
- Review: Turns the instant image review function on or off, with available image display times from two to 10 seconds in one second steps. The Hold option displays the image until you press the shutter release halfway down.
- Save Original: Only appearing with Color Swap and Color Accent modes enabled, this option lets you save a copy of the original image without any alterations, in addition to the altered image.
- Reverse Display: Turns on or off the function that automatically
flips the image in the LCD when the LCD is pointed toward the front of the
camera.
- Disp. Overlay: Turns on a framing grid, 3:2 Guide, or Both.
- Date Stamp: Specifies whether the date and time are overlaid on the image. (Only available in Postcard mode.)
- Save Settings: Saves the current setting to the Custom mode.
 AF Frame: Selects three different auto focus modes. AiAF
selects the focal point from one of nine focus areas arrayed in the display.
Center focuses on a small area in the center of the image. FlexiZone lets
you manually select to one of nine points of focus within the viewing frame.
 MF-Point Zoom: Turns the MF Point zoom option on or off.
If on, the center of the frame is enlarged on the LCD display for better viewing
while adjusting the manual focus.
 Disp. Overlay: Turns on a framing grid, 3:2 Guide, or Both.
Playback Mode: This mode lets you review captured images and movies on the memory card, as well as erase them, protect them, or tag them for printing and transfer. The traditional green Playback symbol marks this mode on the Mode switch. Pressing the Menu button displays the following options:
- Auto Play: Automatically plays all captured images in a
slide show.
- My Colors: Adds the available My Colors effects to a captured image (Vivid Color, Neutral Color, Sepia, Black-and-White, Positive Film, Lighter Skin Tone, Darker Skin Tone, Vivid Blue, Vivid Green, or Vivid Red)
- Sound Memo: Records a short sound clip to accompany a captured image.
- Protect: Marks the current image for write-protection, or removes write-protection. Protected images cannot be deleted or manipulated, except through card formatting, which erases all files.
- Rotate: Rotates the current image 90 or 270 degrees clockwise.
- Erase All: Erases all files on the memory card, except protected
ones.
- Transfer Order: Marks images to be transferred to a computer
later.
 Auto Play: Automatically plays all captured images in a
slide show.
 Transfer Order: Marks images to be transferred to a computer
later.
Print Menu: This menu is available in Playback mode, simply by pressing the Menu button and selecting the Print tab. The bottom line of the display shows how many images are selected for printing and the print method that is active.
- Print: Sends images tagged for printing to the printer.
- Select Images & Quantity: Allows you select images for printing, and set the number of prints for each image selected.
- Select All Images: Selects all images on the memory card for printing.
- Clear All Selections: Clears all print selections.
- Print Settings: Brings up a menu of these options:
- Print Type: You can specify whether to print one image per page, an index of the images, or both.
- Date: Set printing of the date, and time on, or off.
- File No.: Set printing of the file number on, or off.
- Clear DPOF data: Set the option to clear the DPOF tag on, or off.
 Print: Sends images tagged for printing to the printer.
Setup Menu: This menu is available in all exposure modes and Playback mode, with a press the Menu button. Just use the right arrows or the zoom toggle to select the Setup tab.
- Mute: Turns the camera's start-up, operation, self-timer, shutter, and playback sounds on and off.
- Volume: Adjusts the volume settings for the camera's start-up, operation, self-timer, shutter, and playback sounds.
- Power Saving: Sets the camera's Auto Power Down and Display Off settings. Power Down can be enabled or disabled, and Display Off can be set to 10/20/30 seconds, or 1/2/3 minutes.
- Date/Time: Sets the camera's internal calendar and clock.
- Format: Formats the SD/MMC card, erasing all files (even those marked for write-protection). A low-level format option is available for memory cards whose writing speed has slowed.
- File Numbering: Auto Reset resets file numbering with each
new SD/MMC card. Continuous continues numbering in sequence, regardless of
memory card.
- Create Folder: Creates a new folder on the memory card.
You can also select Auto mode, which automatically creates new folders based
on time and date.
- Auto Rotate: Specifies whether images appear vertically in the LCD monitor when the camera is held vertically.
- Distance Units: Sets the manual focus indicator to meters/centimeters or feet/inches.
- Lens Retract: Controls the lens retraction time when switching from Record to Playback modes to zero second or one minute.
- Language: Sets the camera's menu language to one of 25 choices.
English is the default setting.
- Video System: Designates the camera's video-out signal as
NTSC or PAL.
- Print Method: Specify either Auto or PictBridge as the print method.
- Reset All: Resets the camera to its default settings.
 Mute: Turns the camera's start-up, operation, self-timer, shutter, and playback sounds on and off.
 Create Folder: Creates a new folder on the memory card.
You can also select Auto mode, which automatically creates new folders based
on time and date.
 Video System: Designates the camera's video-out signal as
NTSC or PAL.
My Camera Menu: This is the third menu tab on the menu screen, and appears in every mode.
- Theme: Selects a common theme for each My Camera menu settings
item. Four options are available, the first one being Off. When a theme is
selected, all of the following settings automatically adjust to that theme.
- Startup Image: Sets the startup image when you turn on the camera to: Black screen, Canon logo, Canon logo w / sunset, nature scene. The latter two startup images can be overwritten with an image of your own. You can apply your personal image in playback mode by pressing the Display button and choosing an image from the SD card. The image is copied to the camera's internal memory, and is still displayed when the SD card is removed.
- Startup Sound: Sets the startup sound when you turn on the camera to: No sound, musical tone (1), musical tone (2), or birds chirping. You can apply your own sounds in playback mode by using the cameras audio recording function. The sound is copied to the camera's internal memory, and is retained even when the SD card is removed.
- Operation Sound: Sets the sound when any control or switch is used (except the Shutter button). Options include beep, zing, or chirp. You can also record your own custom sound by the same method as the startup sound.
- Self-Timer Sound: Sets the sound that signals you when the shutter release is two seconds away. Options include fast beeps (1), telephone ring, or a Coyote howl. Like the startup and operation sound, you can record a custom tone.
- Shutter Sound: Sets the shutter sound that you hear when you depress the shutter button (there is no shutter sound in Movie mode). Options include beep, zing, bark and custom user sound.
 Theme: Selects a common theme for each My Camera menu settings
item. Four options are available, the first one being Off. When a theme is
selected, all of the following settings automatically adjust to that theme.
Optics
Canon A630 Optics
Lens
Zoom
A generous 4x optical zoom range, with good performance.


The Canon A630 zooms 4x over the equivalent of a 35-140mm range, a bit better than the 3x range typical its class. The 4x digital zoom takes it out to 16x total with less quality loss than we're accustomed to seeing from digital zoom. As you can see in the tests below, the A630's lens is great across the frame, especially in terms of sharpness. Even chromatic aberration is kept under control. If you're looking for the best image quality for the money, the A630 and A640 are the closest you'll get to superb without buying an SLR and a few lenses.
Macro
A small macro area with good detail and high resolution. Flash does not throttle down well at this range, so plan on using external flash for macro shots.


The Canon A630's macro setting performs very well, capturing a small minimum area of 0.82 x 0.62 inches (21 x 16 millimeters). Detail is strong and resolution high, with only a moderate amount of softening in the corners from the lens. (Most cameras have some softening in the corners in Macro mode.) The flash doesn't throttle down well, nor can it evenly illuminate the field at such close range. (Plan on using external lighting for your closest macro shots with the A630.) Most macro shooting for duties like selling on ebay isn't done from this close, however.
Distortion
Moderate barrel distortion, average pincushion.
| Barrel distortion at 35mm is 0.60% |
 |
| Pincushion distortion at 140mm is 0.26% |
 |
This is the tendency for the lens to bend straight lines outward (like a barrel; usually at wide angle) or inward (like a pincushion; usually at telephoto). The Canon A630's 0.60% barrel distortion at wide angle is lower than average among the cameras I've tested. At the telephoto end, the A630's 0.26% pincushion distortion is average.
Chromatic aberration
Pretty low at both wide angle and telephoto, showing just a small effect on images at edges.


Chromatic aberration is very low at wide angle, showing very few pixels of moderately bright coloration on either side of the target lines, decreasing to very low levels at telephoto focal lengths. (This distortion is visible as a very slight colored fringe around the objects at the edges of the field of view on the resolution target.) It is rare to see chromatic aberration this low on a modern digicam.
Corner Sharpness
Some minor softening in the lower corners of the frame, with the strongest effect in the lower right corner.


The Canon A630 showed only a slight loss of sharpness in the corners of the frame, quite a bit less than is average among cameras of its class. The center of the frame was slightly sharper at wide angle than telephoto, but the difference between the two was minor indeed. There is a slight halo visible around the black elements from the sharpening algorithm.
Viewfinder
Coverage
Optical viewfinder tight and skewed to the upper right. Very good accuracy from the LCD monitor.


The Canon A630's optical viewfinder was quite tight, showing only about 80% frame accuracy at wide angle and 78% at telephoto lens settings. However, the LCD monitor showed close to about 100 percent frame accuracy.
The images above were taken from our standardized test shots. For a collection of more pictorial photos, see our Canon PowerShot A630 Photo Gallery .
Exposure
Canon A630 Exposure
Color
Saturation & Hue Accuracy
Slightly oversaturated color (especially reds and blues), very typical of consumer digital cameras. Generally good hue accuracy.
 |
| In the diagram above, the squares show the original color, and the circles show the color that the camera captured. More saturated colors are located towards the periphery of the graph. Hue changes as you travel around the center. Thus, hue-accurate, highly saturated colors appear as lines radiating from the center. |
Most consumer digital cameras produce color that's more highly saturated (more intense) than found in the original subjects. This is simply because most people like their color a bit brighter than life. The Canon A630 follows this trend, but the result you see at right is tempered from what we used to call "Canon color." That was never an insult, by the way, just a tendency to oversaturate colors like red and blue in a way that made for a beautiful image with somewhat clipped colors on occasion. We're happy to see it dialed back a bit, and also glad that the images still look great. Oversaturation is a big problem with Caucasian skin tones, as it's very easy for these "memory colors" to be seen as too bright, too pink, too yellow, etc. The A630 did render skin tones a bit on the pink side in most cases, but the images are still appealing.
The other important part of color rendition is hue accuracy. Hue is
"what color" the color is. Here, the Canon A630 did quite well.
Like most digicams, it shifts cyan colors toward blue, to produce better-looking
sky colors, but the rest of the hues were quite accurate.


Sensor
Exposure and White Balance
Indoors, incandescent lighting
Unusually close results between Auto and Incandescent white balance settings, with Auto only slightly warm, and Incandescent only slightly cool.


Color balance indoors under Auto was slightly warm, and Incandescent mode was just a bit cool; both were still pleasing. The Canon A630 required a +1.0 EV exposure compensation boost to get a good exposure. Overall color well-balanced and hue accurate. Our test lighting for this shot is a mixture of 60 and 100 watt household incandescent bulb, a pretty yellow light source, but a very common one in typical home settings here in the U.S. The A630 handled this very yellow light source quite well.
Outdoors, daylight
Good color balance, very bright colors. Better than average exposure accuracy.

Outdoor shots generally showed accurate exposure with less a tendency to blow out highlights than I'm used to seeing. Shadow detail also tended to hold up pretty well for a consumer digicam. Exposure accuracy overall was better than average, the camera requiring less exposure compensation than I'm accustomed to seeing with consumer digicams.
See full set of test images with explanations
See thumbnails of all test and gallery images
Resolution
High resolution, 1,300 lines of strong detail.


Our laboratory resolution chart revealed sharp, distinct line patterns down to about 1,300 lines per picture height, with extinction at around 1,400. (The camera did produce slight color artifacts at lower line frequencies though, visible in the full-sized res target shots.) Use these numbers to compare with other cameras of similar resolution, or use them to see just what higher resolution can mean in terms of potential detail. Our interpretation of this standard is somewhat conservative. We watch for artifacts and color fringing then move back to the nearest pure part of the scale. In our opinion, detail with artifacts shouldn't be considered detail. You may see other numbers quoted elsewhere, but across the site, our reviews judge this parameter by the same conservative standard.
See full set of test images with explanations
See thumbnails of all test and gallery images
Sharpness & Detail
Fairly sharp images, with some blurring of detail from noise suppression.


The Canon A630's images are reasonably sharp, without strong over-sharpening or significant edge enhancement on the camera's part. (Edge enhancement creates the illusion of sharpness by enhancing colors and tones right at the edge of a rapid transition in color or tone.)
Noise-suppression systems in digital cameras tend to flatten-out detail in areas of subtle contrast. The effects can often be seen in shots of human hair, where the individual strands are lost and an almost "watercolor" look appears. The crop at far right shows this, with darker areas of Marti's hair showing only limited detail, even though individual strands are quite visible against her cheek in the uncropped image. The level of detail loss shown here isn't all that obvious on prints 8x10 inches or smaller, though, and this is quite a tight crop. This is a very good performance.
ISO & Noise Performance
No noticeable noise at normal sensitivity settings, which naturally increases at 400 and 800.


The Canon A630's sensitivity ranges from ISO 80 to 800 equivalents. Up to ISO 200, the PowerShot produced very little noise, with only slightly blurred detail in the dark areas. At ISO 400 and especially at 800, the noise level and the amount of blurring that results increases, but the images are still quite usable. The Canon A630's noise levels are lower than average for its class. At ISO 800, skin tones tend to purple a bit, but not nearly as bad as we've seen on other brands and models of camera.
Extremes: Sunlit and low light tests
High resolution with good overall detail, though high contrast and limited shadow detail. Pretty good low-light performance, capable of capturing bright images under average city street lighting and slightly darker conditions.


Sunlight:
Because digital cameras are more like slide film than negative film (in that they tend to have a more limited tonal range), we test them in the harshest situations to see how they handle scenes with bright highlights and dark shadows, as well as what kind of sensitivity they have in low light. The shot above is designed to mimic the very harsh, contrasty effect of direct noonday sunlight, a very tough challenge for most digital cameras. (You can read details of this test here.)
The Canon A630 had a little trouble with the deliberately harsh lighting in the test above, producing very high contrast with deep shadows. We chose the +0.7EV adjusted image as the better choice, for the reasons stated above. Noise suppression is visible in both shadows and highlights as well, but plenty of detail is still evident. Exposure at least did not wash out the highlights when exposure compensation was set to zero adjustment. (In "real life" though, be sure to use fill flash in situations like the one shown above; it's better to shoot in the shade when possible.)
| 1 fc 11 lux |
1/2 fc 5.5 lux |
1/4 fc 2.7 lux |
1/8 fc 1.3 lux |
1/16 fc 0.67 lux |
|
|---|---|---|---|---|---|
| ISO 79 |
 2 sec f3.0 |
 4 sec f3.0 |
 9.9 sec f3.0 |
 16 sec f2.9 |
 16 sec f2.9 |
| ISO 100 |
 1.6 sec f3.0 |
 3.2 sec f3.0 |
 8 sec f3.0 |
 12.6 sec f3.0 |
 16 sec f2.9 |
| ISO 200 |
 0.8 sec f3.0 |
 1.6 sec f3.0 |
 4 sec f3.0 |
 6.3 sec f3.0 |
 16 sec f3.0 |
| ISO 400 |
 0.4 sec f3.0 |
 0.8 sec f3.0 |
 2 sec f3.0 |
 3.2 sec f3.0 |
 8 sec f3.0 |
| ISO 800 |
 1/5 sec f3.0 |
 0.4 sec f3.0 |
 1 sec f3.0 |
 1.6 sec f3.0 |
 4 sec f3.0 |
Low light:
The Canon PowerShot A630 did very well in our low light tests, producing bright images at the lowest light levels at ISO 200 and above. At ISO 80 and 100, images were bright down to the 1/8 foot-candle level, about 1/8 as bright as average city street lighting at night. The one limitation though, is that you have to resort to Shutter Priority or Manual exposure mode to get exposure times longer than 1 second. As seen by the type in even the darkest images, the auto focus system worked well, relying on its AF assist lamp to find focus at the very darkest levels, but was also able to focus down at a bit less than 1/4 foot-candle without resorting to the AF assist. Given that typical city street-lighting at night is about one foot-candle (the brightest level shown in the test above), the Canon A630 should have no trouble handling the after-dark photography needs of most consumers.
NOTE: This low light test is conducted with a stationary subject, and the camera mounted on a sturdy tripod. Most digital cameras will fail miserably when faced with a moving subject in dim lighting. (For example, a child's ballet recital or a holiday pageant in a gymnasium.) For such applications, you may have better luck with a digital SLR camera, but even there, you'll likely need to set the focus manually. For information and reviews on digital SLRs, refer to our SLR review index page.
Flash
Coverage and Range
The A630's small flash has a limited range, produces a slight blue cast in combination with typical incandescent room lighting. Our standard shots required more exposure compensation than average.


Flash coverage was rather uneven at wide angle but very good at telephoto. In the Indoor test, the flash on the Canon A630 underexposed our subject at its default setting, requiring a +1.0 EV exposure compensation adjustment to get reasonably bright results.
| Flash Range: Wide Angle | |||||
|---|---|---|---|---|---|
| 6 ft | 7 ft | 8 ft | 9 ft | 10 ft | 11 ft |
 1/64 sec f2.9 ISO 100 |
 1/64 sec f2.9 ISO 100 |
 1/64 sec f2.9 ISO 100 |
 1/64 sec f2.9 ISO 100 |
 1/64 sec f2.9 ISO 100 |
 1/64 sec f2.9 ISO 100 |
| 12 ft | 13 ft | 14 ft | 15 ft | 16 ft | |
 1/64 sec f2.9 ISO 100 |
 1/64 sec f2.9 ISO 100 |
 1/64 sec f2.9 ISO 100 |
 1/64 sec f2.9 ISO 100 |
 1/64 sec f2.9 ISO 100 |
|
| Flash Range: Telephoto | |||||
|---|---|---|---|---|---|
| 6 ft | 7 ft | 8 ft | 9 ft | 10 ft | 11 ft |
 1/64 sec f4.2 ISO 100 |
 1/64 sec f4.2 ISO 100 |
 1/64 sec f4.2 ISO 100 |
 1/64 sec f4.2 ISO 100 |
 1/64 sec f4.2 ISO 100 |
 1/64 sec f4.2 ISO 100 |
| 12 ft | 13 ft | 14 ft | 15 ft | 16 ft | |
 1/64 sec f4.2 ISO 100 |
 1/64 sec f4.2 ISO 100 |
 1/64 sec f4.2 ISO 100 |
 1/64 sec f4.2 ISO 100 |
 1/64 sec f4.2 ISO 100 |
|
Even at 16 feet, our most distant test range, the flash did illuminate the DaveBox target adequately. This agrees with camera's own spec of 14 feet for flash range, on the long side for a compact camera model.
| Manufacturer-Specified Flash Range | |
|---|---|
| Wide Angle | Telephoto |
 14 feet Auto ISO |
 10 feet Auto ISO |
Our standard test method for flash range uses a fixed setting of ISO 100, to provide a fair basis of comparison between cameras. We now also capture two shots using the manufacturer-specified camera settings, at the range the company claims for the camera, to assess the validity of the specific claims. In the shots above, the A630 seems to perform exactly as Canon says it will, producing good exposures at the rated distances with its ISO set to Auto. While the range is rather limited, the good news here is that the camera doesn't seem to be significantly boosting its ISO. This would produce greater flash range, but at the cost of higher image noise, and the noise levels from the Canon A630 seem quite acceptable.
Output Quality
Print Quality
Excellent print quality, great color, very usable 16x20 inch prints! ISO 800 images are quite usable at 8x10, excellent at 5x7 and smaller.
Testing hundreds of digital cameras, we've found that you can only tell just so much about a camera's image quality by viewing its images on-screen. Ultimately, there's no substitute for printing a lot of images and examining them closely. For this reason, we now routinely print sample images from the cameras we test on our Canon i9900 studio printer, and on the Canon iP5200 here in the office. (See the Canon i9900 review for details on that model.)
The Canon A630 made surprisingly good 16x20 inch prints at ISO 80 and 100. That's a big print. ISO 200 prints were better at 13x19 and smaller, and ISO 400 prints were still quite good at 11x14. Though some might accept ISO 800 prints at 11x14, we think 8x10 is a little better, though the color is a little more subdued. Drop the size to 5x7 and you really don't even notice that it's shot at ISO 800, except for the slightly darker colors. Quite an impressive performance from the Canon A630, almost identical to the 10 megapixel A640.
The images above were taken from our standardized test shots. For a collection of more pictorial photos, see our Canon PowerShot A630 Photo Gallery .
Not sure which camera to buy? Let your eyes be the ultimate judge! Visit our Comparometer(tm) to compare images from the Canon PowerShot A630 with those from other cameras you may be considering. The proof is in the pictures, so let your own eyes decide which you like best!
Performance
Canon A630 Performance
Timing and Performance
Good to average speed for a consumer camera.
|
Startup/Shutdown
|
||
|
Power on
to first shot |
1.4 seconds
|
Time it takes for LCD to turn on and lens to deploy.
|
|
Shutdown
|
1.7 seconds
|
How long it takes to retract lens and stow in your pocket.
|
|
Buffer clearing time
|
1.54 second
(Large/Fine JPEG, Unlimited shots in continuous mode) |
Worst case buffer clearing time.* This is the delay after a set of shots before you can remove the card. Some cameras won't retract their lenses and shut down until the buffer is cleared.
|
|
Mode switching
|
||
|
Play to Record,
first shot |
1.0 seconds
|
Time until first shot is captured
|
|
Record to play
|
2.8 seconds
|
Time to display a large/fine file immediately after capture
|
|
Display
recorded image |
1.3 second
|
Time to display a large/fine file already on the memory card.
|
|
Shutter response (Lag Time):
|
||
|
Full Autofocus Wide
|
0.52 second
|
Time from fully pressing shutter button to image capture, zoom lens at wide angle position.
|
|
Full Autofocus Tele
|
0.78 second
|
Time from fully pressing shutter button to image capture, zoom lens at telephoto position.
|
|
Prefocused
|
0.059 second
|
Time to capture, after half-pressing and holding shutter button.
|
|
Manual focus
|
0.24 second
|
For most cameras, shutter lag is less in manual focus than autofocus, but usually not as fast as when the camera is "prefocused"
|
|
Cycle time (shot to shot)
|
||
|
Single Shot mode
Large Fine JPEG |
1.78 seconds
|
Time per shot, averaged over 20 shots
|
|
Single Shot mode
640x480 JPEG |
1.33 seconds
|
Time per shot, averaged over 20 shots
|
|
Early shutter
penalty? |
No
|
Some cameras refuse to snap another shot if you release and press the shutter too quickly in Single Shot mode, making "No" the preferred answer
|
|
Continuous mode
Large Fine JPEG |
0.65 second (1.54 frames per second);
No limit w/fast card*; ~2 seconds to clear |
Time per shot, averaged over buffer length or 20 shots, whichever came first
|
|
Continuous mode
640x480 JPEG |
0.66 second (1.51 frames per second);
No limit w/fast card*; ~2 seconds to clear |
Time per shot, averaged over buffer length or 20 shots, whichever came first
|
|
Flash recycling
|
5 seconds
|
Flash at maximum output
|
|
Download speed
|
||
|
Windows Computer, USB 2.0
|
1,088 KBytes/sec
|
Typical Values:
Less than 600=USB 1.1; 600-770=USB 2.0 Low; 771-4000=USB 2.0 High |
|
*Note: Buffer clearing times measured with a Kingston Ultimate 120x SD memory card. Slower cards will produce correspondingly slower clearing times. Slow cards may also limit length of bursts in continuous mode.
|
||
The Canon A630's performance is generally faster than average. Startup and shutdown speeds are above average. Shutter response is a bit faster than average but not dramatically so. Shot-to-shot cycle times and continuous-mode speeds are above average, too. Even the flash, which is pretty powerful, takes just five seconds to recharge after a full-power shot, about average for any digicam flash. Connected to a computer or printer with USB 2.0, download speeds are very fast, pretty much eliminating the need for an external reader. Bottom line, while not a first choice for sports or other really fast-paced action, the A630 is responsive enough (particularly at wide angle lens settings) to handle most family photo opportunities.
Battery and Storage Capacity
Battery
Good battery life with the LCD on, better when off; significantly better with NiMH batteries.
| Battery Type | Battery Life |
| Alkaline |
280 shots
|
| NiMH (2500 mAh capacity) |
500 shots
|
The Canon A630 uses four AA batteries for power. The table above shows the number of shots it can take with either Alkaline or NiMH batteries, based on the CIPA battery-life standard. (Based on 2500 mAh capacity cells.) With a good set of NiMH AA batteries and the LCD switched off, you can actually get 1,500 shots; but since most will use the LCD, even 500 shots is great with the LCD on. Though the A630 performs pretty well with alkalines, we strongly recommend that you purchase a couple of sets of high-capacity NiMH rechargeable batteries and a good-quality charger, as they'll save you many times their cost over the life of the camera.
(Interested readers can find an English translation of the CIPA DC-002 standards document here. (180K PDF document))
Storage
A 16MB SD Memory Card is included with the PowerShot A630.
|
Image Capacity with 16MB SD Memory Card |
Fine | |
| 3,264 x 2,448 | Images | 4 |
| File Size | 3.7MB | |
| 2,592 x 1,944 | Images | 5 |
| File Size | 2.7MB | |
| 2,048 x 1,536 | Images | 9 |
| File Size | 1.7MB | |
| 1,600 x 1,200 | Images | 14 |
| File Size | 1MB | |
| 640 x 480 | Images | 55 |
| File Size | 288K | |
We strongly recommend buying a large capacity SD/MMC memory card at least a 512MB card, preferably a 1GB one, to give yourself extra space for extended outings. (Check the shopping link above, cards are really cheap these days, so no reason to skimp.)