
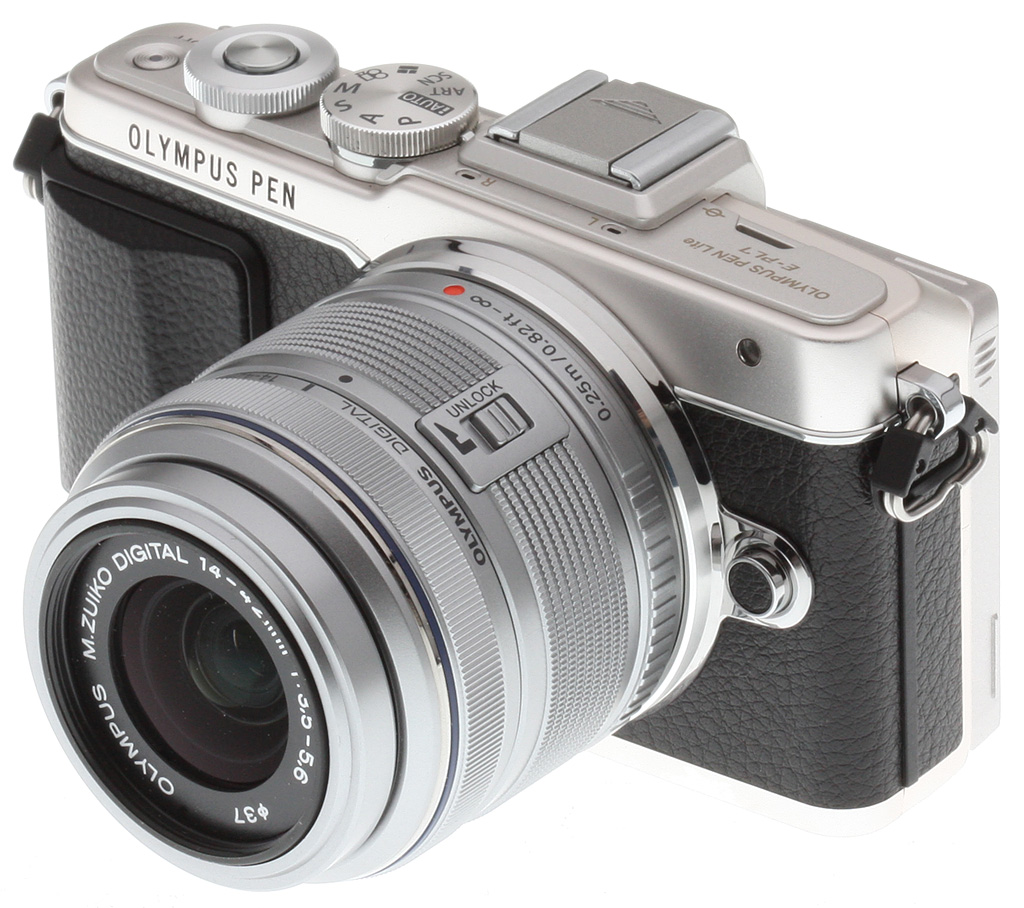


Overview

---
Olympus' E-PL7 was a strong competitor in our Best Mirrorless Camera for Under $1,000. Its lower price compared to the E-M10 allowed us to stock up on more of the incredible Micro Four Thirds glass, giving its competitors a serious run for the money. Check out the article to read about the other options under $1,000! The E-PL7 was also featured in a recent tutorial we posted about capturing indoor sports on a budget -- Click here to read more!
---
In mid-2013, Olympus introduced its latest PEN Lite PL-series compact system camera, the E-PL6, but with only very minor tweaks from 2012's E-PL5, that camera didn't even come to the US market initially (it has been released here since). Not this time around: The Olympus E-PL7 has had a pretty comprehensive revamp, although its heart -- a 16.1-megapixel Live MOS image sensor -- is unchanged from the earlier cameras.
The E-PL5 and PL6 were mid-range models, sitting in between the top-of-the-line PEN E-P5, and the extremely compact E-PM2. Although they were part of the PEN range, they lacked the P5's Olympus PEN badging and more than a few of the high-end model's features. In fact, most of these earlier PL-series cameras' features were almost identical to those of the smaller, lower-cost Olympus PM2.

There were a few key differences, though: a physical Mode dial, a level gauge function (single-axis in the PL5, dual-axis in the PL6), and perhaps most significantly, a self-portrait friendly, tilting, touch-screen LCD monitor. And of course, they were a little bigger and heavier than the PM2. They were also sold in one fewer color, with no red-bodied option, an indication perhaps that they were aimed more at advanced amateurs, and less at the entry-level shooter.
The 16.1-megapixel Olympus E-PL7 retains all of these differences, although as we'll see in a moment, there's been a pretty radical tweak to the tilting, touch-screen display. It also switches to a newer-generation TruePic VII image processor, although it still has the same ISO sensitivity range as the E-PL6, and shoots at the same maximum rate of eight frames per second with focus and exposure locked.

Manufacturer-rated buffer depth has been increased by one RAW frame, though, to a maximum of 16 RAW shots at the maximum frame rate. There's also a much more significant 17 frame improvement in the JPEG buffer depth, which now sits at 36 frames.
What else is new? Well, perhaps most notably, the touch-screen monitor now has higher resolution, and tilts downwards for selfies, where the previous design tilted upwards. The Olympus E-PL7 also sports a completely redesigned body with a fixed grip, rearranged controls, and a metal, top-mounted control dial alongside the existing Mode dial.
There's also in-camera Wi-Fi wireless networking connectivity, and an uprated image stabilization system that should have a greater corrective range, and corrects on one more axis than that of the PL5 and PL6. Both autofocus and metering are also uprated, and there are a variety of new creative functions on offer.

Available in either black or silver-bodied variants -- there's no white version any more, at least in the US -- the Olympus PEN E-PL7 is priced at around US$500 body-only. A kit version bundling the M.ZUIKO DIGITAL 14-42 mm f/3.5-5.6 II R zoom lens is priced at US$600, and an alternate kit which bundles the compact M.ZUIKO DIGITAL ED 14-42 mm f/3.5-5.6 EZ lens is available for about US$700. And since there's still no built-in flash, a compact external flash (FL-LM1) is included in both body-only and kit options.

There are also several new accessories, including a 45-meter underwater housing (PT-EP12; US$750), 75-meter underwater strobe with faster recycle and guide number of 22 (UFL-3; $500), real leather camera body jacket (CS-45B; US$60), and real leather lens jacket (LS-60.5GL; US$45). Note, though, that this last item is intended for use with the 14-42 EZ zoom lens.
The Olympus PEN E-PL7 began shipping in the US market from late September 2014; the new accessories followed from October 2014.
In the Box
The Olympus E-PL7 retail kit package (as reviewed) contains the following items:
- Olympus E-PL7 camera body (in black or silver)
- 14-42mm R II Olympus M.Zuiko Digital zoom lens (an EZ lens kit is also available)
- Flash FL-LM1
- Rechargeable Li-ion battery BLS-50
- Battery charger BCS-5
- USB cable
- Shoulder strap
- Olympus Viewer 3 software (CD-ROM)
- Instruction manual
- Warranty card
Recommended Accessories
- Large capacity SDHC/SDXC memory card. 16GB Class 6 should be a minimum, UHS-I type recommended.
- Spare battery BLS-50 (~US$60)
- Electronic Viewfinder VF-4 (~US$275)
- External Microphone Adapter Set (SEMA-1) (~US$70)
- Camera case
- Additional lenses
Optics
The Olympus E-PL7 is available body-only, bundled with the M.ZUIKO 14-42mm f/3.5-5.6 II R lens, or bundled with the M.ZUIKO ED 14-42mm f/3.5-5.6 EZ lens. See our detailed reviews of these lenses on SLRgear.com: M.ZUIKO 14-42mm f/3.5-5.6 II and M.ZUIKO ED 14-42mm f/3.5-5.6 EZ
See below for our E-PL7 viewfinder accuracy test results.
Viewfinder Test Results
Accuracy
Very good accuracy from the LCD monitor.

The Olympus E-PL7's LCD monitor proved pretty accurate in record mode, showing about 101% coverage with our Olympus Zuiko Digital 50mm f/2.0 low distortion prime. Very good results here.
The images above were taken from our standardized test shots. For a collection of more pictorial photos, see our Olympus PEN E-PL7 Photo Gallery .
Exposure
Color
Saturation & Hue Accuracy
Somewhat muted colors with good hue accuracy.
 |
||
|
ISO Sensitivity
|
||
| In the diagram above, the squares show the original color, and the circles show the color that the camera captured. More saturated colors are located toward the periphery of the graph. Hue changes as you travel around the center. Thus, hue-accurate, highly saturated colors appear as lines radiating from the center. Mouse over the links to compare ISOs and click for a larger version. | ||


Saturation. The Olympus E-PL7's default mean saturation is noticeably lower than most cameras, at 97.3% at base ISO (about 2.7% undersaturated from ideal, and about 13% lower than the average camera.). Only reds are pushed mildly, while most colors are slightly desaturated or close to spot on. Mean saturation remains fairly stable across the ISO range, except at ISOs 12,800 and 25,600 where it is lower (96.3% and 93.9% respectively), likely an attempt to help control chroma noise. Most consumer digital cameras produce color that's more highly saturated (more intense) than what's found in the original subjects. This is simply because most people like their color a bit brighter than life.
Skin tones. The Olympus E-PL7 does fairly well here, producing natural-looking Caucasian skin tones, just slightly on the warm side. Where oversaturation is most problematic is on Caucasian skin tones, as it's very easy for these "memory colors" to be seen as too bright, too pink, too yellow, etc.
Hue. The Olympus E-PL7 exhibits good overall hue accuracy, with a Delta-C color error after correction for saturation of 4.47 at base ISO, which is better than average. And hue accuracy is good across the ISO sensitivity range. Hue is "what color" the color is.


Sensor
Exposure and White Balance
Indoors, incandescent lighting
Warm color cast with Auto and cool with Incandescent white balance, but very good color with the Manual setting. Average exposure compensation required.


Indoors, under normal incandescent lighting, color balance is very warm with the Auto white balance setting, with a strong orange/yellow cast. Results with the Incandescent setting are however actually pretty good, but a little cool and cyan. The Manual setting is quite accurate, providing nearly neutral color balance. The Olympus E-PL7 required an average amount of positive exposure compensation here, at +0.3 EV. (Our test lighting for this shot is a mixture of 60 and 100 watt household incandescent bulbs, a pretty yellow light source, but a very common one in typical home settings here in the U.S.)
Outdoors, daylight
Natural looking colors overall, with good exposure.
Outdoors, the Olympus E-PL7 performed well, with natural colors and good exposure. Skintones are good but slightly warm with the Auto white balance setting in our "Sunlit" Portrait shot, so we preferred Manual white balance, though it too is still a touch warm. The Olympus E-PL7 required an average amount of positive exposure compensation (+0.7 EV) to keep the mannequin's eyes relatively bright. Default contrast is a bit high, but despite the bright appearance in some areas there are very few blown highlights in the mannequin's shirt and flowers, which is much better than average. And there are few lost shadows as well. The Far-field shot has very good exposure at default settings and almost no blown highlights or lost shadows. Shadows are fairly clean, though there are signs of more aggressive noise reduction in darker regions. (Note that these shots were taken at ISO 200 as ISO 100 is an extended setting with inferior dynamic range.)
See full set of test images with explanations
See thumbnails of all test and gallery images
Resolution
~2,450 lines of strong detail in JPEGs, a little higher from processed RAW files.


In-camera JPEGs of our laboratory resolution chart reveals sharp, distinct line patterns down to about 2,450 lines per picture height in the horizontal direction, and about the same in the vertical direction. Complete extinction of the pattern doesn't occur until about 3,200 to 3,400 lines, though. Adobe Camera Raw was able to extract just a touch more high-contrast detail in the horizontal direction here, though color moiré is more apparent near the limits of resolution. Use these numbers to compare with other cameras of similar resolution, or use them to see just what higher resolution can mean in terms of potential detail.
See full set of test images with explanations
See thumbnails of all test and gallery images
Sharpness & Detail
Very good sharpness and detail overall, though edge-enhancement artifacts on high-contrast subjects are visible. Mild noise suppression visible in the shadows.


Sharpness. The Olympus E-PL7 captures very sharp images overall, though as is usually the case for most manufacturers, edge enhancement artifacts are visible on high-contrast subjects such as sharpening halos around the lines and lettering in the crop above left. Edge enhancement creates the illusion of sharpness by enhancing colors and tones right at the edge of a rapid transition in color or tone.
Detail. The crop above right shows fairly mild noise suppression artifacts in the darkest areas of the model's hair as base ISO, smudging individual strands together when contrast between them is low, though quite a few individual strands remain visible. Overall detail is very good for a 16-megapixel Micro Four Thirds model. Noise-suppression systems in digital cameras tend to flatten-out detail in areas of subtle contrast. The effects can often be seen in shots of human hair, where the individual strands are lost and an almost "watercolor" look appears.
RAW vs In-Camera JPEGs
As noted above, the Olympus E-PL7 does a great job at capturing lots of fine detail in its JPEGs, but more detail can often be obtained from carefully processing RAW files, while at the same time reducing sharpening artifacts. Take a look below, to see what we mean:
|
Base ISO (200)
|
|
 |
 |
 |
 |
 |
 |
|
Camera JPEG, defaults
|
RAW via Adobe Camera Raw
|
In the table above, we compare an in-camera JPEG taken at base ISO using default noise reduction and sharpening (on the left) to the matching RAW file converted with Adobe Camera Raw 8.4 using default noise reduction with some strong but tight unsharp masking applied in Photoshop (300%, radius of 0.3 pixels, and a threshold of 0).
As you can see, the Adobe Camera Raw conversion contains fine detail superior to the camera's Super Fine JPEG at default settings, especially in the red-leaf swatch where where much of the thread pattern is resolved, though it does leave behind more noise at default noise reduction settings. Out of camera images also have a bit more "pop," with higher contrast.
The E-PL7's JPEG engine does a very good job capturing most of the detail offered by its 16-megapixel sensor, at least at low ISOs. (And its expanded ISO 100 setting does even better, but at the cost of limited dynamic range.)
ISO & Noise Performance
Very good high ISO performance for its class.
|
Default High ISO Noise Reduction
|
 |
 |
 |
| ISO 100 | ISO 200 | ISO 400 |
 |
 |
 |
| ISO 800 | ISO 1600 | ISO 3200 |
 |
 |
 |
| ISO 6400 | ISO 12,800 | ISO 25,600 |
The Olympus E-PL7's images are quite clean and detailed at ISOs 100 though 400, though there's a minor increase in noise in the shadows as ISO rise within this range. ISO 800 shows a slight drop in overall image quality, but fine detail is still quite strong. At ISO 1600, we see some moderate detail loss due to stronger noise and noise reduction efforts, as well as more visible chroma noise in the shadows, but fine detail is still pretty good. ISO 3200 is the first step in sensitivity where image quality suffers a noticeable drop with much stronger blurring of fine detail. Image quality drops off rapidly at ISO 6400 and above, with stronger noise, visible noise reduction and sharpening artifacts, as well as a shift in color towards green and a drop in saturation.
Overall, though, high ISO noise performance is comparable to the best we've seen from a Micro Four Thirds model thus far, and even competes well with some APS-C rivals. As always, see the Print Quality section below for maximum recommended print sizes at each ISO.
A note about focus for this shot: We shoot this image at f/4, using one of three very sharp reference lenses (70mm Sigma f/2.8 macro for most cameras, 60mm f/2.8 Nikkor macro for Nikon bodies without a drive motor, and Olympus Zuiko 50mm f/2.0 for Four Thirds and Micro Four Thirds bodies). To insure that the hair detail we use for making critical judgements about camera noise processing and detail rendering is in sharp focus at the relatively wide aperture we're shooting at, the focus target at the center of the scene is on a movable stand. This lets us compensate for front- or back-focus by different camera bodies, even those that lack micro-focus adjustments. This does mean, though, that the focus target itself may appear soft or slightly out of focus for bodies that front- or back-focused with the reference lens. If you click to view the full-size image for one of these shots and notice that the focus target is fuzzy, you don't need to email and tell us about it; we already know it. :-) The focus target position will simply have been adjusted to insure that the rest of the scene is focused properly.
Extremes: Sunlit, dynamic range and low light tests
Very good detail and dynamic range. Very good low-light performance as well.


Sunlight. The Olympus E-PL7 did very well with this difficult shot, requiring the average amount of exposure compensation (+0.7 EV) to keep the mannequin's face bright in this harsh lighting. As mentioned previously, despite the bright appearance of the mannequin's shirt, dynamic range is surprisingly good, with very few highlights blown and very good detail in the shadows as well. Performance here is well above average, particularly for a Micro Four Thirds model.
Because digital cameras are more like slide film than negative film (in that they tend to have a more limited tonal range), we test them in the harshest situations to see how they handle scenes with bright highlights and dark shadows, as well as what kind of sensitivity they have in low light. The shot above is designed to mimic the very harsh, contrasty effect of direct noonday sunlight, a very tough challenge for most digital cameras. (You can read details of this test here. In actual shooting conditions, be sure to use fill flash in situations like the one shown here; it's better to shoot in open shade whenever possible.)
| Face Detection | ||
 |
 |
 |
| Off at 0 EV Aperture priority, ISO 200, f/8, 1/100s |
On at 0 EV Aperture priority, ISO 200, f/8, 1/60s |
On at 0 EV Full Auto ISO 200, f/2, 1/1000s |
Face Detection
Like most cameras these days, the Olympus E-PL7 has the ability to detect faces, and adjust exposure and focus accordingly. As you can see from the examples above, it works well, as the center image with face detection enabled is much better exposed for the face without having to use exposure compensation. The Full Auto setting worked even better by choosing Portrait scene mode which used a larger aperture (f/2) and applied Auto Gradation to reduce strong shadows and highlights. An excellent performance under very difficult lighting such as this.
|
Outdoor Portrait Gradation Comparison
|
|
 |
Gradation Normal (Default) Auto Low Key High Key |
 |
|
Gradation
Similar to dynamic range optimization systems from other manufacturers, the Olympus E-PL7's Gradation setting applies local contrast adjustments in an attempt to preserve shadow detail and prevent highlight clipping with the Auto setting. Above are examples of the Normal (default), Auto, Low Key and High Key settings applied to our "Sunlit" Portrait shot with no exposure compensation. Mouse over the links to load the associated thumbnail and histogram, and click on the links to visit the full resolution image.
As you can see, the Low Key setting applies Gradation for making subjects darker (in the thumbnail and histogram above, you can see that the camera shifted levels to the left, darkening the image dramatically), while the High Key setting does the opposite for brighter subjects (shifting levels to the right so that lighter tones are blown, but darker ones are opened up). The Auto setting did a good job here, boosting shadows and midtones without blowing highlights, though the overall exposure is still a bit dim.
|
Far-field Gradation Comparison
|
|||
 |
|||
Above, we can see the Gradation options at work in our Far-field test shot series. Mouse over the links to load the associated thumbnail, and click on the links to visit the full resolution image.
|
High Dynamic Range
|
|||
 |
|||
HDR setting: |
|||
High Dynamic Range
The E-PL7's in-camera HDR feature works by combining four shots at different exposures. Two strength settings are available: HDR1 and HDR2, with the later providing a more extreme result. ISO is fixed to 200, and slowest shutter speed is 1 second (4 seconds total).
Above, you can see the E-PL7's in-camera HDR mode at work with our Far-field shot. HDR1 did a pretty good job brightening shadows and toning down highlights, though you can probably do better by using the bracketing mode and combining the images yourself in software. HDR2 mode looked overprocessed and was too bright with blown-out highlights as well as soft details and more visible noise.
Notice that the HDR images are not cropped compared to the non-HDR image, which can imply the camera does not microalign the source images, or at least can't compensate for much camera motion. This is pretty much confirmed by the user manual which says to use a tripod for HDR shots, potentially making this mode less useful than those offered by some other manufacturers, however we found we were able to capture HDR images hand-held with no alignment issues.
Dynamic Range Analysis (RAW mode)
A key parameter in a digital camera is its Dynamic Range, the range of brightness that can be faithfully recorded. At the upper end of the tonal scale, dynamic range is dictated by the point at which the RGB data "saturates" at values of 255, 255, 255. At the lower end of the tonal scale, dynamic range is determined by the point at which there ceases to be any useful difference between adjacent tonal steps. Note the use of the qualifier "useful" in there: While it's tempting to evaluate dynamic range as the maximum number of tonal steps that can be discerned at all, that measure of dynamic range has very little relevance to real-world photography. What we care about as photographers is how much detail we can pull out of the shadows before image noise becomes too objectionable. This, of course, is a very subjective matter, and will vary with the application and even the subject matter in question. (Noise will be much more visible in subjects with large areas of flat tints and subtle shading than it would in subjects with strong, highly contrasting surface texture.)
While we once performed our own dynamic range measurements based on in-camera JPEGs as well as converted RAW images (when the camera was supported by Adobe Camera Raw), we've switched to using DxO Labs' results from their DxOMark website. As technology advanced, the dynamic range of modern high-end cameras in some cases exceeded the range of the Stouffer T4110 density scale that we used for our own measurements. DxO's approach based on RAW data before demosaicing is also more revealing, because it measures the fundamental dynamic range of the sensor, irrespective of whatever processing is applied to JPEGs, or to RAW data by off-the-shelf conversion software.
In the following, we use DxO's "Print" dynamic range results, which are scaled based on camera resolution. As the name suggests, this scaling corresponds to the situation in which you print at a given size, regardless of how many megapixels the camera might have. (In other words, if you've decided to make a 13x19 inch print, that's the size you're printing, whether the camera's resolution is 16 or 300 megapixels.) For the technically-minded, you can find a discussion of the reasoning behind this here on the DxOMark website. Also note that DxO Labs uses a signal-to-noise (SNR) threshold of 1 when defining the lower boundary of acceptable luminance noise in their dynamic range measurements, which corresponds to the "Low Quality" threshold of the Imatest software we used to use for this measurement.

Here, we compare the Olympus E-PL7's dynamic range to its predecessor, the E-PL5, as well as to an APS-C competitor with an identical list price at introduction, the Sony A5100.
As you can see from the above graph (click for a larger image), compared to its predecessor, the E-PL7's dynamic range is very similar which is not surprising given they use very similar if not identical sensors. The E-PL5 does however do a little better at higher ISOs, but probably not significantly enough to be able to discern in real-world images.
The Olympus E-PL7's dynamic range compares well with the Sony A5100 at low ISOs, where the Sony has only about a 1/3 stop advantage (12.7 vs 12.4 EV) at base ISO, though the Sony pulls away at higher ISOs, with about a full stop advantage at the highest common ISO. Still, a very good performance, especially for a Four Thirds sensor.
Click here to visit the DxOMark page for the Olympus E-PL7 for more of their test results and additional comparisons.
| 1 fc 11 lux |
1/16 fc 0.67 lux |
1/16 fc No NR |
|
|---|---|---|---|
| ISO 100 |
 1s, f2.8 |
 15s, f2.8 |
 15s, f2.8 |
| ISO 3200 |
 1/15s, f2.8 |
 1s, f2.8 |
 1s, f2.8 |
| ISO 25600 |
 1/125s, f2.8 |
 1/8s, f2.8 |
 1/8s, f2.8 |
Low Light
The Olympus E-PL7 performed well in low lighting, capturing bright exposures at our lowest light level at all three ISOs we test. As you'd expect, noise is low at ISO 100 (sorry, we usually test at base ISO which is 200 for the E-PL7) and well-controlled at ISO 3200 though ISO 25,600 is noisy, desaturated and probably best avoided except for small images.
We didn't notice any issues with banding (fixed pattern noise) or heat blooming, however we did spot a few bright pixels at ISO 100.
White balance was fairly neutral using the Auto setting, just slightly cool.
The camera's autofocus system was able to focus on our subject down to below the 1/16 foot-candle light level unassisted with an f/2.8 lens (albeit slowly), which is excellent, and in total darkness with the aid of its focus assist lamp.
How bright is this? The one foot-candle light level that this test begins at roughly corresponds to the brightness of typical city street-lighting at night. Cameras performing well at that level should be able to snap good-looking photos of street-lit scenes.
NOTE: This low light test is conducted with a stationary subject, and the camera mounted on a sturdy tripod. Most digital cameras will fail miserably when faced with a moving subject in dim lighting. (For example, a child's ballet recital or a holiday pageant in a gymnasium.) Thanks to their phase-detect AF systems, digital SLRs tend to do much better than point & shoots, but you still shouldn't expect a quick autofocus lock with moving subjects. The E-PL7 uses contrast-detect autofocus as is found in most point & shoot cameras, so its low-light focusing ability is less than that of most SLRs with phase-detect systems. That said, though, the larger, more sensitive pixels of the E-PL7's sensor do better under dim lighting than do the tiny pixels of most point & shoots, (A useful trick is to just prop the camera on a convenient surface, and use its self-timer to release the shutter. This avoids any jiggling from your finger pressing the shutter button, and can work quite well when you don't have a tripod handy.)
Output Quality
Print Quality
Excellent 24 x 36 inch prints at ISO 100/200; a nice 16 x 20 at ISO 1600; and a good 4 x 6 at ISO 12,800.
 ISO 100/200 images look excellent at 24 x 36 inches. A very close inspection reveals a trace of pixelation given the 16-megapixel resolution, but for normal viewing distances of a 2' x 3' print, this would never be noticed in the slightest. Fine detail is very sharp, and colors look excellent.
ISO 400 prints at 24 x 36 inches introduce the slightest trace of noise in a few flatter areas of our target, but are fine for less critical applications. 20 x 30 inch prints here look quite good with no noticeable issues.
ISO 800 almost makes our "good" grade at 20 x 30 inches. Moving down a size to 16 x 20 inches does the trick and yields a very nice print across the board with virtually no noise reduction artifacts.
ISO 1600 produces a good 16 x 20 inch print, which is quite good for an entry-level camera at ISO 1600. Fine detail and full color reproduction are on display here.
ISO 3200 is often the turning point for Micro Four Thirds cameras in general, but the E-PL7 handles it about as well as any in this class. 13 x 19 inch prints here are good with only a few areas showing minor issues with softening in the red channel and some mild noise in flatter areas.
ISO 6400 takes a fairly dramatic toll on image quality, as is typical for all but the best full-frame camera bodies on the market. 8 x 10 inch prints here pass our "good" rating, though all contrast detail is now lost in our tricky red-leaf fabric swatch.
ISO 12,800 yields a 5 x 7 inch print that almost passes our good grade, but it's the 4 x 6 inch print here that we'll pin our seal of approval on, with full color reproduction still on display here.
ISO 25,600 prints aren't terrible, as with some cameras we've seen, but they don't quite make our good grade at 4 x 6, and this setting is best avoided for most all applications.
Like its predecessor, the E-PL5 and its esteemed big brother the E-P5, the Olympus E-PL7 produces very worthwhile prints across most of the available ISO sensitivity range. It bests the E-PL5 at ISO 1600 and 3200 by a print size, and generally looks better than its predecessor as ISO rises. Fine detail and rich color reproduction are on full display up to ISO 1600, where large 16 x 20 inch prints are still possible with virtually no noise reduction artifacts. Noise and softness begin to take their usual toll in increasing degrees after this, but a good 4 x 6 inch print is still possible at ISO 12,800, which would correspond to a large onscreen image. And while the highest available ISO setting of 25,600 doesn't quite make the grade, it generally doesn't until you move to a larger sensor. A very nice performance in the print quality department by this mid-level PEN camera!
The images above were taken from our standardized test shots. For a collection of more pictorial photos, see our Olympus PEN E-PL7 Photo Gallery .
Not sure which camera to buy? Let your eyes be the ultimate judge! Visit our Comparometer(tm) to compare images from the Olympus PEN E-PL7 with those from other cameras you may be considering. The proof is in the pictures, so let your own eyes decide which you like best!
Performance
Timing and Performance
Excellent overall performance for its class.
| Startup/Play to Record | ||
|---|---|---|
| Power on |
~0.5 second
|
Time it takes to turn on and capture a shot. |
| Play to Record, |
~0.3 second
|
Time until first shot is captured. |
Startup time including taking a shot was excellent, and switching from Play to Record and taking a shot was quite fast.
| Shutter Response (Lag Time) | ||
|---|---|---|
|
Full Autofocus, |
0.158 second
|
Time from fully pressing shutter button to image capture, with the lens already at the proper focal distance setting. (All AF timing performed with the Olympus M.Zuiko 45mm f/1.8 ED prime lens.) |
|
Full Autofocus, |
0.334 second
|
Time from fully pressing shutter button to image capture, with the lens already at the proper focal distance setting, TTL Auto flash enabled. |
|
Manual Focus |
0.098 second
|
For most cameras, shutter lag is less in manual focus than autofocus, but usually not as fast as when the camera is "prefocused". |
|
Prefocused |
0.065 second
|
Time to capture, after half-pressing and holding shutter button. |
The Olympus E-PL7's full-autofocus shutter lag in single-area AF mode (center AF position) was 0.158 second when tested with our Olympus M.Zuiko 45mm f/1.8 ED prime lens. That's faster than average for a CSC and competitive with prosumer DSLRs, though keep in mind our test target is static and we don't refocus between trials for this test.
Enabling the flash increased lag to 0.334 second to account for preflash metering, though that's still pretty fast.
When manually focused, the E-PL7's shutter lag time was 0.098 second, also fast. The E-PL7's prefocused shutter lag time of 0.065 second was quite quick.
To minimize the effect of different lens' focusing speed, we test AF-active shutter lag with the lens already set to the correct focal distance.
| Cycle Time (shot to shot) | ||
|---|---|---|
| Single Shot mode |
0.56 second
|
Time per shot, averaged over a few frames (we no longer test for buffer depths in single-shot mode). |
|
Single Shot mode |
0.66 second
|
Time per shot, averaged over a few frames (we no longer test for buffer depths in single-shot mode). |
| Early shutter |
No
|
Some cameras don't snap another shot if you release and press the shutter too quickly in Single Shot mode, making "No" the preferred answer. |
|
Continuous H Mode |
0.12 second (8.68 frames per second);
24 frames total; 6 seconds to clear* |
Time per shot, averaged over 24 shot buffer capacity, then slows to an average of 0.33s or 3.30fps when buffer is full. |
| Continuous H Mode |
0.11 second (8.74 frames per second);
17 frames total; 6 seconds to clear* |
Time per shot, averaged over 17 shot buffer capacity, then slows to an average of 0.39s or 2.54fps when buffer is full. |
|
Continuous H Mode |
0.11 second (8.72 frames per second);
14 frames total; 10 seconds to clear* |
Time per shot, averaged over 14 shot buffer capacity, then slows to an average of 0.68s or 1.46fps when buffer is full. |
| Flash Recycling |
4.6 seconds
|
Flash at maximum output. |
|
*Note: Buffer clearing times measured with a SanDisk Extreme Pro 95MB/sec UHS-I SDHC card. Slower cards will produce correspondingly slower clearing times. Slow cards may also limit length of bursts in continuous mode. ISO sensitivity and noise reduction settings can also affect cycle times and burst mode performance.
|
||
Single-shot cycle times were quite good for a CSC, ranging from 0.56 second for best quality JPEGs to 0.66 second for RAW+JPEG. (Note that we no longer test just RAW files in single-shot mode, as its cycle-time is usually somewhere between JPEG and RAW+JPEG.)
Continuous H mode performance was very good, at around 8.7 frames per second with any file type. That's noticeably better than Olympus' 8 fps spec. Note that focus, exposure and white balance are fixed at the first frame of a burst in this mode. There is also a "low speed" mode rated at up to 3.7 fps which supports continuous AF and exposure, however we didn't test that mode in the lab.
Buffer depths are quite good for its class at 24 frames for Large/Super Fine JPEGs, 17 frames for RAW files, and 14 frames for RAW+JPEGs. Note that our target for this test was designed to be difficult to compress, so JPEG burst lengths should be longer with typical subjects. (An you'll be able to take longer JPEG bursts by switching to Fine quality.) Buffer clearing was also good, ranging from 6 seconds after a burst of 24 LSF JPEGs or 17 RAW frames to 10 seconds after a burst of 14 RAW+JPEG frames with a fast UHS-I card.
Flash recycle time was about average with the included body-powered external flash, at 4.6 seconds after a full power discharge.
Bottom line, the Olympus E-PL7's performance is generally excellent for its class, with quick startup, fast autofocus speeds, very good cycle times and swift burst performance.
Battery
Battery Life
About average battery life for a CSC.
| Operating Mode | Number of Shots |
|---|---|
|
Still Capture,
(CIPA standard) |
350
|
The Olympus E-PL7 uses a custom rechargeable lithium-ion battery pack for power, and comes with both a single battery and charger. The rated 350 shots per charge is about average for a compact system camera, but well below the capacity of most DSLRs with their optical viewfinders. We recommend getting a second battery for your E-PL7 if you plan any extended outings.
The table above shows the number of shots the camera is capable of (on a fully-charged rechargeable battery), based on CIPA battery-life and/or manufacturer standard test conditions.
(Interested readers can find an English translation of the CIPA DC-002 standards document here. (180K PDF document))
Image Quality
Below are crops from our laboratory Still Life target comparing Olympus E-PL7 image quality to its predecessor, the E-PL5, as well as against several competing models at similar price points or in similar categories: the Fuji X-A2, Nikon D3300, Samsung NX300 and Sony A5100.
NOTE: These images are from best quality JPEGs straight out of the camera, at default settings including noise reduction and using the camera's actual base ISO (not extended ISO settings). All cameras in this comparison were shot with our very sharp reference lenses. Clicking any crop will take you to a carrier page where you can click once again to access the full resolution image as delivered straight from the camera. For those interested in working with the RAW files involved, click these links to visit each camera's respective sample image thumbnail page: Olympus E-PL7, Olympus E-PL5, Fuji X-A2, Nikon D3300, Samsung NX300 and Sony A5100 -- links to the RAW files appear beneath those for the JPEG images, wherever we have them. And remember, you can always go to our world-renowned Comparometer to compare the Olympus E-PL7 to any camera we've ever tested!
Olympus E-PL7 vs Olympus E-PL5 at Base ISO
 |  |
 |  |
 |  |
Olympus E-PL7 at ISO 200 | Olympus E-PL5 at ISO 200 |
At the base ISO of 200, the E-PL7 and E-PL5 produce very similar results which is to say excellent image quality for a 16-megapixel Four Thirds sensor. Interestingly, though, the E-PL7 leaves a bit more noise in the red-leaf fabric, but otherwise, image quality is practically identical here with only very subtle differences. | |
|
 |
Olympus E-PL7 at ISO 200 |
Olympus E-PL7 at ISO 100
|
|
As shown above comparing the E-PL7's base ISO 200 (left) to expanded ISO 100 (right), one advantage of the E-PL7 over its predecessor is that it offers an expanded low ISO 100 equivalent with noticeably improved detail particularly in our red-leaf fabric (due to lower default noise reduction), but at the expense of less dynamic range. The E-PL5 does not offer an extended ISO 100 setting. | |
Olympus E-PL7 vs Fujifilm X-A2 at Base ISO
|  |
|  |
|  |
Olympus E-PL7 at ISO 200 | Fujifilm X-A2 at ISO 200 |
|
Here we compare the E-PL7 to the 16-megapixel APS-C Fuji X-A2. This Fuji model uses a traditional Bayer-filtered sensor instead of Fujifilm's unique X-Trans sensor, but it still performs very well when coupled with Fuji's processing. The X-A2's images are cleaner and softer looking than the PL7's, however they do show a little less detail in the mosaic crop. At first glance, the red-leaf fabric appears to have less detail as well, but if you look closely, it actually has just as much if not more, but contrast is significantly lower. The Olympus does do better with the pink fabric, though. | |
Olympus E-PL7 vs Nikon D3300 at Base ISO
|  |
|  |
|  |
Olympus E-PL7 at ISO 200 | Nikon D3300 at ISO 100 |
Here we decided to compare the E-PL7 to an excellent entry-level APS-C DSLR, the Nikon D3300. The 24-megapixel D3300 does resolve more fine detail with fewer noise reduction artifacts, however the E-PL7 compares well here, especially considering its base ISO is higher. | |
Olympus E-PL7 vs Samsung NX300 at Base ISO
|  |
|  |
|  |
Olympus E-PL7 at ISO 200 | Samsung NX300 at ISO 100 |
The 20-megapixel APS-C Samsung NX300 resolves a bit more detail and also shows fewer noise reduction artifacts, but it struggles with the red-leaf swatch already at base ISO, blurring it more than the E-PL7. Overall, we still give the edge to the Samsung at base ISO, but only just. | |
Olympus E-PL7 vs Sony A5100 at Base ISO
|  |
|  |
|  |
Olympus E-PL7 at ISO 200 | Sony A5100 at ISO 100 |
In this comparison with the 24-megapixel APS-C Sony A5100, the Olympus holds it own, though the Sony does resolve more detail overall. The A5100's images are fairly crisp without the obvious sharpening halos generated by the E-PL7, however the Sony shows quite a few false colors in the monk's clothing (some of them are real -- a result of the offset printing process -- however they appear somewhat exaggerated). Sony's rendering of the tricky red-leaf pattern appears softer but actually contains good detail, while the E-PL7's rendering resolves some of the thread pattern, however it's also noisier giving the impression of more detail. | |
Olympus E-PL7 vs Olympus E-PL5 at ISO 1600
 |  |
 |  |
 |  |
Olympus E-PL7 at ISO 1600 | Olympus E-PL5 at ISO 1600 |
Again, pretty similar results from the two siblings at ISO 1600, however the older E-PL5 does a bit better at holding onto fine detail while the E-PL7 produces a slightly cleaner image. We're splitting hairs here, though, and both struggle to retain fine detail in our challenging red-leaf swatch. | |
Olympus E-PL7 vs Fujifilm X-A2 at ISO 1600
|  |
|  |
|  |
Olympus E-PL7 at ISO 1600 | Fujifilm X-A2 at ISO 1600 |
As we saw at base ISO, the X-A2 produces a cleaner looking image with fewer noise reduction and sharpening artifacts at ISO 1600, though it appears a bit soft. Both cameras struggle with our red-leaf fabric however the X-A2 does resolve slightly better detail, but with much lower contrast. | |
Olympus E-PL7 vs Nikon D3300 at ISO 1600
|  |
|  |
|  |
Olympus E-PL7 at ISO 1600 | Nikon D3300 at ISO 1600 |
There's a dramatic difference between the E-PL7 and D3300 here at ISO 1600. While the Nikon's image is much noisier, it retains much more detail, and the noise is very fine-grained, almost film-like in nature. The E-PL7 on the other hand is working hard to smooth over noise, however it loses more detail in the process. | |
Olympus E-PL7 vs Samsung NX300 at ISO 1600
|  |
|  |
|  |
Olympus E-PL7 at ISO 1600 | Samsung NX300 at ISO 1600 |
At ISO 1600, the Samsung continues to resolve more fine detail while producing lower noise and fewer artifacts, but contrast is a little lower and it really struggles with our red-leaf swatch. | |
Olympus E-PL7 vs Sony A5100 at ISO 1600
|  |
|  |
|  |
Olympus E-PL7 at ISO 1600 | Sony A5100 at ISO 1600 |
The Sony A5100 continues to resolve more detail than the E-PL7 at ISO 1600, but its somewhat clumsy processing smudges fine detail, giving some areas of the image a slightly soft, almost veiled look. The E-PL7's image also shows a loss of detail as well as unwanted artifacts, but it appears crisper with more "pop". The Sony does do a little better with our notorious red-leaf swatch, though some of that apparent detail is false. | |
Olympus E-PL7 vs Olympus E-PL5 at ISO 3200
 |  |
 |  |
 |  |
Olympus E-PL7 at ISO 3200 | Olympus E-PL5 at ISO 3200 |
Again, very similar results from the two Olympus PEN models at ISO 3200, but yet again, the E-PL5 does a tad batter at retaining fine detail, while the E-PL7 shows slightly lower noise. Both produce fairly strong artifacts in their attempt to control noise, and both only show a slight semblance of the red-leaf pattern. | |
Olympus E-PL7 vs Fujifilm X-A2 at ISO 3200
|  |
|  |
|  |
Olympus E-PL7 at ISO 3200 | Fujifilm X-A2 at ISO 3200 |
The X-A2 continues to do noticeably better than the E-PL7 at ISO 3200, with lower noise, fewer artifacts and better fine detail, though the image remains a little soft overall. Both cameras really struggle resolving much of the pattern in our red-leaf swatch, however the E-PL7 does continue to produce slightly higher contrast. | |
Olympus E-PL7 vs Nikon D3300 at ISO 3200
|  |
|  |
|  |
Olympus E-PL7 at ISO 3200 | Nikon D3300 at ISO 3200 |
The D3300 easily out-resolves the PL7 at ISO 3200, but continues to produce a much noisier image. However as was the case at ISO 1600, the noise has a very tight "grain" and images look more natural and film-like, as well as containing more detail than the E-PL7's. | |
Olympus E-PL7 vs Samsung NX300 at ISO 3200
|  |
|  |
|  |
Olympus E-PL7 at ISO 3200 | Samsung NX300 at ISO 3200 |
The Samsung NX300 works hard at eliminating noise at ISO 3200, though it still manages to offer much better fine detail in most areas. The NX300's noise reduction does however leave behind some dark pixels in flat areas, which give those areas a bit of a peppered look, and it really smudges out almost all detail in our red-leaf swatch. The E-PL7's noise in the shadows is more grainy and natural looking, however fine detail in the mosaic crop shows a lot more artifacts. | |
Olympus E-PL7 vs Sony A5100 at ISO 3200
|  |
|  |
|  |
Olympus E-PL7 at ISO 3200 | Sony A5100 at ISO 3200 |
Here again the Sony's image at ISO 3200 is quite soft from aggressive default noise reduction and light sharpening, though it does continue to contain more detail overall. | |
Olympus E-PL7 vs. Olympus E-PL5, Fujifilm X-A2, Nikon D3300, Samsung NX300, Sony A5100
 |  |  |  |  |  |
 |  |  |  |  |  |
 |  |  |  |  |  |
| Olympus E-PL7 ISO 200 ISO 3200 ISO 6400 | Olympus E-PL5 ISO 200 ISO 3200 ISO 6400 | Fujifilm X-A2 ISO 200 ISO 3200 ISO 6400 | Nikon D3300 ISO 100 ISO 3200 ISO 6400 | Samsung NX300 ISO 100 ISO 3200 ISO 6400 | Sony A5100 ISO 100 ISO 3200 ISO 6400 |
| Detail comparison. We also like to take a look at high-contrast detail, as results often differ from what we see in the tables above. Here, the E-PL7 continues the Olympus tradition of producing great results with high-contrast detail as ISO rises, as did the E-PL5. As you can see, contrast and detail remains very good at ISO 3200, and even ISO 6400 only shows a slight drop in detail and saturation. Excellent results, though perhaps not quite as good as the E-PL5's. The Nikon D3300 however performs the best in terms of detail here, but it does lose sharpness and contrast as ISO climbs. The Sony A5100 is almost the opposite, dropping less in sharpness and contrast, but losing more detail. It also generated the most false colors. The NX300 drops in contrast noticeably as ISO climbs, but still retains good detail. Trailing the pack is the Fuji X-A2, which has difficulty resolving the fine lines within the lettering even at base ISO, while losing contrast as sensitivity increases. | |||||
Excellent 24 x 36 inch prints at ISO 100/200; a nice 16 x 20 at ISO 1600; and a good 4 x 6 at ISO 12,800.
ISO 100/200 images look excellent at 24 x 36 inches. A very close inspection reveals a trace of pixelation given the 16-megapixel resolution, but for normal viewing distances of a 2' x 3' print, this would never be noticed in the slightest. Fine detail is very sharp, and colors look excellent.
ISO 400 prints at 24 x 36 inches introduce the slightest trace of noise in a few flatter areas of our target, but are fine for less critical applications. 20 x 30 inch prints here look quite good with no noticeable issues.
ISO 800 almost makes our "good" grade at 20 x 30 inches. Moving down a size to 16 x 20 inches does the trick and yields a very nice print across the board with virtually no noise reduction artifacts.
ISO 1600 produces a good 16 x 20 inch print, which is quite good for an entry-level camera at ISO 1600. Fine detail and full color reproduction are on display here.
ISO 3200 is often the turning point for Micro Four Thirds cameras in general, but the E-PL7 handles it about as well as any in this class. 13 x 19 inch prints here are good with only a few areas showing minor issues with softening in the red channel and some mild noise in flatter areas.
ISO 6400 takes a fairly dramatic toll on image quality, as is typical for all but the best full-frame camera bodies on the market. 8 x 10 inch prints here pass our "good" rating, though all contrast detail is now lost in our tricky red-leaf fabric swatch.
ISO 12,800 yields a 5 x 7 inch print that almost passes our good grade, but it's the 4 x 6 inch print here that we'll pin our seal of approval on, with full color reproduction still on display here.
ISO 25,600 prints aren't terrible, as with some cameras we've seen, but they don't quite make our good grade at 4 x 6, and this setting is best avoided for most all applications.
Like its predecessor, the E-PL5 and its esteemed big brother the E-P5, the Olympus E-PL7 produces very worthwhile prints across most of the available ISO sensitivity range. It bests the E-PL5 at ISO 1600 and 3200 by a print size, and generally looks better than its predecessor as ISO rises. Fine detail and rich color reproduction are on full display up to ISO 1600, where large 16 x 20 inch prints are still possible with virtually no noise reduction artifacts. Noise and softness begin to take their usual toll in increasing degrees after this, but a good 4 x 6 inch print is still possible at ISO 12,800, which would correspond to a large onscreen image. And while the highest available ISO setting of 25,600 doesn't quite make the grade, it generally doesn't until you move to a larger sensor. A very nice performance in the print quality department by this mid-level PEN camera!
Field Test
Field Test Part II
Exploring the benefits of a few significant upgrades
[UPDATED: New addendum section below Part I]
By Dave Pardue | Posted: 09/30/2014 [Addendum posted 9/8/2015]
It seems from some of our reader comments that the E-PL7 is not quite understood for what it is. Perhaps it's the change in style from its predecessor, bringing it closer in appearance to the flagship E-P5's look than the E-PL5, a line that has remained fairly consistent over the past few generations in terms of external design. Or maybe it's the marketing hype of the "selfie" screen, which we promoted in our initial coverage but didn't quite resonate with the enthusiast crowd. Whatever the case may be, after spending my first few days with this camera I can very much report to you that it's quite a solid step up for my tastes and shooting preferences.

I talked a lot about this basic differences between this camera and its predecessor the E-PL5 in our walkaround, but would like to expound on some of them now after having spent more time with it. The most significant improvement for my style is moving the control dial to the top deck, and making it a really solid one at that. It has a super-precision feel for this price range, is similar to the twin dials on the pricier E-P5, and having a top deck dial is so much easier and more intuitive to me than having to use a dial on the back located in the menu area. In addition, the mode dial is much more firm and solid than the one on the E-PL5, easily twice as firm, and far less likely to be accidentally bumped in a bag.


Not to be all roses, there are a few changes I'll go ahead and mention at the outset that I didn't like as much. One is that the battery door on the bottom flips open the wrong way. OK - so that's meant to be a small dose of comedy, but in all seriousness I'm having a hard time getting used to it flipping the opposite way of most every other battery door from Olympus or most anyone else for that matter, flipping towards the edge of the camera instead of the middle. I'm not sure the reasoning, perhaps it's related to the tripod mount screw, but I don't like it. In fact it's one of the only physical features that actually bothers me, as I've already knocked it completely off and had to gently reinsert it. Not at all a deal breaker, just something worth mentioning. And of course, at this price range one shouldn't be expecting an E-P5 anyway.

Back to the positive changes, another significant advantage with the E-PL7 over the E-PL5 is that the play button is now located where I believe the play button belongs, and that's to the lower right of the LCD screen. This location is the most intuitive to me for viewing images, as opposed to somewhere like the top deck or the upper left (as seen from the rear) as on the E-PL5. This may sound like a small thing, but it's not at all to me. Some seem to frown on chimping, but I'm not embarrassed to say that I stop to view my images often, and just prefer the button sitting right where it is now. The info and menu buttons are also logically placed for my taste, and the dedicated movie button is not in a location conducive to accidental trigger.
Which brings us to another nice upgrade...
A Better LCD
I'm not traditional when it comes to the hobby and enthusiast crowd, in that I'm rarely interested in using a viewfinder. I find it constricting for most shooting situations other than sports, and generally prefer the LCD. Of course it's nice to have one as an option for those times that it's critical to have, but that's about 10% for me, and so I'd just as soon a camera like this be stripped down to remain lightweight and affordable. After all, like most hobbyist photographers I also own a DSLR and can call on it for those times, or attach the optional VF-4 as needed. Most of my colleagues tend to prefer the OM-D bodies and their built-in EVF's, but I'm much more of a PEN kinda guy. To each his own shooting style, I guess.
All this to say, the new 1.03 million dot viewfinder is a welcome addition to shooters who primarily like to compose with an LCD. As with any technology, I always try and ask the question: "Is that added resolution better, or is there a point at which the human eye or ear simply can't detect that much resolution anyway?" In this case I can definitely say that they're still making strides towards "better". In the traditional 4:3 aspect ratio, the effective viewing size is noticeably larger than found on the E-PL5, and also has greater dynamic range, rendering scenes more life-like both indoors and while outside with better shadow detail and more natural bright areas.
MFT Lens Arsenal
One of the huge benefits of the Micro Four Thirds system is the vast array of quality lenses available from Olympus, Panasonic and others, including many available that are light of weight and price but still able to deliver great images. In addition, both Olympus and Panasonic have been given high marks for kit lens quality in recent years, including the kit lens found on the E-PL7, the 14-42mm mark II, which dates back several years and received good marks from us at our sister site SLRgear. Below are examples shot with the E-PL7 using both the kit lens as well as a few other Olympus lenses to show you the camera in combination with various possibilities, because in the interchangeable lens market today, the available lens line-up is becoming almost as important as the camera bodies themselves.
Olympus E-PL7 - Pairing with a variety of lenses |
 |
| 1/320s / f/5.6 / 84mm eq. / ISO 200 / 14-42mm kit lens |
 |
| 1/250s / f/5.1 / 200mm eq. / ISO 400 / 75-300mm lens |
 |
| 1/400s / f/1.8 / 90mm eq. / ISO 1600 / 45mm f/1.8 lens |
 |
| 1/250s / f/3.2 / 120mm eq. / ISO 200 / 60mm f/2.8 lens |
 |
| 1/100s / f/2.5 / 24mm eq. / ISO 200 / 12mm f/2 lens |
HDR mode
Among the upgrades to the advanced shooting options palette, this series now sports several HDR modes under Shooting Menu 2. HDR1 shoots 3 images and then bakes them into one final "high contrast" image. HDR2 does the same but takes it a step further and renders a "super high-contrast" image. Further options include various combinations of 3, 5 and 7 exposure series with a 2 or 3 EV exposure range (3ev only available for 3 and 5 shot series) in which all images are preserved for use in creating the final HDR image in post-processing (or for those of you who have done it the old-school way). Below is an example of a backlit pair of flowers with no HDR and with HDR1, which does the final rendering in-camera.


Filters
Given that this model is a hybrid between the E-PM series and the flagship E-P series, there will naturally be a variety of differing levels of shooters looking at the E-PL7, some of whom will certainly be interested in the capabilities of the onboard filters. While it'd be impossible to explore them all here, I thought I'd at least try out the new Partial Color mode, as well as a tried and true favorite of mine: Dramatic Tone. Partial color styles have been around for a few years now in models from other manufacturers, but most of the ones I've used thus far tend to offer only 4 or 6 color options, and thus only basic palettes. The E-PL7 brings up a color wheel which has 18 different color points to choose from, ranging from the basic primary colors to varying blends, covering a significantly broader range.
 |
Being selective: Partial Color mode is one of the new additions to the E-PL7's filter array and has 18 points along the color wheel to choose from, displaying on the LCD as you scroll what the result will be from each. |
Below are a few examples using Partial Color mode. As most of our readers are aware, this can be achieved after the fact using post-processing software like Photoshop, but for those of us with limited available free time, I find it useful to have the camera do it for me. And if you're not sure, you can always shoot one image without the mode so that you preserve both, or shoot in RAW + JPEG and the original will be preserved in RAW format.
Olympus E-PL7 - Examples using Partial Color mode |
 |
| 1/80s / f/1.8 / 90mm eq. / ISO 320 / 45mm f/1.8 lens |
 |
| 1/80s / f/2.2 / 24mm eq. / ISO 200 / 12mm f/2 lens |
 |
| 1/160s / f/6.3 / 44mm eq. / ISO 200 / 14-42mm kit lens |
And not new to the party is Dramatic Tone, which Olympus first pioneered and many other manufacturers have now copied. It is still one of my very favorite filters out there, so I couldn't help posting an example image here.
 |
1/500s / f/9 / 28mm eq. / ISO 200 / 14-42mm kit lens |
Drama Queen: Dramatic Tone is just that, and a filter best suited for landscapes. |
Moving up in ISO
One of the most obvious advantages of the Four Thirds sensor over traditional and even newer enthusiast compacts is that it's significantly larger, roughly ten times the common 1/2.3" sensor and about twice as large as the 1" type sensor like the one in the Sony RX100 series. Larger tends to correlate to better when it comes to being able to push the ISO higher with less noise, and I've found that ISO 1600 is a great setting for the majority of the Four Thirds bodies I've shot with when needing to achieve faster shutter speeds at the max aperture. Below is an example at ISO 1600 where I wanted to try and freeze this little guy's hands, which were furiously busy with a nut. The only trace of noise is found in the nice background from the 40-150mm lens (not the newer constant aperture f/2.8 version) but you have to almost squint to see it. This allowed me to achieve 1/200s, which was adequate to capture his little hands working away on his sunflower seed.
 |
1/200s / f/5.1 / 210mm eq. / ISO 1600 / 40-150mm lens (Slightly enhanced in post for shadows/highlights) |
 |
1/500s / f/1.8 / 90mm eq. / ISO 1600 / 45mm f/1.8 lens |
Going higher: ISO 1600 allowed me to capture the above squirrel at 1/200s to freeze his fast dining. and to showcase this restaurant setting with no concern for slower shutter speeds causing blur from camera shake. |
Not that it can't be pushed even higher, but ISO 1600 has tended to be the sweet spot of this sensor size when little to no noise is desired, and the E-PL7 certainly handles it quite well and virtually noise-free, something that most premium compacts at similar price points still struggle with.
[Note: None of the images above have been post-processed other than a resize to fit this page unless otherwise specified. Click on any image to take you to a carrier page from which you can access EXIF data as well as the full resolution image as delivered straight from the camera. To see even more images, please visit our Olympus E-PL7 Gallery page, where clicking on any thumbnail will take you to that image carrier page.]
Special addendum section: More on our E-PL7 experience
Our apologies that we were never able to "pen" a subsequent Field Test II for the capable E-PL7! We ended up shooting it instead for a tutorial that we posted earlier this year called "How to photograph indoor sports on a budget: A primer for beginners and novices" - with the E-PL7 being one of four price-firendly cameras showcased in the tutorial. While not a camera that would likely be considered an indoor sports shooter upon first glance, attaching the optional VF-4 EVF brings the model closer to OM-D territory. The VF-4 is bright and clear and has the additional side-benefit of being able to swivel vertically (shown to the left at 45 degrees, but is capable of extending all the way to vertical at 90 degrees). Given my relatively low position at the games I found myself using the swivel feature most of the time, and this somewhat made up for the E-PL7 not having a built-in EVF.
 |
1/500s / f/1.8 / ISO 800 / 17mm (34mm eq.) f/1.8 prime lens |
Indoor sports: The E-PL7 is quite capable of capturing fast action in low light situations, as we found while shooting an indoor sports tutorial earlier this year. The optional VF-4 is critical to your success, and is better than most EVF's found on mid-level cameras, and has the ability to swivel vertically for different directions of shooting. |
I primarily used "continuous low" burst shooting, which is rated at 3.7fps. We didn't test the low setting on our Performance page, but found the "high" setting to exceed their rated 8fps (~8.7fps in our measurements). Only the low setting allows for continuous autofocus between frames, however, which is the primary reason I opted for it instead of sequential high. Not being a professional sports photographer, and simply wanting to come home from the game with a nice batch of good shots, I found 3.7fps to be more than adequate for that requirement.
Of course, as any Micro Four Thirds shooter will tell you, the smaller and lighter lenses as compared to larger DSLR rigs is a bonus, especially when changing lenses in the heat of battle. I went back and forth a lot during this game between the Olympus 17mm f/1.8 and their 75mm f/1.8, as they're both quite bright and yet bring an entirely different perspective to the shots. These locations tend to simply be too dim for using a kit lens if you need a fast shutter speed while keeping the ISO in check (which for me in the 4/3rds arena means trying to stay below ~ ISO 2000).
 |
1/320s / f/1.8 / ISO 1250 / 75mm (150mm eq.) f/1.8 prime lens |
Breaks in the action: Once again from our indoor sports tutorial piece, this shot utilizes the excellent M.Zuiko 75mm f/1.8 lens. With the 3-axis IS system I likely could have gotten away with a slightly slower shutter speed for this shot, thereby lowering ISO, but this sensor allows shooting up to ISO 1600 with little worry about introducing much noise into the images. |
For more on the performance aspects of the E-PL7 please visit our Performance page. And don't forget to check out our Optics and Exposure pages as well, for more critical lab test results and analysis! And for anyone ready for our final take, we've now posted our Olympus E-PL7 Conclusion page.
Olympus E-PL7 Overview • Gallery • Conclusion
Flash
Olympus E-PL7 Flash

Bundled Flash Test Results
Coverage and Range
A weak flash with very narrow and uneven coverage. Our standard indoor portrait shot required more than average exposure compensation and still came out dim.

Coverage. Flash coverage is very narrow and uneven at wide angle (14mm), leaving very dark corners in our flash coverage test image. We no longer test at full telephoto is coverage is invariably better, making wide angle the worst case. (Note, this shot taken with the E-PL5 with the same bundled flash and kit lens.)


Exposure. Our Indoor Portrait test scene came out dim even with +1.0 EV flash exposure compensation at ISO 200, and additional flash exposure compensation didn't make much difference. The average amount of flash exposure compensation required for this scene is +0.7 EV, so the E-PL7's bundled flash performed below average here. The camera's Slow-Sync flash mode produced bright results with +1.0 EV flash exposure compensation, though with a strong orange cast in the shadows from the ambient room lighting.
| Manufacturer-Specified Flash Range |
|---|
 5.9 feet, f/5.6 ISO 200 |
Manufacturer Specified Flash Test. The Olympus E-PL7's bundled flash has a Guide Number (GN) of 10 meters at ISO 200. That works out to a distance of about 5.9 feet at f/5.6, the maximum aperture of the kit lens at full telephoto. In the shot above, the E-PL7 did not perform as Olympus says it will, producing a dim exposure at the rated distance, aperture and ISO. (Note, this shot taken with the E-PL5 with the same bundled flash and kit lens.) We shoot this image using the manufacturer-specified camera settings, at the range the company claims for the camera, to assess the validity of the specific claims.
Technical Info
by Mike Tomkins | Posted: 08/28/2014
The heart and soul of the PL7
Although the 16.05 megapixel Live MOS image sensor that sits at the heart of the Olympus E-PL7 would appear to be the same as that used in the PL5 and PL6, the processor isn't. Olympus has stepped its new model up from the earlier TruePic VI processor to a next-gen TruePic VII chip.
With that said, the pairing of new processor and current sensor appear -- on paper at least -- to yield similar performance, with the exact same manufacturer-rated burst capture rate of eight frames per second at full resolution, with focus and exposure locked from the first frame. (In the lab, the E-PL7 managed 8.7 fps. See the Performance page for details.) However, performance with focus and exposure adjustment between frames is up slightly to 3.7 fps, from 3.6 fps in the earlier cameras.

The PL7's sensitivity range of ISO 200 to 25,600 equivalents, extendable to ISO 100 on the lower end, is likewise unchanged from the PL6. (The PL5, though, lacked the extended lower limit, so compared to that camera, Olympus' latest has a broader range.)
And of course, this camera sports the exact same Micro Four Thirds lens mount as featured in all of Olympus' compact system cameras, be they part of the PEN or OM-D lines.
It's down with the selfie
The most immediately obvious difference when comparing the Olympus E-PL7 with its predecessors is the updated LCD articulation mechanism. Where the PL5 and PL6 shared a 3.0-inch, 460k-dot touch-screen that tilted upwards 180 degrees for selfie capture, the PL7's screen tilts downwards.
That might seem a curious change to make, but Olympus has its reasons. Firstly, as the company pointed out in press briefings, the earlier design meant that you had to reach past the lens to access the touch-screen, blocking the camera's view of you in the process. Secondly, flash exposure wasn't possible for selfies, simply because the hot shoe placement meant that the strobe blocked the screen. And thirdly, even without a strobe attached, the top-of-camera controls and hot shoe just slightly obscured the bottom of the display.

The Olympus PL7's screen now tilts 180 degrees downwards, or 80 degrees upwards. This means it isn't obscured by either the camera body or flash strobe, and you don't have to reach past the lens to use the touch screen. The screen itself also has higher resolution, with a total of 1,037k-dots, and still uses a capacitive overlay to detect touches.
The new screen and articulation mechanism are coupled with an improved graphical user interface, and as soon as you flip the screen down, soft buttons are shown for shutter, e-Portrait function and a customizable self-timer, making it quick to set up and get the shot.
Sadly, the new articulation mechanism also means that the tilting display is really useful only for arm's length selfies of the kind so popular on Facebook. Place the camera on a convenient surface or use a tripod, and the LCD will be obscured, if there's even room to tilt it all the way downwards in the first place. For that reason, we'd have preferred a much more versatile, side-mounted tilt/swivel screen, which would also allow viewing from difficult angles in portrait-orientation shooting, and allow the LCD to be closed facing inwards to keep it clean and safe from minor bumps and scrapes.
Redesigned body
The Olympus E-PL7's body has also been completely rethought. It's just a little bigger and heavier than before, at around 0.2 inches (4.4mm) wider, 0.1 inches (3.3mm) higher, and an essentially undetectable 0.2mm deeper. Weight has climbed some 1.1 ounces (32g), loaded and ready without lens, of which 0.1 ounces (2g) is down to a new battery pack.

(This new pack, incidentally, increases charge density from 1,150mAh to 1,210mAh, and takes battery life from 320 to 350 shots, to CIPA testing standards.)
For this increase in size, you get an improved control layout. The total number of controls is unchanged, but Olympus has replaced the small, fiddly ring around the four-way controller on the camera's rear with a larger, metal dial that surrounds the shutter button. This is perfectly positioned for either your index finger or thumb to reach. At the same time, all rear-panel controls have been moved to the right of the LCD monitor, leaving the area above the LCD smooth and clean. (This change will likely make the PL7 easier to shoot single-handed, too.)
A couple more changes of note: The body is now wrapped with a leatherette finish, where before it was smooth other than the grip. The grip itself is no longer removable, and the E-PL7 now sports Olympus PEN branding, proudly displayed atop the front deck.
Improved stabilization
The Olympus PL7 sports an upgraded image stabilization system that puts it somewhere in between the earlier PL5, PL6 and PM2, and the top-end P5. The latter camera has a five-axis stabilization system, while the other earlier models all have dual-axis stabilization.
For the PL7, though, Olympus has chosen a three-axis system that now stabilizes not only yaw and pitch, but also roll. And for bonus points, the company now specs the PL7's stabilization system as good for a 3.5EV correction, up from a 3EV correction in the PL5 and PL6.
One final improvement is that this new model now has an additional image stabilization mode on top of the existing three choices founds in its PL-series siblings. This fourth mode will simply choose one of the other three modes for you automatically, based on the motion it detects as you're panning (or not panning, as the case may be.)

Better autofocus
Autofocus, too, has been uprated. It's still branded as an Olympus FAST ("Frequency Acceleration Sensor Technology") AF system operating on information from the image sensor, but there are now 81 addressable focus points provided, up from 35 points in earlier models. There's also now a Super Spot AF mode that works on a small area of just 0.02 to 0.16% of the image frame.
Tweaks to exposure, too
We already noted the expanded sensitivity range -- compared to the PL5 -- of everything from a low of ISO 100 to a high of ISO 25,600 equivalents. The E-PL7 can also now meter in lower light down to -2EV, where previously the working range started at 0EV. There's a wider exposure compensation range of +/-5EV for still images, too, up from +/-3EV. And finally, there are now four custom white balance settings, instead of two.
What are selfies without sharing?
Another pretty significant change is that the Olympus E-PL7 now has in-camera Wi-Fi wireless networking, supporting 802.11b/g/n networks.
This works hand-in-hand with the company's OI Share app for Android and iOS, which has been updated so that it no longer disconnects 3G/4G data when enabling Wi-Fi. That means you can share immediately as you're offloading photos, without needing to disconnect and reconnect, over and over. The app also now shoots bursts of sequential images, and supports Live Bulb mode. And this new version now allows you to transfer or shoot movies, too, albeit you're limited to just a seven-minute clip length.

Although the Olympus PL7 lacks an NFC radio or tag for one-touch connection to Android devices, you can connect almost as quickly using a QR code that's shown on the camera's own LCD monitor, just as in past Olympus models. (And unlike NFC, this approach works with Apple, who still stubbornly refuse to support the NFC standard in their devices.)
New creative tools
The E-PL7 includes quite a few new creative tools and functions. There are two new Scene modes: Panning Shot (which does what it says on the can), and Hand-held Starlight (which merges eight shots into one with reduced noise and a fast shutter speed).
We already mentioned the new e-Portrait picture mode and the sequential self-timer, handy when shooting self-portraits as it lets you adjust interval and number of shots, then capture several selfies in a row with time to change pose in between, a bit like a photo booth. This has been updated, though, and now lets you choose whether to autofocus between shots.

The Olympus PL7 also has in-camera HDR for the first time, as well as the existing bracketing function that's handy for making your own HDRs, merged on a PC or Mac. With the new in-camera version, four images are combined into one. All four images have a fixed sensitivity of ISO 200 equivalent, an exposure time of one second max., and can be combined with one of two renderings -- one more realistic, the other more artistic and painting-like.
There are also two new Art Filters: Vintage and Partial Color. Each has three different effect types. For Partial Color, there's an interesting interface that lets you select 18 different hues with the control dial on the top deck. For any hue, you can opt to keep just a very narrow range of similar hues, a broader range, or a broader range as well as retaining a very slight saturation for all other colors outside the range.
Finally, Olympus' Photo Story function now has a hold mode, which lets you pause an underway story, and then return to finish it later.
Movie capture has also been honed a little
The Olympus E-PL7 still shoots Full HD (1,920 x 1,080 pixel; 1080p) movies at a rate of 30 frames per second, but Olympus is now listing the maximum bitrate for video capture as 24Mbps, up from 20Mbps in earlier models.
The new camera also has an additional Old Film movie effect, and it uses its three-axis sensor shift stabilization system in movie mode too, instead of electronic stabilization.
And if you want, you can also shoot 720p time-lapse movies, a feature that was added in the E-PL6, and hence is new for the US market. The PL7 also has a microphone volume limiter function, which we believe is new.

But storage is little-changed...
Like its predecessors, the Olympus E-PL7 stores images on Secure Digital cards, including SDHC, SDXC, UHS-I and Eye-Fi types -- although given the in-camera Wi-Fi wireless networking, we're not quite sure why you'd want to use the latter. There's no longer any mention of Toshiba's FlashAir, a rival to Eye-Fi, but again there's little reason to use these in a Wi-Fi enabled camera anyway.

Images are saved in either JPEG or 12-bit RAW formats, with a maximum resolution of 4,608 x 3,456 pixels, just as in the PL5. While the maximum resolution is unchanged, though, Olympus has increased resolution of Medium and Small image sizes to 3,200 x 2,400 and 1,280 x 960 pixels, respectively.
...and connectivity is identical to the PL5
Connectivity options in the Olympus E-PL7 -- in addition to its new in-camera Wi-Fi radio -- include USB 2.0 High Speed data, composite standard-definition video output, Micro (Type-D) HDMI high-def video output, a flash hot shoe, and Olympus' proprietary Accessory Port 2. These are all unchanged from previous models.
Walkaround
Initial first impressions of this complete body overhaul
I've been a big fan of the Olympus Pen line since long before the digital era came about, and cut most of my photography teeth decades ago with one from the film era, so I've been heavily drawn to the digital versions since first picking up an E-P3, and later falling completely in love with the E-PM1. This has continued as the line has progressed, and I've welcomed many of the changes Olympus has brought about, like the tilting LCD and improved image quality found in both the E-PL5 and E-PM2 from 2012.
The E-PL line has represented the middle tier that sits between the larger E-P and compact E-PM series, with the "L" standing for "Lite". I say all of that because this middle tier has always seemed to have a greater kinship to the E-PM version than the flagship E-P's, at least until this model. Now, this series bears the "Olympus Pen" logo for the first time, sporting the same font as the original film cameras, similar to the E-P5 released last year. This combined with the black and silver version like our sample model brings this line into a greater kinship with the higher level E-P line than ever before, as seen in the image below.
 |
Family resemblance: The E-PL7 (top) is the first E-PL series model to carry the storied "PEN" logo, as seen here with the E-P5 released last year, and it's the first of its line to bear such a striking resemblance to the flagship line as well. |
From the front face, the most noticeable difference is that the leatherette material is now on all black surfaces, and even on the lens release button. The E-PL5 has a smooth body finish like the E-P5, so this marks a break from both it and the E-PL5 and is a really nice touch for my tastes, both aesthetically and in the handling aspect (summer in the south means a greater need for grip-friendly surfaces).
Let's move now to side-by-side images with the E-PL5 and take a closer look at all the additional changes Olympus has made to the line. The removable grip from the E-PL5 has been changed to the permanent grip as found on the E-P5, but all other front view changes are cosmetic ones other than the control dial being visible on the E-PL7.

Moving onto the top deck, the most striking difference that stands out on the E-PL7 is the addition of a control dial, and it's a very precise feeling dial at that. In fact, it feels a lot like the E-P5's twin dials, although they are inset, but the construction and quality feel similar. This dial actually surrounds the shutter button, which to me seems like a nice ergonomic touch. The mode dial looks and feels identical to the E-P5's as well, although again the E-P5's is inset somewhat into the body. The dial on the older E-PL5 feels fairly solid, but this is a big step up in terms of the overall professional feel.

Moving now to the rear, much has changed as well. The most notable are moving the play and erase (trash) buttons from the top left to the lower right, where they are much more conveniently located. The menu button moves up to join the info button, creating a quad around the 4-way rear control (which was a dial on the E-PL5). The four functions available here: exposure compensation, metering, drive and flash are unchanged, as well as the center OK button. The function, zoom and movie buttons have all migrated slightly from their former positions as well, while the thumb rest is virtually identical.

Now let's move to the biggest change of all, namely that downward tilting "selfie" screen.
Good news for the selfie crowd
Selfies certainly do seem popular these days. I'd love to make fun of this craze, but I recently stumbled upon a selfie I made of my uncle and I with my film PEN back in 1989, so I'm in no position to do that. Olympus is betting that having the screen flip 180 degrees down will be more popular than the more common upwards version. I enlisted my colleague William Brawley to give us all a demonstration (he's a lot younger than me, so he's naturally better at it) and this is the result.

Swinging the display downward puts the camera into "selfie mode" and allows for one-touch selfies by tapping the screen and effectively hitting the "shutter" button. There's also a convenient (and fun!) selfie interval function, which allows for 3 shots to fire over one second intervals, giving the subject (or subjects) time to artfully or comically recompose themselves during each selfie "burst".
Taking a look under the hood things become more familiar, starting with the basic menu configuration that Olympus has employed for some time now. Depending on how you set up your preferences and which mode you're in, hitting the OK button will either bring up the Super Control Panel (shown below) where you have instant access to the most common settings, or the Live Guide panel, which accesses more consumer oriented settings like saturation. This can be easily toggled as well in order to go back and forth between the two.

Hop on over to our Olympus E-PL7 Field Test for more detailed operational and handling information.
Conclusion
The first PEN series "lite" model to sport the legendary "Olympus PEN" badge, the E-PL7 brings lots of upgrades to the table, and a good portion of it is not something that can be tallied in a "specs" column. Starting with the most important change is that the build quality is a big step up from the E-PL5, and the controls and dials now look and feel much more akin to the higher-end E-P5 model, the current flagship "PEN" camera.

What's new to the line...?
In addition to the excellent ergonomic refinements, the E-PL7 has a few notable improvements up its sleeve. Our enthusiast readers will take note of the newer TruePic VII processor, the move to an improved 3-axis image stabilization system (up from dual-axis IS on the E-PL5 and a less-powerful 3-axis one on the E-PL6) and 81 AF points (up from 35 on the E-PL5). And for the selfie-crowd there's an LCD that can tilt downward a full 180 degrees.
The E-PL7 also has in-camera HDR, a first to the line and a feature which we found in our Field Test to work fairly well. It also has built-in Wi-Fi, and while it doesn't support Near Field Communication, it can connect utilizing a QR code. It also adds sequential shooting to its self-timer, allowing for multiple shots with some custom settings as well.

What we loved...
The build quality mentioned above is tough to overstate - it simple feels more like a higher-end camera and that's something you really have to experience first-hand to truly appreciate, but you can take our word for it that you'll be satisfied with the E-PL7's build quality. And we found the image quality to walk right in step with it, allowing us to capture high quality images even as ISO began to rise. The E-PL7 is capable of producing a solid 13 x 19 inch print at ISO 3200 (see: Image Quality) and that's no easy feat for anything smaller than full frame!
For those of you needing higher performance than your average mid-level camera, we found the E-PL7 performed admirably in challenging conditions in our "How to photograph indoor sports on a budget" tutorial. We also loved how fast the camera powers up and fires off its first shot - no missed opportunities here! (See our Performance page for more details in that department.)
The camera is lighter than even the entry-level (E-M10/II) OM-D lines, and while it lacks an EVF, the optional VF-4 is excellent. And for you fans of fun creative filters (we know you're out there, and it's OK to remain anonymous!), the partial color palette has been expanded to 18 choices, with a neat little interface for selecting your color choice (see more in our Field Test).
And how about the drawbacks....?
Ah yes, well, all cameras have those too. For some of us at IR the lack of an EVF is a deal-breaker, and that will be the case for some of our enthusiast shooters as well. This is the single largest difference between the PEN and the OM-D lines. There is also less in the way of a front grip or rear thumb-rest than on the OM-D line. But of course these trade-offs allow the E-PL7 to be lighter and sleeker, and thus more of a go-anywhere travel camera, so anyone interested in either of these lines will want to balance the trade-offs for your individual needs.
The battery door swivels open in the reverse direction (towards the side of the camera) than with other Olympus models we've tested, and it puts it in a spot that makes it easy to knock off. It was likely done to help it not interfere with the tripod screw, but we knocked it off a few times. It does make it easier to access the SD card than, say, the E-M10 line, so perhaps that was another factor in the decision. (Just be careful not to knock it off like we did!)
Overall, while the Olympus E-PL7 is not the most ground-breaking of cameras, it is a solid step-up with some excellent features for the price, most notably that it feels and shoots like a higher-end camera, and that makes it an easy Dave's Pick.
Pros
- Excellent image quality, with slightly improved JPEG rendering
- Great high ISO performance for 4/3" sensor
- Very good dynamic range for its class
- Improved performance over the E-PL5 which was already fast (faster startup, AF and burst speeds)
- Improved buffer depth with faster clearing
- Expanded ISO 100 setting
- LCD tilts 180dg down for easy selfies
- Lighter and sleeker than any of the OM-D series camera bodies
- Upgraded 3-axis image stabilization
- In-camera WiFi
- New sequential self-timer modes
- Single-color filter extended to 18 colors
Cons
- Somewhat muted default colors (below average mean saturation)
- Auto WB too warm in incandescent lighting
- No built-in flash (but a small external flash is included)
- Battery door prone to being knocked off due to irregular placement
- Not compatible with NFC
- Somewhat quirky menu systems
- No built-in EVF (but optional VF-4 is excellent)
Follow Imaging-Resource.com on Twitter!