


Overview
Panasonic Lumix DMC-GF2 Overview
by Mike Tomkins, Dave Etchells, Shawn Barnett
and Zig Weidelich
Hands-on Preview: 11/04/2010
Review: 02/27/2011
Playing to their main strength over their single lens reflex brethren, compact system cameras -- otherwise known as mirrorless interchangeable lens, or single-lens direct view models -- have gotten quite a bit smaller since their debut a couple of years ago. Doing its part, Panasonic intensifies that aggressive drive towards a truly compact design with the Lumix DMC-GF2. Though the push toward smaller cameras was begun by Olympus and Panasonic, Sony's very small NEX series of compact system cameras has forced Panasonic to respond. As a result, the Panasonic GF2 is closer to the size of the LX5 than it is the GF1, and also close to the diminutive size of the Sony NEX-5. It's even smaller than two of the high-end fixed-lens digital cameras that it competes with: the Nikon P7000 and Canon G12.
Discussion of size is important in this market space, because in addition to image quality, this is where the battle lines are drawn. These cameras are designed to deliver the best image quality in the smallest volume. Technically, the Lumix GF2 is similar to its predecessor, with the same 12.1-megapixel sensor, but Panasonic says its Venus Engine FHD processor will improve noise performance across the ISO range, which is important when going up against cameras featuring APS-C sensors.
Size isn't the only component to the story, what's also interesting is what they had to do to achieve this size reduction, which includes moving many of the features that previously had a dial to the new touchscreen. Many of the G2's touchscreen features have been brought to the GF2, and many new ones were created to replace features like the Mode dial. At the same time, Panasonic added higher resolution video to the GF2, up to 1,920 x 1,080 at 60i in AVCHD compression.
The Panasonic GF2 is packed with both trade-offs and benefits, and as such is likely to prove a bit divisive, with some photographers drawn by the advantages of its relatively compact body, and others concerned at the reduction in external controls. There's a lot more to the story, though, as you'll discover in our User Report below.
The Panasonic Lumix DMC-GF2 is available in three different kit versions, and started shipping in mid-February 2011. Sold without a lens, the Panasonic GF2 body is priced at US$499.95. The DMC-GF2K kit includes a LUMIX G VARIO 14-42 mm / F3.5-5.6 ASPH. zoom lens, and is priced at US$599.95. The DMC-GF2C kit, meanwhile, includes a LUMIX G 14 mm / F2.5 ASPH. prime lens, and is the highest-priced US-market kit, at US$699.95. In certain other markets, there's also a double-lens kit including both of these lenses, but this kit is not available in the US market. The optional DMW-LVF1 external viewfinder is priced at US$199.95. Other Panasonic-branded accessories include a DMW-ZL1 zoom lever, DMW-TA1 tripod adapter, an AC adaptor and DC coupler, and a variety of lens mount adapters, external flash strobes, cameras cases and bags, and shoulder straps.
Look and feel. The Panasonic Lumix GF2 is smaller than the company's previous GF1 model, with an approximate 19% reduction in body volume, accompanied by a 7% drop in body-only weight. The change brings the Panasonic GF2 into much closer contention with Sony's popular NEX-series camera in terms of overall size and weight. Compared to the Sony NEX-3, both cameras have similar body thickness. The Panasonic GF2 is a little less than a quarter inch taller, and the Sony NEX-3 is wider by a similar margin. Compared to the more aggressively styled Sony NEX-5, though, the comparison still falls more clearly in Sony's favor. Both cameras have similar width, and the NEX-5 gives away a little less than a quarter inch in thickness to the Panasonic GF2, but is almost a third of an inch less tall than the Panasonic.
| Model | Standard | Metric |
| Panasonic GF1 | 4.7 x 2.8 x 1.4 in. | 119 x 71 x 36mm |
| Panasonic GF2 | 4.4 x 2.7 x 1.3 in. | 113 x 68 x 33mm |
| Panasonic LX5 | 4.3 x 2.6 x 1.7 in. | 110 x 66 x 43mm |
| Sony NEX-5 | 4.4 x 2.4 x 1.6 in. | 111 x 60 x 40mm |
| Sony NEX-3 | 4.6 x 2.5 x 1.3 in. | 117 x 63 x 33mm |
| Olympus E-P2 | 4.7 x 2.8 x 1.4 in. | 121 x 70 x 35mm |
| Olympus E-PL1 | 4.5 x 2.8 x 1.6 in. | 115 x 72 x 42mm |
| Nikon P7000 (including fixed lens) |
4.5 x 3.0 x 1.8 in. | 114 x 77 x 45mm |
| Canon G12 (including fixed lens) |
4.4 x 3.0 x 1.9 in. | 112 x 76 x 48mm |
Excluding protrusions, the Panasonic GF2 measures 4.4 x 2.7 x 1.3 inches (113 x 68 x 33mm), versus 4.6 x 2.5 x 1.3 inches (117 x 63 x 33mm) for the Sony NEX-3. The NEX-5, meanwhile, is 4.4 x 2.4 x 1.6 inches (111 x 60 x 40mm). An important detail hidden by these numbers is that both Sony cameras have a more deeply sculpted handgrip, where Panasonic's new offering has only a very slight protrusion offering purchase for your fingertips. In other words, its body thickness is similar across most of the camera's width, whereas much of the bulk in the NEX cameras is found in their handgrips. Note also that the GF2 is only one-tenth of an inch larger than the Panasonic LX5 in width and height. (When comparing the camera dimensions shown above right, be sure to consider that the last dimension, thickness, is measured without a lens for the compact system cameras. Also, see our comparison images below.)
The Panasonic GF2 weighs approximately 9.4 ounces (265g) body-only, or 12.9 ounces (365g) with battery, flash card, and the 14mm f/2.5 (28mm eq.) lens shown below. The Sony NEX-5, for comparison, weighs 8.1 ounces (229g) body-only, or 12.9 ounces (365g) when ready to shoot with its 16mm f/2.8 (24mm eq.) lens -- the nearest model to that on the Panasonic. The Sony NEX-3 weighs 8.4 ounces (239g) body-only, or 13.1 ounces loaded and ready with the same 16mm f/2.8 lens.

To achieve the smaller, lighter body versus that of its predecessor, Panasonic has made quite a few changes in the Lumix GF2's layout and user interface. Looking at the front of the Panasonic GF2, a small finger grip lined with a silver trim piece curves away gently towards the top of the camera, providing just enough of a hold to make the otherwise flat camera easy to handle while shooting, although photographers with larger hands may find it to be too close to the edge of the camera to hold comfortably. Compared to the GF1, the AF Assist lamp has jumped to the other side of the lens mount, and now sits directly beneath the GF2 badge. Directly beneath, the silver lens release button appears just right of the lens mount, with a greater gap between the two than in the GF1.

Comparing the top deck of the Panasonic GF2 side-by-side with that of the GF1, the most obvious difference is the removal of the Mode dial, as well as the Drive Mode switch that was located directly beneath. The newly available space is occupied by a repositioned power switch, and a new stereo microphone, which is an upgrade from the GF1's monaural mic. While the change to a two-channel mic might look good on paper, the lack of spacing between the microphone channels -- and the fact that they don't face toward the subject -- conspires to rob the GF2's video of much stereo effect. (Note that this is mic arrangement is similar to that on other G-series cameras that support stereo recording, although in this smaller camera they can't be mounted on the pop-up flash mechanism). To the left, the flash hot shoe sits lower on the GF2's top panel than on the GF1. Along with the removal of the Mode dial and Drive Mode switch, this change gives the GF2 a smoother top deck than in its predecessor.
Just to the right of the stereo microphone ports is the Shutter button, and directly to its right is the Movie Record button; both still and movie modes are available at all times. Directly behind the Shutter and Movie Record buttons is a new Intelligent Auto button, dedicated to activating Panasonic's beginner-friendly shooting mode that can automatically control most camera functions, including automatic recognition of the shooting scene type. The ring encircling the outside of this button glows blue when activated. Just like the GF1, the left and right ends of the Panasonic GF2's top deck feature wide metal camera strap lugs, something we greatly appreciate. The metal D-rings on the E-P1 and several other recent digital SLRs are unsuitable for video, because they can make noise that gets picked up by the camera's microphone.

The bulk of the user interface differences from the GF1 can be found on the Panasonic GF2's rear panel. There are four less physical controls here than on the previous camera, and that's achieved thanks to a switch to a touch-panel LCD display. Panasonic is far from the only company offering touch-panel digital cameras, but it's the only one to provide an interchangeable-lens camera with the feature. The Panasonic GF2's touch interface is similar to that from the Lumix G2, one which we found to be uncommonly mature and useful -- especially when it came to controlling autofocus in video mode. As well as controlling menus and accessing soft keys, the touch panel can be used to indicate the subject on which the camera should focus and set exposure, and to trip the shutter release. It can also be used to intuitively control the playback zoom, and then pan around the zoomed image by dragging a finger across the screen, among other functions. The Panasonic GF2's 3-inch LCD is very sharp, with 460,000 dots of resolution, sufficient to confirm focus with good accuracy, but lags somewhat behind the 921,000 dot resolution of Sony's NEX-series cameras.
To save real estate and clutter, the Panasonic GF2 combines the Quick Menu and Function controls into a single button, necessitating an either-or proposition, with the button's purpose selected through the menu system, although the Quick Menu is always accessible through the touch panel. The Q.Menu / Function button also serves double duty as a Delete / Return button in Playback mode. The GF2 also drops the Autofocus / Auto Exposure lock, Autofocus / Manual Focus, Display Mode, and Preview / Delete buttons from the rear panel, with their functionality either catered for with the touch screen, or other buttons -- in some cases thanks to the ability to assign functions to the Quick Menu / Function button. Despite the reduction in size, the GF2 manages to find space to retain a single, SLR-style rear dial that can be used both to adjust variables such as aperture or shutter speed by rolling it in either direction, and also to confirm selections by pressing it inward. In the absence of the top-panel Drive Mode dial from the GF1, the down arrow button in the Lumix GF2's four-way controller serves as a Drive Mode button. Most other rear-panel controls are similar in functionality and approximate placement to those of the GF1.

Compact Flash The Panasonic GF2 is the smallest interchangeable-lens digital camera with a built-in flash.
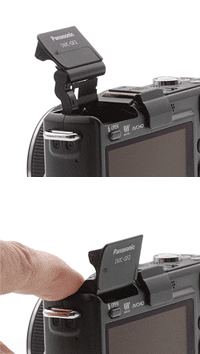
Bounce Flash? By gently holding back the flash mechanism, you can mimic bounce flash, although with limited utility; see text for the details.
Flash. The Panasonic Lumix GF2 is the smallest and lightest interchangeable-lens camera to include a built-in flash. We shoot available-light whenever possible, but frequently flash is either the only way to go, or makes for a better photo.
Similar to that of the GF1, the Panasonic GF2's OPEN button on the back releases the springloaded flash mechanism, which pops up and forward at the same time. Panasonic told us that the GF2's flash mechanism has been redesigned to make it more simple. While we didn't have a GF1 handy to make a direct comparison, the Panasonic GF2's flash head does appear to pop up a little higher than that on the GF1, and it felt less finicky than we recalled when pressing it back down to its closed position.
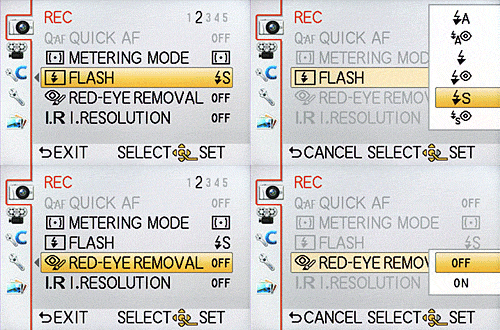
The Panasonic GF2's flash has a guide number of 6 meters at ISO 100, the same as that of the GF1, but significantly reduced from the flash in the G1 and GH1 which had an ISO 100 guide number of 11 meters. Flash modes include Auto, Auto w/ Red-eye reduction, Forced, Forced w/ Red-eye reduction, Slow-sync, Slow-sync w/ Red-eye reduction, and Off. X-sync is at 1/160 second. As well as the built-in flash, there's also an intelligent hot shoe, compatible with Panasonic's DMW-FL220, DMW-FL360, and DMW-FL500 flash strobes.
One of the first things we noticed about the Panasonic GF2's flash head was that we could easily tilt it back as shown at right, aiming the flash at the ceiling. In effect, the built-in strobe can be made to operate as a bounce flash, albeit with significant limitations. The flash is itself already rather short on range, and bouncing it off the ceiling significantly increases the effective distance to the subject. Add in the fact that bouncing off a ceiling will only result in a portion of the flash output illuminating your subject, with much of the light wasted, and this makes the technique useful only for relatively nearby subjects where the ceiling is reasonably low. Unfortunately since the GF2 doesn't know that flash is being bounced, it won't adjust the exposure to compensate, so if your subject is too far away, you'll likely get an underexposed shot. In some circumstances, though -- especially macro shots where the camera has a tendency to blow the exposure -- this unintended bounce trick can make for a noticeably better result, sometimes vastly so.

EVF Socket The Panasonic GF2 has the same external viewfinder socket we saw on the GF1.
EVF. Just like the GF1 before it, the GF2 includes a small connector beneath its hot shoe, which can be used for Panasonic's optional swiveling, electronic viewfinder accessory: the DMW-LVF1 External Live Viewfinder. This neat little accessory is essentially an electronic viewfinder that you can snap on if you're having trouble viewing the LCD in direct light, or if you just prefer looking through a viewfinder. It's similar in concept to the electronic viewfinder accessory offered by Olympus for the E-P2 and E-PL1 Micro Four Thirds models, and has the same drawback -- attachment of the viewfinder accessory precludes use of an external flash strobe. That's perhaps less of an issue thanks to the inclusion of a built-in flash strobe, but it's still a compromise worth bearing in mind.
 With 202,000 dots of resolution, the Panasonic DMW-LVF1 EVF accessory isn't in the same class as the 1,440,000 dot resolution of Olympus' EVF, nor does it match the resolution of the GF2's own rear-panel LCD. On the plus side, though, it has a swift 60 frame per second refresh, and 1.04x magnification. It also comes in a very retro leather pouch with a snap cover, and a loop on the back designed to thread onto the camera strap. There's even a plastic socket inside the pouch into which the DMW-LVF1 can securely dock. List pricing for this accessory is set at $199, and street pricing is in the region of $150, making it a reasonably affordable, worthwhile addition to your camera bag.
Sensor and Processor. The Panasonic GF2's sensor resolution is unchanged from 12.1 megapixels of the GF1, and according to Panasonic, it's the same sensor used in the G1 and GF1. Panasonic says its new three-core Venus Engine FHD processor offers better noise reduction, even at higher ISOs. In our testing, we did note stronger levels of noise reduction, but found that these were at the expense of image detail. Even at the very lowest sensitivity -- ISO 100 equivalent -- the effects of noise reduction were somewhat noticeable. By ISO 1,600 equivalent, stronger noise is visible in images, despite the noise reduction. With that said, unless you're pixel peeping, the GF2 should be good for prints up to 16x20 inches at ISO 400 or perhaps ISO 800, while at ISO 1,600 and beyond, useful results can still be obtained at lower print sizes. Much more detail can be found on the Image Quality tab.
The sensor and processor combination also enable 1,920 x 1,080 videos at 60i or 1280 x 720 at 60p in AVCHD mode. HD Motion JPEG recording is also available at 1,280 x 720, 848 x 480, 640 x 480, and 320 x 240, all at 30fps. (Maximum data rate from the sensor is 30fps, so the 60i in AVCHD mode is basically captured at 30p, then encoded at 60i.)
ISO range. ISO settings range from 100 to 6,400 equivalents There's also both an Auto ISO mode whose upper limit can be defined by the user from 200 to 1,600, and an Intelligent ISO function which takes into account not only the brightness of the scene when determining the sensitivity, but also subject motion.
Dust reduction. The Panasonic GF2 includes a Supersonic Wave Filter dust reduction system that vibrates the a filter over the image sensor at around 50,000 cycles per second to remove dust, which is captured on a sticky material beneath the filter.

Autofocus. The Panasonic Lumix GF2 offers a 23-point TTL contrast-detection autofocusing system, and includes an AF-assist lamp to help with focusing in low-light conditions. As well as the multi-point focusing mode, the GF2 can be set to either single AF, tracking AF, or face detection modes.
When a face is detected, the camera can automatically adjust focus and exposure to ensure that your subject's face is correctly rendered. When determining exposure variables, the faces of six specific individuals can be prioritized over others in the scene (and over each other, based on the order they've been sorted when training the camera). The image metadata can also be automatically tagged with up to three individuals' names. Thanks to the GF2's touch screen and iAuto mode, touching a face onscreen automatically switches the GF2 to Portrait mode and sets focus and exposure accordingly.
Face recognition also offers assistance in Playback mode, making it easier to find photos containing a specific individual -- and in the event that a face has been detected incorrectly, the tagging can be changed after the fact. Images that weren't tagged at capture time cannot be tagged manually, however. The Panasonic GF2 can be programmed to recognize up to six specific faces, assigning a name to each, and you can store up to three shots per face to refine its detection capability.
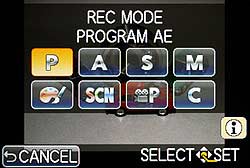
Modes. The Panasonic GF2's Mode selection is brought up by pressing the Mode icon in the upper left of the screen, and includes Intelligent Auto, Program, Aperture- and Shutter-priority, and Manual shooting modes, plus Intelligent Auto, My Color, Scene, and Custom.
The Panasonic GF2's Custom mode allows three groups of settings to be saved for later recall. Just press on the C button, then press to select one of the three Custom buttons.
The Scene selection offers 17 modes that help beginners get the results they desire with a minimum of effort.

Peripheral defocus. The Panasonic GF2 has a Scene mode designed to help novices use depth of field to their advantage.
Modes on offer in the Panasonic GF2 include Portrait, Soft Skin, Scenery, Architecture, Sports, Peripheral Defocus, Flower, Food, Objects, Night Portrait, Night Scenery, Illuminations, Baby 1 + 2 (so you can keep track of birthdays for two different children, allowing the Panasonic software to display the child's age along with the photo), Pet, Party, and Sunset.
A subset of eleven of these Scene modes are applicable not only to still images, but also to movie capture. The Panasonic GF2's Intelligent Auto mode, activated via a button on the camera's top deck, can automatically detect certain scene types and select the appropriate scene mode from either i-Portrait, i-Scenery, i-Macro, i-Night Portrait, i-Night Scenery, or i-Baby.
Connectivity. The Lumix GF2 uses a miniHDMI Type C connector for output to high-definition displays, and includes VIERA Link compatibility where the camera can be controlled by the remote control of a Panasonic VIERA Link enabled HDTV. Linked operation with HDMI CEC compatible devices made by other companies is not guaranteed. It is also possible to display 3D images taken with Panasonic's 12.5mm f/12 Lumix G 3D lens, when connected to a compatible 3D television. The GF2's proprietary AV/USB connector also supports composite video and stereo audio output to standard definition devices. Data can be transferred via USB 2.0 High-Speed. The USB port has PTP (for PictBridge compatible printers) and Mass Storage modes. The Panasonic GF2 no longer has the remote cable socket found on the GF1.
 Storage and battery. The Panasonic GF2 uses SD cards for storage, with support for the newer SDHC and SDXC types. Panasonic recommends using a Class 4 or faster card for AVCHD video recording, and Class 6 or faster for Motion JPEG videos. Power is supplied by a proprietary Panasonic 7.2v, 1,010mAh battery, with an expected battery life of 300 shots with the 14-42mm kit lens, or 320 shots with the 14mm kit lens. The GF2 includes the company's ID-Security technology, which prevents use of third-party batteries. This battery is smaller in mAh capacity when compared to the GF1's 1,250 mAh battery.
Panasonic GF2 Comparisons
One of the main advantages of compact system cameras over their SLR siblings is that -- with no need to accommodate a bulky reflex mirror mechanism -- they can be made significantly smaller and lighter. As Sony has proven with its NEX series, that can be a very desirable selling point. With the Panasonic GF2, the company shows that it's stood up and taken notice of the desire for smaller interchangeable lens cameras. With that in mind, we thought comparisons against some of the Panasonic GF2 competitors were appropriate. The Sony NEX-5 marks the current best-in-breed in terms of what's possible with compact system camera miniaturization, while the Olympus PEN E-P2 and Samsung NX100 represent something closer to the norm in terms of form factor. Finally, the Nikon P7000 represents a fixed-lens camera designed with the enthusiast photographer in mind. Read on to see how each compares with the Panasonic GF2.
Panasonic GF2 vs Sony NEX-5
 |
|
Compared to the Sony NEX-5, the Panasonic GF2 is almost exactly the same width, but it's around a third of an inch taller than Sony's aggressively-styled competitor. Neither the GF2's internal strobe or the NEX-5's proprietary external strobe are very powerful, but Panasonic's camera can also accept more powerful external strobes courtesy of an intelligent hot shoe. The GF2 can also accept both optical and electronic viewfinder accessories in the shoe, where Sony offers only an optical finder.
|
 |
|
Both cameras offer 3.0-inch LCD panels, but thanks to a 3:2 aspect ratio, the GF2's screen has a larger surface area than the wide-aspect display on the Sony, and it also includes a touch panel. The NEX-5's LCD has significantly higher resolution, and is also articulated, able to tilt 80 degrees upwards, or 45 degrees downwards. The GF2 has a roomier thumbgrip, and includes a more traditional, SLR-like rear dial.
|
 |
|
On paper, the GF2 is the slimmer camera, but a view from above shows that the NEX-5's body is pretty thin over much of its surface, despite the articulated LCD. The Sony's bulk is mostly to be found in the much deeper handgrip, where the Panasonic's grip is only a relatively subtle bulge, although the lens mount also makes the NEX thicker than its slim body makes you think. The GF2 should provide a better two-handed grip with small lenses, however, since unlike the Sony, it provides a little room to grip at left of the lens mount. The GF2 is shown with a 14mm f/2.5 lens, while the NEX-5 carries a 16mm f/2.8, the closest equivalent in Sony's E-mount range. Body-only, the GF2 weighs around 16% more than the NEX-5. |
Panasonic GF2 vs Olympus E-P2
 |
|
The Panasonic GF2 is a third of an inch less wide than the Olympus E-P2, and also just slightly less tall, especially at the hot shoe.
|
 |
|
LCD panel size and aspect is identical, but compared to the E-P2, the Panasonic GF2 adds a touch panel, and doubles the total dot count -- 460K dots for the Panasonic, versus 230K for the Olympus.
|
 |
|
Seen from above, the size advantage of the Panasonic GF2 is clearer, although it's hardly a night and day difference. As well as the previously mentioned reduction in width and height, the Panasonic GF2 is almost a tenth of an inch slimmer. Body-only, it's also around 20% lighter than its Micro Four Thirds rival. The Olympus is shown here with the 17mm f/2.8 lens attached.
|
Panasonic GF2 vs Samsung NX100
 |
|
The Panasonic GF2 is a little smaller in every dimension than the Samsung NX100. The width difference is the most significant, at almost a third of an inch. The GF2 is also just barely shorter, by around a tenth of an inch. Also notable is the difference in sensor size between a Micro Four Thirds sensor camera (such as those from Panasonic and Olympus), versus an APS-C sensor camera (like the Samsung and Sony compact system cameras.) (Note: As we didn't have the NX100 in-house at the time our comparison images were made, the image above shows our own GF2 images alongside Samsung's NX100 press images. The NX100 has been re-scaled appropriately using manufacturer-supplied dimensions for camera width, excluding projections. The comparison is hence approximate.) |
 |
|
As seen from above, there's little to choose between the GF2 and NX100 in terms of body thickness, but the Samsung lacks an internal flash strobe.
|
Panasonic GF2 vs. Nikon P7000
 |
|
The Nikon P7000 doesn't accept interchangeable lenses, but we've included it in this comparison as being representative of an enthusiast-friendly, fixed-lens model. As you can see, there's little to choose in terms of body width, but the GF2 is nearly half an inch shorter -- largely thanks to the fact it lacks an optical viewfinder directly above the lens, as in the P7000.
|
 |
|
Both cameras have 3.0-inch LCD panels, but thanks to an even narrower aspect, the P7000's screen has slightly higher total area. It also provides much higher resolution, at around 921k dots. Catering to enthusiasts, the P7000 is rich in external controls, making for quick settings adjustments, but a steeper learning curve.
|
 |
|
Weight and overall depth are similar with the Panasonic's 14mm lens mounted, or at least, would be if the P7000's lens was retracted in this image. Of course, that's with a fixed focal length lens on the GF2. There isn't a direct equivalent to the P7000's 7x zoom lens in the Micro Four Thirds lineup, but it falls roughly between Panasonic's 14-50mm and 14-150mm lenses in terms of 35mm-equivalent focal length range. Both of those lenses are in the region of 3.5 inches long, and 15+ ounces for the lens alone. Hence, with an equivalent lens to that of the P7000, the size and weight advantage would fall very clearly in favor of the fixed-lens camera. Of course, that would be thanks to its (relatively speaking) tiny image sensor, which also brings increased noise compared to a large-sensor camera, limits the wide-angle possibilities, and makes it harder to blur backgrounds.
|
Panasonic Lumix DMC-GF2 Field Test
by Shawn Barnett
I'm pretty enthusiastic about this new category of digital camera, so I was keen to check out Panasonic's latest entry. Panasonic made many changes to their small mirrorless model, shrinking it by a few millimeters in the process. The result is what you'd expect to see if you reduced the size of the outer body of the GF1 in a computer aided design program, then noted and removed the components that no longer fit inside the new skin without completely redesigning the other internal components. As a result, the Mode and Drive mode dials are supplanted by the stereo microphones, which had to move from under the hot shoe in order to reduce the overall height of the GF2. The power switch also moved to a better position to make room for the iA (Intelligent Auto) button.
 Build. The Panasonic GF2's body is solid and hefty, with no creaks or twisting. A hard, plastic door attached to the camera body via rubber tethers conceals the ports on the right side, and a plastic, springloaded door covers the battery and memory card on the bottom right. The grip is more comfortable than the one on the GF1, allowing my fingers to curve around it and still get good purchase on the rear thumbgrip and find easy placement on the shutter button. Photographers with larger hands may find the grip is still uncomfortably close to the edge of the camera, though. I found it easy to shoot one-handed with the 14mm lens, but longer lenses will likely require two hands; naturally zooms are mechanical, so you'll need that second hand anyway. Note the red model at right, and a white model is also available.
Pop-up Flash. The simplified pop-up flash is very similar to the design in the Olympus E-PL1. I'm glad they simplified it compared to the GF1, because that one, while elegant, was very finicky about how you moved it to press it back down. The GF2's flash releases mechanically by pressing an adjacent button on the camera's rear panel. Due to the mechanical release, it won't automatically pop up, even in the iAuto and scene modes.
As for power, this tiny flash has very little, barely lighting objects just six feet away. It's also not equal to the 14mm (28mm equivalent) lens that shipped with the GF2, only lighting up the center of the frame, leaving most of the left and right dark.

External flash. Though I used the Olympus flash that I had, this Lumix DMW-FL220 unit is also available for the GF2.
I slipped the Olympus FL-14 flash into the hot shoe to good effect. It worked just fine, overexposing a bit for my taste, but I was able to adjust it to my satisfaction. It's so close to the lens that I had a little problem with red-eye. Panasonic makes several flashes that will work with the G-series, including the smallest FL220, which should have less of a problem with red-eye, though it is larger.
LCD. The vibrant LCD is a pleasure to use, with 460,000 pixels and a fast refresh rate. We didn't have the optional EVF, called the DMW-LVF1, but that optional accessory attaches to the Lumix GF2, slipping into the hot shoe and accessory port just like it does on the GF1 and LX5. I prefer to keep the camera smaller, so I wouldn't have used this $199 accessory anyway. The higher-resolution LCD is great for framing and focusing manually, offering better discrimination than is available on Olympus PENs, and the touch interface offers a fast way to pick a focus point--and even fire the shutter--with a simple touch on the screen.
Autofocus. But before I get into using the touch screen, I should mention the main aspect that made the Panasonic GF2 such fun to use: its autofocus is very responsive. I detected very little delay from when I half-pressed the shutter button to hearing and seeing focus confirmation with the 14mm f/2.5 lens. Almost none. According to the lab, the full-autofocus shutter lag is 0.38 to 0.41 second. That includes the shutter mechanism delay, which on mirrorless cameras is fairly long, because the shutter has to first close before opening for the exposure. That's about as fast as the GF1 was with the 20mm f/1.7 lens, so it's not a noticeable net gain over its predecessor, it's just fast for the category.
Fast autofocus means not only getting closer to the moment you want, but also quicker followup shots so you can capture multiple moments without thinking about it. I took a fun sequence of my boys being silly and I didn't have to think about the camera at all, just the changing expressions and poses.
I also attached the Olympus 14-150mm f/4-5.6 lens -- one of Olympus's better lenses, with a more advanced autofocus motor -- for some of the focus tracking shots, since focusing a 28mm-equivalent lens isn't quite as challenging as focusing a longer zoom. I had trouble getting the Panasonic GF2's tracking AF point to stay on a panning subject, but got much better luck when that subject (a child on a bike) was coming straight toward me. It only lost focus lock as the subject got within 10 feet or so. Not bad. It's worth noting that Panasonic specifically tunes their Micro Four Thirds lenses for their cameras' AF systems, making them generally more responsive than those from third parties, so it's possible that one of their lenses would've performed even better. Unfortunately I didn't receive any other lenses with the GF2 body, beyond the aforementioned 14mm f/2.5, and so couldn't test that theory in the real world.
Touch. Much of the control simplification comes thanks to the addition of a touchscreen on the GF2, which we've detailed in the table above. Though it's not quite the same as the touchscreen implementation on the Panasonic G2, I find that I generally like it, despite my distaste for touchscreen digital cameras in general. There's no question that it speeds some operations, like autofocus point selection, but it's made switching modes more cumbersome.
First, picking an AF point can be as easy as touching the screen where you want the camera to focus. That's especially good if you're shooting on a tripod, but also useful handheld. One thing I always find difficult, though, is re-centering the AF point after shooting, but the GF2 has a solution for that too, if you set the Quick Menu/Function button to re-centering (there's an onscreen button for the Quick Menu, so the physical button is better assigned to another function).
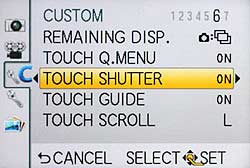
The Panasonic GF2 will also focus and fire with one touch on the screen if you have the Touch-shutter feature enabled. A few translucent touch icons appear left and right of the screen for quickly activating or deactivating these features. The icons tend to clutter the screen, unfortunately, and they also limit the area you can select for autofocus. An optional histogram can be moved around the screen with a touch, but unfortunately it's not translucent, so it blocks a good percentage of the view when enabled. Unlike in the prototype, enabling or disabling the histogram involves a visit to the camera's main or quick menu systems, rather than there being an extra on-screen button for this purpose. That frees up a little real estate on screen when the histogram's disabled, but it also means it takes longer to switch it on or off.
Another feature of the GF2 that I like is the ability to change the size of the autofocus point using either the rear command dial or a scroll bar on the touchscreen itself.
After training me to use the touch controls instead of the four-way navigator, the Panasonic GF2 insists I return to the navigator once I've pressed the last screen control telling it which kind of menu I want, as the main menu system doesn't support touch control. From there it's the usual tabs and line items that you move through with the navigator. I'm okay with it, because I don't think there's anything wrong with using the four-way navigator most of the time, and thankfully, you can navigate the touch-based menu items with the four-way as well. I'm sure there are some who would wish for the ability to turn off the touchscreen altogether, but alas, that would require a mode dial.
The Quick menu is a useful tool, but now that it's designed for touch, it's not quite as compact and versatile as the old pull-down Quick menu. As such there are many items that require you to scroll left and right to see all the available options, which can be a pain. You can at least change the order of the icons, and the precise selection of icons that appear, although from the 23 icons available for addition to the Quick menu, only ten can be added at any one time.

Drive modes. There are now three Continuous drive modes, and two of them address a problem that all mirrorless cameras have had since their inception: You can't follow a subject once you've started shooting. That's because most mirrorless cameras only have the time to capture the image and show you the last one captured, rather than returning you to Live view. SLRs don't have this problem when you're looking through the optical viewfinder, because the mirror goes down between each shot, giving you a real-time view so you can follow your subject. The Panasonic GF2's fastest mode still behaves like other mirrorless designs, but Medium and Low speed modes return you to a live view between each shot so you can better track your subject. There's some electronic delay, I'm sure, but I found it considerably easier to track my kids on their bike in these modes than in the fastest mode, where I just had to point and pray.
Intelligent Auto seems to be designed as a quick way to go fully automatic if you find yourself in the wrong mode, and you want to just take a picture, letting the camera decide what Intelligent Scene mode to apply. Those who would leave it on all the time might be annoyed by the button's bright blue glow when activated, but thankfully, you don't have to reactivate iAuto every time you turn the camera on, as the GF2 will remember that it was in use even after a change of battery.
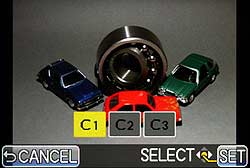
Customization. You can do many things to make the Panasonic GF2 your own, like turning off a few of the touch icons, and adding that moveable histogram, and there are quite a few Scene modes to explore if that's your thing. But having the three Custom modes is important to me, where I can create something like a black and white, a vivid and a mode meant more for Movies than for stills. Why would I want that? Well, there's a menu item called Record area, that lets you select between the aspect ratio you've set for your movies--which would usually be 16:9--and the aspect ratio I'd usually want for stills, either 3:2 or 4:3. This little setting is fairly stubborn, in that it completely blackens the undesired area, rather than just masking it out as we've seen on other cameras. So though you can start recording a movie while shooting stills in 4:3, you won't know precisely where it'll cut off when recording starts in 16:9 ratio. (And likewise, if you set the camera to default to a 16:9 aspect to match the movie aspect, you won't know precisely where a 4:3 image will be cut off when you press the shutter release button.) The Custom modes at least allow you a way around that. In fairness, while I found this either/or aspect ratio display annoying, it does allow the camera to make maximum use of its LCD area for each image format. It would be nice, though, if there were a custom settings option that would display the full viewfinder image for both modes, and indicate the video area with an outline or ghosting of appropriate parts of the overall display.
Panasonic 12.5mm 3D lens on the GF2
by Shawn Barnett

Reviewing a 3D lens naturally requires the hardware--TV and glasses--to view the effect, as the back of the current Panasonic cameras do not serve to show you 3D. So along with the new 12.5mm lens, Panasonic sent us a rather large plasma display, the TC-P50GT25 50-inch TV. They also sent a couple pair of TY-EW3D10U battery-operated 3D glasses. Working together, the TV and glasses deliver an alternating 60 frames per second to each eye, which means that the TV puts out 120 frames per second total. Called Active Shutter, the technology is universal to current 3D televisions, but it seems the brand of glasses needs to be matched to the television.
We shot a number of images of different subjects, including trees, dogs, kids, buildings, and cars. That gave us a pretty good feel for what the Lumix 12.5mm 3D lens could do. Though the active shutter technology built into the TV is optimized to deliver smooth video, according to marketing materials, the Panasonic GF2 does not produce videos with the 12.5mm 3D lens, only stills. The lens is also only compatible with the G2, GH2, and GF2 Micro Four Thirds cameras; currently no Olympus Pen Micro Four Thirds models support the lens. The camera can be set to record just the 3D image in MPO (Multi-Picture Object) format, or else the MPO plus JPEG in fine or compressed formats. Note that the resolution of the JPEG captured is 1.4 megapixels (1,600 x 904), because the lens is just laying down two images side by side on the camera's sensor. The MPO is essentially the same times two, so don't be expecting lush 12 or 16-megapixel images; the 3D images from this lens are intended primarily for electronic viewing.

ISO-Standard Dog. Charlotte the dog sat for the rare static photo, but only when she heard it was 3D. She fairly leaps from the screen in this sharp shot. Download MPO file to play on a 3D television.
While using the lens was fun, we were quickly disappointed with a few aspects. One is that the very small, and fixed aperture of f/12 limits your shooting to bright daylight. The lens is hyperfocal, meaning that you don't need to focus. Objects from 1.97 feet (60 cm) to infinity should be in focus in all shots; that's really what you want for 3D, so no foul there. And though it's a 12.5mm focal length, the angle of view is actually quite a bit narrower than a 12.5mm lens would be with any other MFT lens, again because it's projecting two images side by side on the sensor (it should be a 25mm equivalent). Panasonic calls it 65mm equivalent at 16:9, and we'd have to agree. That kept us backing up quite a bit to frame images, sometimes quite a distance. So not just bright daylight, but preferably flat, open spaces are necessary to take advantage of this 3D lens.
What's noteworthy is that Panasonic was able to deliver 3D imaging in such a small lens. 3D as we're used to seeing it, however, is made with eyes that are separated by about 60-70mm (depending on the person), compared to this lens's 10mm separation. This almost probably explains lack of depth that we often perceived on the television.

Vehicles. To my eye, the vehicles are mostly 3D, but without the proper depth. The trees in the background are mostly flat. Download MPO file to play on a 3D television.
I happened upon a nice day in mid-Winter, and took a few shots of the kids outside, then piled them in the van for a trip to the office where we could see the pictures in 3D. I'm blessed with a yard that is big enough to zoom with my feet, and I found myself having to back off as much as 20 or 30 feet to frame images the way I'd normally do with a zoom, just to get two small kids in the frame. I also crouched down much of the time to allow for plenty of background in the pictures. I had the sense that I could see some of the 3D effect on the Panasonic GF2's screen after capture, almost certainly an illusion, but it wasn't until we got to the big 50-inch television that the images really popped.

Children. Most shots of the kids were well-defined from the background, but that background tended to curve up rapidly behind them to my perception. Download MPO file to play on a 3D television.
Some of them, anyway. Whether an image popped really depended on the lighting and the distance between me, the subject, and the background. In fact, it seems that objects about halfway between the camera and the background stood out the most, an observation made by my oldest daughter. All three kids seemed to enjoy seeing themselves at first, and they fought for the two sets of glasses, with me fighting right along with them so I could have a glimpse too. After about 10 minutes, though, the interest faded, and the younger boys wandered off to explore the office, while my daughter took the glasses off altogether, only putting them back on to see what I was talking about as I continued to rifle through the images. She was getting nauseated, and the glasses hurt her eyes. To be fair, she said she was nauseated before we got there, and it turned out she had a stomach flu after all. But the boys also said the glasses bothered their eyes after a few minutes of viewing, and when their sister freed up her glasses, they were not interested in coming back to see more (my youngest son refuses to watch 3D movies at the theater, so it's impressive that this Panasonic TV held him as long as it did).
Publisher Dave (who's notoriously sensitive to motion sickness) also reported some queasiness when viewing 3-D images. He thinks it's caused by the way the scene position appears to shift when you move your head. If you don't easily become seasick or just don't move your head much while viewing, this may not be a problem for you.

Depth. This shot of the small truck should show what I mean with the lack of depth going back when viewed in 3D. Download MPO file to play on a 3D television.
My eyes were slightly bothered by viewing the images at first, but I think I could get used to the glasses and TV. I was surprised that you could still see 3D fairly well as much as 45 degrees off-axis, unlike the passive 3D glasses I've used in the past. Each of the lab viewers experienced more or less 3D effect depending on the person. People with a very dominant eye might see no effect at all. I tended to see more than most, but I noticed a limitation: backgrounds often seemed to wrap back up toward the camera, rather than continuing cleanly back as I knew they should. As a result, you get the effect of paper cutouts against a steeply sloping background, rather than full depth. The 3D experts around me say it's likely the small 10-millimeter separation between the lenses that causes the perceived compression, not so much the 65mm-equivalent lens. Another flaw in the viewing experience was that dark objects against a light background tended to show ghost images overlaying the dark portions, especially noticeable in people and tree trunks. This is likely the result of the glasses not completely blocking light when in the "off" state: Some of the other eye's image leaks through, making the ghost images appear where a dark foreground object is next to a light one or vice versa.
The images were realistic enough that I found myself shifting my head to see if I could see more of a scene by moving to peek around a real opening into 3D space. When you do that, though, the 3D background just appears to float, unmoving, behind the foreground objects, an odd, somewhat unsettling phenomenon that caused a couple of viewer's queasiness.

Lab shot. Here's a tighter-than-usual shot of the INB indoor test target that should also show some depth. Download MPO file to play on a 3D television.
Since we had the big, beautiful Panasonic 3D TV in-house, we also viewed a few images from the Sony NEX-3 made with the 3D Sweep Panorama function, as these are also MPO files. Results were good, with perhaps a bit more depth. But because the images are stitched from multiple images, it was really obvious where the stitching errors were made, because things like bunches of trees, which are considerably more difficult to stitch, would stand out as not conforming to the 3D world; one tree even popped out from the background to appear to be in front of the trees it was most certainly behind.
While I enjoyed looking at the 3D images for the novelty, I don't think it's something I'd do very often. Given how little time the kids looked at it, I'm sure I won't be an early adopter of the technology, even though the television Panasonic sent us currently sells for about as much as a 2D 50-inch TV cost last year: around US$1,050 at current street prices. (And the TC-P50GT25 is a very, very good 2D TV as well, with great color, excellent dynamic range, and very fast refresh.) The glasses are about US$100 per pair. Those already invested in 3D, be it for gaming or movie viewing, will likely find the US$250 lens an inexpensive way to enjoy the hardware they already have, provided they also already have a Panasonic G2, GF2, or GH2. (Those same users might also see it as additional reason to buy into the whole Panasonic Micro Four Thirds camera lineup as a whole.)
Still, I'm glad I have some photos of the kids playing in 3D, because someday the technology may be as ubiquitous as the once-futuristic flat panels are today. Indeed, some of what we saw at CES 2011, especially glasses-free 3D, made even the most skeptical 3D doubters among us start to wonder. Perhaps instead of continued confinement to the iconic reels of the 72-year-old Viewmaster stereoscopic viewer, 3D might finally stick around, what with electronic capture and electronic display technology finally becoming the mainstream method of image creation and consumption. Meanwhile, if you want to start capturing 3D now, the Panasonic 3D lens is available for current or future G2, GF2, or GH2 shooters at a reasonable price.
Panasonic GF2 Image Quality
Most digital SLRs will produce a reasonable ISO 100 shot, so we like to push them and see what they can do at ISO 1,600. Recent advances in sensor technology have made ISO 1,600 look a lot more like ISO 100, but there are still cameras whose quality starts to fall apart at this setting. I also choose 1,600 because I like to be able to shoot at least at this level when indoors and at night.
Panasonic GF2 versus GF1 at ISO 1,600
 |
 |
 |
 |
 |
 |
|
Panasonic GF2 at ISO 1,600
|
Panasonic GF1 at ISO 1,600 |
|
While we'd expect it to be almost equal at ISO 1,600 between the GF2 and GF1, it's really not quite. I prefer the smoother noise pattern of the GF2, but detail appears sharper in the GF1, and color more vibrant. Both are somewhat muted when compared to others, shown below. But in terms of detail, the GF1 seems to leave more intact.
|
|
Panasonic GF2 versus Olympus E-PL2 at ISO 1,600
|
 |
|
 |
|
 |
|
Panasonic GF2 at ISO 1,600
|
Olympus E-PL2 at ISO 1,600 |
|
It's a bit of a draw in terms of detail between the GF2 and the Olympus E-PL2, but the clear win goes to the E-PL2, with truer yellows. The GF2 remains shackled with Panasonic's tendency to turn yellows more than a little green, hence the darker reds, the almost gray mosaic pattern, and the greenish olive oil bottle.
|
|
Panasonic GF2 versus Samsung NX100 at ISO 1,600
|
 |
|
 |
|
 |
|
Panasonic GF2 at ISO 1,600
|
Samsung NX100 at ISO 1,600 |
|
The Samsung NX100 leaves quite a bit more noise in the file, but also retains more detail and color in most cases than the Panasonic GF2 manages.
|
|
Panasonic GF2 versus Sony NEX-5 at ISO 1,600
|
 |
|
 |
|
 |
|
Panasonic GF2 at ISO 1,600
|
Sony NEX-5 at ISO 1,600 |
|
The Sony NEX-5 both out-resolves the GF2 and manages better color at ISO 1,600.
|
|
Panasonic GF2 versus Nikon D5000 at ISO 1,600
|
 |
|
 |
|
 |
|
Panasonic GF2 at ISO 1,600
|
Nikon D5000 at ISO 1,600 |
|
The 12-megapixel Nikon D5000 has better color and detail, especially noticeable in the red leaf swatch. There's a little more chrominance noise in the shadows from the Nikon D5000, however.
|
|
Detail: Panasonic GF2 versus GF1, Olympus E-PL2, Samsung NX100, Sony NEX-5, Nikon D5000
 |
 |
 |
 |
 |
 |
 |
 |
 |
 |
 |
 |
|
Panasonic
GF2 ISO 100 ISO 3,200 |
Panasonic |
Olympus |
Samsung
NX100 ISO 100 ISO 3,200 |
Sony
NEX-5 ISO 200 ISO 3,200 |
Nikon
D5000 ISO 100 ISO 3,200 |
|
Detail comparison. High-contrast detail is often another story, and the Panasonic GF2 does manage to best the Nikon D5000 at rendering the lines between the letters of the Pure Brewed logo, at least at ISO 100. The others fare a little better, with the E-PL2 doing the best job at ISO 200 (the E-PL2 has no ISO 100 setting), and the Sony NEX-5 doing better at ISO 3,200. The Panasonic GF2 and Samsung NX100 both seem to have the lowest contrast overall, with one a little too bright and the other a little too dark.
|
|||||
Overall, the Panasonic GF2 really didn't do that well in our ISO 1,600 JPEG comparisons, nor at the ISO 3,200 detail comparisons. We recommend sticking to ISO 800 and lower when shooting JPEGs, and sticking to RAW capture when shooting at ISO 1,600 and above. A program like Adobe Lightroom makes shooting and processing your RAW images quite a bit easier.
 Printed Results. Peeping at pixels onscreen is only worth so much. It's when we print the images that we get to the relevant performance of a camera's lens and sensor.
ISO 100 shots are a little soft at 20x30 inches, which is not a surprise for a 12-megapixel camera. Prints look much better at 16x20 inches, with good detail and color.
ISO 200 images look almost the same at 16x20 inches.
ISO 400 images have about the same level of detail as ISO 200, but colors and shadows are a little darker.
ISO 800 images are softer at 16x20, thanks to a noticeable jump in noise and noise suppression efforts. Reducing image size to 13x19 brings quality back up sufficiently for a good print.
ISO 1,600 files are where quality drops off more dramatically, with lower saturation, darker shadows, and considerably softer detail, especially in reds. 13x19-inch prints are not acceptable, but 11x14-inch prints bring detail back in terms of sharpness, while reds still suffer a lack of detail.
ISO 3,200 shots are a bit rough at 11x14 inches, with mottled shadows, and darker reds. Printing at 8x10 brings back detail, but those reds are still troublesome and darker than we're used to seeing (blur is not uncommon, but a darkening of the red is unusual).
ISO 6,400 images are usable at 5x7, but really look better at 4x6. Reds are still darker, but we think that prints from low-light photos at these sizes will look just fine.
Overall, the Panasonic GF2 performs admirably in terms of printed results. Its image quality tracks pretty similarly to the GF1, producing a good 13x19-inch print at ISO 800, but does a little better at 3,200 and 6,400 (the GF1 did not offer ISO 6,400).
In the Box
The Panasonic GF2 ships with the following items in the box:
- Panasonic Lumix DMC-GF2 body
- LUMIX G VARIO 14-42 mm / F3.5-5.6 ASPH. and/or LUMIX G 14 mm / F2.5 ASPH. lens (if purchased as a kit)
- Lens hood (if purchased in a kit with the 14-42mm lens)
- Lens caps and bags (if purchased as a kit)
- Body cap
- Lithium-ion battery DMW-BLD10
- Battery charger DE-A93
- Battery cap
- Hot shoe cover
- Touch-screen stylus pen
- A/V cable
- USB cable
- Shoulder strap
- Software CD-ROM (includes PHOTOfunSTUDIO 6.0 HD Edition, SILKYPIX® Developer Studio 3.1 SE, Super Loilo Scope trial version, and USB driver)
- Manual CD-ROM (includes Operating Instructions for Advanced Features, PDF format, 218 pages)
- Basic Operating Instructions (printed manual, 55 pages)
- Warranty card
Panasonic GF2 Conclusion
| Pro: | Con: |
|---|---|
|
|
Overall, I had a great time with the little Panasonic GF2. Although it doesn't quite catch up to that of Sony's aggressively styled NEX-5, the Panasonic GF2's new body is noticeably more compact than that of the GF1. It's extremely nimble and compact -- still a little too large to slip into a pair of slacks without looking like you have a camera in your pocket (I did get looks), but the design has never been more sportcoat or jacket-friendly. With the 14mm f/2.5 prime lens mounted, it's about the same profile as the Sony NEX-5 in a pocket, just a slightly different shape. With the 14-42mm lens, all that changes, but it's still amazing what a few millimeters can do to make a camera more portable.
Key to achieving the trimmer body was the GF's new touchscreen user interface, something that we've found to prove rather divisive among photographers. In some respects, the GF2's touch panel is great, making for a really smooth experience. In particular, the ability to simply tap on a subject to focus and set exposure is extremely intuitive. Unfortunately there are definite drawbacks to the touch interface as well, most notably the fact that you can't completely remove overlays during capture or playback -- there's always at least one soft button obscuring your view. There are also respects where the GF2's interface seems to lack cohesion, most notably in that the menu system isn't touch-capable, requiring you to switch mindset between using the touch screen and physical controls.
Performance is also somewhat of a mixed bag. Panasonic promises improved noise reduction across the board, and the GF2 does indeed improve chroma noise in shadows, but this comes at the expense of subtle image detail. The effects of noise reduction can be seen as smudging in images shot at all ISO sensitivities, although you're not likely to notice this at the base sensitivity without pixel peeping. Image quality starts to degrade noticeably by ISO 800, and at ISO 1,600 and beyond, it suffers quite a bit. We also noted some fairly pronounced hue shifts, and a greater degree of oversaturation than in the GF1. For the best results, you'll really want to shoot raw and -- since the bundled Silkypix software didn't seem to do much better than the camera's own JPEG engine in terms of detail -- process with third party software. Unfortunately despite the relatively sedate burst shooting speed of the GF2, raw burst depth feels pretty limited. JPEG shooters can breathe much easier, with a pretty generous burst depth available, but when shooting above ISO 100 you'll find that the GF2's burst rate falls still further.
There's still plenty to recommend the GF2, however. Put Panasonic's 14mm prime -- a great walk-around lens -- on the mount, and the package is arguably still smaller than competing fixed-lens cameras. Keep a zoom in your camera bag for when you need a little telephoto reach, and you get the benefit of a much larger image sensor. Autofocus speeds are very good for a compact system camera, and since autofocus is possible during Full HD video capture, you can safely leave your camcorder at home. Throw in the novelty value of the available 3D lens -- albeit with its limited resolution and 3D "depth" -- and Panasonic has put forth a pretty unique package for potential buyers to consider. For many, the purchase decision will likely hinge on the touch screen interface, and whether body size or the quantity of external controls are of greater importance.
Although I'm a traditionalist at heart, the advantages of Panasonic's touch screen implementation were such that I mostly didn't find myself missing the extra controls. Factoring in the more compact body and swift autofocus, I found the Panasonic GF2 a very enjoyable camera to shoot with, and one to which we're happy to award a Dave's Pick.
Design
Panasonic GF2 Design

(Illustration courtesy Panasonic USA)
1 |
Image sensor
|
4 |
Lens fitting mark |
2 |
Self-timer indicator
|
5 |
Lens mount |
AF assist lamp |
6 |
Lens lock pin |
|
3 |
Flash
|
7 |
Lens release button |
The Panasonic GF2's front panel layout has changed in a couple of notable areas, since that of the GF1. While the lens release button is still in the same location, and the mount itself is unchanged, the hand grip has been reprofiled to make it more comfortable. Those with larger hands may still find the GF2 a little tiring for single-handed shooting, as the grip is quite close to the edge of the camera body, but photographers with average or smaller hands should find the GF2's more sculpted, less angular grip to be quite an improvement. The autofocus assist lamp -- which also doubles as a self-timer indicator -- has jumped across the camera body, and is now to be found directly beneath the 'GF2' branding. Also immediately noticeable here is that the GF2 lacks the hump underneath the flash hot shoe, where the speaker grille was placed in the GF1. It further drops the Mode dial, making for less protrusions and a more pocket / bag friendly design.

(Illustration courtesy Panasonic USA)
8 |
Flash open button |
14 |
Menu / Set button |
9 |
Speaker |
15 |
Cursor buttons: |
10 |
Rear dial |
Up arrow / ISO button |
|
11 |
Touch panel / LCD monitor |
Right arrow / White balance button |
|
12 |
Playback button |
Left arrow / AF mode button |
|
13 |
Q.Menu / Fn (Function) button |
Down arrow / Drive mode button |
|
Delete / Return button |
Seen from the rear, the GF2 has changed a lot more significantly. There are now four less physical controls here than in the GF1, this being one of the main changes that has enabled Panasonic to reduce the overall body size. To achieve this, the LCD panel -- whose resolution, size and aspect ratio are all unchanged -- now includes a touch screen overlay, and so serves as a control device. The separate Q. Menu, Function, and Delete buttons from the GF1 are all combined into a single control, and the Down Arrow button -- which previously doubled as the Function button -- now serves as a Drive mode button in Record mode. As well as the removal of the Preview / Delete button, other dedicated external controls absent from the GF2 design include Display, AF/MF, and AF/AE Lock. One other change of note is the new seven-hole, circular speaker grille, now located just to the right of the accessory port, which still sits directly beneath the flash hot shoe.

(Illustration courtesy Panasonic USA)
16 |
Stereo microphone |
20 |
Hot shoe cover |
17 |
Shutter button |
21 |
Camera on/off switch |
18 |
Motion picture button |
22 |
Status indicator |
19 |
Focus distance reference mark |
23 |
Intelligent Auto button |
The GF2's top panel has also had quite an overhaul. As mentioned previously, the speaker grille has moved to the rear panel, and the Mode dial has been removed altogether. In the process, the Drive mode lever has also been removed, with its functionality taken up by the Down arrow button on the rear-panel four-way controller. The space previously occupied by these controls is now taken up by a relocated Power switch, and a new stereo microphone. With each half of the stereo microphone sitting underneath a 24-hole grille, it's a lot more immediately noticeable than the tiny single-port monaural mic in the GF1, but unfortunately it's still not ideally located, either for best capturing sound from your subject, or for stereo imaging. The Movie record button has grown rather in size since the GF1, and the Panasonic GF2 also now sports a dedicated iA (Intelligent Auto) button whose outer ring is illuminated in blue when the mode is active.

(Illustration courtesy Panasonic USA)
24 |
Shoulder strap eyelet |
26 |
AV out / digital (USB) jack |
25 |
HDMI jack |
The GF2's external connectivity has jumped to the opposite side of the camera from that of the GF1, and is now to be found behind a rubber-hinged plastic door on the left-hand side (as seen from the rear). There are now only two ports located here -- one for HDMI high definition video output, and one that's a shared composite video output (NTSC only in US models), and a USB digital output for use with a computer. Gone is the wired remote control jack from the Panasonic GF1, as the GF2 sadly lacks any form of capture-mode remote control capability. (It does support remote control in playback mode from Viera-link compatible displays, through the high-def HDMI output, however.) The right-hand side of the GF2 -- not shown here -- is now essentially featureless, with only a second eyelet for the shoulder strap. (The GF1's left-hand side was similarly almost featureless, although it did also have a small access hatch through which the AC adapter's dummy battery cable was inserted, something the GF2 places inside the battery compartment door, instead.)

(Illustration courtesy Panasonic USA)
27 |
Tripod socket |
29 |
DC coupler cover |
28 |
Flash card / battery compartment door |
30 |
Compartment lock release lever |
Finally, the GF2's bottom panel is very similar in arrangement to that of the GF1. As just mentioned, there's a slight change, in that the access hatch for the AC adapter's dummy battery cable now sits in the middle of the battery compartment door, but otherwise there's little difference. The lockable compartment door still sits beneath the hand grip, and the metal tripod mount is still on the center axis of the lens, but rather close to the front of the camera body. (It's also still rather too close to the compartment door to allow quick battery or flash card changes with most tripods or quick release plates attached.)
Optics
Panasonic Lumix DMC-GF2 Optics
Panasonic LUMIX G Lenses
 The Panasonic GF2 is compatible with any Micro Four Thirds lens, with
Panasonic, Olympus, and third parties together offering at least twenty lens models at the time of writing (March 2011). Panasonic has dubbed the bulk of their Micro Four Thirds lenses "LUMIX G,"
and the company has released 11 models to date. Six of these are zooms, as identified by their Vario branding, while five are primes -- among these, one macro and one 3D lens. Of the Panasonic lenses on offer, two are available in a kit along with the GF2 -- the 14-42 mm zoom, or the 14 mm prime. (In some markets, it's also possible to buy a kit consisting of both lenses.)
The Panasonic Lumix G 14 mm / f/2.5 Asph. is the company's smallest Micro Four Thirds lens. Despite featuring a metal mount, it's also the lightest by some margin -- at least, with the sole exception of the unusual 3D lens -- weighing just under two ounces. With a maximum aperture of f/2.5, it's among the brightest, bettered in Panasonic's own lineup only by the 20mm f/1.7 prime. (These two lenses would complement each other nicely, with 35mm-equivalent focal lengths of 28mm and 40mm respectively.) The Lumix G Vario 14-42mm f/3.5-5.6 Asph. Mega O.I.S, meanwhile, is the lightest zoom lens in the line, and offers equivalent focal lengths from 28-84mm. To save weight and cost, the 14-42mm lens forgoes an IS switch, with stabilization instead being enabled or disabled through the camera's menu system. It uses a plastic lens mount, instead of a metal one.
The Lumix G Vario 7-14mm f/4.0 Asph. offers the widest field of view among Panasonic's Micro Four Thirds zooms, and is also unique as the company's only zoom to offer a constant maximum aperture -- but no stabilization. The Lumix G Vario 14-45mm f/3.5-5.6 Asph. Mega O.I.S. is just a fraction smaller and has ever so slightly more reach than the 14-42mm, with an equivalent range of 28-90mm, but weighs almost 20% more.
The Lumix G Vario HD 14-140mm f/4.0-5.8 Asph. Mega O.I.S. has by far the most reach of Panasonic's Micro Four Thirds lenses, with 35mm-equivalent focal lengths ranging from 28-280mm, for a 10x zoom range. It's the only lens carrying the "HD" badge, which indicates that it's designed for movie recording. This comes thanks to two specific features -- a nearly silent inner focus direct-drive linear motor for continuous auto focusing, and a seamless aperture adjustment.
The Lumix G Vario 45-200mm f/4.0-5.6 Mega O.I.S., while it has a more modest 4.4x zoom range, reaches out to a stronger 400mm-equivalent telephoto. The Lumix G Vario 100-300mm f/4.0-5.6 Mega O.I.S. offers the strongest telephoto of all, though, at 600mm equivalent. It's also the heaviest of Panasonic's offerings, at a little over 1.1 pounds, not to mention the largest, at just under five inches in length when retracted, with a maximum diameter of 2.9 inches.
Finally, the Lumix G Fisheye 8mm f/3.5 offers the widest field of view, and the Leica DG Macro-Elmarit 45mm f/2.8 Asph. Mega O.I.S. has the tightest field of view among the primes. The latter is also the only model not carrying Lumix G branding, is also the only prime in the group to offer image stabilization. The Lumix G 12.5mm f/12 is pretty much unique, not only within Panasonic's line, but for Micro Four Thirds as a whole, allowing simultaneous recording of two low-resolution images (1.4 megapixel on the GF2) with slightly differing field of view, which are combined to create a single 3D image for viewing on compatible displays.
Although the only one of Panasonic's lenses available to us during our time with the GF2 was the 14mm prime, we've shot extensively with the company's other lenses as part of our reviews of Panasonic cameras, and have also tested them in the lab for SLRgear. Overall, we've found them generally to be of very good quality. Helped in part by in-camera processing which reduces both geometric distortion and chromatic aberration, Panasonic lenses have consistently delivered excellent optical results in our testing and use. Lens quality is an important part of the decision whether or not to adopt a new camera system, and on that score, the Panasonic G-series does very well.
Quite a range of other options are available from Olympus, Panasonic's partner in the Micro Four Thirds format, or are on the horizon from a variety of companies. Olympus currently offers six Micro Four Thirds-mount lenses (or seven if you count the two 14-42mm variants), of which one is a prime, and the remainder are zooms. Third party lens maker Sigma Corp. recently announced that it is working on intends to market lenses for the Micro Four Thirds format, although it had yet to announce specifics as of March 2011. Fans of manual focus will also find interesting the fact that several famous names have thrown their hat in the Micro Four Thirds ring, including Carl Zeiss, Cosina, Komamura, and Schneider Kreuznach, although of these only Cosina has yet to reach market with a 25mm f/0.95 prime. Finally, a new startup company called Noktor has also shipped a completely manual 50mm (100mm equivalent) F0.95 prime lens, manufactured by Goyo Optical, which appears to be based on a design intended for CCTV security cameras.
The Micro Four Thirds mount has an unusually small flange to sensor distance, which means there's plenty of room to insert mount adapters between the camera body and lens flange. As a result, a vast selection of adapters make it possible to mount all sorts of current and historic glass on a Micro Four Thirds camera. Lenses that can be adapted include certain standard Four Thirds, Olympus OM, Canon FD, Nikon F, Pentax K, Sony / Minolta Alpha, Contax / Yashica, M42, T2, Leica M / R, Voigtlander VM / Ai-S / PK-A/R / KA, and Carl Zeiss ZM / ZF / ZK types. These adapters generally have some limitations as to compatibility and available features, which will depend on the specific model being used, but photographers on the Micro Four Thirds platform can rest assured they won't be left wanting in terms of compatibility with other lens mounts.
Because the company's lenses largely feature optical stabilization, the Panasonic GF2 doesn't itself incorporate in-body image stabilization. This means that while third party lenses can be used with the camera, only Panasonic's lenses offer stabilization on the GF2 (at least, for the time being -- it's certainly possible that a third party could offer its own stabilized Micro Four Thirds lens in the future).
Panasonic GF2 Autofocus
The Panasonic GF2 has a 23-area contrast-detect autofocus system, using the main imaging sensor to determine focus, similar to how most point & shoot cameras work. There are four AF Area options, selected by pressing the Left arrow key on the four-way controller, which doubles as an AF Mode button. These options include Face Detection, AF Tracking, 23-area Focusing, and 1-area Focusing. In addition, there are three focus servo modes, selected with the Focus Mode option in the Setup menu. These are Single AF (AFS), Continuous AF (AFC), and Manual.

Touch AF. The autofocus point can be set anywhere within the frame (except the extreme edges) by touching the LCD display, and four different point sizes are available. We found this one of the camera's most compelling features. (Picture shows Panasonic G2, which operates similarly to the GF2).
A built-in AF Assist lamp illuminates the center of the image frame in difficult lighting conditions, to assist in achieving a focus lock. Its effective range varies depending on the lens in use, and it can be disabled altogether for situations when it might prove a distraction to your subject, or otherwise objectionable. Lenses with larger diameters may partially or completely block the assist lamp from illuminating your subject.
When the AF Mode is set to Face Detection, the camera automatically detects up to 15 faces in a scene, and can be programmed to recognize three specific individuals whenever they appear in the frame, allowing them to be prioritized over other faces when recognized. (In other words, you can train the camera to distinguish six specific people from others, and base exposure and focus on just their faces, rather than others in the frame.) The GF2 will focus on an individual selected by the face recognition function if possible, or on the dominant face if no individuals are recognized. When a photo contains more than one recognized face, the camera selects on which face to focus based on the priority selected when programming the faces to be recognized. There's also a three-step control over the facial recognition sensitivity, allowing higher recognition accuracy (but with an increased likelihood that one of the designated faces won't be recognized), or vice versa.
The face selected for focusing is indicated by a yellow frame until focus lock is achieved, at which point the frame color changes to green; other faces get a white frame to indicate their location. Once detected, faces are tracked around the screen automatically. A manual AF point can be set in face detection mode by simply touching the desired point on the screen, and one of four point sizes selected by dragging a slider that appears at the right-hand side. The point position can also be set or adjusted with the arrow buttons on the back of the camera, and the size adjusted by rolling the rear dial. If a manual point is set, all detected faces are still indicated with white frames, but not used for AF calculation.
The AF Tracking mode is great for shooting sports, kids, and pets, as it automatically tracks any moving subject -- not just faces -- around the frame, based on the subject's tone and color. The subject can be selected by touching it on the screen. Alternatively, it can be selected by aiming the camera so as to place the AF point over the subject, then half-pressing the shutter button. In either case, when tracking, the subject is indicated with a yellow frame. Face recognition is disabled when the camera is set to AF tracking mode. The tracking mode also doesn't function when the Panasonic GF2 is set to black & white film modes, or the monochrome My Color mode.
In 23-Area Focusing mode, the GF2 defaults to automatically selecting between all twenty three focusing points. By touching the screen, one of nine groups of AF points can be selected, and the camera will automatically choose only from the points in the selected group. Each group consists of five points, apart from in the extreme corners of the frame, where the groups only contain four points. The selected group is indicated by a cross mark in the center of the cluster of AF points.
Finally, the 1-Area Focusing mode provides a single autofocus point which can be moved anywhere within the frame except the extreme edges, again either by touching the display or by using the arrow buttons. As with the face detection mode, the AF frame size can be changed to Spot, Normal, Large or Extra Large, either by dragging an on-screen slider, or by rolling the rear dial.
In Single AF servo mode, the camera will attempt to determine the point of focus when the shutter button is half-pressed, and then lock focus at this distance for as long as the shutter button remains pressed. Through the Custom menu, you can assign the Q.Menu / FN button to serve as either an autofocus lock button, an autoexposure lock button, or a combined AF/AE lock button, with a second press releasing the lock. A further Custom setting instructs the camera to operate in AF+MF mode, allowing the point of focus to be fine-tuned manually after the autofocus operation is complete.
In Continuous AF servo mode, the camera will attempt to predict subject motion and keep the area under the AF point in focus, for as long as the shutter button remains half-pressed. Because contrast-detect AF systems have to perturb the focus in order to tell whether the image is actually in focus or not, the DMC-GF2's Continuous-AF mode's operation can be seen in the live view feed, at least if you're watching closely: The image will continuously shift very slightly in and out of focus when C-AF is active, as the camera constantly re-checks its focus setting.
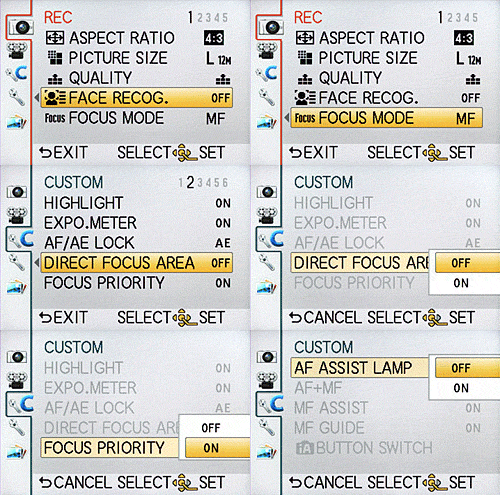
A Focus Priority setting in the Custom menu allows the Panasonic GF2 to be set to require a focus lock before the shutter can be triggered, or alternatively to allow the shutter to fire regardless of whether a lock has been achieved. When shooting in burst mode with continuous AF, enabling Focus Priority can reduce the burst speed, because a focus lock must be obtained before each shot in the burst. With Focus Priority disabled, the GF2 simply focuses at the predicted distance for each subsequent image in the burst, without actually confirming a focus lock has been achieved. (For bursts in Single AF mode, focus is locked from the first shot, so the only effect enabling Focus Priority has in this situation is that it delays firing of the first frame in the burst, until a focus lock has been achieved.)
Through a Record menu setting, the Panasonic GF2 can be configured to begin seeking a focus lock as soon as the camera is held relatively steady, before the shutter button is half-pressed. When this Quick AF setting is enabled, the time to obtain an AF lock should be reduced, but at the expense of battery life.
Of course, the Panasonic DMC-GF2 also offers a Manual Focus mode. In MF mode, a Custom setting called MF Assist optionally causes the camera to magnify the preview image by 5x, whenever the focus ring is adjusted, to help determine critical focus. The MF assist preview can be panned around the image frame by dragging your finger across the surface of the display, and the zoom level increased to 10x (and reverted to 5x) by pressing an on-screen magnifying glass icon. After 10 seconds of manual focus inactivity, the Panasonic GF2 reverts to showing the full image frame.
For use with old manual-focus lenses (which lack the communication that would tell the body when the focus ring was being adjusted), or perhaps to simply check the focus that the AF system has achieved, it's also possible to call up the MF assist function without first adjusting focus, by pressing the Left-arrow button when in MF mode. An MF Guide function displays an on-screen gauge with a visual indication of the current relative focus distance, making it easy to see whether you're focusing closer or further away when the focus ring is turned. (It doesn't display the actual focus distance, just a relative range from close-up to infinity.)
While the LCD on the Panasonic GF2 is a relatively high-resolution design, with some 460,000 dots, the optional electronic viewfinder offers less than half this resolution, with some 202,000 dots. For precise manual focusing, the LCD display hence proves a better choice, so long as it isn't obscured by ambient lighting conditions.
Touch-AF Interface
In the above discussion, we mentioned several times how the Panasonic GF2's touch screen can be used to set the AF point, identify the desired subject, or call up the focus-assist display in Manual Focus mode. We've often said that we're no particular fans of touch-screen interfaces, but the touch interface on the previous Panasonic G2 model really made believers of us, and the GF2 retains that heritage. Shawn and Dave first heard about the original G2's touch interface in the non-disclosure briefing, and shared much the same initial opinion: "eh - another gimmicky touch-screen interface." Once they had a chance to shoot with the camera, they found their opinion changing pretty radically. The touch interface on the G2 and GF2 is really done exactly right, and using it to set focus or select a subject for tracking is an incredibly natural way of doing so. Perhaps the best measure of how much we all like it is how often we find ourselves wanting to select an AF point on other cameras we're testing by poking their screens.
Shawn made a video showing how the Panasonic G2's touch interface works, for our review of that camera, and with the touch interface being a similarly integral part of the GF2 experience, we think it's worth re-linking here. Check it out, it's really a very intuitive way of relating to your camera!
AF in Movie mode
In Movie mode, you have the same focusing options available as when shooting stills, and it is possible to adjust focus not only before movie recording starts, but also during recording. There
are a couple of differences from their still image counterparts though -- the most
obvious being the absence of the beep that serves to confirm AF lock. Also, when set to AF-C servo mode, the Panasonic GF2 looks to a setting in the Motion Picture menu to determine whether to allow Continuous AF. If the option is disabled, the GF2 will operate in Single AF mode, regardless of the Focus Mode being set to AF-C, performing an AF operation only until a lock is achieved. If the option is enabled, Continuous AF becomes available during movie recording as well as for still images. Since focus operation is picked up by the camera's internal
microphone, you may want to choose either S-AF or MF modes to minimize
the presence of AF drive noise.
Panasonic DMC-GF2 Sensor Cleaning
The Panasonic DMC-GF2 features an ultrasonic dust-reduction system, especially important since the DMC-GF2's shutter is normally open for full-time Live View. The system automatically runs at power-up, and might as a result slow camera startup slightly. We measured the GF2's delay from power-on to first shot at about a second, about 0.4 seconds faster than the previous Panasonic GF1. While it is slower than some competing SLR models, we never felt that the GF2's startup time was too slow, or came even close to causing us to miss a shot.
We have found, however, that in-camera dust-removal systems are less than perfectly effective. You're still going to need to use a sensor-cleaning kit fairly often, so the advantage of in-body dust removal is perhaps less than it might seem. If you've got dust specks on your sensor (and sooner or later you will), you're going to need to clean it. There are a lot of products out there intended to address this need, but a distressing number of them work poorly (if at all), and many are grossly overpriced. Advertising hype is rampant, with bogus pseudo-scientific jargon and absurd product claims. And prices -- Did I mention prices? How about $100 for a simple synthetic-bristle brush?
So how do you know what product to use?
We don't pretend to have used everything currently on the market, but we can tell you about one solution that worked very well for us. The "Copper Hill" cleaning method is straightforward and safe, and in our routine usage here at Imaging Resource, highly effective. Better yet, the products sold by Copper Hill Imaging are very reasonably priced. Best of all, Nicholas R (proprietor of Copper Hill) has put together an amazingly detailed tutorial on sensor cleaning, free for all.
Sensor cleaning is one of the last things people think about when buying a d-SLR, but it's vital to capturing the best possible images. Take our advice and order a cleaning kit from Copper Hill right along with your d-SLR, so you'll have it close at hand when you need it: You'll be glad you did!
(While they've advertised on our sister site SLRgear.com from time to time, we receive no promotional consideration from Copper Hill for this note. We just think their sensor cleaning products are among the best on the market, and like their way of doing business. -- We think you will too. Click here to check them out.)
14mm Pancake Lens Test Results
Zoom
Very good performance with the 14mm f/2.5 ASPH kit lens.

The Panasonic Lumix DMC-GF2 is available bundled with a Lumix G 14mm f/2.5 ASPH Micro Four Thirds lens. The 35mm equivalent focal range is about 28mm, a result of the GF2's 2x "crop factor." Results were very good at 14mm, with strong detail throughout most of the frame and only a hint of softness in the corners at f/8. Coma distortion in the trees was low, but a very small amount of chromatic aberration is visible around the bare limbs in the top left. Overall, very good performance.
Macro
A much larger than average minimum area, with good detail. Flash had trouble though.


The Panasonic Lumix DMC-GF2's macro performance will depend entirely on the lens in use. However, with the 14mm kit lens, the Panasonic GF2 captured a much larger than average minimum area measuring 5.69 x 4.27 inches (145 x 108 millimeters). Detail was very good with just a hint of softness. There was only a small amount of blurring in the right corners, though stronger blurring along the far left side. (Most lenses have some softening in the corners at macro distances, and the Panasonic GF2's kit lens has less than most.) The built-in flash had trouble throttling down at such a close distance, resulting in a strongly overexposed image with uneven coverage. (Thus, external lighting may be the best bet for macro shots with this lens.)
Geometric Distortion
Low geometric distortion with the 14mm kit lens in JPEGs, much higher than average distortion in uncorrected RAW files.
| In-Camera JPEG: Barrel distortion at 14mm is 0.5 percent |
 |
| Uncorrected RAW: Barrel distortion at 14mm is 2.0% |
 |
When shooting JPEGs, the Panasonic GF2's 14mm kit lens produced just under 0.5 percent barrel distortion, which is much less than average especially for a wide-angle lens, and hardly noticeable in its images. This is the tendency for the lens to bend straight lines outward (like a barrel -- usually at wide-angle).
To see how much correction is taking place in the camera, we converted a RAW file from the above shot with dcraw, which does not correct for distortion. As you can see, the actual barrel distortion is very high at about 2.0%. We expect this for smaller interchangeable lenses though, so it's nothing to be concerned about unless you are using a RAW converter which does not understand the embedded "opcodes" to perform distortion corrections automatically. Most RAW converters these days (including Adobe Camera Raw and SilkyPix) are capable of applying distortion correction automatically, as specified by the manufacturer. (There's going to be some loss of resolution as a result of such correction, because pixels in the corners of the frame are being "stretched" to correct for the distortion. Obviously, a lens that doesn't require such correction, and is also sharp in the corners to begin with would be preferable, but relaxing constraints on barrel and pincushion distortion brings other benefits in the lens design.)
Chromatic Aberration and Corner Sharpness
Moderate level of chromatic aberration from the 14mm kit lens in JPEGs. RAW files also show moderate amounts. Corners were just slightly soft wide-open.
Chromatic Aberration. Chromatic aberration in the corners with the Panasonic Lumix DMC-GF2's 14mm kit lens is moderate but dull and blue-ish. The camera does a pretty good job of removing it from JPEGs. As usual, what little color fringing there is gradually reduces in brightness and width as it approaches the center of the image, where it is almost nonexistent.
Corner Softness. The Panasonic GF2's 14mm kit lens produced only very mild blurring in the corners, and what little softness there was didn't extend far into the frame. Some corner shading ("vignetting") is also noticeable from the difference in brightness of the crops above.
Chromatic Aberration Correction. As mentioned above, the Panasonic GF2 applies some chromatic aberration correction to its JPEGs, as uncorrected RAW files show more distinct green and magenta coloration. RAW files converted with Adobe Camera Raw or SilkyPix are also automatically corrected, so we used dcraw for the uncorrected conversion on the right.
Overall, a very good performance for a pancake kit lens here, especially since these shots were taken wide-open at f/2.5, and both corner softness & shading improves when stopped-down.
Panasonic GF2 LCD Viewfinder
Viewfinder Test Results
Accuracy
Excellent accuracy from the LCD monitor.

The Panasonic GF2's LCD monitor proved quite accurate when used as a viewfinder, showing about 101% coverage with our low-distortion Olympus 50mm f/2 reference lens. Excellent results here. We did not have access to the optional electronic viewfinder during testing, so we couldn't check its coverage.
The images above were taken from our standardized test shots. For a collection of more pictorial photos, see our Panasonic Lumix DMC-GF2 Photo Gallery .
Exposure
Panasonic GF2 Image Quality
Color
Saturation & Hue Accuracy
Good color and hue accuracy over most of the spectrum, with minor to moderate oversaturation and shifts in some colors. Some issues with orange through yellows and color balance, though.
 |
| In the diagram above, the squares show the original color, and the circles show the color that the camera captured. More saturated colors are located toward the periphery of the graph. Hue changes as you travel around the center. Thus, hue-accurate, highly saturated colors appear as lines radiating from the center. Click for a larger image. |
Saturation. The Panasonic GF2 pushes blues, reds and dark greens a fair amount, while slightly undersaturating lighter greens, some cyans and oranges. Bright yellows are undersaturated a little more. Default saturation is 110.2% (10.2% oversaturated). That's a bit higher than the GF1 (106.9%), but a fairly typical result for average saturation. Most consumer digital cameras produce color that's more highly saturated (more intense) than found in the original subjects. This is simply because most people like their color a bit brighter than life.
Skin tones. Here, the Panasonic GF2 did well, producing natural-looking lighter skin tones, though just slightly on the pinkish side. Darker skin tones had a small nudge toward orange. Where oversaturation is most problematic is on Caucasian skin tones, as it's very easy for these "memory colors" to be seen as too bright, too pink, too yellow, etc.
Hue. The Panasonic GF2 pushed cyan toward blue, red toward orange, and orange toward yellow. These shifts were especially apparent in the yellow through orange yarn of our Still Life test image. The camera's average "delta-C" color error of 7.12 is one of the highest for an SLR-class of camera in recent memory. The good news is the orange-yellow shifts are significantly mitigated by shooting in RAW format and using a good-quality third-party RAW converter, as can be seen in this Adobe Camera Raw conversion. Delta-C color error improved significantly using Adobe Camera Raw defaults, to only 4.7, a much better score than the in-camera JPEG. Hue is "what color" the color is.
My Color Modes
The Panasonic GF2 offers nine preset "My Color" modes. You can adjust color, brightness, saturation, and contrast, and then save the settings as a custom option.
| Preset "My Color" Modes | |||
 |
|||
Mouse over the links above to see the effect of the presets on our Still Life target. You can click on a link to load the full resolution image.
Saturation Adjustment
The Panasonic GF2 lets you adjust the image saturation, contrast, and sharpness in five steps each. As can be seen below, the saturation adjustment was very subtle, and worked mainly on reds. We usually argue in favor of more subtle adjustments for saturation on the cameras we test, but the Panasonic GF2 goes a bit too far in that direction; we'd like to see a wider range here (more steps), but still with the fine steps the GF2 currently offers.
| Saturation Adjustment Examples | ||
 |
 |
 |
| -2 | 0 | +2 |
The table above shows results with the default as well as the two "extreme" saturation settings. Click on any thumbnail above, then click again to see the full-sized image.
Sensor
Exposure and White Balance
Indoors, incandescent lighting
Slight yellow cast with Auto, pink with Incandescent, but good color with the Manual and 2,600 Kelvin white balance settings. Slightly higher than average positive exposure compensation required.


Indoors, under normal incandescent lighting, color balance was just slightly warm and yellow with the Auto white balance setting, though the Panasonic GF2 did much better than most digital SLRs in this regard. (While slightly warm, results with the Auto setting were quite acceptable, and many users in fact prefer a slightly warm look in situations like this, to better represent the mood of the original lighting.) Results with the Incandescent setting erred on the pink-red side. The Manual setting produced the most accurate results, though the 2,600 Kelvin setting wasn't far off the mark either, being just slightly cooler. The Panasonic GF2 required +0.7 EV exposure compensation here, which is slightly higher than the average of +0.3 EV normally required for this shot. (Our test lighting for this shot is a mixture of 60 and 100 watt household incandescent bulbs, a pretty yellow light source, but a very common one in typical home settings here in the U.S.)
Outdoors, daylight
Slightly cool colors overall, with a tendency toward high contrast under harsh lighting. Average exposure accuracy.


Outdoors, the Panasonic GF2 performed pretty well, with good though slightly cool color in the Far-field house shot, though skin-tones were fairly realistic in our Outdoor Portrait shot. Exposure accuracy was about average, as the camera required +0.7 EV compensation for our Outdoor Portrait shot to keep facial tones reasonably bright, which led to some blown highlights. The default exposure was quite good for the Far-field House shot, with very few blown highlights along edges of the white trim. Default contrast is on the high side, but that's how most consumers prefer their photos.
See full set of test images with explanations
See thumbnails of all test and gallery images
Resolution
Very high resolution, 1,800 ~ 1,900 lines of strong detail.

In camera JPEGs, our laboratory resolution chart revealed sharp, distinct line patterns down to about 1,900 lines per picture height horizontally, and about 1,800 lines in the vertical direction. Complete extinction of the pattern didn't occur until about 2,900 lines horizontally and vertically. We weren't able to extract much more resolution by processing the Panasonic GF2's RW2 files using Adobe Camera Raw 6.3, but ACR did hold definition in the target lines a bit better than the camera's own JPEG conversion did, making the target lines more distinct at higher spacial frequencies. ACR also showed a lot more color moiré than the camera JPEG.
Use these numbers to compare with other cameras of similar resolution, or use them to see just what higher resolution can mean in terms of potential detail.
See full set of test images with explanations
See thumbnails of all test and gallery images
Sharpness & Detail
Very good sharpness overall, though some minor edge-enhancement artifacts on high-contrast subjects are visible. Moderate noise suppression visible in the shadows.


Sharpness. The Panasonic GF2 captures sharp, fairly detailed images overall, though a few edge enhancement artifacts are visible on high-contrast subjects such as the branches in the crop above left. On some high-contrast subjects (like our resolution test target), the GF2's sharpening leaves more noticeable halo artifacts, but on natural subjects such as those shown above, the sharpening isn't nearly as evident. Edge enhancement creates the illusion of sharpness by enhancing colors and tones right at the edge of a rapid transition in color or tone.
Detail. The crop above right shows the effect of moderate noise suppression in the form of smudging of individual strands together in the darker areas of the model's hair, as well as in areas with low local contrast. There are also some blue-ish color blotches (particularly visible on the left edge of the crop above), that we believe may be the result of insufficient anti-aliasing filtering, and the demosaicing problems that produces. (We also saw these with previous G series cameras, but only in the very fine, reddish detail of the mannequin's hair. This is something that we've seen with a number of other cameras in the past, including several SLRs. Processing RAW files in a good RAW converter usually minimizes or eliminates the issue. ) Noise-suppression systems in digital cameras tend to flatten-out detail in areas of subtle contrast. The effects can often be seen in shots of human hair, where the individual strands are lost and an almost "watercolor" look appears.
Intelligent Resolution
The Panasonic GF2 offers three levels of "Intelligent Resolution", which essentially sharpens fine detail while leaving areas with little or no detail (such as a cloudless sky) untouched to keep visible noise to a minimum. To see how well it works, compare the crops below at each setting.

In the table above, mousing over a link at the bottom will load the corresponding crop in the area above, and clicking on the link will load the full resolution image.
As you can see, fine detail has progressively stronger sharpening applied as the setting is increased, while visible noise in the sky is not increased (in fact, noise is reduced). The increased sharpening does tend to coarsen fine detail at higher settings, though. The bark and leaves in the trees behind the house are a good illustration of this effect. Very fine detail such as the pine needles tends to be blurred a bit, probably due to the increased noise reduction.
RAW vs In-Camera JPEGs
As noted above, the Panasonic GF2 produces sharp in-camera JPEGs. As is almost always the case, though, quite a bit more detail can be obtained from carefully processing RAW files than can be seen in the in-camera JPEGs. The Panasonic GF2's JPEGs are pretty good straight from the camera, but it's surprising how much more detail is visible after processing in a good RAW converter. Take a look below, to see what we mean:


In the table above, mousing over a link at the bottom will load the corresponding crop in the area above, and clicking on the link will load the full resolution image.
SilkyPix 3.1 SE (the RAW converter Panasonic bundles with their RAW-capable cameras) is pretty sophisticated in the controls it provides for tweaking your photos. In the second crop above, we used the default "Natural" setting, but noticed fine detail in the pine needles was being smeared away, so we turned sharpening and noise reduction down all the way in SilkyPix, and used its output unsharp masking feature set to 250%, a radius of 0.3 pixels, and a threshold of 0. File output is actually a logical place to apply unsharp masking, as you'll want to use different sharpening settings for printing at different sizes, but we found it awkward not being able to preview the effect of the unsharp masking on-screen.
Adobe Camera Raw 6.3 was used for the ACR conversion version. Default settings were used, though no sharpening was applied during conversion. The image was then sharpened in Photoshop using unsharp masking at 250% with a radius of 0.3 pixel.
As you can see, the Adobe Camera Raw conversions contains more fine detail than the camera JPEG or the SilkyPix conversions. SilkyPix seems to have trouble with the pine needles, even with NR turned all the way down, so it is likely doing some NR under the hood which can't be disabled. The ACR conversion extracted the most detail, but shows quite bit more noise especially in the areas of with little detail such as sky. You can always turn up the luminance noise reduction (default of zero was used here), or process the files in your favorite noise reduction program or plugin. The results we got using SilkyPix were a bit disappointing, but we must confess we didn't experiment with different settings for very long, so you may be able to do better. Bottom line: the Panasonic DMC-GF2 rewards RAW shooters with very good detail (and better color) when used with a good RAW converter.
ISO & Noise Performance
Low noise up to ISO 400, moderate to high at higher ISOs. The effects of noise reduction can already be seen at ISO 100.
Default Noise Reduction |
||
 |
 |
 |
| ISO 100 | ISO 200 | ISO 400 |
 |
 |
 |
| ISO 800 | ISO 1,600 | ISO 3,200 |
 |
||
| ISO 6,400 | ||
| Default NR Setting | |
|
|
|
The Panasonic Lumix DMC-GF2's images are pretty clean at ISO 100, with only minor luminance and chrominance noise visible in the shadows, but there is already some smudging visible from slightly over-zealous default noise reduction. The effects of noise reduction become stronger as ISO increases, and a moderate amount of detail is already lost at ISO 400, and there is more visible chroma noise as well. The effects of noise reduction are more evident at ISO 800 where there's additional blurring, though stronger chroma noise reduction has removed most color noise including the blue botches we attribute to demosaicing errors. See the crops at right to see how the GF2 compares to its predecessor, the GF1 at ISO 800. At ISO 1,600 we see additional detail loss and stronger luminance noise, as expected. At ISO 3,200 very little fine detail is left, and some yellow and purple blotching is visible, along with sharpening artifacts around noisier pixels. Noise gets very ugly at ISO 6,400. There's no fine detail left, and the camera's noise reduction coupled with sharpening artifacts produce a very prominent peppering effect. Overall color balance has shifted toward yellow at the highest ISO, and saturation is also reduced.
| Lowest NR Setting | |
 |
|
As mentioned above, the Panasonic GF2 performs much stronger chrominance noise reduction than the GF1 at higher ISOs. While this results in fewer color blotches in shadow areas, it does come at a cost, even at the lowest noise reduction setting. Compare the crops to the right, which are both at ISO 800 at the lowest available NR setting. Mouse over the links to load the corresponding crop. Note how the crop on from the GF2 blurs the subtle tone-on-tone detail in the red-leaf fabric of our Still Life shot, while the GF1 leaves much more detail intact.
We're of course pixel-peeping to an extraordinary extent here, since 1:1 images on an LCD screen have little to do with how those same images will appear when printed. See the Print Quality section below for our evaluation of maximum print sizes at each ISO setting.
A note about focus for this shot: We shoot this image at f/4, usually using one of three very sharp reference lenses (70mm Sigma f/2.8 macro for most cameras, 60mm f/2.8 Nikkor macro for Nikon bodies without a drive motor, and Olympus Zuiko 50mm f/2.0 for Four Thirds and Micro Four Thirds bodies). To insure that the hair detail we use for making critical judgements about camera noise processing and detail rendering is in sharp focus at the relatively wide aperture we're shooting at, the focus target at the center of the scene is on a movable stand. This lets us compensate for front- or back-focus by different camera bodies, even those that lack micro-focus adjustments. This does mean, though, that the focus target itself may appear soft or slightly out of focus for bodies that front- or back-focused with the reference lens. We know this; if you click to view the full-size image for one of these shots and notice that the focus target is fuzzy, you don't need to email and tell us. :-) The focus target position will have been adjusted to insure that the rest of the scene is focused properly.
Extremes: Sunlit and low light tests
High resolution with good overall detail, but somewhat high default contrast and limited dynamic range. Very good low-light performance.


Sunlight. The Panasonic Lumix DMC-GF2 struggled a bit with the deliberately harsh lighting of this test, as contrast was a little high at its default setting, and the dynamic range somewhat limited. Although skin tones in the face are a bit dark at +0.7 EV with the default contrast, we preferred it to +1.0 EV exposure overall, because there were fewer clipped highlights. It's really the photographer's choice here as to which direction to go in. For those Panasonic GF2 owners that are going to want to just print an image with little or no tweaking, the +1.0 image would probably produce a better-looking print uncorrected. The bottom line though, is that the Panasonic GF2 had difficulty with the wide dynamic range of this shot, at least with its default settings.
Because digital cameras are more like slide film than negative film (in that they tend to have a more limited tonal range), we test them in the harshest situations to see how they handle scenes with bright highlights and dark shadows, as well as what kind of sensitivity they have in low light. The shot above is designed to mimic the very harsh, contrasty effect of direct noonday sunlight, a very tough challenge for most digital cameras. (You can read details of this test here.)
Contrast Adjustment
As mentioned previously, the camera's limited contrast adjustment was at least some help in handling the harsh lighting.
Minimum Contrast |
|
 |
 |
| Contrast set to lowest, +0.7 EV |
Contrast set to lowest, Auto Exposure |
The Panasonic Lumix DMC-GF2's lowest contrast setting did a good job bringing out detail in the shadows and darker midtones, but it did little did little to preserve clipped highlight detail. Overall, the camera's limited dynamic range makes it perform a bit below average in this situation.
| Contrast Adjustment Examples | ||
|
 |
 |
| -2 | 0 | +2 |
The table above shows results with the default as well as the two "extreme" contrast settings. Click on any thumbnail above, then click again to see the full-sized image. The control for contrast was not quite as subtle as saturation was in its effect, though it appeared to leave the strongest highlights at about the same values, then applied a proportional boost to tones as it moved down the tone curve. To make the most of it in a shot like this, you'll want to expose for the highlights and apply a good amount of contrast reduction (probably the maximum).
The Panasonic GF2's contrast adjustment doesn't help with strong highlights here, and we'd really like to see more steps, covering a slightly greater range. Even with the lowest contrast setting, the dynamic range isn't terribly impressive. Lowering the contrast helps the visual appearance of images such as these, but doesn't result in any significant extension of the tonal scale.
|
Outdoor Portrait Intelligent Dynamic Range
|
|
 |
iDynamic Setting: Off (Default) Low Standard High |
 |
|
Panasonic's Intelligent Dynamic Range
The above shots are examples of Panasonic's Intelligent Dynamic Range (or iDynamic) at work, with no exposure compensation. iDynamic appears to be a more advanced version of iExposure, capable of reducing both blocked shadows and clipped highlights, and is currently only found on the GF2 and GH2 system cameras thus far. iExposure, which worked by raising sensitivity in dark areas to bring out more detail is no longer offered.
There are three levels of iDynamic available on the Panasonic GF2: Low, Standard and High, plus Off. It's automatically invoked in iAuto mode and manually selectable in PASM mods. For our Outdoor Portrait shot, all three settings were an improvement over the Off setting, pulling detail out of the shadows and delivering a better exposure overall, while doing a very good job at holding on to highlight detail. Pretty good results here.
| Face Detection | ||
 |
 |
 |
| Off at 0 EV | On at 0 EV | iAuto Mode at 0 EV |
Face Detection
Like most Point & Shoot cameras these days (and most DSLRs in Live View mode), the Panasonic Lumix DMC-GF2 has the ability to detect faces, and adjust exposure and focus accordingly. The GF2 does it automatically in Intelligent Auto (iAuto) mode, when a Portrait scene mode is selected, or when Face Detection AF mode is selected. As you can see from the examples above, it worked fairly well, as the images with face detection enabled are better exposed for the face. iAuto also adjusted the tone curve, which helped retain highlights and bring out shadows under this very difficult lighting.
| 1 fc 11 lux |
1/2 fc 5.5 lux |
1/4 fc 2.7 lux |
1/8 fc 1.3 lux |
1/16 fc 0.67 lux |
1/16fc No NR |
|
|---|---|---|---|---|---|---|
| ISO 100 |
 1.6 sec f2.8 |
 3.2 sec f2.8 |
 6 sec f2.8 |
 13 sec f2.8 |
 25 sec f2.8 |
 25 sec f2.8 |
| ISO 200 |
 0.8 sec f2.8 |
 1.6 sec f2.8 |
 3.2 sec f2.8 |
 6 sec f2.8 |
 13 sec f2.8 |
 13 sec f2.8 |
| ISO 400 |
 0.4 sec f2.8 |
 0.8 sec f2.8 |
 1.6 sec f2.8 |
 3.2 sec f2.8 |
 6 sec f2.8 |
 6 sec f2.8 |
| ISO 800 |
 1/5 sec f2.8 |
 0.4 sec f2.8 |
 0.8 sec f2.8 |
 1.6 sec f2.8 |
 3.2 sec f2.8 |
 3.2 sec f2.8 |
| ISO 1600 |
 1/10 sec f2.8 |
 1/5 sec f2.8 |
 0.4 sec f2.8 |
 0.8 sec f2.8 |
 1.6 sec f2.8 |
 1.6 sec f2.8 |
| ISO 3200 |
 1/20 sec f2.8 |
 1/10 sec f2.8 |
 1/5 sec f2.8 |
 0.4 sec f2.8 |
 0.8 sec f2.8 |
 0.8 sec f2.8 |
| ISO 6400 |
 1/40 sec f2.8 |
 1/20 sec f2.8 |
 1/10 sec f2.8 |
 1/5 sec f2.8 |
 0.4 sec f2.8 |
 0.4 sec f2.8 |
Low Light. The Panasonic Lumix DMC-GF2 performed well in our low light test, capturing bright images down to the lowest light level we test at, at all ISO settings. This darkest level equates to about 1/16 the brightness of average city street lighting at night, so the Panasonic GF2 should be able to take well-exposed photos in almost any environment in which you can see well enough to walk around in. Automatic color balance was pretty good (just slightly cool), something that's not a given at such low light levels. Using the default noise reduction setting, noise was low to moderate up to ISO 800. At ISOs 1,600 and above, noise was a little high compared to most digital SLRs these days. We did not detect any issues with banding or hot pixels.
The camera's autofocus system was able to focus on the subject down to just a shade above the 1/8 foot-candle light level unassisted, which is pretty good for contrast-detect autofocus, but not as good as some SLRs. The Panasonic Lumix DMC-GF2 does have a focus-assist light option which allows it to autofocus in total darkness, as long as the subject is within range and has sufficient contrast.
How bright is this? The one foot-candle light level that this test begins at roughly corresponds to the brightness of typical city street-lighting at night. Cameras performing well at that level should be able to snap good-looking photos of street-lit scenes.
NOTE: This low light test is conducted with a stationary subject, and the camera mounted on a sturdy tripod. Most digital cameras will fail miserably when faced with a moving subject in dim lighting. (For example, a child's ballet recital or a holiday pageant in a gymnasium.) Thanks to their phase-detect AF systems, digital SLRs tend to do much better than point & shoots, but you still shouldn't expect a quick autofocus lock with moving subjects. The GF2 uses contrast-detect autofocus, as is found in most point & shoot cameras, so its low-light focusing ability is less than that of some SLRs with phase-detect systems. That said, though, the larger, more sensitive pixels of the GF2's sensor do better under dim lighting than do the tiny pixels of most point & shoots, (A useful trick is to just prop the camera on a convenient surface, and use its self-timer to release the shutter. This avoids any jiggling from your finger pressing the shutter button, and can work quite well when you don't have a tripod handy.)
Output Quality
Print Quality
Great 16x20-inch prints at ISO 100, good 13x19-inch prints at ISO 800, and even ISO 6,400 makes a decent 4x6.
 ISO 100 shots are a little soft at 20x30 inches, which is not a surprise for a 12-megapixel camera. Prints look much better at 16x20 inches, with good detail and color.
ISO 200 images look almost the same at 16x20 inches.
ISO 400 images have about the same level of detail as ISO 200, but colors and shadows are a little darker.
ISO 800 images are softer at 16x20, thanks to a noticeable jump in noise and noise suppression efforts. Reducing image size to 13x19 brings quality back up sufficiently for a good print.
ISO 1,600 files are where quality drops off more dramatically, with lower saturation, darker shadows, and considerably softer detail, especially in reds. 13x19-inch prints are not acceptable, but 11x14-inch prints bring detail back in terms of sharpness, while reds still suffer a lack of detail.
ISO 3,200 shots are a bit rough at 11x14 inches, with mottled shadows, and darker reds. Printing at 8x10 brings back detail, but those reds are still troublesome and darker than we're used to seeing (blur is not uncommon, but a darkening of the red is unusual).
ISO 6,400 images are usable at 5x7, but really look better at 4x6. Reds are still darker, but we think that prints from low-light photos at these sizes will look just fine.
Overall, the Panasonic GF2 performs admirably. Its image quality tracks pretty similarly to the GF1, producing a good 13x19-inch print at ISO 800, but does a little better at 3,200 and 6,400 (the GF1 did not offer ISO 6,400).
Testing hundreds of digital cameras, we've found that you can only tell just so much about a camera's image quality by viewing its images on-screen. Ultimately, there's no substitute for printing a lot of images and examining them closely. For this reason, we now routinely print sample images from the cameras we test on our Canon Pro9000 Mark II studio printer, and on the Canon Pixma MP610 here in the office. (See the Canon Pixma Pro9000 Mark II review for details on that model.)
The images above were taken from our standardized test shots. For a collection of more pictorial photos, see our Panasonic Lumix DMC-GF2 Photo Gallery .
Not sure which camera to buy? Let your eyes be the ultimate judge! Visit our Comparometer(tm) to compare images from the Panasonic Lumix DMC-GF2 with those from other cameras you may be considering. The proof is in the pictures, so let your own eyes decide which you like best!
Performance
Panasonic Lumx DMC-GF2 Performance
Timing and Performance
The Panasonic GF2's performance is a bit slower than most SLRs, but generally good for a compact system camera. Burst mode is below average, though.
Startup/Shutdown |
||
Power on |
~1.0 second |
Time it takes to turn on and capture a shot.
|
Shutdown |
~3.0 seconds |
How long it takes camera to turn off before you can remove the memory card.
|
Buffer clearing time |
2 seconds after 50 L/F JPEGs* |
Worst case buffer clearing time. -- This is the delay after a set of shots before you can remove the card.
|
9 seconds after 7 RAW files* |
||
11 seconds after 4 RAW+ L/F JPEG files* |
||
*Note: Buffer clearing times measured with a SanDisk Extreme III 30MB/sec 8GB SDHC card. Slower cards will produce correspondingly slower clearing times. Slow cards may also limit length of bursts in continuous mode. ISO sensitivity and noise reduction settings can also affect cycle times and burst mode performance. |
||
Startup and shut-down times were slower than those for most SLRs, but fairly typical for a compact system camera. Startup was a bit faster than the GF1 (1 second vs 1.4), but shutdown was slower (3 seconds vs 2). Dust reduction is automatically performed at startup and can't be disabled, but can also be run manually. Buffer clearing times depend on the speed of the SD card, as well as image size and quality. Buffer clearing was pretty fast for its class, and a bit faster than the GF1.
| Mode Switching | ||
|---|---|---|
Play to Record, |
~0.7 second |
Time until first shot is captured.
|
Record to play |
~1.9 seconds |
Time to display a large/fine file immediately after capture.
|
Display |
~0.2 second |
Time to display a large/fine file already on the memory card.
|
Mode switching was reasonably fast and faster than the GF1, except for Record to Play which was about average and a bit slower than the GF1's 1.4 seconds.
| Shutter Response (Lag Time) | ||
|---|---|---|
Full Autofocus, Single-area Center AF mode |
0.337 second |
Time from fully pressing shutter button to image capture, with the lens already at the proper focal distance setting. (All timing performed with 14mm kit lens.) |
Full Autofocus, 23-point AF mode |
0.348 second |
Time from fully pressing shutter button to image capture, with the lens already at the proper focal distance setting. |
|
Full Autofocus,
Single-area AF mode, Wide Angle, Flash enabled |
0.685 second
|
Time from fully pressing shutter button to image capture, with the lens already at the proper focal distance setting, auto flash enabled.
|
Prefocused |
0.074 second |
Time to capture, after half-pressing and holding shutter button.
|
Continuous AF |
0.384 second |
This mode usually shows no speed increase with our static subject; we have no way to measure performance with moving subjects. |
Manual Focus |
0.089 second |
For most cameras, shutter lag is less in manual focus than autofocus, but usually not as fast as when the camera is "prefocused". |
The Panasonic GF2 showed full-autofocus shutter lag in single-area AF mode (center AF position) of 0.337 second with the 14mm kit lens. That's a bit slower than most SLRs, but pretty fast for a compact system camera, and faster than the GF1's 0.409 second result. In 23-point AF mode, this time increased just slightly to 0.348 second, also faster than the GF1's 0.473 second.
Full autofocus shutter lag increased to 0.685 second with the flash enabled, which includes an additional delay for the preflash metering. This too was faster than the GF1's 0.887 second. Continuous AF mode resulted in a shutter lag of 0.384 second (the GF1's 20mm f/1.7 lens did not support continuous AF). When manually focused, the Panasonic GF2's lag time dropped to only 0.089 second, which is competitive with consumer SLRs and a bit faster than the GF1's 0.104 second lag. The GF2's prefocused lag time of 0.074 second was fast enough that you shouldn't miss any photo opportunities if prefocused, though it was a touch slower than the GF1's 0.072 second.
To minimize the effect of different lens' focusing speed, we test AF-active shutter lag with the lens already set to the correct focal distance. We also use the same Sigma 70mm f/2.8 macro with every camera (on all platforms except Four Thirds/Micro Four Thirds, Samsung NX, and Nikon consumer models lacking an in-body focus motor), to further reduce variation, and because our tests showed that focus-determination time with this lens was close to the fastest, across multiple camera bodies from different manufacturers. Being an older design with a non-ultrasonic motor, it wouldn't be the fastest at slewing from one focus setting to another, but that's exactly the reason we measure focus determination speed, which is primarily a function of the camera body, vs focus adjustment speed, which is primarily a function of the lens.
| Cycle Time (shot to shot) | ||
|---|---|---|
Single Shot mode |
0.72 second |
Time per shot, averaged over 21 shots, 1 second to clear*. |
Single Shot mode |
0.71 second |
Time per shot, averaged over 7 shots, 9 seconds to clear*.
|
Single Shot mode |
0.73 second |
Time per shot, averaged over 4 shots, 11 seconds to clear*.
|
Early shutter |
No |
Some cameras don't snap another
shot if you release and press the shutter too quickly in Single Shot
mode, making "No" the preferred answer.
|
Continuous High |
0.38 second (2.60 frames per second); 50 frames; 2 seconds to clear* |
Time per shot, averaged over buffer length of 50 frames, with no signs of slowing.
|
Continuous High |
0.38 second (2.62 frames per second); 6 frames total; 9 seconds to clear* |
Time per shot, averaged over buffer length of 6 frames, then slows to an average of about 1.58s or 0.63 fps.
|
Continuous High |
0.38 second (2.61 frames per second); 4 frames total; 9 seconds to clear* |
Time per shot, averaged over buffer length of 4 frames, then slows to an average of 2.68s or 0.37 fps.
|
Flash Recycling |
5.6 seconds |
Flash at maximum output.
|
*Note: Buffer clearing times measured with a SanDisk Extreme III 30 MB/sec 8GB SDHC card. Slower cards will produce correspondingly slower clearing times. Slow cards may also limit length of bursts in continuous mode. ISO sensitivity and noise reduction settings can also affect cycle times and burst mode performance. |
||
Single-shot cycle times were slower than most SLRs, and slightly slower than the Panasonic GF1, at about 0.72 vs 0.70 second for Large/Fine JPEGs, 0.71 vs 0.69 second for RAW, and 0.73 vs 0.69 second for RAW + Large/Fine JPEG.
Continuous High mode was slower than average compared to SLRs, in the 2.6 frames per second range for Large/Fine JPEGs, RAW files, as well as RAW + Large/Fine JPEGs. This was also slower than the GF2's 3.0 frames/second specification, but not unusual for a Panasonic camera which we've found to be very sensitive to camera settings such as ISO sensitivity when it comes to maximum burst speed. (We shoot our continuous mode test at ISO 200 for a fast enough shutter speeds to read our electronic timer values.) The GF1 managed slightly faster burst rates than the GF2, at 2.93, 2.82 and 2.70 fps respectively.
Buffer size was very good for Large/Fine JPEGs in Continuous High mode, as the camera processed 50 frames with no signs of slowing, which is much better than the 13 frames we got with the GF1. Buffer size dropped to only 6 frames when shooting RAW, and 4 frames for RAW + L/F JPEGs, which while very limited, is typical for a consumer model and the same results as the GF1. Note that our test target for this was designed to be difficult to compress, so your results may be better with more typical subjects. Flash recycle after a full power discharge was slower than average, at 5.6 seconds, about the same as the GF1's 5.8 seconds.
| Download Speed | ||
|---|---|---|
Windows Computer, USB 2.0 |
8,315 KBytes/sec |
Typical Values:
Less than 600=USB 1.1; 600-769=USB 2.0 Low; Above 770=USB 2.0 High |
Download speeds were fast, quick enough that you probably won't feel the need for a separate card reader, even with large memory cards. (Note that this test was performed with a SanDisk Extreme III 30 MB/sec SD card: Slower cards would likely show slower transfer times.)
Bottom line, the Panasonic GF2 is a fairly responsive camera, well-suited to handling typical family shots, though not a good choice for really fast action mainly because of its mediocre burst speed. Autofocus speeds were noticeably improved over the GF1.
Battery and Storage Capacity
Battery
Fair battery life, but below average compared to an SLR using an optical viewfinder.
| Operating Mode |
Battery Life | |
|---|---|---|
|
Lens
|
14mm
f/2.5 |
14-42mm
f/3.5-5.6 OIS |
|
Still Capture,
(CIPA standard - LCD) |
320 shots
|
300 shots
|
|
Still Capture,
(CIPA standard - Optional EVF) |
330 shots
|
310 shots
|
|
Playback Time
Using LCD |
160 minutes
|
150 minutes
|
The Panasonic GF2 uses a custom rechargeable lithium-ion battery pack for power, and comes with both a single battery and charger. The rated 320 shots per charge with the 14mm lens is below the capacity of typical SLRs, a consequence of the power drain for the electronic display. (When using the optical viewfinder on an SLR, there's very little power consumption except when the shutter fires or when you're in playback mode. The CIPA numbers for the Panasonic GF2 are in line with compact SLRs operating in Live View mode.) We do recommend getting a second battery for your GF2 if you plan any extended outings.
The table above shows the number of shots the camera is capable of (on a fully-charged rechargeable battery), based on CIPA battery-life and/or manufacturer standard test conditions.
(Interested readers can find an English translation of the CIPA DC-002 standards document here. (180K PDF document))
Storage
The Panasonic GF2 accepts SD/SDHC/SDXC memory cards, and does not ship with a card. Panasonic recommends a Class 4 or faster card for recording movies in AVCHD format, Class 6 or faster for recording Motion JPEG movies.
| Image Capacity with 1GB Memory Card |
Fine | Normal | RAW | RAW + Fine JPEG |
|
|---|---|---|---|---|---|
4,000 x 3,000 |
Images (Avg Size) |
140 7.3 MB |
280 3.7 MB |
67 15.2 MB |
45 22.8 MB |
Approx. Comp. |
5:1 |
10:1 |
1.2:1 |
- |
|
2,816 x 2,112 |
Images (Avg Size) |
250 4.1 MB |
510 2.0 MB |
- |
- |
Approx. Comp. |
4:1 |
9:1 |
- |
- |
|
2,048 x 1,536 |
Images (Avg Size) |
400 2.6 MB |
800 1.3 MB |
- |
- |
Approx. Comp. |
4:1 |
7:1 |
- |
- |
|
We strongly recommend buying a large capacity SD/SDHC/SDXC memory card at least a 2GB card, preferably a 4 or 8GB one, to give yourself extra space for extended outings, or when shooting RAW or video files. (Check the shopping link above, cards are really cheap these days, so no reason to skimp.)
Flash
Panasonic GF2 Flash

The Panasonic GF2's built-in flash has a Guide Number (GN) rating of 20 feet (6 meters) at ISO 100, the same as the GF1's. That's a lot weaker than most digital SLRs, which are typically rated at 12 or 13 meters, but still better than no flash when you don't have an external flash with you. The GF2's closest rival, the Olympus E-PL1, has a slightly more powerful flash with a GN of 23 feet (7 meters) at ISO 100.
The Panasonic GF2's flash is released manually by pushing the Flash Open button on the camera's rear panel. Raising the flash enables it, though it can be defeated using a menu selection. It never pops up automatically like some models, which can be good or bad, depending on your point of view. A novice would probably appreciate an auto-pop-up flash, but someone with experience might think it a nuisance.
When open, the flash doesn't extend very high, so at wide angle longer Micro Four Thirds lenses could cast a shadow when the lens hood is attached.The Panasonic GF2's flash is disabled by pressing down until it clicks shut.
The Panasonic GF2's built-in flash has seven modes: Auto, Auto with Red-Eye Reduction, Forced On, Forced On with Red-Eye Reduction, Slow Sync, Slow Sync with Red-Eye Reduction, and Forced Off. Flash modes are changed via the Record menu, and available settings vary depending on exposure mode. A Digital Red-Eye Reduction feature is offered, which when enabled, will attempt to remove red-eye after the photo is taken, via post-processing. A second curtain synchronization mode is not offered. X-Sync (the maximum shutter speed with the flash enabled) is 1/160 second, a bit below average these days, and there is no mention of a higher-speed FP (focal plane) mode. There's also no wireless flash support in the Panasonic GF2.
The Panasonic GF2 does not allow you to adjust flash and ambient exposure independently of each other when using the built-in flash, as there is no separate flash exposure compensation. Flash exposure bracketing is not supported, and there is no manual flash mode where output level can be set as a percentage of full power.

Like an SLR, the DMC-GF2 also has a dedicated hot shoe for mounting external flash units, like Panasonic's DMW-FL500, FL360, and FL220. Olympus flash units such as the FL-50, FL-36, FL-20, and FL-14 should also work, and non-dedicated units can also be used provided they have a compatible trigger voltage and polarity. (Panasonic does not seem to mention the trigger voltage or polarity in the GF2's user manual, though.)
The advantages of a good external flash are many: more power for increased range, faster recycle times, longer battery life, reduced red-eye, auto zoom to match coverage to the current focal length, and the ability to adjust the tilt and swivel of the head to allow light from the flash to be bounced off nearby surfaces such as a ceiling, for a diffuse effect. Most external flash units have a more powerful AF assist illuminator built-in than the one on the body, and other useful features such as modeling flash are common on higher end models.
Flash Test Results
Coverage and Range
Modest flash power with uneven coverage using the 14mm kit lens. Higher than average positive exposure compensation required.


Coverage. Flash coverage is rather uneven and dark at 14mm, leaving the corners of our flash target image quite dark and even center values very dim.
Exposure. Indoors under incandescent background lighting, the Panasonic Lumix DMC-GF2's flash performed modestly, as the higher than average positive exposure compensation of +1.0 EV still resulted in dim results overall. The camera's slow-sync flash mode required no compensation, though the longer shutter time results in a much warmer cast from the ambient background lighting.
| Flash Range 14mm | |||||
|---|---|---|---|---|---|
| 6 ft | 7 ft | 8 ft | 9 ft | 10 ft | 11 ft |
 1/60 sec f2.5 ISO 100 |
 1/60 sec f2.5 ISO 100 |
 1/60 sec f2.5 ISO 100 |
 1/60 sec f2.5 ISO 100 |
 1/60 sec f2.5 ISO 100 |
 1/60 sec f2.5 ISO 100 |
| 12 ft | 13 ft | 14 ft | 15 ft | 16 ft | |
 1/60 sec f2.5 ISO 100 |
 1/60 sec f2.5 ISO 100 |
 1/60 sec f2.5 ISO 100 |
 1/60 sec f2.5 ISO 100 |
 1/60 sec f2.5 ISO 100 |
|
ISO 100 Range. Flash exposure started out bright at 6 feet (at least in the center), then increased in brightness, peaking at about 9-10 feet. Exposure didn't start falling off appreciably until about 12 feet, where it decreased gradually as distance increased.
| Manufacturer-Specified Flash Range |
|---|
| 14mm |
 7.9 feet ISO 100 |
Manufacturer-Specified Flash Range Test. Panasonic rates the GF2's flash with a Guide Number (GN) of 6 meters at ISO 100. That works out to about 7.9 feet at an aperture of f/2.5, the maximum aperture of the 14mm kit lens. In the shot above, the Panasonic GF2 produced a good exposure with the 14mm kit lens. The flash target was actually slightly overexposed by about 1/4 f-stop, indicating the flash's GN rating is fairly accurate. Our standard test method for flash range uses a fixed setting of ISO 100, to provide a fair basis of comparison between cameras. We've now also begun shooting two shots using the manufacturer-specified camera settings, at the range the company claims for the camera, to assess the validity of the specific claims.
Press Release
PANASONIC INTRODUCES COMPANY’S SMALLEST AND LIGHTEST
DIGITAL INTERCHANGEABLE LENS SYSTEM CAMERA WITH FLASH
New Panasonic LUMIX GF2 Features Touch-Screen Operation, Full HD Video Recording
Capability and Compatible with Panasonic’s Interchangeable 3D Lens
SECAUCUS, NJ (November 4, 2010) – Panasonic today announced the LUMIX DMC-GF2, the latest of the company’s DSL Micro (DSLM) compact mirrorless cameras, which is Panasonic’s smallest and lightest interchangeable lens system camera – complete with a built-in flash. The LUMIX GF2 is compatible with lenses from the Micro Four Thirds standard, meaning the system is small and compact, while not compromising ease of operation or image quality. Even more, the LUMIX GF2 is compatible with Panasonic’s new 3D interchangeable lens, the LUMIX G 12.5mm / F12, so users can take 3D photos.
“The LUMIX GF2 is key in the Panasonic DSL Micro line-up, as it’s the smallest and lightest model we offer, while still offering superb image quality, which our consumers have come to expect from LUMIX. Compared to the GF1, its predecessor, the GF2 has been reduced approximately 19% in size and approximately 7% in weight yet is still retains its signature built-in flash,” said Darin Pepple, Senior Product Manager, Imaging, Panasonic Consumer Electronics Company. “We expect the LUMIX GF2 to be an attractive model for consumers who want to step up to a more powerful camera that is easy to use, and a camera that is ‘future-proof’ with its 3D capabilities.”
The LUMIX GF2 is extremely easy to operate for consumers at any level, thanks to a newly- designed user interface, which allows for the focus to be set, or shutter released, by simply touching the large 3-inch touch-screen LCD. The touch-screen LCD with a 460,000-dot-resolution makes taking great photos intuitive. Once a user locks on a subject by touch, the LUMIX GF2 tracks the subject with the AF tracking function, even if the subject moves – making it easy to take photos of moving subjects, like children playing. The contrast AF system adopted by the LUMIX DMC-GF2 is not only accurate and easy to use, but also very fast. Users can choose from a wide range of AF (Auto Focus) modes, including multiple-area AF with up to 23 focus areas, 1-area AF with a selectable focus area, Face Detection, and AF Tracking.
The touch operation also dramatically shortens the time spent navigating the menus. With the LUMIX GF2’s newly-designed Touch Q-menu, the user can customize the camera’s shortcuts with the most commonly used settings. Together with the simple button components, including dedicated buttons for video recording and iA (Intelligent Auto) mode which lights in-use, users can operate the camera intuitively with ease.
With the Intelligent Scene Selector in the iA mode, the camera automatically switches to the appropriate mode according to the subject touched. For example, a touch on a human face switches to the portrait mode and a touch on the background or scenery switches to the scenery mode, while a touch on the subject close to the camera switches to the close-up mode. With the MF assist mode for manual focusing, users can enlarge the subject by just a touch to select 1x, 5x or 10x and smoothly move the subject by dragging it on the screen. In iA mode and the Peripheral Defocus mode, the range of defocus can be adjusted by just moving the slider with a finger, something not possible with larger more complicated DSLR cameras that don’t feature touch control.
While achieving breakthroughs in compactness of design and outstanding photo and video quality, the Panasonic LUMIX GF2 can contribute its professional-level imaging performance to well-balanced engine and sensor technologies. For the image processor, the Venus Engine FHD is incorporated, featuring exceptionally high performance signal processing capabilities in both photo and movie recording. With the advanced noise reduction system employing the 3D NR and CNR (Chromatic Noise Reduction), users can capture clear, naturally-balanced images even when shooting at high ISO sensitivity levels to help prevent the color bleeding.
Panasonic’s Venus Engine FHD enables Intelligent Resolution technology, which means that three areas – outlines, detailed texture areas and soft gradation – are automatically detected. Then, the outline parts are enhanced effectively to give edges more clearness while giving a moderate accentuation to the texture areas to look more finely detailed. To the soft gradation part, noise reduction system is applied to make it smoother. Apart from the uniform enhancement of sharpness, the innovative technology Intelligent Resolution precisely performs signal processing pixel by pixel, resulting in images that are naturally clear and crisp in both video and photos. The 12.1-megapixel Live MOS sensor featured in the LUMIX GF2 offers the best of both worlds – the superb image quality of a CCD sensor, plus the lower power consumption of a CMOS sensor.
All of Panasonic’s LUMIX G-Series DSLM cameras are equipped with the highly-efficient Dust Reduction System. If dust gets inside the camera when the user changes lenses, it could cling to the image sensor and show up as a spot in photos. The Dust Reduction System helps to reduce this risk by placing a supersonic wave filter in front of the Live MOS sensor. Vibrating vertically around 50,000 times per second, the filter repels dust and other particles.
The LUMIX GF2 shoots professional-quality full High Definition (HD) videos as well as handling still photography. The LUMIX GF2 can record 1920 x 1080 videos at 60i or smooth HD 1280 x 720 movies at 60p in AVCHD. For those looking for better compatibility with computers, the LUMIX GF2 can also record HD Motion JPEG in 1280 x 720 and QVGA, VGA and WVGA. A dedicated video record button makes it easy to start shooting videos, and high quality sound is recorded with the stereo microphone for Dolby® Digital Stereo Creator. Panasonic’s iA mode extends to video recording, with the following features: Optical Image Stabilizer, Face Detection, Intelligent D-range Control and Intelligent Scene Selector.
The Panasonic LUMIX GF2 is artistic not only in form, but also in function, as it provides an array of features that lets users capture true-to-life images while also creating their own expressive, beautiful images. The LUMIX GF2 features My Color mode which is integrated with the conventional Film mode. My Color mode offers a total of eight preset effects — Expressive, Retro, Pure, Elegant, Cinema, Monochrome, Dynamic Art, Silhouette, plus Custom mode, which lets users manually set the color, brightness, saturation and contrast levels. Also, with the Full-time Live View function, users can see how these settings will affect the images before they shoot, which makes it easier to capture the exact effect desired. The LUMIX GF2 has 17 Scene modes, most which can be used during video shooting, too. The exposure meter can be displayed in the P/A/S/M shooting modes for entry-level users to visually learn the correlation between shutter speed and aperture to enhance their photography skills.
The Panasonic LUMIX DMC-GF2, with a quality and solid aluminum body, will be available in black, silver, white, and red models with the following kit options: DMC-GF2C – 14mm F2.5 Lens Kit and DMC-GF2K – 14-42mm Zoom Lens Kit. The LUMIX GF2 will be available in January 2011 and pricing will be announced approximately 30 days prior to shipment.
Four Thirds and Micro Four Thirds and Four Thirds and Micro Four Thirds Logo marks are trademarks or registered trademarks of Olympus Imaging Corporation, in Japan, the United States, the European Union and other countries.
*The "AVCHD" is a high definition (HD) digital video recording / playback format jointly established by Panasonic Corporation and Sony Corporation.
Dolby and the double-D symbol are trademarks of Dolby Laboratories.
HDMI, the HDMI logo and High-Definition Multimedia Interface are trademarks or registered trademarks of HDMI Licensing LLC.
All other company and product names are trademarks of their respective corporations.
This unit is compatible with both SD/SDHC/SDXC Memory Cards. You can only use SDHC Memory Cards on devices that are compatible with them. You cannot use SDHC Memory Cards on devices that are only compatible with SD Memory Cards. (When using an SDHC Memory Card on another device, be sure to read the operating instructions for that device.)
The use of recorded or printed materials that are protected by copyright for any purpose other than personal enjoyment is prohibited, as it would infringe upon the rights of the copyright holder.
Design and specifications are subject to change without notice.
About Panasonic Consumer Electronics Company
Based in Secaucus, N.J., Panasonic Consumer Electronics Company (PCEC), is a Division of Panasonic Corporation of North America, the principal North American subsidiary of Panasonic Corporation (NYSE: PC) and the hub of Panasonic's U.S. marketing, sales, service and R&D operations. Panasonic is pledged to practice prudent, sustainable use of the earth's natural resources and protect our environment through the company’s Eco Ideas programs. Company information for journalists is available at www.panasonic.com/pressroom.
# # #