Nikon CoolPix 4500Nikon updates the hugely successful Coolpix 995, adding a full 4.0-megapixel CCD!<<Operation & User Interface :(Previous) | (Next): Image Storage & Interface>> Page 9:Camera Modes & MenusReview First Posted: 5/29/2002 |
Camera Modes and Menus
Record Mode: Automatically enabled when the camera is powered on, this mode offers several exposure modes (Program, Flexible Program, Aperture Priority, Shutter Priority, Manual, Auto, and Scene). The various exposure modes are selected by holding down the Mode button and turning the Command Dial. Program puts the camera in charge of aperture and shutter speed, while the user can control things like white balance, motor drive, etc. Flexible Program allows the user to select from a range of equivalent exposure settings. Aperture and Shutter Priority put the user in charge of either the aperture or shutter speed while the camera controls the other value. Manual lets the user control both aperture and shutter speed, independent of the camera's exposure system, while Auto places the camera in control of all aspects of the exposure, except for image size/quality and flash mode. Finally, Scene mode actually consists of 16 different sub-options, each of which optimizes the camera settings for a particular shooting condition. (Portrait, Sunset, Party, Fireworks, etc) Pressing the Menu button in this mode pulls up the following settings menu screens, though some options may not be available in all exposure modes. (In particular, only image size and quality options are available in Auto or Scene modes):
 White
Balance: Displays a sub-menu with seven white balance options: Auto, White
Balance Preset, Daylight, Incandescent, Fluorescent, Cloudy, and Speedlight
(flash balanced).
White
Balance: Displays a sub-menu with seven white balance options: Auto, White
Balance Preset, Daylight, Incandescent, Fluorescent, Cloudy, and Speedlight
(flash balanced).
- Metering: Offers 256 Segment Matrix, Center-Weighted, Spot, and Spot
AF Area metering options.
- Continuous: Offers five "motor-drive" options: Single exposure,
Continuous Shooting, Multi-Shot 16, Ultra-High Speed, and Movie.
- BSS: Turns the Best Shot Selector function on or off.
- Image Adjustment: Basically a contrast adjustment control, with options
of Auto, Normal, More Contrast, and Less Contrast.
- Saturation Control: Controls the amount of color saturation (total
of 5 levels), and includes a black and white monotone mode.
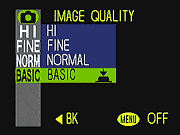 Image
Quality: Offers Hi (TIFF), Fine, Normal, and Basic file quality settings.
Image
Quality: Offers Hi (TIFF), Fine, Normal, and Basic file quality settings.
- Image Size: Sets the image resolution to 2,272 x 1,704; 1,600 x 1,200;
1,280 x 960; 1,024 x 768; 640 x 480; or 2,272 x 1,520 (3:2 aspect).
- User Setting: Lets you save up to three different sets of user settings
to be recalled at any given time (useful for quickly switching between groups
of settings for different shooting scenarios).
- Image Sharpening: Adjusts the in-camera sharpening to Auto, High,
Normal, Low, or Off.
- Lens: Lets you select between Normal (built-in lens), Wide Adapter,
Telephoto 1 (a 2x adapter), Telephoto 2 (a 3x adapter), Fisheye 1, Fisheye
2, and Slide Copy Adapter options to accommodate the specified accessory lens.
The different options adjust various exposure and zoom setting options to
best accommodate the chosen lens.
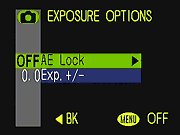 Exposure
Options: Controls the AE Lock function, as well as the exposure compensation
setting. (While exposure compensation can be set from this menu entry, you
would more commonly do so via the top-panel +/- button and function wheel.)
Exposure
Options: Controls the AE Lock function, as well as the exposure compensation
setting. (While exposure compensation can be set from this menu entry, you
would more commonly do so via the top-panel +/- button and function wheel.)
- Focus Options: Selects between AF Area Modes (Auto, Manual, or off),
Autofocus Modes (Continuous or Single AF), and Focus Confirmation (MF, On,
Off).
- Zoom Options: Activates digital telephoto, or designates the lens
startup position (wide, telephoto, or the last-used position). Also lets you
select the Fixed Aperture option, which keeps the aperture fixed as the lens
zooms.
- Speedlight Options: Displays a sub-menu of flash adjustments. A Pop-Up
option places the flash release under manual or automatic control. You can
adjust the flash intensity to +/- 2 exposure equivalents (EV) in one-third
step increments, as well as set up the internal and/or external Speedlight
options (both active or internal flash off).
- Auto Bracketing: Accesses the Auto Bracketing and White Balance Bracketing
functions.
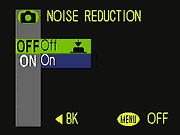 Noise
Reduction : Activates the Noise Reduction feature for shooting in low-light
situations.
Noise
Reduction : Activates the Noise Reduction feature for shooting in low-light
situations.
- Reset All: Resets all the menu options to factory defaults (it also
(fortunately) gives you an option to back out if you decide you want to).
Setup Screen
(Not accessible in Auto or Scene modes.)
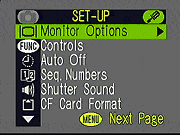 Monitor
Options: Displays a sub-menu to adjust the brightness of the LCD monitor
display, or the display mode (options are Monitor On, Review Only, Preview
Only, Monitor Off).
Monitor
Options: Displays a sub-menu to adjust the brightness of the LCD monitor
display, or the display mode (options are Monitor On, Review Only, Preview
Only, Monitor Off).
- Controls: Programs the Function button (-/+ button) to control specific
exposure functions. (Exposure mode, landscape/macro/self timer, flash mode,
white balance, exposure compensation, metering pattern.) Also determine the
AE / AF Lock function of the Multi-Selector button.
- Auto Off: Lets you set the auto-off delay to 30 seconds, or 1, 5,
or 30 minutes.
- Seq. Numbers: Turns the file numbering sequence option on or off,
as well as resets the current sequence.
- Shutter Sound: Turns the shutter annunciator on or off.
- CF Card Format: Formats the CompactFlash card and erases all
folders and images (even protected ones).
- Date: Sets the camera's internal date and time.
- Shot Confirmation: Determines whether or not the Self-Timer lamp
blinks to confirm shutter release.
- Info txt: Activates or deactivates the Information Text option, which
records a separate image information text file to accompany the images. The
text file includes information such as filename and exposure parameters. (Handy
for recording detailed exposure data!)
- Video Mode: Establishes the video format as NTSC or PAL.
- Language: Changes the menu language to German, English, French, Japanese,
or Spanish.
- Disable Delete: Disables the delete and format options.
- USB: Sets the camera's USB protocol to PTP or Mass Storage.
Playback Mode: Accessed by pressing the Quick Review / Playback button
twice, this mode lets users view captured images and movies. Pressing the Multi-Selector
button to right and left scrolls through images while the Delete and Index Display
buttons offer quick image deletion and display. Pressing the Menu button in
this mode pulls up the Playback settings menu:
Screen One
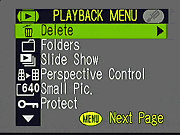 Delete:
Erases the Selected Image, All Images, Folder, Transfer, or Print Set. ("Transfer"
refers to images marked to be automatically transferred to a computer. A "Print
Set" refers to the set of images currently marked for printing, using
the DPOF (Digital Print Order Format))
Delete:
Erases the Selected Image, All Images, Folder, Transfer, or Print Set. ("Transfer"
refers to images marked to be automatically transferred to a computer. A "Print
Set" refers to the set of images currently marked for printing, using
the DPOF (Digital Print Order Format))
- Folders: Allows the user to create, delete, or rename folders as
well as select the playback folder from a list.
- Slide Show: Starts a slide show playback of all images in a folder
and allows the user to set the frame interval.
- Perspective Control: Makes a copy of the displayed image, though
with an altered vertical perspective. (See the more detailed discussion of
this in the Optics section of this review.)
- Small Pic: Creates a smaller resolution copy of the displayed image.
Sizes are 640 x 480, 320 x 240, 160 x 120, and 96 x 72 pixels. Very handy
for photos you want to email.
- Protect: Write-protects individual images to prevent accidental erasure
(except from card formatting).
- Hide Image: Hide selected images from the playback view.
- Print Set: Marks individual images for printing on a DPOF compatible
device.
- Auto Transfer: Specifies whether the Nikon View software will automatically transfer files from the camera once connected.
Setup Screen
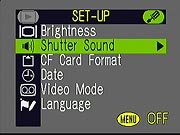 Brightness:
Lets you adjust the brightness of the LCD display.
Brightness:
Lets you adjust the brightness of the LCD display.
- Shutter Sound: Turns the shutter annunciator on or off.
- CF Card Format: Formats the CompactFlash card and erases all folders
and images.
- Date: Sets the camera's internal date and time.
- Video Mode: Establishes the video format as NTSC or PAL.
- Language: Changes the menu language to German, English, French, Japanese, or Spanish.

Follow Imaging Resource: