Olympus C-5060 Wide ZoomOlympus makes a strong update to the top of their prosumer lineup<<Shutter Lag & Cycle Time Tests :(Previous) | (Next): Camera Modes & Menus>> Page 8:Operation & User InterfaceReview First Posted: 11/21/2003 |
The C-5060 Wide Zoom has a similar interface design to the previous C-5050, but with a few minor differences. Most obviously, two separate buttons control the Quick View and LCD Display options, but most of the other controls are placed similarly to those on the C-5050, with the same familiar icons. As with the C-5050, the C-5060's Mode dial quickly sets the exposure mode, and the Command dial lets you change a variety of settings without delving into the LCD menu. The LCD menu system itself is about the same as the C-5050, and the C-5060's external control buttons access the same virtual dial that proved so useful previously. Several of the C-5060 Wide Zoom's external controls can be combined in pairs to adjust a third camera setting. For example, holding down the Flash and +/- buttons adjusts the flash exposure compensation. This is excellent in terms of limiting LCD menu usage, but does make the camera's interface slightly more complicated. I'd say it will probably take a couple of hours for the average user to get fully acquainted with the 5060's control layout. The full instruction manual is included on the CD-ROM that accompanies the camera, but a smaller Basic Manual will get you up and running quickly. (Though it may be somewhat archaic, I'd much prefer to have a paper version of the full manual as well, for reference when a computer isn't readily available. If you're paying $700 or so for a camera, a hardcopy manual doesn't seem like too much to ask for!)
Control Enumeration

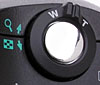
Mode Dial: On top of the camera, the Mode dial selects the camera's operating mode. Choices are Playback, Program, Aperture Priority, Shutter Speed Priority, Manual, My Mode, Movie, Night, Landscape Scene, Landscape Portrait, Sports, and Portrait modes.
![]()
Power Switch: Directly underneath the Mode dial is the Power
dial, which simply turns the camera on and off. The settings are marked
on the side of the dial, making it easy to read when holding the camera
in front of you. (I really like this location for the power switch.
It was very convenient, yet I never had a problem with it being turned
on inadvertently. It's much easier to use than the typical rear- or
top-panel pushbutton.)
Shutter Button: Located in the center of the Zoom lever,
the Shutter button sets focus and exposure settings when depressed halfway
and triggers the shutter when fully depressed.
Zoom Lever: On top of the camera, in front of
the Mode dial, the Zoom lever controls the optical zoom in all exposure
modes, and the digital zoom when enabled through the Shooting menu.
In Playback mode, the lever switches between Index view, normal image
display, and zoomed playback.

Self-Timer / Remote / Rotate Button: Behind the Shutter button and Zoom lever on the camera's top panel, this button accesses the Self-Timer and Remote Control modes when pressed while turning the Command dial. Pressing this button in Playback mode rotates the captured image 90 degrees clockwise. Pressing and holding this button in conjunction with the Custom / DPOF button directly beside it resets all of the camera's settings to their defaults.

Custom / DPOF Button: Directly to the right of the Self-Timer / Remote / Rotate button, this button can be programmed to access a variety of camera settings while in Shooting mode.
In Playback mode, this button calls up the DPOF settings menu, where you can select images for printing, the number of copies of each, etc.
When pressed and held down in conjunction with the Self-Timer / Remote / Rotate button, this button resets the camera's settings to their defaults.

Focus Button: Located on the left side of the camera's top panel, this button controls the focus mode. Pressing the button displays a "virtual dial" containing focus options on the LCD. Turning the Command dial cycles between Macro, Manual Focus, Super Macro, Super Macro Manual Focus, and Auto Focus modes.

Metering / Protect Button: Located behind the Focus button on the top panel, this button sets the camera's metering mode to Spot, Multi, or ESP when pressed while turning the Command dial. In Playback mode, this button marks the current image for write-protection.
![]()
+/- Button: Angled toward the front of the camera on the left side of the rear panel, this button adjusts the exposure compensation when pressed while turning the Command dial. Exposure can be increased or decreased from -2 to +2 EV in one-third-step increments. In Manual exposure mode, this button accesses the lens aperture setting rather than exposure compensation. Pressing this button and the Flash button below it accesses the flash exposure compensation adjustment (likewise set by turning the Command dial).
![]()
Flash Button: Directly below the +/- button, this button controls
the flash operating mode. Turning the Command dial cycles between Auto,
Forced, Suppressed, Red-Eye Reduction, and Slow Synchro modes. When
held down in conjunction with the +/- button, this button accesses the
flash exposure compensation setting.
![]()
Diopter Adjustment Dial: Snug against the right side of
the optical viewfinder eyepiece, this dial adjusts the optical viewfinder
to accommodate eyeglass wearers.

AE Lock / Erase Button: To the right of the optical viewfinder eyepiece on the rear panel, this button locks the exposure in any Shooting mode (a second press cancels the exposure lock). In Playback mode, this button calls up the Single Erase menu, for deleting the currently-displayed image.
![]()
Command Dial: In the top right corner of the camera's rear panel, just below the Mode and Power dials, this dial adjusts a variety of camera settings when turned while pressing one of the control buttons. In Aperture and Shutter Priority modes, this dial adjusts the available exposure variable (lens aperture or shutter speed, respectively). In Manual exposure mode, it adjusts the shutter speed when no button is pressed, or aperture in conjunction with the +/- button. In Playback mode, this dial scrolls back and forth between captured images.

Quick View Button: Below the AEL button, this button activates the Quick View function, which calls up the previously captured image on the screen.
![]()
Monitor Button: Just above the four-way Arrow
pad, this button turns the LCD monitor on or off, and controls the information
display. If the Dual Control Panel option has been enabled through the
Setup menu, this button also accesses a more detailed information display,
without the image display.
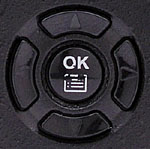
Four-Way Arrow Pad: The largest control on the back panel,
the Arrow Pad features four arrow keys surrounding the central, OK /
Menu button. In any settings menu, the arrow buttons navigate through
available options and make selections. In Playback mode, the left and
right Arrows move forward or backward through the pictures stored on
the card, or scroll around portions of the expanded image in Zoom Playback
mode.
OK / Menu Button: Located in the center of the
four-way Arrow pad, this button activates the menu system on the rear
panel LCD monitor and confirms selected menu settings in the various
LCD menu screens. If the LCD monitor is turned on when you press the
Display button, it will call up the menu options and display them over
the viewfinder image. If the LCD monitor is off when you press Display,
it brings up the camera's menu system with no viewfinder image in the
background.

CF / xD Button: Below the four-way Arrow pad, this button switches
between the two memory card slots (CompactFlash and xD-Picture Card),
if you happen to have cards of both types loaded into the camera.

Follow Imaging Resource: