Nikon CoolPix 775Nikon packs advanced Coolpix technology & superior ease-of-use into a tiny, affordable 2 megapixel camera!<<Shutter Lag & Cycle Time Tests :(Previous) | (Next): Camera Modes & Menus>> Page 8:Operation & User InterfaceReview First Posted: 07/23/2001 |
Operation and User Interface
The 775 continues in the footsteps of earlier Coolpix models by offering a very simple user interface with most of the controls easily accessed by external buttons and dials. We were particularly fond of its Mode Dial, which lays all of the point-and-shoot exposure modes (eight altogether!) right at your fingertips. In fact, you don't have to be a rocket scientist to figure out how to set up just about any shot -- portraits, sunsets, night scenes, even ski slopes -- it's all right on the dial, illustrated with easy to follow icons. A series of five buttons -- each well-marked with its multiple functions -- add even more fingertip control around the LCD monitor. As a group, they cover just about all of the bases: Flash, Self-Timer, Delete, Macro or Infinity focus, Quick Review, and the Menu button. The Multi-Selector control (what we normally refer to as a four-way arrow pad) is a little trickier to navigate, especially with the Up and Down arrows assigned to scrolling through image playback -- a function we would normally expect to find with the Left and Right arrows. However, this is a relatively minor gripe, as it doesn't take long to learn the protocol.
What we do miss is not having external access to the Exposure Compensation control, which becomes very tedious when you have to make adjustments through an on-screen menu (tedious enough to discourage its use). The menu screens are very compact, obviously to compensate for the small amount of LCD real estate, but they are also difficult to read, especially for users who are visually challenged by small typefaces.
Overall, we were pleased with the 775's operation and layout. The compact size made it real handy to carry around, and it doesn't sacrifice a lot of external controls to make everything fit. Here is a brief rundown of the buttons and menus and how they all fit into the camera's operation.
Control Enumeration
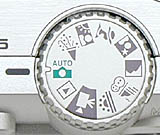
Mode Dial: Located on top of the camera, slightly to the right of center, the Mode dial offers nine Shooting modes and one Playback mode. Options include (clockwise): Auto Exposure, Party / Indoors, Backlight, Portrait, Night Portrait, Landscape, Beach / Snow, Sunset, Movie, and Playback.
Shutter Button: Positioned in front of the Mode dial, on the far right side of the camera's top panel, the Shutter button sets focus when depressed halfway and triggers the shutter when fully depressed. Pressing the Shutter button in Self-Timer mode triggers a 10-second countdown before the exposure completed.
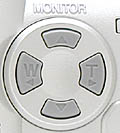
Multi-Selector: This set of four arrow keys, located on the back panel in the upper right corner, performs a variety of functions, including scrolling through images in Quick Review and Playback, navigating through the camera menus, and controlling the monitor display. Individually, the four buttons perform the following functions:
- Up Arrow: In Shooting mode, turns the LCD monitor on and off, and changes the information display on-screen. In Playback and Quick Review modes, brings up the previously recorded photograph for review. In Menu mode, moves the highlight bar up to make a selection.
- Left Arrow: In Shooting and Quick Review modes, zooms out to the widest angle setting. In Playback and Full Screen Reviews, changes the information display on-screen. In Menu mode, returns to the previous menu.
- Right Arrow: In Shooting and Quick Review modes, zooms in to the maximum telephoto setting.
- Down Arrow: In Playback and Quick Review modes, advances to the next recorded image. In Menu mode, moves the highlight bar down to make a selection.
![]()
Flash Indicator: The top LED lamp next to the eye-level viewfinder is the red Flash Indicator, which glows steadily when the Flash is charged and ready to fire. When the lamp blinks red, the Flash is charging, and when the LED lamp is off, the Flash is turned off, or the Auto Flash has determined that a flash is not required.
![]()
Autofocus Indicator: The bottom LED lamp next to the viewfinder glows a steady green color when the subject is in focus. If it flickers, the camera is having trouble focusing on the subject. If the green light flashes, it means the camera is recording one or more images to the memory card. If the light flashes slowly, the Digital Zoom is activated.
![]()
Transfer Button: The top button on the right side of the LCD monitor, the Transfer button is used to select images for transfer, and to transfer selected images from the camera to the computer while running NikonView software. When the camera is in Playback mode, the Transfer button is used to select images and movies for transfer to a computer at a later time.

Quick Review / Playback Zoom Button: Directly below the Transfer button, this control is used to view results of previously recorded images while still in Shooting mode. Pressing the button once brings up a thumbnail size review image in the upper left corner of the LCD monitor, while keeping the current, active LCD view on-screen. Pressing the button twice brings up a full-page review image. In Playback mode, this button functions as a Playback Zoom, magnifying the image to twice its normal size.

Focus Mode / Self-Timer / Delete Button: In Shooting mode, the left button under the LCD monitor functions as the Focus and Self Timer selector. Options include Autofocus (no icon), Landscape (mountain icon), Macro (flower icon), and Self-Timer (clock), which can be combined with Autofocus or Macro. In full-frame or thumbnail Playback, this button is used to select photographs for deletion.

Flash Mode / Index Button: This center button under the LCD monitor controls the built-in Flash when the camera is in Shooting mode. Flash options include:
- Auto Flash: Automatically fires when the lighting is low.
- Flash Cancel (Off): Flash will not fire under any lighting conditions.
- Auto Flash w/ Red-Eye Reduction: This Flash option fires a small pre-flash before the main flash to shrink the size of the subject's pupils and reduce the effects of red-eye.
- Anytime Flash (Fill Flash): Automatically fires the flash no matter what the lighting conditions.
- Slow Sync: Auto flash combined with a slow shutter speed to record more ambient or background light.

Menu Button: Located on the right side under the LCD monitor, the Menu button brings up the on-screen menu for the current operating mode. If the menu has more than one page, pressing the Menu button a second time displays the next page of the menu. When the last menu page is displayed, pressing the Menu button exits from the on-screen menu.
Battery Chamber Cover Latch: A sliding latch located on the bottom panel of the camera, this button opens the battery compartment door.

Follow Imaging Resource: