Nikon CoolPix 775Nikon packs advanced Coolpix technology & superior ease-of-use into a tiny, affordable 2 megapixel camera!<<Operation & User Interface :(Previous) | (Next): Image Storage & Interface>> Page 9:Camera Modes & MenusReview First Posted: 07/23/2001 |
Camera Modes & Menus
Scene Modes: The 775 offers seven Scene exposure modes, which are preset for specific shooting situations.
In single-image playback mode, images are displayed briefly as low-resolution photos while they are being read from the memory card (indicated by the appearance of an hour-glass icon on the monitor). By pressing the Up or Down Arrow buttons quickly, you can scroll through the low-resolution images without having to wait for each image to load at full resolution, or you can hold down the Arrow buttons and view the image numbers flashing in the lower right corner of the screen. Releasing the Arrow button at a particular frame number will bring up that photo.
Camera Menus
Auto Menu
Accessed by turning the Mode Dial to the Auto setting, the Auto mode controls all exposure settings, with a limited number of user-selectable exposure options, such as Image Quality, Image Size, White Balance, Exposure Compensation, and Image Sharpening. The suggested use for this mode is point-and-shoot photography under average shooting conditions. When the camera is in Auto mode, pressing the Menu button brings up the following options:
 Image Quality: Offers a choice of Fine, Normal, or Basic JPEG compression ratios.
- Image Size: Options include Full (1,600 x 1,200-pixel), XGA (1,024 x 768-pixel), and VGA (640 x 480-pixel).
- White Balance: Adjusts the white balance to accommodate different light sources. Choices include: Auto, White Balance Preset (Manual), Fine (Sunlight), Incandescent, Fluorescent, Cloudy, and Speedlight (Flash).
- Continuous: Establishes the capture mode at Single, Continuous, or Multi-Shot 16.
- BSS: Turns Best Shot Selection On or Off. BSS takes a continuous series of images and automatically chooses the sharpest frame for recording to the memory card.
- Exp. + / -: Exposure Compensation adjusts the camera's exposure reading for very bright, dark, or high-contrast scenes. Values can be set from +2 to -2 exposure values (EV) in one-third-step increments.
- Image Sharpening: This menu option allows you to set the amount of image sharpening that is applied to an image in-camera. Options include: Auto, Normal, High, Low, and Off.
Scene Menu
Scene exposure modes are preset for specific subjects and / or lighting situations. Options are selected on the camera's Mode Dial and include the following options: Party / Indoor, Backlight, Portrait, Night Portrait, Landscape, Snow / Sand, and Sunset. Because these settings are optimised for specific shooting conditions, the menu is limited to only two options:
 Image Quality: Offers a choice of Fine, Normal, or Basic JPEG compression.
- Image Size: Options include Full (1,600 x 1,200-pixel), XGA (1,024 x 768-pixel), and VGA (640 x 480-pixel).
Set-Up Menu
The Set-Up menu adjusts the camera's basic operating parameters and consists of two pages:
 Brightness: This option controls monitor brightness by pressing the Up and Down Arrow buttons on the Mult-Selector control. The Up Arrow increases brightness and the Down Arrow decreases brightness. The results can be seen immediately on the LCD monitor.
- Auto Transfer: Turns the Auto Transfer function On or Off. When turned On, Auto Transfer automatically marks all images and movies to be automatically copied to the computer when the camera is connected to the computer running NikonView software.
- Seq. Numbers: Provides three options for numbering recorded images: On automatically numbers all images sequentially in ascending order and continues the numbering sequence from one card to the next (or when the card is removed and re-inserted into the camera. Off starts a new numbering sequence when a new file is created. Reset clears the current file number from memory and begins with the lowest number available.
- Memory Card Format: Formats the installed memory card, erasing all files, including write-protected ones.
- Date: Sets the current date and time.
- Auto Off: Sets the amount of time the camera is idle before it goes into sleep mode. Options are: 30 seconds, 1 minute, 5 minutes, 30 minutes.
- Video Mode: Sets the video output signal to NTSC or PAL.
- Language: Sets the camera's language to German, English, French, or Spanish.
Playback Menu
The Playback menu includes options for deleting pictures, playing slide shows, protecting images from accidental erasure, and marking images for DPOF or for automatic transfer to the computer. Playback menu options are:
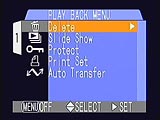 Delete: Provides the option of deleting Selected Images, All Pictures, or the Current Print Order.
- Slide Show: Used for automated playback of sequential images.
- Protect: Write-protects images to prevent accidental erasure (but not from card formatting).
- Print Set: Sets up images for printing on Digital Print Order Format-enabled printers with the following print options:
- Info: Prints shutter speed and aperture on all selected photographs.
- Date: Prints the recording date on all selected photographs.
- Done: Completes the print order and returns to the Playback menu.
- Transfer: Selects or deselects all images on the memory card for transfer to the computer. (By default, all photos and movies are automatically marked for transfer when they are recorded.)

Follow Imaging Resource: