Sony MVC-CD500Sony further expands its CD-equipped camera line, adding a five megapixel CCD and a host of other features to last year's top-of-the-line CD Mavica model.<<Shutter Lag & Cycle Time Tests :(Previous) | (Next): Camera Modes & Menus>> Page 8:Operation & User InterfaceReview First Posted: 06/09/2003 |
Operation and User Interface
As I mentioned in the Design section of this review, the CD500 offers the same
great user interface seen on other 2003-model Sony digicams. I've found Sony's
user interface to be one of the most straightforward on the market, and in many
of their 2003 models, they've moved additional camera controls to external buttons
to further enhance the user experience. The ready access to exposure controls
and other camera functions, and the uncomplicated menu system mean that you
spend less time scrolling through menu screens and options than you would with
many other cameras on the market. Although the LCD menu is still required for
some settings, overall camera operation is fast and uncomplicated. The Command
wheel lets you adjust the exposure compensation, aperture, and shutter speed
settings quickly. The Mode dial and the assignment of some functions to quadrants
on the Four-Way Arrow pad, provide even faster operation. Overall, the control
system is very well thought out, and very conducive to fluid use of the camera
as a photographic tool.
Control Enumeration

Shutter Button: Located on the right side of the top panel, this button sets focus and exposure when pressed halfway. Fully depressing the button fires the shutter. When the Quick Review (the shot just taken) is displayed on the screen, a half press of the Shutter button returns the LCD to the normal image display. When the Self-timer is enabled, fully depressing the Shutter button kicks off the 10-second countdown.
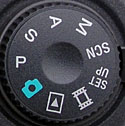
Mode Dial: Stacked on top of the Power Switch, this dial controls the camera's operating modes. Options include Program (camera symbol), Shutter Priority (S), Aperture Priority (A), Manual (M), Scene (SCN), Setup, Movie (film frame), and Playback modes.
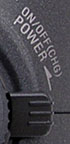
Power Switch: Just beneath the Mode dial, this switch turns the camera on or off.

Command Wheel: Located on the top right side of the camera's back panel, this wheel controls aperture and shutter speed settings in Shutter Priority, Aperture Priority, and Manual modes. When Manual Focus is enabled, turning the wheel adjusts focus and displays the focus distance on the LCD monitor. When the Exposure Compensation adjustment is activated, turning the wheel adjusts the exposure from -2 to +2 exposure equivalents (EV) in one-third-step increments.
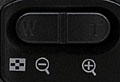
Zoom Toggle: To the left of the Command wheel, the Zoom toggle controls the optical and digital zoom (when enabled) in any capture mode. In Playback mode, the wide angle button activates the Index Display mode, while the telephoto button controls the Playback Zoom up to 5x (the wide angle button also zooms back out). Once in Index Display mode, pressing the wide-angle side again displays the image information for the highlighted thumbnail, including exposure information.
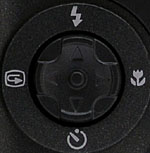
Four-Way Arrow Rocker Pad (also: Flash, Quick Review, Macro, and Self-Timer Buttons): Situated just below the zoom toggle, this button serves a variety of functions. On its surface, the pad features four arrows, one pointing in each direction. When any settings menu is engaged, these arrows navigate through the menu options. Once an option is selected, you confirm the selection by pressing on the center of the button. (You will hear a dual tone when you press the center, as opposed to the single tone you hear when you press one of the arrows.) In Playback mode, the right and left arrows scroll through captured images, while the up and down arrows control the playback volume. If a movie file is displayed, pressing the center of the button triggers the movie playback. When Playback zoom is enabled, pressing the center of the button returns the LCD to the normal 1x image display.
In addition to menu scroll functions, the Arrow Pad also controls certain exposure and camera settings. The Up Arrow button is marked with a flash symbol, and cycles between Auto, Forced, Slow Synchro, and Suppressed Flash modes (in all capture modes except Movie). The Right Arrow button, marked with the macro flower symbol, enables and disables the camera's Macro mode. The Down Arrow controls the Self-timer mode, cycling between Normal and Self-timer capture modes. Finally, the Left Arrow activates and deactivates the Quick Review function, which displays the most recently captured image on the LCD screen.

Menu Button: Located directly below the Arrow Rocker Pad, on the left side, this button activates and deactivates the settings menus in any camera mode except Setup (which automatically displays the menu upon entering the mode).

Display Button: Just beneath the LCD monitor, on the far left side, the
Display button controls the LCD display in all camera modes except Setup. Pressing
the Display button in Playback mode sequentially cycles through three modes:
Backlight off; image and information display; and image display only. In Record
mode, the information display never completely disappears. - Critical exposure
and mode information remains onscreen, regardless of the state of the Display
Button.

AE Lock Button: The first button in the series below the LCD monitor, the AE Lock button locks an exposure reading until the shutter is snapped.

Focus Button: Adjacent to the Spot Metering button on the right, the Focus button cycles between Automatic and Manual focus modes, and manual focus-point selection. In focus point selection mode, you can select from normal multifocus operation, or choose one of five small focus areas. (One in the center, and two on either side of center, vertically and horizontally.)

Exposure Compensation Button: Directly to the right of the Focus button, the Exposure Compensation button (+/-) activates the exposure compensation adjustment, which is changed by turning the Command wheel.

Image Size / Trash Button: Directly to the right of the Exposure Compensation button, the Exposure Image Size / Trash button permits selection of available image resolutions in Record mode or deletes images in Playback mode.
Open CD-R Compartment Button: Tucked in the side of the CD-R compartment, just above the external flash connection jack, this sliding button opens the CD-R compartment door.

Follow Imaging Resource: