Sony MVC-CD500Sony further expands its CD-equipped camera line, adding a five megapixel CCD and a host of other features to last year's top-of-the-line CD Mavica model.<<Operation & User Interface :(Previous) | (Next): Image Storage & Interface>> Page 9:Camera Modes & MenusReview First Posted: 06/09/2003 |
Camera Modes and Menus
![]() Program AE:
Marked on the Mode dial with a green camera symbol, Program mode places the
camera in control of both the aperture and shutter speed settings, letting you
set the remaining exposure variables (White Balance, ISO, Exposure Compensation,
Image Size, Picture Quality, Flash, and Normal or Spot Metering).
Program AE:
Marked on the Mode dial with a green camera symbol, Program mode places the
camera in control of both the aperture and shutter speed settings, letting you
set the remaining exposure variables (White Balance, ISO, Exposure Compensation,
Image Size, Picture Quality, Flash, and Normal or Spot Metering).
![]() Shutter Priority:
In Shutter Priority mode, you set the shutter speed (from 1/1,000 to eight seconds),
while the camera selects the best corresponding aperture. All other exposure
variables can also be adjusted.
Shutter Priority:
In Shutter Priority mode, you set the shutter speed (from 1/1,000 to eight seconds),
while the camera selects the best corresponding aperture. All other exposure
variables can also be adjusted.
![]() Aperture Priority:
In Aperture Priority mode, you set the desired lens aperture (from f/2.1 to
f/8.0) while the camera selects the best corresponding shutter speed. All other
exposure variables can also be adjusted.
Aperture Priority:
In Aperture Priority mode, you set the desired lens aperture (from f/2.1 to
f/8.0) while the camera selects the best corresponding shutter speed. All other
exposure variables can also be adjusted.
![]() Manual: Manual
exposure mode offers full user control over exposure, including aperture and
shutter speed settings. All exposure variables except for exposure compensation
are available in this mode.
Manual: Manual
exposure mode offers full user control over exposure, including aperture and
shutter speed settings. All exposure variables except for exposure compensation
are available in this mode.
![]() Scene: Scene
mode provides access to six preset shooting modes: Twilight, Twilight Portrait,
Landscape, Portrait, Snow and Beach. The actual scenes are changed through the
shooting menu, via the Scene setting. Twilight mode uses a slow shutter speed
to accommodate darker shooting situations. Twilight Portrait uses the flash,
in a slow sync mode, capturing the illuminated subjects in the foreground with
the flash, and using the longer shutter speed to record ambient light from the
background. Landscape mode uses a small aperture opening to keep both the foreground
and background settings in focus. The Portrait mode uses a large aperture opening
to decrease the depth of field, thereby keeping the subject in sharp focus and
slightly blurring the background. Snow preserves color despite the glare of
bright scenes like snowscapes and optimizes focus like landscape. Beach exposes
for the blue of the water in seaside of lakeside scenes where automatic exposure
is often fooled. Most exposure variables, except for aperture and shutter speed
settings, are available in the Scene modes.
Scene: Scene
mode provides access to six preset shooting modes: Twilight, Twilight Portrait,
Landscape, Portrait, Snow and Beach. The actual scenes are changed through the
shooting menu, via the Scene setting. Twilight mode uses a slow shutter speed
to accommodate darker shooting situations. Twilight Portrait uses the flash,
in a slow sync mode, capturing the illuminated subjects in the foreground with
the flash, and using the longer shutter speed to record ambient light from the
background. Landscape mode uses a small aperture opening to keep both the foreground
and background settings in focus. The Portrait mode uses a large aperture opening
to decrease the depth of field, thereby keeping the subject in sharp focus and
slightly blurring the background. Snow preserves color despite the glare of
bright scenes like snowscapes and optimizes focus like landscape. Beach exposes
for the blue of the water in seaside of lakeside scenes where automatic exposure
is often fooled. Most exposure variables, except for aperture and shutter speed
settings, are available in the Scene modes.
![]() Setup: Setup
mode lets you change basic camera settings.
Setup: Setup
mode lets you change basic camera settings.
![]() Movie:
Movie mode, marked on the Mode dial with a film strip symbol, captures MPEG
movies with sound by default. Most exposure options are available, except for
flash and ISO. If the Clip Motion option is selected from the Setup menu, Movie
mode will capture up to 10 sequential still images, and combine them into a
single animated GIF file. When Multi Burst is selected in the Setup menu, the
camera records a rapid burst of frames, saved in a single image frame but played
back on the camera as a slow motion animation.
Movie:
Movie mode, marked on the Mode dial with a film strip symbol, captures MPEG
movies with sound by default. Most exposure options are available, except for
flash and ISO. If the Clip Motion option is selected from the Setup menu, Movie
mode will capture up to 10 sequential still images, and combine them into a
single animated GIF file. When Multi Burst is selected in the Setup menu, the
camera records a rapid burst of frames, saved in a single image frame but played
back on the camera as a slow motion animation.
![]() Playback:
Captured images and movies can be reviewed and played back in this mode. Images
can also be erased, write-protected, copied, resized, set up for printing on
a DPOF device, or played back in a slide show.
Playback:
Captured images and movies can be reviewed and played back in this mode. Images
can also be erased, write-protected, copied, resized, set up for printing on
a DPOF device, or played back in a slide show.
Record Menu: The Record menu is accessible in all capture modes by pressing
the Menu button, however, not all menu options are available in all capture
modes. (The menu is normally overlaid on the live viewfinder display. I've blocked
the lens to produce a black background here, to help keep down the size of the
screenshot GIF.)
 Metering Mode: Selects Multi, Center or Spot metering mode.
- White Balance: Adjusts the camera's white balance to accommodate a variety of light sources. Options include: Auto, Daylight, Cloudy, Fluorescent, Incandescent, and One-Push (manual setting).
- ISO: Changes the camera's light sensitivity level. Choices are Auto, 100, 200, and 400 ISO equivalents.
- Quality: Sets the JPEG compression level to Fine or Standard.
- Record Mode: Accesses the following recording modes:
- TIFF: Records images in the uncompressed TIFF file format (at the 2,272 x 1,704-pixel size, in addition to another image at the pixel resolution and JPEG compression levels set under Image Size and Quality submenus).
- Voice: Optionally records up to 40-second sound clips to accompany captured images.
- E-Mail: Captures a separate image file size of 320 x 240 pixels for easy e-mail transmission in addition to another image at the pixel resolution size set under the Image Size submenu.
- Exposure Bracketing: Takes three images, each at different exposure settings (one at the normal meter reading, and two more at higher and lower exposure settings). Exposure variation is established through the Setup menu, under the Bracket Step option.
- Burst 3: Allows the camera to record up to three frames in rapid succession. Actual frame rates vary with file size and the amount of image information being recorded.
- Normal: Returns the camera to normal still capture mode.
- Flash Level: Sets the flash intensity level to High, Normal, or Low.
- Picture Effects: Enables a variety of creative picture effects modes, including Solarize, Sepia, and Negative Art. The Off setting returns the camera to normal capture mode.
- Sharpness: Adjusts the image sharpness with options of normal, plus and minus.
- Saturation: Adjusts the image saturation with options of normal, plus and minus.
- Contrast: Adjusts the image contrast with options of normal, plus and minus.
Playback Menu: As with the Record menu, the Playback menu is accessed by pressing the Menu button when in Playback mode. The following options are available:
 Folder: Selects the folder whose images you want to play back.
- Protect: Write-protects the currently displayed image from accidental erasure or manipulation in any way (except for CD formatting, which deletes all images).
- DPOF: Marks the current image for printing on a Digital Print Order Format (DPOF) compatible device.
- Slide: Activates an automatic slide show of all images on the CD-R. You can define the picture interval and whether or not the slide show repeats itself.
- Resize: Resizes the currently displayed image to 2,592 x 1,944, 2,048 x 1,536, 1,280 x 960, or 640 x 480 pixels.
- Rotate: Rotates the displayed image 90 degrees clockwise or counterclockwise.
Setup Menu: The six-panel setup menu is displayed on the LCD monitor as soon as you enter Setup mode:
 Moving
Image: Establishes the recording mode to be used when the mode dial is
set to the Movie position: MPEG Movie, Clip Motion, or Multi Burst.
Moving
Image: Establishes the recording mode to be used when the mode dial is
set to the Movie position: MPEG Movie, Clip Motion, or Multi Burst.
- AF Mode: Selects the focus mode from Single, Monitor or Continuous options.
- Smart Zoom: Turns the Smart Zoom digital zoom function on or off.
- Date/Time: Determines whether or not the date and/or time is recorded with the image. Choices are Off, Date, and Day & Time.
- Red-Eye Reduction: Enables or disables the Red-Eye Reduction flash mode.
- Hologram AF: Turns the Hologram AF lamp off, or allows the camera
to use it whenever it's needed (Auto mode).
 Bracket
Step: Designates the EV step that the exposure bracketing shots will vary
by. Choices are +/- 1.0, 0.7, and 0.3 EV.
Bracket
Step: Designates the EV step that the exposure bracketing shots will vary
by. Choices are +/- 1.0, 0.7, and 0.3 EV.
- Conversion Lens: Set to On when using the optional VCL-MHG07 conversion lens.
- Hot Shoe: Turns the flash hot shoe on or off.
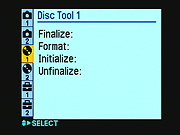 Finalize:
Finalizes the CD-R or CD-RW, making it readable on a computer's CD-ROM drive.
Finalize:
Finalizes the CD-R or CD-RW, making it readable on a computer's CD-ROM drive.
- Format: Erases all the images on the CD-RW (CD-RW only, not CD-R), even write protected ones.
- Initialize: Initializes new CD-Rs or CD-RWs, so that the camera can write images to the drive.
- Unfinalize: Undoes the effects of a Finalize operation, allows the
CD-RW (not CD-R) to be written to again.
 File
Number: Determines the file number sequence. Normal resets the file numbering
with each new CD-R inserted into the drive. Series continues file numbering
from one CD-R to the next.
File
Number: Determines the file number sequence. Normal resets the file numbering
with each new CD-R inserted into the drive. Series continues file numbering
from one CD-R to the next.
- Create REC. Folder: Creates a folder to store images when captured.
- Change REC. Folder: Changes the folder in which images are stored when captured.
- Confirm B. Write: Selects whether to confirm recording or deleting before
writing to the disc.
 LCD
Brightness: Adjusts the LCD's brightness level (really more of a contrast
adjustment) to Bright, Normal, or Dark.
LCD
Brightness: Adjusts the LCD's brightness level (really more of a contrast
adjustment) to Bright, Normal, or Dark.
- LCD Backlight: Sets the backlight brightness to Normal or Bright.
- Beep: Controls the camera's operating sounds. Choices are Shutter (noise with shutter only), On (activates all camera noise), and Off (silences the camera).
- Language: Sets the menu language to English or Japanese.
- Clock Set: Sets the camera's internal clock and calendar.
 Video
Out: Sets the A/V Out signal to NTSC or PAL timing.
Video
Out: Sets the A/V Out signal to NTSC or PAL timing.

Follow Imaging Resource: