Nikon D50By: Dave Etchells and Shawn BarnettNikon develops an "entry-level" SLR loaded with features for less than $750. (Body only) <<Shutter Lag & Cycle Time Tests :(Previous) | (Next): Camera Menus>> Page 12:Operation & User InterfaceReview First Posted: 05/20/2005, Updated: 08/10/2005 |
Operation and User Interface
The Nikon D50 may look a little intimidating to new users at first, even though its controls are pared-down slightly from those on the D70. Given the entry-level focus of the D50 though, it's important to note right up front that it's dead easy to operate in its fully automatic "green zone" mode, buttons and knobs notwithstanding.
Looking closer at the control interface, we immediately see that a few of the D70's external controls (such as metering mode) are now only accessible through the LCD menu on the D50, and the sub-command dial that was used for a lot of secondary control settings on the D70 is gone as well. This makes some of the camera's more advanced options slightly more difficult to access, but also leaves a less cluttered interface for novice users. All in all, I really like the overall control layout, which places the main shooting controls on top of the camera and the rest on the back panel. The Mode dial is dedicated to the 11 exposure modes and nothing else (no ISO or white balance options), keeping it simple for the user. Changing shutter speed, aperture, metering mode, etc. is quick and simple, using the Command dial in combination with several other buttons.
The LCD menu itself is well organized and simple to navigate, with four main tabbed menu pages. When shooting, the detailed information display in the viewfinder window does a good job of communicating current camera settings. Anyone already familiar with Nikon's SLRs, whether film or digital, will have no trouble operating the D50. For less experienced users, an hour or two spent with the manual and camera together should be enough to get comfortable with even its more advanced options. - And it's easy to start with the camera in "green zone" mode (almost without reading the manual at all), and then gradually explore the more advanced functions as you gain experience.

Lens Release Button: Tucked on the right side of the lens mount (when looking at the front), this button releases the lens from its mount when pressed and held as you turn the lens. It's best to hold the lens with your right hand while pressing the button and turning the lens to the left.
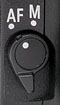
Focus Mode Switch: Below the Lens Release button, this switch puts the camera into Auto or Manual focus modes.
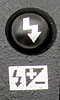
Flash Sync Mode/Compensation Button: Just left of the flash in the front, holding this button and rotating the Command Dial cycles between the five flash sync modes (Fill, Red-Eye Reduction, Red-Eye Reduction with Slow Sync, Slow Sync, and Rear Curtain Sync). Pressing and holding this button as well as the +/- button while turning the Command dial chooses flash compensation values.

Power Switch: Surrounding the Shutter button on the top right of the camera, this switch turns the camera on and off.
Shutter Button (see image above): In the center of the Power switch, on the top of the camera, this button sets focus (when in autofocus mode) when halfway pressed and fires the shutter when fully pressed.
When an image is displayed on the LCD monitor, halfway pressing the Shutter button dismisses the display and immediately readies the camera for shooting. (Nice, you'll never have to blame the camera for missing a quick shot, just because you happened to be viewing an image on the LCD when the critical moment occurred.)

Exposure Compensation Button: Directly behind and right of the Shutter button on the top of the camera, pressing this button while turning the Command dial sets the Exposure Compensation from -5 to +5 exposure equivalents (EV) in one-third step increments. One-half step increments can be selected instead via a Custom Menu setting. Pressing this button in Manual exposure mode and rotating the Command dial sets the aperture. Pressing this button with the Flash Sync button on the side of the flash accesses the Flash Compensation setting.

Self-Timer/Remote Control Button: Directly to the left of the Exposure Compensation button, this button cycles through the Self-Timer, Delayed Remote, Quick Response Remote, and Timer Off modes when pressed repeatedly. Pressing this button in conjunction with the Shooting mode button resets the camera to its default settings.
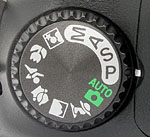
Mode Dial: Dominating the left side of the camera's top panel (as viewed from the rear), this dial selects the camera's exposure mode from the following:
 Auto: The camera sets everything, the D50 becomes a true "point & shoot" camera. Useful for snapshots or users who just don't want to be bothered with the details of how the camera will do its work. Flash is set to front curtain sync.
 Program: Puts the camera in charge of aperture and shutter speed, though all remaining camera settings are available. (And you can vary the combination of aperture and shutter speed the camera has selected, by rotating the Main Command Dial.)
 Shutter Priority: The user controls shutter speed, from 1/4,000 to 30 seconds, while the camera sets the aperture value.
 Aperture Priority: The opposite of Shutter Priority mode, this mode lets the user control the aperture, while the camera sets the shutter speed.
 Manual: Gives the user complete control over the exposure (both shutter and aperture settings), and provides access to the camera's Bulb shutter setting for exposures longer than 30 seconds.
-
 Night Portrait: Uses a slow shutter speed with the flash, balancing the two so that night portraits look natural even with flash.
 Close up: Reds and greens are pumped up slightly, camera sets center focus point, flash is set to front curtain sync.
 Sports: Uses high shutter speeds, camera switches to continuous focus, both flash and AF illuminator are turned off and will not fire.
 Child: This mode renders skin tones soft and natural, but revs up background and clothing colors.
 Landscape: Turns up color, saturation, contrast, and enhances outlines for city and forest landscape shots. Flash is turned off in this mode.
 Portrait: Adjusts aperture to soften background details to help the main subject stand out more clearly. Flash set to front curtain sync.
![]()
Shooting Mode Button: Located in the top left corner of the rear panel, this button switches between Single frame and Continuous shooting modes when pressed while turning the Command dial. Pressing and holding down this button together with the Self-Timer button resets the camera's basic settings.
![]()
Playback Button: Just off the top left corner of the LCD monitor, this button displays the most recently captured image, putting the camera into Playback mode. Once an image is displayed, the arrow keys navigate through the other images saved on the memory card. This button also dismisses the image display.
![]()
Menu Button: Below the Playback button, this button displays or dismisses the LCD menu system.
![]()
ISO/Thumbnail View Button: Just below the Menu button, this button works in capture mode to set the ISO. Press and hold this button and rotate the Command dial to adjust the ISO. When the camera is displaying captured images in Playback mode, pressing this button repeatedly cycles between four-image and nine-image thumbnail displays and a full-screen display. The chosen display mode remains selected indefinitely, even if the camera is turned off. When a thumbnail view is activated, you can scroll a cursor through the thumbnail images very rapidly with the rocker pad. Pressing the Enter button magnifies the image that's currently selected. Once an image has been magnified, turning the Command dial while the Thumbnail View button is held down changes the level of magnification, showing the current zoomed display area as a red-bounded rectangle. Releasing the Thumbnail View button displays the magnified portion of the image full-screen. See the previous Viewfinder section of this review for a more complete description of this function.
![]()
White Balance/Protect/Help Button: Directly below the ISO / Thumbnail View button, this button changes the white balance setting when pressed while turning the Command dial. In Playback mode, this button write-protects individual images, protecting them from accidental deletion. (Note though, that even "protected" images will be lost when a card is reformatted.) If an image is already protected, pressing the Protect button removes protection. When in Menu mode/Custom Settings, pressing and holding this button brings up help to explain each custom setting.
![]()
Quality/Enter/Magnify Button: Just below the Protect button, this button confirms menu selections. In conjunction with the Command dial, it sets image resolution and compression. Finally, it also activates the playback magnification, when a captured image is displayed in the LCD monitor.
![]()
Diopter Adjustment Switch: Sitting vertically next to the right side of the viewfinder eyepiece, this slide control adjusts the optical viewfinder to accommodate eyeglass wearers. (Range is -1.6 to +0.5 diopters. Not quite as broad as some cameras, it can't quite compensate for my own 20:180 vision.)

AE/AF Lock Button: Located just right of the viewfinder, this button locks the exposure and/or focus when pressed. The settings remain locked as long as you hold the button down, regardless of any action of the shutter button. Several options for this control can be set via the Custom Settings Menu. You can program it to lock either focus or exposure separately, or both together (the default). You can also change its operation so a single press locks and holds the exposure setting. (No need to keep the button pressed down.) Finally, you can set the AE/AF lock button so it alone controls the autofocus system, meaning the autofocus won't actuate when the shutter button is half-pressed, only when the AE/AF lock button is pressed instead.
![]()
Command Dial: The Command dial is located on the back of the camera, in the upper right hand corner, right under your right thumb. Used in conjunction with other buttons, this controls a variety of camera settings.
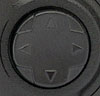
Multi-Selector Button: Just off the top right corner of the LCD monitor on the back panel, this rocker button navigates through menu options in any LCD menu.
In Playback mode, the rocker pad's right and left arrows scroll through captured images while the up and down arrow buttons cycle through various information displays for each image. When you zoom in on an image in playback mode, the rocker pad lets you scroll around the magnified image.

Delete Button: Just below the locking switch of the Four-Way Arrow pad, this button deletes individual images in Playback mode, with a confirmation screen to give you the opportunity to change your mind.
Reader Comments! --> Visit our discussion forum for the Nikon D50!

Follow Imaging Resource: