Nikon D50By: Dave Etchells and Shawn BarnettNikon develops an "entry-level" SLR loaded with features for less than $750. (Body only) <<Operation & User Interface :(Previous) | (Next): Image Storage & Interface>> Page 13:Camera MenusReview First Posted: 05/20/2005, Updated: 08/10/2005 |
Camera Menus
The Nikon D50 has a very extensive menu system, but it's cleanly organized as a set of tabbed screens, as on the D70 and D100 before it. On the D50 though, a combination of the larger LCD screen and subtly enhanced text and graphics make for an unusually readable menu system. There are four menus on the D50: Playback, Shooting, CSM (Custom Settings Menu) and Set Up. All menu entries are selected via the Multi-Selector button. The menus themselves are chosen via a "tabbed" interface, with icons on the left of the screen corresponding to the four menus. All screens can be reached whether the camera is in playback or record mode. There's also a very nice "help" function that provides plain-English descriptions of virtually every menu screen, simply by pressing the WB/?/Lock button next to the LCD. The D70 had a similar help system, but it was only available for the Custom Settings Menu items. The D50 extends this useful feature to almost every menu screen.
In the section below, rather than reproduce every menu screen in the main body of the review, I've shown screenshots for only the top level of each menu, with clickable links in the descriptive text leading to the individual screens.
Playback Menu
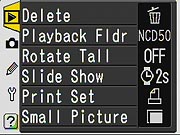
| Playback Menu | |||
| Top-Level Selection |
Second-Level | Third-Level | Notes |
| Delete | - Selected |
- Select image from thumbnail display |
Select one or multiple images, then execute with "Enter" button.
Delete All doesn't affect images that have been "protected" via the WB/help/protect button |
| Playback Folder | - Current - All (view) |
"All" will also display DCF-compliant image from other manufacturers that may be on the same card. | |
| Rotate Tall | - Yes - No (view) |
Images captured in "portrait" orientation are rotated onscreen to display in their original orientation. (The camera can even tell whether you had the grip side up or down.) | |
| Slide Show | - Start - Frame Interval (view) |
- Select frame interval, 2-10 seconds | |
| Print Set | - Select/set - Deselect all? (view) |
- Select image from thumbnail display, if select/set is chosen | |
| Small Picture | - Select picture - Choose Size (view) |
- Select image from thumbnail display, if select/set is chosen -Image sizes: |
|
Shooting Menu
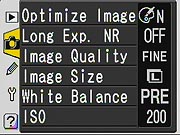
| Shooting Menu Options | |||
| Top-Level Selection |
Second-Level | Third-Level | Notes |
| Optimize Image | - Normal
|
(For Custom option only)
- Done (accept settings)
|
Direct print affects sharpening and image rendering.
Portrait and Landscape make subtle, specific color and tonal-rendering adjustments. Custom tone compensation option enables curve loaded from computer I and III color modes are both sRGB, but III has higher saturation. NOTE - you must select "Done" for custom settings to be registered. |
| Long exp. NR | - Off - On (view) |
Only affects exposures longer than one second.
(I found little need for this, the basic exposures are very clean.) |
|
| Image Quality | - NEF (Raw) - JPEG Fine - JPEG Normal - JPEG Basic - NEF + JPEG Basic (view) |
Note that only option for NEF + JPEG is for Basic (lowest) JPEG quality. | |
| Image Size | - L (3,008 x 2,000) - M (2,256 x 1,496) - S (1,504 x 1,000) (view) |
||
| White bal. | - Auto - Incandescent - Fluorescent - Dir. sunlight - Flash - Cloudy - Shade - PRE Preset (view)
|
(Preset option only) | All options let you fine-tune white balance +/- three units.
Manual option (PRE) is nice, in that it gives you the choice of setting directly or using a previously-shot photo on the card. |
| ISO | - 200 - 400 - 800 - 1600 (view) |
||
Custom Settings Menu (CSM)
When you first turn it on, the Nikon D50 displays only the "Simple" Custom Settings Menu (CSM) options, which are the first six options listed below. You can enable the "Detailed" CSM via an option on the setup menu. For those interested, I've provided links below to view each of the help screens. Also, for menu items, I've highlighted the default option with boldface type.
| Custom Settings Menu Options | |||
| Top-Level Selection |
Second-Level | Third-Level | Notes |
| -- Menu Reset | - No |
Resets the CSM options to their default values. | |
| 01 Beep | - On - Off |
Beep sounds for focus confirmation, remote release, or self-timer countdown. | |
| 02 Autofocus | - AF-A |
AF-A auto selects either AF-S (Single) or AF-C (Continuous) modes. Single or continuous autofocus. (As with other d-SLRs though, AF operates only when shutter button is half-pressed or AE-L/AF-L button is fully pressed, regardless of this setting.) | |
| 03 AF-area mode | - Single area - Dynamic area - Closest subjct |
Single and Dynamic area let you select the primary AF point. Closest subject lets the camera choose whichever area has the closest subject detail.
Single is the default for P, S, A, M and Macro modes. Closest subject is the default for the Scene modes other than Macro. |
|
| 04 No SD Card? | - Release Locked - Enable Release |
Prevents shutter release if there's no SD card in the camera. (Helps avoid shooting a pile of photos without "film" in the camera.) |
|
| 05 Image review | - On - Off |
Enables or disables the immediate review of an image on the LCD screen after each shot. | |
| 06 Flash Level | - -3 to +1 EV |
Adjusts the intensity of the on-board flash.
|
|
| 07 AF assist | - On - Off |
Enable or disable the AF-assist light. Light only comes on if it's needed.
If SB-800 or SB-600 is attached, camera will use the strobe's AF assist illuminator. |
|
| 08 AF area illm | - Auto - Off - On |
Controls the subtle backlighting of the active AF point when the AF system actuates. In Auto mode, the backlight doesn't activate when you're shooting a bright subject. | |
| 09 ISO Control | - On - Off |
Enables Auto ISO in Auto and Scene modes. | |
| 10 ISO Auto | - Off - On |
On: - Done - P,A, DVP mode |
Boosts ISO automatically in creative exposure modes (P, A, or Digital Vari Program (scene) modes) when set to On, you can select the slowest shutter speed beyond which the camera will raise sensitivity. Options range from 1/125 to 1/8 second. |
| 11 EV step | - 1/3 step - 1/2 step |
Sets step size (in EV units) for aperture, shutter, and exposure compensation adjustment. | |
| 12 BKT set | - AE & flash |
The D50's auto bracketing feature can control either normal and flash exposure or white balance variation. | |
| 13 Metering | - Matrix - Center-weighted - Spot |
(See the discussion under the Exposure section of this review for details on these options.) | |
| 14 AE-L/AF-L | - AE/AF Lock - AE Lock only - AF Lock only - AE Lock hold - AF-ON - FV Lock |
Controls the function of the AE/AF lock button.
Most modes release the lock after the shutter is tripped, but "AE Lock hold" holds the AE setting until the button is pressed again. AF-ON causes the camera to autofocus when the AE/AF button is pressed. FV Lock fires a metering flash and locks flash exposure when the AE/AF button is pressed. |
|
| 15 AE Lock | - AE-L/AF-L button - + Release bttn |
The first option locks AE with the AE-L/AF-L button only, the second also permits AE lock with a half-press of the shutter button.
(This is unusual, most digital cameras by default lock exposure when the shutter button is half-pressed.) |
|
| 16 Flash mode | - TTL - Manual |
- Full Power - 1/2 Power - 1/4 Power - 1/8 Power - 1/16 Power |
Sets flash mode. Manual option leads to screen to set power level, from Full down to 1/16. |
| 17 Monitor off | - 10 sec - 20 sec - 1 min - 5 min - 10 min |
Delay after which rear-panel LCD switches off if no activity. | |
| 18 Meter-off | - 4 sec - 8 sec - 16 sec - 30 min |
Length of time the meter displays the exposure setting after it's been activated. (By either a shutter half-press or a press of the AE-L/AF-L button.) Unless the AE-Lock hold option is selected, the meter will continuously update while it's active, as the scene or camera settings change. | |
| 19 Self-timer | - 2 sec - 5 sec - 10 sec - 20 sec |
Duration of self-timer delay. | |
| 20 Remote | - 1 min - 5 min - 10 min - 15 min |
Sets the length of time the camera will wait for a signal from the infrared remote control before reverting to single-shot or continuous mode, whichever was last in effect. | |
Setup Menu
| Setup Menu Options | |||
| Top-Level Selection |
Second-Level | Third-Level | Notes |
| Format | - No - Yes |
Erases all files on card, including any images hidden or "protected" | |
| CSM Menu | - Simple - Detailed |
The camera defaults to showing only the "Simple" Custom Settings Menu. Selecting "Detailed" here enables display of the full CSM. | |
| Date | - Set | Sets the date and time. | |
| LCD Brightness | -2 to +2 | The camera displays a gray scale on its LCD as an aid to setting the LCD brightness. | |
| Video mode | - NTSC - PAL |
Selects video timing for US/Japan or European compatibility. | |
| Language | - German - English - Spanish - French - Italian - Dutch - Portuguese - Russian - Swedish - Chinese (Traditional) - Chinese (Simplified) - Japanese - Korean |
What? No Urdu?
;-) |
|
| Image comment | - Done - Input comment - Attach comment (view) |
(Input comment) | Embeds an alphanumeric character string in the EXIF header of captured images.
Comments are visible in Picture Project or Nikon Capture 4, versions 4.1 and later. |
| USB | - Mass storage - PTP |
Chooses protocol for USB port. Mass Storage tends to transfer faster, PTP links to automatic camera-download software on Mac OS 10 and Windows XP. | |
| Folders | - Select folder |
(Select folder)
(New) (Rename) |
Select which folder will be used for both image storage and playback. |
| File No. Seq | - Off - On - Reset |
If on, camera will remember and continue file number sequence from one card to the next, and across erase/format operations. | |
| Mirror lock-up | - Yes - No |
For sensor cleaning, locks mirror up and shutter open. Turn off camera to reset. AC adapter not required.
NOTE: Don't confuse this with a mirror lockup mode that locks the mirror pre-exposure, to minimize camera shake from mirror bounce. (The D50 doesn't have that feature.) |
|
| Dust ref photo | - Yes - No |
Capture a special "Dust Reference" image that can be used with Nikon Capture 4 to automatically touch-out the images of dust specks on the sensor. | |
| Firmware Ver. | Displays current camera firmware version. | ||
| Image rotation | - Automatic - Off |
The D50 has an orientation sensor that records the position of the camera in the file headers, allowing the images to display in their correct orientation on the camera's LCD or in Nikon's software. This option disables this, useful if you're going to be using in an orientation (straight up or straight down) that would result in incorrect orientation data being recorded. | |
Reader Comments! --> Visit our discussion forum for the Nikon D50!

Follow Imaging Resource: