Canon EOS-1D Mark IICanon doubles the resolution of their speed demon SLR, while actually increasing its speed and cutting image noise. Amazing!<<Sensor, Noise Reduction, and Optics :(Previous) | (Next): The "Red Problem," Description and Workaround>> Page 7:ExposureReview First Posted: 01/27/2005 |
Exposure
Wide Range of Exposure Options
| Free Photo Lessons | |
|
Noise Reduction System
The remaining exposure mode is Bulb, which simply allows you to take long exposures
for unlimited periods of time, depending on the type of power source (With the
new DIGIC II chip, Canon estimates a fully charged battery pack will allow for
a 3-hour maximum exposure time, double that of the 1D and 1Ds; however the AC
adapter allows for unlimited exposure times.) The Mark II automatically employs
a noise reduction system in exposures longer than 1/15-second (this function
can be turned off through the Record menu when shot-to-shot cycle time is an
issue). To reduce image noise, the camera captures a second, blank, image with
the shutter closed, which is then compared against, and subtracted from, the
original to remove the noise. As with the earlier 1D, it's somewhat surprising
that the dark-frame noise reduction system works even for very long Bulb exposures,
as those of most cameras I've tested do not. Even more impressive, is that the
1D Mark II can queue up multiple bulb exposures, waiting until you're finished
with an entire series of shots before doing the dark-frame processing for the
first one, and then processing all of the exposures in sequence, performing
separate dark-frame exposures for each of them. (If you do run up against the
buffer limit, the top LCD readout will display "busy" when you try
to take another shot while it's still processing the dark frame reference images
for shots you've already captured.) To prevent any camera movement during long
exposures (from holding down or releasing the Shutter button), it's best to
work with the accessory remote control and attach the camera to a tripod. As
was the case with the original EOS-1D, I was pleased to find that the noise
reduction system worked even in Bulb exposure: The dark-frame noise suppression
systems on most digital cameras I test are limited to timed exposures of relatively
short duration. Even more impressive, the EOS-1D Mark II can queue up the dark-frame
processing from number of successive exposures, waiting to apply the dark frame
adjustment until you've stopped shooting. If you run up against the limit of
the buffer capacity while the camera is still processing dark frames from previous
shots, the top LCD readout displays "busy". Very slick!
In my testing, I found the Mark II's noise reduction system exceptionally effective.
It won't work miracles with a very warm camera (image noise roughly doubles
for every 8°C rise in temperature), but I rarely found any "hot
pixels" in any of the bulb exposures I did, although I only tested it to
roughly three minute exposure times. (If you do encounter any stuck pixels,
I highly recommend Mike Chaney's Qimage
Pro, a program with an amazing ability to remove spot noise without disturbing
the underlying image.)
 Metering
Sensors
Metering
Sensors
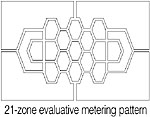
To determine exposure, the Mark II borrows the 21-Zone Evaluative Metering system
employed by the 35mm EOS-1v and EOS-1D. Evaluative metering divides the image
area into 21 zones of different sizes, with a honeycomb pattern in the central
portion of the frame. The full Evaluative Metering mode determines the exposure
by assessing each of the 21 zones and averaging the best exposure value for
the entire frame. The 21-zone system also offers Center-Weighted and Partial
metering modes. In Center-Weighted metering, the camera reads the exposure from
the entire scene, but places emphasis on a large area in the center of the frame.
Partial metering works along similar lines, but only places emphasis on approximately
13.5 percent of the center area.
Spot Metering Options
In addition to the Evaluative Metering options, the Mark II also offers a range
of Spot metering choices. Normal Spot metering bases the exposure on a reading
taken from the very center of the frame, and is usually chosen for use with
high-contrast subjects. Alternatively, in some autofocus modes, you can choose
to link the Spot metering area to one of nine or 11 active AF points. When you
use Custom Function menu 13 to limit the selectable AF points to either nine
or 11, the manually-selected AF point is linked to a 3.8 percent Spot Metering
sensor, centered on that point. Another option is to choose the Multi-Spot metering
option, which bases the exposure on as many as eight separate readings from
different parts of the image. In Multi-Spot metering mode, the central spot
metering sensor is activated, and a meter reading is taken every time you press
the "FEL" button on the top front of the camera. As you take successive
readings, the exposure readouts in the viewfinder show the current aperture
and shutter speed settings the camera has computed, while the vertical exposure
level indicator shows the relative light levels corresponding to each of the
points you measured. This is a pretty powerful exposure option, giving the photographer
great control over the final exposure. The exposure level indicator gives you
a pretty good idea of how much dynamic range the shot requires, and you can
choose to give more weight to a given area of the image by taking multiple readings
there. Very slick, a great feature!
Exposure Lock
As you'd expect, the Mark II also offers an Exposure Lock option, which lets
you lock exposure independently from the autofocus determination. You simply
center the frame on the part of the subject you want to expose for, and press
the AE Lock button, marked with an "*" on the camera. What's interesting
though, is that this same AE Lock capability is extended to flash exposures
when using Canon Speedlights. When shooting with an external flash, a Flash
Exposure Lock option (the same FEL button used in the Multi-Spot metering mode)
works with Spot metering to determine and lock the flash exposure. While not
a multi-spot system, you can select a specific portion of the image on which
to meter for flash exposure, just as you can with non-flash shots using the
AE Lock button. You can also lock non-flash exposures, by pressing the AE Lock
button marked with an "*" on the camera body.
Exposure Compensation
Exposure Compensation is adjustable from -3 to +3 exposure values (EV) in one-third-step
increments. An Auto Exposure Bracketing option is available when you're not
sure about the best exposure. Three images are captured in succession -- one
at the metered exposure, one overexposed, and one underexposed. The amount of
exposure variation can vary as much as +/-3 EV steps. In addition to aperture
or shutter-speed based bracketing, the Mark II offers a unique ISO speed bracketing
option. In this mode, the camera leaves the aperture and shutter settings at
their predetermined values, and brackets the exposure by varying the ISO light
sensitivity of the camera.
ISO Sensitivity
The Mark II's light sensitivity is adjustable from 100 to 1,600 ISO equivalents,
which is expandable to 50 to 3,200 ISO equivalents through an on-screen menu
option. You can experiment with a range of ISOs, by using the ISO Auto Bracketing
function to capture three images at different ISO settings. The first image
is taken at the set ISO value, followed by one at the next lowest value, and
one at the next highest value. For example, bracketing the ISO around the 200
value results in a series of images taken at 100, 200, and 400 ISO equivalents.
12 White Balance Modes
The Mark II offers 12 White Balance modes from which to choose, including Auto,
Daylight, Shade, Overcast, Tungsten, Fluorescent, Flash, Custom, Color Temperature,
and up to three separate Personal White Balance settings. Custom
is the manual white balance option, which determines the white balance setting
from a previously-captured image of a gray card. This method differs from the
customary use of a white card held in front of the lens. (Other Canon pro SLRs
also use this approach.) While slightly less convenient for on-the-fly white
balance adjustment (you have to shoot the test image, then go back into the
menu system to select it as the white balance reference), the advantages
are actually manifold. First, you can easily store several different reference
images on the camera's card, letting you quickly switch between different custom
white balance settings. This can be very handy in environments where you need
to quickly switch between radically different lighting environments. (Consider
sports shooting, where you may want one custom setting for the stadium lights
and another for the fluorescent lighting of the locker room.) Another advantage
of Canon's custom white balance approach comes in scenarios where multiple photographers
are covering the same event. The same set of white balance reference images
can be loaded onto each shooter's CF cards, making for perfect color consistency
between all the cameras and shooters. (A great help for post-event image workflow!).
Here's a list of the available White Balance modes:
- Auto - (see below for information on Canon's unusual "Hybrid Auto" white balance)
- Daylight - Balanced for sunlight, approximately 5,200°K
- Shade - Balanced for open shade on sunny days, approximately 7,000°K
- Overcast - Balanced for cloudy skies or dusk, approximately 6,000°K
- Tungsten - Set up for professional tungsten studio lighting, approximately 3,200°K
- Fluorescent - "Typical" fluorescent (is there such a thing?), about 4,000°K
- Flash - Set to match EOS Speedlights, approximately 5,600°K
- Custom - The usual custom or "manual" white balance option, which bases the white balance adjustment on a shot of a white or gray reference card. The EOS-1D can accommodate a range of roughly 2,000°K - 10,000°K in this mode. (That's a very wide white balance range.)
- Manual Color Temperature Setting - This is an unusual mode we suspect will be very popular with photographers. You can specify the color temperature for neutral white balance in 100-degree increments from 2,800 to 10,000°K. Very nice, a feature we're surprised isn't widespread. (Why not extend it all the way down to the 2,000°K that the Custom option can handle, though?)
- Personal White Balance Settings (as many as three) - You can use Canon's
software to create up to three custom white balance settings on the computer,
and then upload them to the camera. These settings will then appear as options
in the Mark II's menu system. (This strikes us as potentially very useful
for news organizations or other situations where you'd have multiple shooters
working an event, and want to ensure color consistency between them.)
White Balance Bracketing
White Balance Bracketing is another useful feature that Canon included in the
Mark II. You can set the camera to shoot three images at the same exposure level,
varying the White Balance setting between shots by up to +/- 3 steps, each step
being equivalent to five Mireds (Micro-reciprocal degrees). Mireds are a bit
of an arcane measurement, but represent the units most directly applicable to
the mathematics of color adjustment, their main benefit being that they're additive.
A filter that shifts 3200°K light by 100°K will produce a much different
shift (measured in degrees Kelvin) with 7000°K light, hence the use of mireds
to describe the shift, rather than degrees Kelvin. (For example, five mireds
at 3200°K is a shift of only 52°K, while five mireds at 7000°K is
a shift of about 257°K.) This is all a little convoluted for the uninitiated,
but pro photographers are accustomed to working with mireds in calculating filter
factors, and professional color meters generally offer a mired scale for calculating
filter corrections.)
White Balance in Degrees Kelvin
I also like Canon's provision of a Color Temperature white balance option, which
allows the user to select the desired color temperature in 100-degree increments
from 2,800°K to 10,000°K. I'd still like to see the lower end of this
range extend a little further, since household and commercial incandescent lighting
tends to be more in the range of 2,500°K to 2,800°K. Still, the Color
Temperature white balance is very handy, particularly if the shooter has access
to a color temperature meter.
"Personal" White Balance Settings for Rapid-fire Custom Changes
Finally, the Personal White Balance feature allows you to create as many as
three different white balance settings on a computer and load them into the
Mark II for quick use. This strikes me as another great option for pros who
have to shoot under highly variable lighting, or for groups of pros needing
consistency between their setups. Not quite as flexible as the Custom option,
because the Personal settings must be downloaded to the camera from a host computer,
but arguably more powerful, not to mention having the advantage of allowing
you to switch between three distinct custom settings very quickly.
"Color Matrix" options
The Mark II offers a nice range of color options, moving away from the tyranny
of the sRGB color space. sRGB produces bright, saturated color on computer monitors,
but has a woefully restricted color gamut. Bottom line, sRGB is fine for consumer-level
devices, but is really unsuited for color-critical professional applications.
Nikon took a step away from sRGB in its D1x and D1h models, by providing support
for the so-called Adobe RGB color space in addition to the default sRGB. The
Canon EOS-1D Mark II goes a step further, offering no fewer than five color-space
options through the Record menu, plus the ability to store two customized settings.
Canon calls these "Color Matrix" settings, and they offer an interesting
range of possibilities. The table below lists their attributes.
| |
|
| Color Matrix 1 (Standard) |
Default color matrix. Normal saturation, sRGB color space. |
| Color Matrix 2 (Portrait) |
sRGB color space, but hue and chroma optimized for reproduction of skin tones. (A little warmer, more saturated in the reds and pinks.) |
| Color Matrix 3 (High Saturation) |
sRGB color space, extra saturation. Intended to reproduce the characteristics of high-chroma slide film. |
| Color Matrix 4 (Adobe RGB) |
Adobe RGB color space, normal hue and chroma within that space. Much wider color gamut than sRGB, which means images will look dull on sRGB monitors. Excellent for use in color-managed workflows, particularly ones going to print as final output. |
| Color Matrix 5 (Low Saturation) |
Mysterious low-saturation color space. Apparently sRGB-based, but color saturation is lower than normal. |
| Color Matrix Settings 1 and 2 |
Preset settings. |
| Color Matrix Setup |
Lets you set your own custom color matrix. |
For the pros likely to buy this camera, I call particular attention to Color Matrix settings 4 and 5. Setting 4 is matched to Adobe RGB, providing the greater color gamut that color space offers. The EOS-1D Mark II's handling of Adobe RGB JPEGs is another area that's been enhanced relative to the performance of the original 1D. Thanks to its support of the EXIF 2.21 standard, the 1D Mark II now embeds an ICC color profile into the EXIF header of JPEG files, so EXIF 2.21-aware image editing applications can recognize and apply the proper color space parameters automatically. (With the original EOS-1D, it was up to you to be alert and configure your image editor properly when opening images shot with the Adobe RGB color space.) Note though, that only the more recent versions of most imaging applications will be EXIF 2.21-aware: Adobe Photoshop version 7 doesn't recognize the 1D Mark II's Adobe RGB tags in its JPEG files, but Photoshop CS does.
Color Matrix setting 5 is a little mysterious, as there are some indications Canon intended it to be a special wide-gamut color space, but now treats it simply as a low-saturation sRGB.

Follow Imaging Resource: