Canon EOS-1D Mark IICanon doubles the resolution of their speed demon SLR, while actually increasing its speed and cutting image noise. Amazing!<<Exposure :(Previous) | (Next): Flash>> Page 8:The "Red Problem," Description and WorkaroundReview First Posted: 01/27/2005 |
The "Red Problem," Description and Workaround
Soon after production models of the 1D Mark II began hitting retail shelves, users reported odd behavior when photographing strong reds. As time went on, some users also found similar issues with some shades of blue, under certain ill-defined conditions. In the months leading up to the publishing of this review (in mid-January, 2004), the 1D Mark II's color handling generated an unusual amount of foment and speculation across the Internet, but unfortunately with the lack of careful test and analysis so often characteristic of Internet discussion.
When we checked with Canon, we were told that they felt that most of the reported problems resulted from people inadvertently running the camera with the color saturation setting boosted, but that the color management in the Digital Photo Professional software package was indeed more sophisticated than that in the camera.
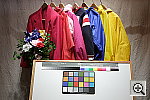
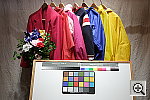
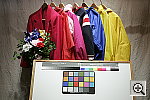
Wanting to get to the bottom of the issue, I put together a "red-hue torture test" in the studio, using our artificial "sunlight" lighting setup. (The smooth spectrum of the dichroic-filtered incandescent lighting of this setup should give rise to fewer potential problems with metamerism than the more "spiky" spectral distribution of HMI lights, and would avoid potential problems with fluorescence from the UV content of strobes.)
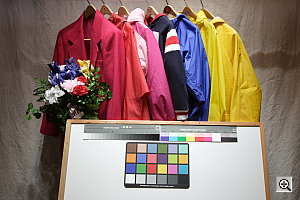
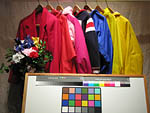
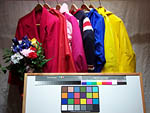
The image above shows the test scene I set up (as rendered by Digital Photo Professional, which did indeed produce the best results). There's a collection of bright colors in the red/magenta portion of the spectrum, as well as a bright blue and yellow, some greens in the flower bouquet, and several color and grayscale reference targets, so I could see how the color management affected other portions of the spectrum.
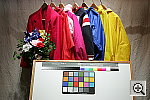
To see what was really going on, I shot this scene with each of the 1D Mark II's color matrices, creating both RAW and JPEG files in the camera. All exposures were widely bracketed, so I could be sure of having shots that captured the full dynamic range of the scene and that were comparable with each other. I shot the range of color matrices using the camera's default settings, then went back to CM1 (the default sRGB color space) and shot with the camera's color saturation setting dialed down a few days later. (This was after I spoke with Canon, and they indicated that they thought that the red problem was caused by incorrect color saturation settings.) The positions of some of the coats are slightly different in this second set of shots, but the lighting is identical between the two scenes.
The results were very interesting, and underscore the importance of RAW shooting
and the use of the Digital Photo Professional software package for color-critical
work with the EOS-1D Mark II. The thumbnails below show the results with various
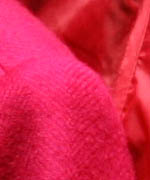
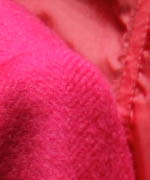
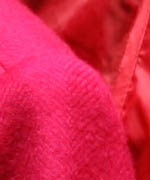
combinations of color settings and conversion methods. The color of the magenta
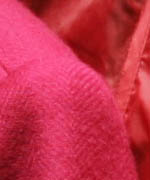
jacket on the left side of the frame should be more purplish, with more color
separation between it and the red nylon shell to the right of it. Also, because
the red channel completely saturates in the highlight on the shoulder of the
jacket, considerable detail is lost.
| Canon EOS-1D Mark II In-Camera Red Handling | ||
| Camera
RGB (CM1) Default Saturation |
Camera
RGB (CM1) Medium-Low Saturation |
Camera
RGB (CM1) Lowest Saturation |
 |
 |
 |
 |
 |
 |
The color of the magenta jacket on the left side of the frame should be more purplish, with more color separation between it and the red nylon shell to the right of it. Also, because the red channel completely saturates in the highlight on the shoulder of the jacket, considerable detail is lost. From this, it's pretty clear that the 1D Mark II has difficulty with the (admittedly very tough, out-of-gamut) magenta of the jacket on the left, and also somewhat oversaturates the magenta jacket that's more towards the middle of the frame as well. Also, it's evident that reducing the camera's saturation setting has relatively little effect. As noted, close inspection reveals that what's happening is that the red channel saturates completely, well short of the point of maximum brightness/saturation. This is a not-uncommon issue in color management when dealing with out-of-gamut colors: The color management scheme just tries for the best match it can manage, and when the color goes out of gamut, it "clips", the affected color channel staying pegged at its maximum value, while the others change in accordance with the color-mapping equations.
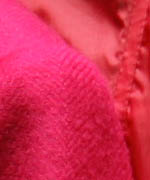
A better (or at least, more often preferable) approach is that taken by the Digital Photo Professional software. Rather than aiming for the best accuracy for in-gamut colors, and letting out-of-gamut ones clip, this approach is to compress the color at the edges of the available color space, so some range of out-of-gamut colors are mapped to the edge of the color space. Typically, colors are mapped exactly in areas that are well within the available color space, but a region of color space near the edge of the gamut is selectively compressed, so at least some differences in relative color will still be displayed as the subject moves out of gamut, but a broader range of color can still be accommodated. (This is a very simple description of the concept of gamut compression. - The real art comes in deciding exactly how to compress the color, over what range of values, and how to transition from exact mapping to varying degrees of compression.)
So how does Digital Photo Professional do? Here are some samples showing its
output, as well as that from the less-sophisticated Canon EOS Viewer utility.
(Which more or less matches the color management of the camera itself.)
|
EOS-1D Mark II Red Hues, Processed
from RAW files |
||
| EOS Viewer from RAW |
Digital Photo Professional from RAW |
Digital
Photo Professional (From RAW shot in CM4, Adobe RGB) |
 |
 |
 |
 |
 |
 |
As noted, the EOS Viewer utility falls prey to the same phenomenon as does the camera's own internal JPEG conversion, saturating the red channel and clipping the color gamut on the magenta jacket. In contrast, Digital Photo Professional's RAW converter engine reduces saturation in the magenta hues somewhat overall, and compresses the color space somewhat as the subject color approaches the edge of the color space. The result is much more natural-looking, and very little detail is lost in the highlights on the shoulder of the jacket.
What about Adobe RGB color space? The broader color gamut of Adobe RGB does
indeed largely fix the problem, although you'll need to use the resulting
images in a color-managed environment, since most desktop imaging applications
assume sRGB as their standard color space. Here are some examples, shot with
Adobe RGB, showing that the Camera, EOS Viewer Utility, and Digital Photo
Professional all do fairly well when working in the Adobe RGB color space
(although DPP still wins out, in my opinion):
|
EOS-1D Mark II Red Hues, Adobe
RGB color space |
||
| Camera
JPEG, Color Mode 4 |
Digital Photo Professional from CM4 RAW file |
EOS Viewer Utility, from CM4 RAW file |
 |
|
 |
 |
|
 |
Finally, given the difficulty of the colors we're dealing with here, a fair question would be whether other cameras handle them much better. At the time I shot the test, I didn't have a lot of competing SLR models available, but shot the scene with my Nikon D70, as well as two consumer cameras, a Canon PowerShot S70 and a Kodak DX7440. Of the three, the D70 arguably did the best job, losing relatively little detail, and maintaining fairly good color separation between the jacket and red nylon shell. The Canon S70 also held onto detail fairly well, but rendered the magenta jacket as an almost pure red. Finally, the Kodak DX7440 maintained excellent separation between the colors, but at the cost of a lot of detail in the highlights of the magenta jacket. (Sorry, no larger images are linked to the thumbnails below.)
| Other Cameras | ||
| Nikon
D70 |
Canon PowerShot S70 |
Kodak DX 7440 |
 |
 |
 |
 |
 |
 |
Bottom line then, there are issues to be found in some areas of the spectrum
(strong magentas and reds in our testing, possibly other colors as well -
Shawn also had issues with a bright orange on a model's bikini he shot with
the 1D Mark II), but when working with the JPEG files generated in-camera.
Processing RAW images through Canon's Digital Photo Professional software
seems to avoid these color issues almost entirely.
Tonality and Custom Tonal Curves
This was a major feature of the original 1D, but also a bit an Achilles heel.
In the 1D Mark II, most limitations have been addressed. The original 1D's default
tone curve was rather contrasty, but its support for custom tone curves at least
gave you a way to deal with the issue. The remaining problem though, was that
the process of manipulating tone curves in Canon's EOS Capture utility was glacially
slow, at least on Macintosh computers. With the version shipped with the 1D
Mark II though, not only is the camera's default tone curve less contrasty,
but the software is much more responsive when you're interactively adjusting
a tone curve. Now, creating a custom tone curve and downloading it into the
camera is a relatively painless process. (Although I would still like to see
it be a little faster in displaying the results of a tone curve tweak.)

Follow Imaging Resource: