Epson PhotoPC 3100ZEpson updates their excellent 3 megapixel digicam with a new user interface, and support for PRINT Image Matching!<<Shutter Lag & Cycle Time Tests :(Previous) | (Next): Camera Modes & Menus>> Page 8:Operation & User InterfaceReview First Posted: 7/10/2001 |
Operation and User Interface
We found the user interface on the 3100Z a little confusing at first, but a quick read through the manual put everything in perspective. We applaud Epson's attempt to simplify the conventional LCD menu by setting up a grid-like system of control buttons around the LCD monitor. This setup definitely saves time, allowing you to quickly change exposure compensation, white balance, and metering mode, without having to scroll through multiple screens and options. That said, we still found some of the settings a bit of a nuisance to change. For example, to change the camera's User mode, you have to go into the Setup menu via the mode dial to change the option. It seems far more sensible to keep the mode dial in control of camera mode. As it was on the prior 3000Z model, the mode dial controls whether you're using the LCD monitor or just the optical viewfinder, as well as the Multi-Shot, Playback, PC, and Setup modes. Aside from some exposure settings located in the Setup menu, overall exposure control was relatively straightforward, once we got the hang of it. The following overview will give you brief explanation of all of the controls and their functions.

Shutter Button: Located on the very top of the hand grip, the shutter button sets focus and exposure when halfway pressed, and fires the shutter when fully pressed. It also starts the 10-second countdown when the camera is in Self-Timer mode.

Power Button: Situated on the right side of the top panel, encircled by the mode dial, this button turns the camera on and off, signaling the lens to extend or retract, depending on the mode setting.
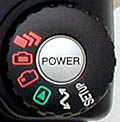
Mode Dial: Surrounding the power button on the top right of the camera, this notched dial sets the camera's operating mode:
- Setup: Pulls up the Setup menu for changing various camera settings.

- PC: Allows the camera to connect to a computer and download images, also used for printing images using PRINT Image Matching or Digital Print Order (DPOF) functions.
- Playback: Displays recorded images on screen, so you can review, delete, or protect them.
- Viewfinder: Turns the LCD monitor off, for shooting with the optical viewfinder only.
- LCD: Activates the LCD monitor for composing images.
- Multi-Shot: Sets up the camera for shooting in Continuous, Interval, Stitching, or Video Clip modes.

Flash Button: Positioned to the left of the mode dial, this button controls the Flash mode:
- Auto: Puts the camera in control of when the flash fires, based on existing light conditions.
- Forced Flash: Sets the flash to fire with every exposure.
- Flash Off: Deactivates the flash, so that it never fires, regardless of light level.
- Red-Eye Reduction: Fires a small pre-flash before firing the full flash, to reduce the red-eye effect.
- Slow Synchronized: Combines the flash with a slow shutter speed, allowing more ambient light into the image. Two slow synchro options (Leading or Trailing) are available through the Setup menu, to control whether motion blurs appear in front of or behind the sharp, flash-exposed image.

Image Quality Button: Diagonally to the left of the Flash button, this button sets the image quality and size to Standard JPEG (640 x 480), Fine JPEG (1,600 x 1,200), Super Fine JPEG (2,048 x 1,536), HyPict JPEG (2,544 x 1,904 interpolated) or Uncompressed TIFF (2,048 x 1,536 pixels).

Self-Timer Button: Located just below the Image Quality button, this button activates the Self-Timer mode, which starts a 10-second countdown when the Shutter button is fully depressed.

Diopter Adjustment Dial: Located on the left side of the optical viewfinder, this small dial adjusts the viewfinder focus to accommodate eyeglass wearers.
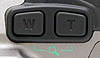
Telephoto (T) / Wide Angle (W) Buttons: Situated in the top right corner of the back panel, these two buttons control the Optical Zoom in any capture mode.

Menu On / Off Button: Positioned at the very bottom right corner of the LCD monitor, this button controls the on-screen menu display in Playback mode and any capture mode.
![]()
LCD Buttons: This series of seven unmarked buttons are positioned along the bottom and right side of the LCD monitor. Depending on the camera's mode, these buttons control various menu items on the LCD screen. Each button corresponds to a menu option, which is directly above or to the side of the actual button.

"Push" Battery Compartment Button: Located in the center of the battery compartment door, this button releases the door and allows it to slide open.

Follow Imaging Resource: