Epson PhotoPC 3100ZEpson updates their excellent 3 megapixel digicam with a new user interface, and support for PRINT Image Matching!<<Operation & User Interface :(Previous) | (Next): Image Storage & Interface>> Page 9:Camera Modes & MenusReview First Posted: 7/10/2001 |
Camera Modes and Menus
Mode Dial Menus: The following explains each Mode dial setting and its corresponding menus:
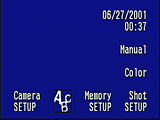
Setup Mode: Marked on the mode dial as "Setup" in white letters, this mode controls all of the basic camera settings. Immediately upon entering the mode, the Setup menu is displayed on the LCD monitor with the following options:
 Date and Time: The first button on the top right of the Setup menu is used to adjust the current date and time.
- User Mode: Selects between Program, Manual or Full Auto capture modes. (See descriptions and menus below.)
- Color Mode: Alternates between Color and Monochrome (black and white) shooting modes.
- Shot Setup: Brings up the image setup menu (see below)
- Memory Setup: Formats the CompactFlash card.
- Language: Sets the menu language to English, German, Portuguese, Chinese, Japanese, French, Italian, or Spanish. You can also set the TV timing to PAL or NTSC.
- Camera Setup: Calls up a submenu of camera settings (see below)
Shot Setup: The Shot Setup choice on the main setup menu produces this submenu of options:
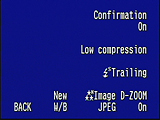 Confirmation On / Off: Sets the camera to automatically display or not display the last image recorded as it is written to memory, with an option to delete immediately.
- Compression: Sets the JPEG compression to Standard or Low (the best quality) compression.
- Trailing / Leading: Sets the Slow Synchro Flash option to Trailing, in which the flash fires at the end of the exposure, or Leading, in which the flash fires at the beginning.
- Digital Zoom On / Off: Enables and disables the Digital Zoom.
- File Type: Sets the file type to JPEG or TIFF.
- New White Balance: Enables you to save Custom white balance settings you've created for specific light sources.
- Back: Takes you back to the main Setup menu.
Camera Setup: The Camera Setup choice on the main setup menu produces this submenu of options:
 Power Save: Sets the Power Save (auto shutdown) option to turn off the camera after 30 seconds, one minute, or five minutes.
- Brightness: Adjusts the LCD monitor's brightness level.
- Volume: Increases or decreases the camera's volume level.
- Beep: Sets the camera's beep sound to occur Always, Never, or with the Shutter only.
- Back: Takes you back to the main Setup menu.
PC Mode: Noted on the Mode dial with a double ended arrow, this mode allows the camera to connect to a computer and download images. It also provides access to the PRINT Image Match and DPOF settings menus for output to compatible printers.
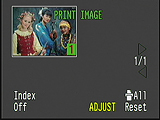 Print Image: This menu designates which images have been chosen to be printed (by pressing the green Print button) and how many prints of each are ordered.
- Image Number: The second and third LCD buttons from the top left side are used to scroll through selected images.
- All Reset: Offers the option of resetting all of the print settings.
- Adjust: This menu enables you to make basic adjustments to the images in-camera, which are translated to PRINT Image Matching printers. (Note: Brighten and Sharpen adjustments remain in effect until you change them back to standard.) Options include:
- Sharpness: Changes sharpness to Standard, Low, or High
- Print Number: Allows you to order the number of prints you want of each image using up and down arrows.
- Brightness: Changes brightness to Standard, Low, or High
- Back: Takes you back to main menu
- Index Off / On: In On position, this menu option sets up an Index print of all selected images
Playback Mode: Accessed by turning the Mode dial to the green playback symbol, this mode allows you to review captured images, protect them, or delete them. The on-screen LCD menu offers the following choices:
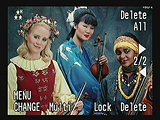 Delete All: Erases all of the images on the CompactFlash card (with an option to cancel).
- Right and Left Arrows: Scroll through the captured images, either forward or backward.
- Delete: Erases the currently displayed image from the CompactFlash card (with an option to cancel).
- Lock: Protects or unprotects the currently displayed image from being altered or deleted, except when the card is formatted.
- Multi: Displays up to nine thumbnail images on a page.
- Menu Change: Brings up the playback sub-menu shown below.
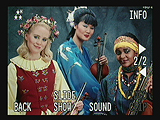 Menu Change: This sub-menu is accessed from the main Playback Mode menu above:
- Info: Produces an image information screen that reports the exposure settings used.
- Right and Left Arrows: Scrolls through captured images, either forward or backward.
- Video Clip: Brings up Video Clip Playback screen, with Play, Delete, Forward / Reverse, Multi Display, and Back options.
- Sound: Allows you to play back a recorded sound or delete it.
- Slide Show: Plays back all the captured images in a slide show format.
Viewfinder Mode: One of two single-capture positions, this Mode dial setting is marked by a red camera outline with a small red rectangle on the inside. It deactivates the LCD monitor for shooting with the optical viewfinder only.
LCD Mode: One of two single-capture positions, this Mode dial setting is marked by a red camera outline with a large red rectangle on the inside. This mode activates the LCD monitor for use in image composition. It works in one of three Exposure modes selected through the Setup menu and described below: Program, Manual, and Full Auto.
Multi Mode: This mode is entered by turning the Mode dial to the red, multi-shot symbol at the far end of the dial. Because this mode is controlled by the Mode dial, the available exposure settings are determined by the capture mode set in the Setup menu or by switching back to the LCD mode to adjust settings. The Mult-Shot mode offers the following options, adjustable using the Mode Change button in the lower left corner.
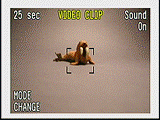 Video Clip: Records up to 25-second video clips with sound or 35-second clips without sound, at 15 frames per second. The on-screen menu includes:
- Sound On / Off: Turns the sound on and off.
- Sound On / Off: Turns the sound on and off.
- Continuous Shooting: Sets the camera to capture up to 45 standard quality images at two shots per second, 13 fine quality images at two shots per second, or seven super fine images at one image per second.
- Interval: Like time-lapse photography, this mode allows you to set a time interval from 10 seconds to 24 hours for how often the shutter is fired.
- Sound On / Off: Turns the sound on and off.
- Interval Time Set Arrows: Used to set the time interval. The right and left arrows at the bottom of the screen are used to highlight hour, minute, or seconds. The up and down arrows on the right side of the screen are used to increase or decrease the highlighted settings.
- Max / Min: Sets the time interval to the maximum (24 hours) and minimum (5 seconds, 10 seconds w / flash, 20 seconds w / sound) settings.
- Stitching: Takes a series of images that can be stitched together into one single panorama.
User (Exposure) Modes: The camera's three basic User Modes are selected using the top right LCD button in the Setup mode on the Mode dial: Full Auto, Program, and Manual. Their descriptions and menus are as follows:
Full Auto: This mode puts the camera in charge of all exposure settings. The user has control over Self-Timer, Flash, Image Quality, Zoom, and Macro modes. (Other options, such as Digital Zoom, can be activated using the Setup menu.)
Program: The Program provides more user controls than the Full Auto mode, but less than the Manual mode, with the same controls available in Full Auto, plus the following exposure settings: Exposure Compensation, ISO, and White Balance. It also offers a choice of four preset shooting options:
- Normal: Sets up the camera for most standard shooting situations, good for average daylight shots.
- Sports: Uses a high shutter speed and matrix metering for capturing fast-moving subjects.
- Portrait: Puts the camera in spot metering mode and uses a fixed aperture of f/2.0 to place emphasis on the subject and blur the background.
- Landscape: Combines matrix metering and a fixed aperture of f/8.0 (which changes to f/2.0 if the subject is in dim light) to capture wide landscape scenes.
While in Program capture mode, the basic on-screen menu offers the following options:
- Review: The top LCD button displays a green arrow, which brings up the last recorded image and places the screen in Playback mode.
- Exposure Compensation: Adjusts the exposure compensation from -2 to +2 EV in one-half-step increments.
- Macro On / Off: Turns the camera's Macro (close-up) mode on or off.
- White Balance: Sets the camera white balance to Auto, Fix or Custom.
- ISO: Changes the camera's sensitivity to 100, 200 or 400 ISO settings (indicated by 1, 2, or 3 arrows).
- Program: Selects Normal, Sports, Portrait, or Landscape presets.
Manual: Also selected through the Setup menu, Manual exposure mode provides access to all of the camera's exposure settings, including ISO, White Balance, Shutter Speed, Aperture, Metering, and Manual Focus. Within Manual mode, you can choose from three levels of exposure control:
- Auto Exposure: Puts the camera in charge of shutter speed and aperture, while you control white balance, ISO, metering, and autofocus.
- Aperture Priority: Allows you to set the desired aperture (from f/2.0 to f/8.0) while the camera controls the shutter speed.
- Shutter Priority: Allows you to set the desired shutter speed from 1/1,000 to 8 seconds while the camera controls aperture.
- Manual Exposure: Gives you control over both aperture and shutter speed.
While in Manual capture mode, the basic on-screen menu offers the following settings, depending on the exposure control:
- Exposure Mode: Cycles through the Auto Exposure, Aperture Priority, Shutter Priority, and Manual Exposure modes.
- Exposure Compensation: Sets the exposure compensation from -2 to +2 EV in one-third-step increments. (Not available in Manual Exposure.)
- Shutter Speed: Sets the camera's shutter speed from 1/1,000 to 8 seconds. (Shutter Priority and Manual Exposures only.)
- Aperture: Selects the lens aperture setting from f/2.0 to f/8.0. (Aperture Priority and Manual Exposure modes only.)
- Macro On / Off: Turns the camera's Macro (close-up) mode on or off.
- Menu Change: Brings up the following on-screen menu options:
- Review: The top LCD button displays a green arrow, which brings up the last recorded image and places the screen in Playback mode.
- Auto Focus: The second and third LCD buttons cycle through Auto Focus (AF) and three preset Manual Focus modes: Three feet (single head), 10 feet (three people), and Infinity (mountain range). If you are in Macro mode, you can choose between: Auto Focus (AF), eight inches (M1), and 20 inches (M2).
- Metering: Sets the camera metering system to Spot or Matrix.
- White Balance: Sets the camera white balance to Auto, Fix, or Custom.
- ISO: Changes the camera's sensitivity to 100, 200, or 400 ISO settings (one to three arrows).
- Back: Takes the LCD monitor out of Menu Change mode.

Follow Imaging Resource: