Sony Cyber-shot DSC-F828Sony extends their high end to encompass 8(!) megapixels and a sharp 7x Zeiss zoom lens. - And Sony's new RGB+E sensor technology for more accurate color!<<Operation & User Interface :(Previous) | (Next): Image Storage & Interface>> Page 9:Camera Modes & MenusReview First Posted: 08/15/2003, Updated: 02/05/04 |
Camera Modes and Menus
Full Auto
Indicated on the Mode dial by a green camera icon, this
mode places the camera in charge of everything apart from flash, zoom, resolution,
and record mode. (Think of this as a quick way to get back to the camera's
default settings, without disturbing all the settings you've made in various
menus.)
Program AE (P): This mode puts the camera in control of aperture and
shutter speed, while you control all remaining exposure decisions. You can
cycle through equivalent exposure settings by turning the Command dial, thereby
biasing the exposure either toward shutter speed or depth of field.
Shutter Priority (S): Shutter Priority mode lets you control the shutter
speed, from 1/2,000 to 30 seconds, while the camera selects the best corresponding
aperture setting. You retain control over all other exposure variables.
Aperture Priority (A): As the opposite of Shutter Priority mode, Aperture
Priority mode lets you the aperture setting, from f/2.0-2.8 (depending on
lens zoom setting) to f/9, while the camera chooses the best shutter speed.
All other exposure parameters are under your control.
Manual Exposure Mode (M): This mode provides
total control over the exposure, as you're able to select both aperture and
shutter speed independently of each other, as well as control all other exposure
variables.
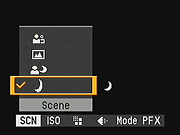
Scene (SCN): Scene mode offers four preset
shooting modes to choose from (Twilight, Twilight Portrait, Landscape, and
Portrait) which set the camera's exposure controls for photographing each
specific subject. The available exposure settings depend on the scene selected.
Twilight and twilight portrait both enable camera-determined exposure times
longer than 1/30 second. Twilight mode disables the flash, while Twilight
Portrait enables it. Landscape mode sets the exposure system to prefer smaller
apertures, for greater depth of field. Portrait mode is the opposite, setting
a bias toward larger apertures, for less depth of field.
Movie Mode: Marked on the Mode dial with
a film strip icon, this mode allows the user to capture moving images with
sound.
 Record
Menu: In each of the above recording modes, pressing the Menu
button calls up the following menu selections. Some options are not available
in all modes.
Record
Menu: In each of the above recording modes, pressing the Menu
button calls up the following menu selections. Some options are not available
in all modes.
- Scene: (Scene mode only.) Determines the preset shooting scene. Choices are Twilight, Twilight Portrait, Landscape, and Portrait.
- ISO: Sets the camera's light sensitivity to Auto or 64, 100, 200, 400, or 800 ISO equivalents.
- Image Size: Sets still image resolution to 8M (3,264 x 2,448 pixels), 3:2 Ratio (3,264 x 2,176 pixels), 5M (2,592 x 1,944 pixels), 3M (2,048 x 1,536 pixels), 1M (1,280 x 960 pixels), or VGA (640 x 480 pixels).
- Picture Quality: Changes the JPEG compression level to Fine or Standard.
- Record Mode: Enables the F828's special recording modes. Choices are RAW, TIFF, Voice, E-Mail, and Normal. (See the earlier portions of this review for descriptions of these options.)
- Bracket Step: Sets the step increment for Auto Exposure Bracketing mode. Options are +/- 0.3, 0.7, and 1.0 EV.
- Multi-Burst Interval: Specifies the frame interval for Multi-Burst mode. Choices are 1/7.5, 1/15, and 1/30.
- Flash Level: Adjusts the flash brightness to High, Normal, or Low.
- Picture Effect: Accesses the F828's creative effects menu, with options for Solarize, Sepia, and Negative Art.
- Color: Adjusts the color mode to Real or Standard.
- Saturation: Controls the level of color saturation, with options of Normal, High, and Low.
- Contrast: Controls the amount of contrast in the image, with options Normal, High, and Low.
- Sharpness: Adjusts the overall image sharpness
to Normal, High, or Low.
Movie Mode Menu - MPEG Movie Option: MPEG Movie
mode has only two options on its record menu:
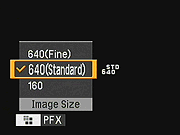 Image
Size: Sets the resolution for movies. Choices are 160 x 112, 640
x 480 Standard, and 640 x 480 Fine.
Image
Size: Sets the resolution for movies. Choices are 160 x 112, 640
x 480 Standard, and 640 x 480 Fine.
- Picture Effect: Accesses the F828's creative
effects menu, with options for Solarize, Sepia, and Negative Art.
Playback Mode: Indicated on the Mode dial
with the traditional green arrow Playback symbol, this mode lets the user
scroll through captured images on the Memory Stick. Images can be deleted,
protected, copied, resized, rotated, or set up for printing on DPOF devices.
Movie files and Clip Motion animations can also be played back. Pressing
the Menu button displays the following options:
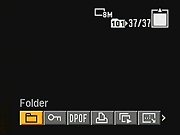 Folder:
Selects which folder will be played back, and displays the number of
files, creation date, and folder name for each.
Folder:
Selects which folder will be played back, and displays the number of
files, creation date, and folder name for each.
- Protect: Write-protects the current image, preventing it from being erased or manipulated in any way (except from card formatting). Also removes protection. A set of arrows appears on the LCD display, letting you scroll through captured images and mark others for protection as well.
- DPOF: Marks the current image for printing on a DPOF device, or removes the print mark. Like the Protect option, lets you scroll through other images on the card. (Only works for still images.)
- Print: Activates the USB direct print option, for use with printers supporting the Pict Bridge protocol.
- Slide Show: Activates an automated slide show of captured images. You can set the frame interval and whether or not the show repeats, as well as specify the folder of images to play back. (An interesting note - Slide shows will play back movie files stored on the memory card too, so you can mix movies with still images in a slide show.)
- Resize: Resizes the currently displayed image, to either 5M, 3M, 1M, or VGA settings. (Only works with still images.)
- Rotate: Rotates the currently displayed image 90 degrees clockwise or counterclockwise. (Only works with still images.)
- Divide: Activates the in-camera movie editing
function. (Only works with MPEG movie files.)
Setup Mode: This mode lets you change a
variety of camera settings. The Setup menu is displays immediately upon entering
the mode. Five separate screens of options are available, selected via a
tabbed interface running down the left-hand side of the screen.
-
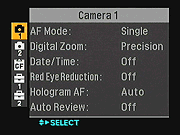 Camera
1:
Camera
1:
- AF Mode: Sets the autofocus mode to Single, Monitor, or Continuous.
- Digital Zoom: Enables or disables the Precision Digital Zoom or Smart Zoom settings.
- Date / Time: Determines whether the Day and Time or Date is overlaid on captured images.
- Red-Eye Reduction: Enables or disables the Red-Eye Reduction flash mode.
- Hologram AF: Turns the Hologram AF system on (Auto setting) or off.
- Auto Review: Turns the Auto Review
function on or off. If on, the image is displayed on the LCD
screen immediately post-capture.
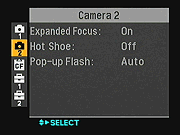 Camera
2:
Camera
2:
- Expanded Focus: Turns the Expanded Focus option on or off. Expanded Focus automatically enlarges the on-screen image 2x while focusing in Manual Focus mode, handy for telling when the subject is properly in focus.
- Hot Shoe: Turns the external flash hot shoe connection on or off.
- Pop-up Flash: Places the pop-up
flash under Auto or Manual control. If under Auto control,
it automatically pops up whenever an active flash mode is
set.
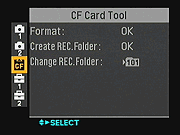 Card Tool:
- Format: Formats the Memory Stick or CompactFlash card, erasing all files (even "protected" ones).
- Create Record Folder: Creates a new folder for recording images. (The camera assigns the name to the folder though.)
- Change Record Folder: Selects the
folder for recording images. (The display for choosing the
active folder is more useful than many I've seen, showing
the folder name, the number of files it currently contains,
and the date and time it was created.)
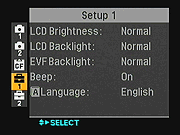 Setup 1:
- LCD Brightness: Controls the brightness of the LCD display. Options are Bright, Normal, and Dark.
- LCD Backlight: Controls the backlight for the main LCD, options are Bright and Normal. (NOTE that this option only appears when the camera is running from battery power - connecting the AC adapter automatically sets the brightness to "Bright", and removes this option from the menu.)
- EVF Backlight: Controls the backlight for the electronic viewfinder, options are Bright and Normal.
- Beep: Turns the camera's beep sounds on or off. The "Shutter" option enables only the shutter release sound.
- Language: Sets the camera's menu
language to English, French, German, Spanish, Italian, or
Portuguese.
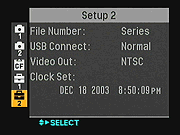 Setup 2:
- File Number: Sets the file numbering to Series (which continues file numbering from one memory card to another) or Reset (resets file numbering with each new card).
- USB Connect: Sets the USB connection type to PictBridge, PTP, or Normal.
- Video Out: Selects the A/V Out signal timing as either NTSC or PAL.
- Clock Set: Sets the camera's internal
clock and calendar.

Follow Imaging Resource: