Panasonic Lumix DMC-FZ8 Operation
Considering the Panasonic DMC-FZ8's extensive feature set, using the camera is quite easy thanks to the convenient external controls, easy access to settings and the clear and easy to navigate menu systems. But there are so many features, some of which are less than obvious, it's important to review the user's guide to make sure that you don't miss anything. Even with experimentation and a solid knowledge of digital cameras, there's a chance you might miss a few things that will enhance your experience with the FZ8. On the other hand, if you're more interested in keeping it simple, turn the Mode Dial to the red heart for a Simple mode that allows access to only the most basic settings or select a Scene Mode from among that mode's 21 options.
Record Mode Display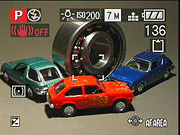 In Record Mode, the LCD monitor is on by default, displaying the selected Record mode, flash status, resolution and compression settings, battery status, OIS settings, approximate number of images remaining, card status, metering mode, EV compensation level, and AF area options. Press the shutter button halfway and the Panasonic FZ8 will set focus and exposure, displaying both shutter speed and aperture, as well as green boxes to indicate in-focus areas. Pressing the Display/LCD mode button on the back of the FZ8 cycles through available display modes, including info, info with histogram, an inset image with the information set off to the right and bottom of the display, a grid display, and no info at all. Holding this button down brings up the LCD Mode menu, which offers Power LCD and High Angle options, to either brighten the image in sunlight, or brighten the image for overhead shooting. Pressing the Set button brings up a menu that's well organized, easy to read in sunlight, and quick to navigate with either the Joystick or the Four-way controller. Pressing any of the Four-way buttons brings up a specific menu on the LCD, as indicated on the buttons themselves, namely: EV compensation, Flash mode, Review, and Self-timer.
The EVF mode is accessed with the EVF/LCD button. Each of the aforementioned menus comes up on the EVF as well, except for the Review button, which switches the FZ8 back to LCD mode.
Playback Mode Display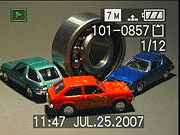 Accessed via the Mode dial, Playback Mode shows basic information, including resolution, battery status, image number, card status, image sequence number, time, and date. Press the Display button, and the capture mode appears, as well as the shutter speed and aperture, along with ISO, flash status, white balance status, and a histogram. A third press of the Display button clears all info, showing the photo only. Toggling the zoom control left toward the Wide setting takes you though a nine- and 25-image display, as well as a Calendar view. Toggling right on the zoom control takes you through 2x, 4x, 8x, and 16x views. Using either the Joystick or Four-way navigation controls, you can move around in the zoomed image. Left and right arrows toggle through images one at a time, as do left and right motions on the Joystick. Pressing the Delete button brings up a menu that allows deletion of a single image, and a second press takes you to Multi-Delete or All-Delete options.
Panasonic Lumix DMC-FZ8 Modes and Menus
![]() Program: In the Program mode, the FZ8 employs automatic exposure, selecting the Aperture and Shutter Speed settings. All other settings can be changed manually.
Program: In the Program mode, the FZ8 employs automatic exposure, selecting the Aperture and Shutter Speed settings. All other settings can be changed manually.
![]() Aperture Priority: When set to Aperture Priority, you can select the Aperture and the camera chooses the appropriate Shutter Speed for the selected f/stop.
Aperture Priority: When set to Aperture Priority, you can select the Aperture and the camera chooses the appropriate Shutter Speed for the selected f/stop.
![]() Shutter Speed Priority: You select the Shutter Speed and the camera automatically selects the corresponding Aperture.
Shutter Speed Priority: You select the Shutter Speed and the camera automatically selects the corresponding Aperture.
![]() Manual: In Manual Exposure mode, you select the Shutter Speed and the Aperture. Exposure Compensation is disabled in this mode, since complete control of exposure is already in your hands.
Manual: In Manual Exposure mode, you select the Shutter Speed and the Aperture. Exposure Compensation is disabled in this mode, since complete control of exposure is already in your hands.
![]() Motion Picture: This sets the camera to the movie mode to capture video clips.
Motion Picture: This sets the camera to the movie mode to capture video clips.
![]() Print Mode: Select this mode when you want to print directly from the camera to a printer.
Print Mode: Select this mode when you want to print directly from the camera to a printer.
![]() Scene Mode: Provides access to the following 21 Scene modes: Portrait, Soft Skin, Scenery, Sports, Panning, Night Portrait, Night Scenery, Food, Party, Candle Light, Baby 1, Baby 2, Pet, Sunset, High Sensitivity, Starry Sky, Fireworks, Beach, Snow, Aerial Photo. A text description of each mode can be accessed by pressing the Display button.
Scene Mode: Provides access to the following 21 Scene modes: Portrait, Soft Skin, Scenery, Sports, Panning, Night Portrait, Night Scenery, Food, Party, Candle Light, Baby 1, Baby 2, Pet, Sunset, High Sensitivity, Starry Sky, Fireworks, Beach, Snow, Aerial Photo. A text description of each mode can be accessed by pressing the Display button.
![]() Simple Mode: In this mode, the camera automatically selects the settings for image capture. Image size, compression, Exposure Compensation, Flash, Self-Timer, and Macro can be selected by the user.
Simple Mode: In this mode, the camera automatically selects the settings for image capture. Image size, compression, Exposure Compensation, Flash, Self-Timer, and Macro can be selected by the user.
![]() Playback Mode: Changes the mode to Playback where you can review, edit, delete, mark the images for printing, play a slideshow, and more.
Playback Mode: Changes the mode to Playback where you can review, edit, delete, mark the images for printing, play a slideshow, and more.
![]() Intelligent ISO: This mode automatically boosts the ISO sensitivity and Shutter Speed to avoid blurry pictures based on the amount of movement and brightness sensed by the camera. The maximum ISO the camera is allowed to access can be determined and set by the user beforehand.
Intelligent ISO: This mode automatically boosts the ISO sensitivity and Shutter Speed to avoid blurry pictures based on the amount of movement and brightness sensed by the camera. The maximum ISO the camera is allowed to access can be determined and set by the user beforehand.
Shooting Mode Menu: Accessed by pressing the Menu button in record mode. Note: In Simple mode, only four menu items are displayed. The submenus available in the Shooting Mode Menu are:
Record Menu:
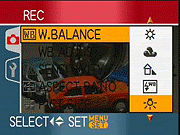 White Balance: Adjusts the overall color balance of the image according to light source. Options include Auto, Daylight, Cloudy, Shade, Flash, Halogen, White Set 1, White Set 2, White Set. The latter "White Set" option is used to manually set the white balance; two manual white balance settings can be saved--one to White Set 1 and the other to White Set 2.
- White Balance Adjust: Fine-tune the White Balance by adjusting the amount of Amber, Blue, Green, and Magenta in the image.
- Sensitivity: Set the ISO (light sensitivity). Available settings include Auto, 100, 200, 400, 800, 1250.
- Aspect Ratio: Change the Aspect Ratio to 4:3, 3:2, or 16:9 (widescreen).
- Picture Size: Select the Picture Size from among the following when the aspect ratio is set to 4:3: 7 megapixels (3072 x 2304), 5 megapixels (2560 x 1920), 3 megapixels (2048 x 1536), 2 megapixels (1600 x 1200), 1 megapixel (1280 x 960), 0.3 megapixels (640 x 480). Selections for 3:2 aspect ratio are limited to 6 megapixels (3072 x 2048) and 2.5 megapixels (2048 x 1360); when set to the 16:9 aspect ratio, options are limited to 5.5 megapixels (3072 x 1728) and 2 megapixels (1920 x 1080).
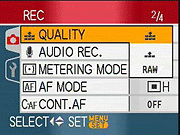 Picture Quality: Set the compression level for pictures. Options include Fine, Standard and Raw (no compression).
- Picture Mode: (In Motion Picture mode only) Choose movie quality (VGA or QVGA) and frames per second (10fps or 30fps).
- Audio Recording: Turn this option On to record about 5 seconds of Audio when you take a still picture. Not available in Auto Bracket, Burst Mode, Raw or Starry Sky scene mode.
- Metering Mode: Select from among Multiple, Center-weighted, and Spot metering to help determine the proper exposure.
- Autofocus Mode: Change the Autofocus area to Multi-area, high speed 3-area focusing, high speed 1-area (center) focusing, normal speed 1-area (center) focusing, and Spot focus.
- Continuous Autofocus: Turn the Continuous Autofocus On or Off.
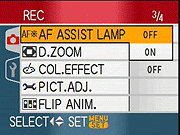 AF Assist Lamp: Turn the Autofocus Assist Lamp On (it will automatically light up to help focus on subjects in dark light when needed) or Off.
- Digital Zoom: Turns the Digital Zoom On or Off.
- Color Effects: Select from Cool (more blue), Warm (more red), Black and White or Sepia.
- Picture Adjustment: Manually adjust the Contrast, Sharpness, Saturation, and Noise Reduction settings individually. High, Standard and Low options are available for each; the default setting is Standard.
- Flip Animation: Capture up to 100 images to create a Motion Picture up to 20 seconds long from a series of still images capture in the Flip Animation mode.
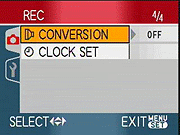 Conversion: Set the camera to work with accessory Conversion lenses. Choose from Wide Angle, Telephoto, and Close-up.
- Clock Set: Adjust the date and time.
Playback Menu: Accessed by pressing the Menu button when in Playback mode.
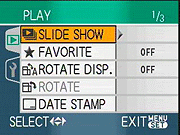 Slideshow: Choose to have all images or only those tagged as Favorites to play as a Slideshow. You can also set the duration of time between slides for either 1, 2, 3, or 5 seconds or to advance the pictures manually. You can also elect to apply an Effect (transition) as one image moves to the next. Choices include a sliding transition, a fade, a fill or allow the transitions to be applied randomly. You can also elect to have Audio recorded with the pictures play in the Slideshow.
- Favorite: Mark individual photographs as Favorites.
- Rotate Display: When activated, images shot vertically will automatically be rotated to the correct orientation.
- Rotate: Rotate an image manually.
- Date Stamp: "Stamp" the image with information such as date and time, baby's age, pet's age, travel date so that it appears on one or more photos. The clock must have already been set and certain images, i.e., Raw, those recorded with audio, etc. cannot be stamped. Additionally, images shot at larger than 3 megapixels will be downsized to 3 megapixels or smaller, depending on the picture's aspect ratio.
 DPOF (Digital Print Order Format): Use this to tag one or more images you want to print, how many copies of each to print and whether or not to print date information. This information can be read by most inkjet printers and retail printing venues.
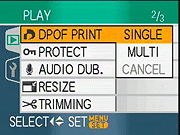
- Protect: Select one or more images to Protect them from being deleted accidentally. They will not be protected from deletion when formatting the card, however.
- Audio Dub: Add up to a 10 second Audio clip (a description of the photo, etc.) to an already captured image. If you already recorded Audio when you shot the picture, you will be asked whether or not you want the new Audio to overwrite the original clip. Audio clips cannot be added to video clips, protected pictures or Raw images.
- Resize: Resizes image to smaller megapixel counts so they can be more easily e-mailed or posted to the Web. The original image can be replaced by the resized image or it can be saved as separate file. Not all images can be resized, i.e., Raw, video clips, pictures with Audio, Flip Animation pictures, pictures with a Date Stamp.
- Trimming: Used to crop an image in-camera. The cropped image can replace the original image or be saved as a separate file. Like Resize, not all images can be trimmed.
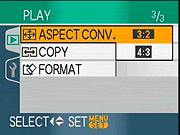 Aspect Conversion: Change an image shot in 16:9 to a 3:2 or 4:3 aspect ratio. The new image can replace the original or be saved as a separate file. Not all images shot in 16:9 can be converted.
- Copy: Copy images from the internal memory to the SD card or vice versa.
- Format: Format the media card or internal memory to erase all data.
Setup Menu: Available in both Record and Playback except where noted.
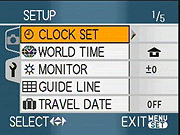 Clock Set: Set the date and time.
- World Time: Select your local (Home) time zone and, when you're going on vacation, your Destination time zone. Choose which one to use and the camera will utilize the time zone of your choice to display on screen and with your images.
- Monitor: Manually adjust the brightness/darkness of the LCD monitor. .
- Guide Line: Choose what information is available to be displayed on the LCD when cycling through the Display button, i.e., Recording Information, Histogram, Pattern (one of two Pattern/Grid overlays).
- Travel Date: Set the day of departure for your vacation and the camera will automatically record which day of the vacation (first day, third day, fifth day, etc.) when an image is captured.
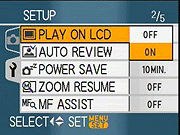 Play On LCD: Set this feature to On when using the EVF (Electronic Viewfinder) and images will be played back on the LCD automatically; otherwise the images will be displayed in the EVF unless you first switch back to the LCD manually.
- Auto Review: Control whether the image captured is displayed automatically and/or how long it is displayed. Auto Review can be turned Off, set to 1 second or 3 seconds. Or, it can be set to Zoom, which will automatically Zoom into the image when it is briefly displayed post-capture.
- Power Save: Determine how long before the camera will power down after no activity has taken place to save battery life. Choose from Off (the camera will remain on), 1 minute, 2 minutes, 5 minutes, or 10 minutes.
- Zoom Resume: Set to On, the camera will automatically return the lens to the last zoom position (focal length) before the camera was turned off.
- Manual Focus Assist: Helps you focus manually by enlarging the center of the frame only (MF1) or the entire frame (MF2). The Manual Focus Assist feature can also be turned Off.
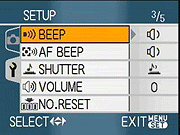 Beep: Change the Beep sounds that are heard while operating the camera, such as scrolling through the menus, hitting the Set button, etc. to Off, Soft (low), or Loud.
- AF Beep: Change the Beep sound used when Autofocus is achieved from Off, to Soft (low), or Loud.
- Shutter: Change the sound played when the Shutter is clicked to Off, Soft (low), or Loud.
- Volume: Adjust the volume of the on-board speakers in seven steps from low (0) to high (6).
- Number Reset: Reset the number scheme for folders so that your image files start again from 0001.
 Reset: This resets all options, with the exception of the regular Clock and folder numbers, to default settings.
- Video Out: (Playback only) Set the Video format to either NTSC (for US) or PAL.
- TV Aspect: (Playback only) When displaying images on a TV screen directly from the camera, set the Aspect ratio to match your TV (16:9 widescreen or standard 4:3).
- MF m/ft: Determine whether the manual focus distance is displayed in meters or feet.
- Scene Menu: Set Scene Menu to On to display the full menu when the Scene Mode is selected. When turned Off, the last Scene Mode used will be applied; press the Menu button to access the full complement of Scene modes.
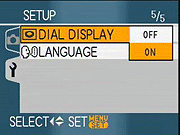 Dial Display: Set to On to show the virtual Mode dial on the LCD that appears when the shooting mode is changed. The virtual Mode dial will not appear when this setting is turned Off.
- Language: Choose the language that will be displayed on the LCD from English, German, French, Spanish, Italian, Japanese.
 Fujifilm GFX 50S Review
 Fujifilm X-T3 Review
 Olympus E-M5 III Review

Follow Imaging Resource