Olympus Stylus 770 SW Operation
Operating the Olympus Stylus 770 SW in any of its automatic modes is fairly straightforward, as the camera controls the exposure at all times. The Record Mode button on the rear panel accesses the range of preset shooting modes, as well as the Digital Image Stabilization and Scene modes. The Four-way navigator lets you change exposure compensation and flash mode without entering the menu system, and also accesses the Macro and Self-Timer functions. The OK/FUNC button in the center of the 770's Four-way not only confirms menu selections, but also pulls up a small Function menu outside of the main menu, for quick access to Drive mode, Program/Auto exposure mode, and a handful of other common camera settings. All remaining options are adjusted through the camera's settings menu. A button on the rear panel accesses Playback and My Favorites modes, while pressing the Shutter button quickly returns to shooting mode. This latter behavior is essential in a sports camera, and we're glad to see it here. Overall, the 770SW is a snap to operate, and shouldn't require too much downtime to get to know.
Record-Mode Display In the Olympus 770 SW's record mode, the LCD monitor displays the subject with a fair amount of overlaid information, including battery status (this leaves the screen after a few seconds), flash mode, focus mode (macro or normal), autofocus mode setting, any currently-selected exposure compensation setting, ISO setting, White Balance, Drive mode, the current size/quality setting, and number of images that can be stored on the remaining memory space at the current size and quality. A variety of other camera settings may appear on the LCD monitor when set to anything other than their defaults.
Playback-Mode Display In Playback mode, the image display shows the most recently captured image, with an information overlay that reports basic camera settings, plus any print settings, and the image number and sequence number. Pressing the wide-angle zoom button takes you through a series of index display modes, with 4, 9, 16, or 25 images to the page. Pressing the telephoto side of the Olympus 770SW's zoom lever when viewing an image full-size on the LCD screen will zoom in on the image, and you can use the arrow keys to pan the view.
Olympus Stylus 770 SW Modes and Menus
Auto Record Mode: In this mode, the camera automatically selects the settings for image capture, although image size, compression, Exposure Compensation, Flash, Self-Timer, and Macro options are available.
Program: Though the 770SW's Program mode is also an automatic exposure mode, all other Function button and Menu options are available.
Digital Image Stabilization Mode: The camera automatically boosts the ISO in order to gain a faster shutter speed and help eliminate blurring. This also increases the possibility of image noise.
Scene Mode: Accesses the following 24 scene modes: Portrait, Landscape, Portrait + Landscape, Night Scene, Night + Portrait, Sport, Indoor, Candle, Self-Portrait, Available Light, Sunset, Fireworks, Cuisine, Behind Glass, Documents, Auction, Shoot & Select 1, Shoot & Select 2 (these two allow you to shoot successive images of a moving subject and choose only the ones you like), Beach & Snow, Underwater Snapshot, Underwater Wide 1 for underwater landscapes, Underwater Wide 2 (for moving subjects underwater), Underwater Macro, and Movie. A text description of each mode automatically appears on the monitor when a scene mode is selected.
Playback Mode: This button puts the camera in playback so you can review images for content and quality, edit them, mark them for printing and deletion. Movies can also be viewed and edited in this mode.
My Favorite: If the Playback button is pressed again while in Playback mode, your My Favorite images are displayed. The camera can hold up to nine images in its memory. They are of lower resolution, but they are not deleted when you format the card. It's unclear whether you can do anything but delete them, however; and it does not seem like you can copy the images from the camera's My Favorite bank. You can choose an image to display at startup.
Shooting Mode Menu: Accessed by pressing the Menu button in record mode. The submenus available in the Shooting Mode Menu are:
Image Quality Menu:
- Still Image Quality: Available in still image capture mode. Selects image quality and file size/compression. Options include SHQ (3072 x 2304 at low compression); HQ (3072 x 2304 at standard compression); SQ1 (2048 x 1536, 2304 x 1728, 2560 x 1920 at standard compression); SQ2 (640 x 480 at low compression; 1024 x 768, 1280 x 960, 1600 x 1200 at standard compression); 16:9 wide format (1920 x 1080 at standard compression).
- Move Quality: Available in movie mode. Image quality/image size options are: SHQ (640 x 480); HQ (320 x 240); SQ (160 x 120).
Reset: Select whether or not to reset all shooting functions to the factory default settings.
Camera Menu: This menu is not available in Auto mode; some options in this menu, i.e., White Balance, ISO, Drive Mode, Metering Mode, are also available via the OK/FUNC button.
 White Balance: Adjusts the overall color balance of the image according to light source. Options include Auto, Daylight, Cloudy, Tungsten, and three Fluorescent settings (daylight fluorescent, neutral white fluorescent, white fluorescent).
- ISO: Selects the light sensitivity. Settings include Auto plus manual options from 80-1600.
- Drive: Chooses between Single and Sequential Shooting where the focus and exposure are locked in the first frame and a Hi-Speed sequential shooting. In Hi-Speed mode, the flash is turned off, ISO is set to Auto and image quality is limited to 2048 x 1536 or lower, which enables the increase in shooting speed.
- Metering: Options include multi-segment and center metering to meter the scene for exposure settings.
- Digital Zoom: Turns the camera's 5x digital zoom on and off. When on, the digital zoom engages after the optical zoom has reached the maximum telephoto focal length.
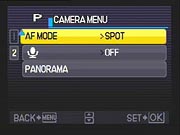 AF Mode (Autofocus): Changes the autofocus area between multi-segment and spot modes.
- Audio Note: Records about 4 seconds of sound after an image is captured.
- Panorama: Provides visual guides to shoot up to 10 consecutive images for a panorama. Shots can be taken from left-to-right, right-to-left, top-to-bottom, or bottom-to-top. Stitching software is provided with the bundled Olympus Master Software CD-ROM. An Olympus xD-Picture Card is required for panorama shooting, however.
Setup Menu:
 Format: Formats the internal memory or the optional xD card, erasing all existing images and data, even files marked as protected. Olympus recommends that any card formatted in a computer or non-Olympus cards be formatted in-camera before use.
- Backup: Copies images on the internal memory to an xD card.
- Language: Selects the display language. Other languages can be added via the Olympus Master software CD-ROM.
- Power Activation: Provides the option to power the camera on directly using either the Capture Mode button or the Playback button; the camera will start up in whatever mode is pressed.
- Save Settings: Keeps the current shooting mode settings. In the Scene Mode, the last scene option that was selected will be displayed when the camera is powered on again.
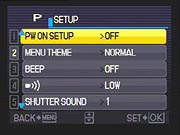 PW on Setup: Saves the startup screen and volume settings. Screen options are Off (no image displayed), option 1 (Olympus logo), option 2 (image from internal memory or xD card) or an image tagged as a Favorite. Volume settings, which are applied to the various camera sounds, are off (no sound), low volume, or high volume.
- Menu Theme: Choose color and background for menu screen. Colors include "normal" (a blue pinstriped effect), blue, black, pink, or a still image from your Favorites.
- Beep: Adjust the volume of the beep when camera buttons are pressed: off/low volume/high volume. The volume of the camera warning sound can also be adjusted in the same way.
- Warning Sound volume: Can be set to off/low/high.
- Shutter Sound: Select the sound that indicates when the shutter has been clicked from a typical shutter sound, a musical bell-like sound, or a bird chirp. The volume of the sound can be adjusted from low to high volume, or can be turned off.
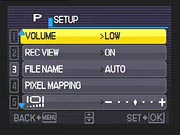 Volume: Adjusts the volume in playback mode. Options are off/low/high.
- Rec View: Selects whether or not an image is displayed immediately after it has been shot.
- File Name: Choose whether to reset the file and folder number to "1" each time a new card is used in the camera or to have the numbers continue in sequence regardless of whether or not a different card is inserted into the card slot so that you won't have duplicate numbered files on your hard drive.
- Pixel Mapping: This feature assesses whether or not the camera has a "missing" or "dead" pixel and then compensates by filling in the aberration. Olympus recommends that this process be performed once a year.
- Monitor Brightness: Increases or decreases the monitor's brightness in two step increments up and down.
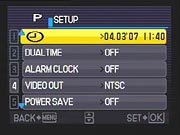 Date/Time: Sets the camera's internal clock and calendar. Date format can also be selected (mm/dd/yy, dd/mm/yy, yy/mm/dd).
- Dual Time: Sets an additional date/time. When this feature is turned on, images are recorded with these alternative date/time settings. When turned off, the original date/time settings are recorded with the image data.
- Alarm Clock: An alarm can be set to occur once or on a daily basis. You can set the time, whether or not the alarm utilizes a "snooze" function (the alarm rings every 5 minutes up to 7 times), what one of three sounds is used for the alarm. The alarm sound volume can be set to Low, Mid, or High.
- Video Out: Switches the video output signal to either NTSC or PAL in order to playback images on a TV.
- Power Save: Choose whether or not the LCD monitor automatically turns off after 10 seconds of inactivity. The monitor can be turned back on by pressing any button.
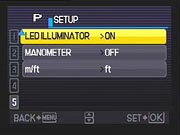 LED Illuminator: Allows the LED Illuminator light to be turned on when the Menu button is pressed and held for additional light. This feature can also be turned off in the Setup Menu.
- Manometer: This measures the depth or altitude at which a picture is taken. When turned on, you'll need to set the current depth/altitude to calibrate the manometer. This feature can also be turned off when not needed.
- m/ft: Selects whether the manometer reading is measured in meters or feet.
Demo: Plays a short demo highlighting the camera's features.
SCN: Available in Scene Mode only; functions the same as the Scene Mode button (see controls, above) providing access to 24 scene modes (including movie mode).
Silent Mode: Determines via off/on settings whether or not the operational sounds of the camera are heard.
My Camera Menu Contents:
Playback Mode Menu: Accessed by switching the camera to Playback and pressing the Menu button. Like the Record mode, the Playback menu is arranged as a virtual menu with icon and text identification of each submenu. Press the playback button twice to view images saved as Favorites.
Slideshow: Automatically plays back images in slideshow format.
- BGM: When "On" is chosen, the slideshow is accompanied by background music.
- Type: Selects the transition between each slide. Choices are Normal (moves from one image to another as if you were manually advancing through images) as well as Fader, Slide, Zoom effects.
Movie Play: Available only in Movie Mode when a move has been recorded. Automatically plays back movie, with options to adjust volume and playback speed, play the movie in reverse, play the movie frame by frame (forward or reverse).
Add Favorite: Select and add images to Favorites, which are registered as separate still images that can also be viewed separately.
Calendar: Images are organized by date they were shot on a calendar and can be played back according to calendar date.
Edit:
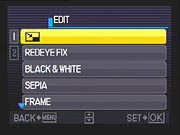 Resize Image: Resizes image to e-mail/Web ready size of 640 x 480 or 320 x 240 and saves it as a separate file.
- Red-eye Fix: Automatically detects and removes red-eye and saves the picture as a separate file.
- Black & White: Converts color image to black and white and saves it as a separate file.
- Sepia: Converts image to sepia tone and saves it as a separate file.
- Frame: Adds a decorative frame to an image and saves it as a separate file. The image can be rotated manually and its size and position in relation to the frame can be adjusted as well. The image is saved as a separate file.
 Label: Adds a decorative text message such as Congratulations or Happy Birthday to an image. The text message size, placement, and color can be adjusted. The image size and position is adjustable as well. The image is saved as a separate file.
- Calendar: Add a photograph to one of eight calendar layouts. The photograph can be rotated and changed within this function and the date of the calendar can be chosen. The calendar is saved as a separate file for printing or viewing.
- Brightness: Adjust the brightness of an image and save it as a new picture.
- Saturation: Adjust the saturation of an image and save it as a new picture.
- Index: (Available in Movie Mode) Selects nine frames from a movie and saves them as a new picture, i.e., an index print of thumbnails.
Playback Menu:
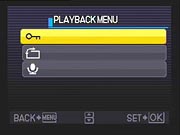 Protect Pictures: Marks images to protect them from being erased.
- Rotate Pictures: Rotate pictures 90 degrees clockwise or 90 degrees counterclockwise. The new orientation is saved.
- Record voice annotation: Allows you to record a sound or voice file associated with an image.
Erase:
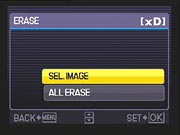 Sel Image: Select an image to be erased.
- All Erase: Erase all images.
Print Order: Select individual images or all images for printing (DPOF).
Setup: Same as Setup in Record Mode (see above).
Silent Mode: Same as Silent Mode in Record Mode (see above).
 Fujifilm GFX 50S Review
 Fujifilm X-T3 Review
 Olympus E-M5 III Review

Follow Imaging Resource