HP PhotoSmart 618HP's capable mid-level model offers 2.1 megapixels, an optical zoom lens, and ease-of-use.<<Shutter Lag & Cycle Time Tests :(Previous) | (Next): Camera Modes & Menus>> Page 8:Operation & User InterfaceReview First Posted: 03/19/2001 |
Operation and User Interface
The PhotoSmart 618's user interface is reasonably uncomplicated, but with more menus and external controls than the 215 and 315 camera models, which in some cases requires more reliance on its LCD menu. However, if you operate the camera in standard Auto Exposure mode, you can easily use it without the LCD monitor, because the optical Zoom, Flash, Self-timer, Remote, and Macro/Infinity Focus modes are all controlled externally.
We appreciated the status display on top of the camera, which reports the Flash, Focus, Self-timer, and Remote modes, plus remaining battery power and the number of shots remaining on the CompactFlash card. The 618's LCD menu is colorful and easy to navigate using the four-way rocker pad and the soft keys underneath the LCD monitor.
Our only complaint with the menu system is that it's quite "deep", requiring you to sort through several pages of settings. On the one hand, this is a good feature, because it provides an extensive amount of user control, and is very easy for a novice user to understand. On the other hand, it can be quite tedious to make just a few simple changes. A copy of the camera's detailed User Guide is provided in PDF format on the software CDs, but it's more than 125 pages, requiring a hefty amount of paper to print. We'd like to see a smaller paper copy in the box as well, to use as a reference when shooting in the field. A Quick Start Guide is supplied, with step-by-step directions for basic camera operation.
Control Enumeration
Shutter Button: Located on the front of the camera, on a sloping edge from the top panel, this button sets focus and exposure when depressed halfway. When fully depressed, the button activates the shutter to record the exposure. When the Self-Timer mode is enabled, pressing the shutter button activates the 10-second countdown.
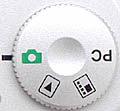
Mode Dial: Set on the far right side of the camera's top panel, this notched dial sets the camera's operating mode. The following options are available:
 Capture (Record): Sets up the camera to record digital images. The user has control over a variety of exposure modes and features.
 Playback: Allows the user to scroll through captured images on the memory card or play them back in an automated slide show.
 Review: Displays a horizontal index of all the captured images on the memory card, as well as individual thumbnails of selected images with text information listed on the right. Images can be deleted, organized by groups, write-protected, set up for printing on DPOF devices, transmitted to a JetSend device, and searched by date or category.
 PC: Sets up the camera for connection to a PC or Macintosh computer via the USB cable.

Flash Mode: The first in a series of three Status LCD Buttons on the camera's top panel, this button controls the 618's seven Flash modes, cycling between the following settings (corresponding icons include an Eye for Red-Eye Reduction, Lightening for Forced Flash, and Moon for Night mode):
- Auto: The camera determines when to fire the flash, based on existing light levels. (No icon)
- Auto with Red-Eye Reduction: The flash fires the same as in Auto mode, but fires a small pre-flash before firing the full flash, reducing the occurrence of red-eye. (Eye)
- Forced On: The flash fires with every exposure, regardless of light levels. (Lightening)
- Forced On with Red-Eye Reduction: The flash fires with every exposure, but with the addition of the Red-Eye Reduction pre-flash. (Eye with Lightening)
- Forced Off: Completely disables the flash. (Lightening with line through it)
- Night: Synchronizes the flash with a slow shutter speed, allowing more ambient light into night exposures. (Moon with Lightening)
- Night with Red-Eye Reduction: Fires the Red-Eye Reduction pre-flash before firing the full flash in synchronization with a slow shutter speed. (Moon, Lightening, and Eye)

Timer Mode: Directly to the left of the Flash Mode button, this one cycles through the Normal (no icon), Self-Timer (Clock), and Remote Control (Remote icon) capture modes. When the Remote Control mode is activated, the Remote LED lamp on the front of the camera begins flashing.

Auto Focus Range: The last of the Status LCD Buttons, this one is marked with the traditional Macro (flower) and Infinity (mountain range) focus symbols. In Record mode, this button cycles through the Normal, Macro, and Infinity focus settings.
![]()
On/Off Switch: Positioned at the top right of the camera's back panel, this sliding switch turns the camera on or off. When the camera is turned on, the lens cover opens and the lens extends from the camera body. It reverses this action when the camera is powered off.
Zoom Lever: Diagonally to the right of the On/Off switch, this lever controls the Optical and Digital Zoom. Once the end of the optical telephoto range is reached, pressing the Zoom lever on the telephoto end activates the Digital Zoom.

Display Button: On the right side of the LCD monitor, this button controls the LCD display mode. In Capture mode, pressing this button enables or disables the image display. In Playback mode, it controls the information overlay displays.

Menu Button: Just below the Display button, the Menu button activates and deactivates the settings menus in Capture, Playback, and Review modes.
![]()
Soft Keys: Along the bottom of the LCD monitor, these three buttons perform a variety of functions, depending on the camera mode and menu setting. In standard Capture mode, the far left button cycles between One-Shot, Continuous, and Time-Lapse modes. The center button activates and deactivates the information overlays, and the far right button pulls up the Status page, which reports the following exposure settings: Resolution, Quality, White Balance, EV Compensation, ISO Speed, and AE Metering.
When the Capture menus are displayed, the buttons' functions change, allowing you to edit menus or exit the menu screen. In Playback mode, the center soft key controls the 2x playback zoom, digitally zooming in and out of the captured image; the left key places image sequences or slideshows, and the right key expands or collapses series of images. In both Playback and Review Menu modes, the soft keys allow you to edit menu options or exit the menu screens. In Review mode, the far left key marks (selects) images, the center key deletes the currently selected image, and the right key expands or collapses series of images.
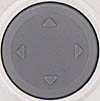
Four-Way Arrow Rocker Pad: Located on the left side of the LCD monitor, this large button features an arrow in each direction (up, down, right, left). In any settings menu, these arrow keys navigate through menu options. In Shutter and Aperture Priority exposure modes, the up and down buttons control either the shutter speed or aperture setting. In Playback and Review modes, these arrows scroll through captured images.
![]()
JetSend Button: Just above the rocker pad, this button is marked with a flying paper airplane symbol. In Playback or Review modes, pressing the JetSend button allows you to send the currently selected image to another JetSend device, via the infrared port on the front of the camera. In Record mode, pressing the JetSend button sends the last image captured.
![]()
Sound Button: Directly above the JetSend button, this one activates the sound recording feature, allowing you to record up to 45 seconds of sound to accompany an image. In Record mode, the sound function only works when Instant Review is enabled. In Playback and Review modes, pressing the button pulls up the sound recording icon, and begins recording sound until the button is pressed a second time.

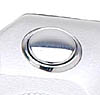
Diopter Adjustment Dial: Located to the left of the optical viewfinder eyepiece, this dial adjusts the eyepiece focus to accommodate eyeglass wearers.
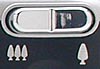
CompactFlash Release Button: Hidden inside the CompactFlash compartment, this button releases the CompactFlash card and pops it up slightly so that it can be removed from the slot.
Open Battery Switch: Located in the center of the battery compartment door, this button locks and unlocks the battery compartment door.

Follow Imaging Resource: