The Imaging Resource
Quick Review
Hewlett Packard Photosmart R707 Digital Camera
 |
Camera QuickLook | |
|
Review Date |
|
|
|
User Level |
|
|
|
Product Uses |
|
|
|
Digicam Design |
|
|
|
Picture Quality |
|
|
|
Print Sizes |
To 11x14 inches, with some cropping | |
|
Availability |
March, 2004 | |
|
Suggested Retail Price (At introduction) |
$349.99 | |
|
||||||||||
The Hewlett Packard Photosmart R707 digital camera is the latest in a long line of Photosmart-branded digital cameras aimed at making digital cameras more accessible and easier to use. Early on, HP got their start in the digicam market partnered with Pentax, but soon stepped out on their own. The HP R707 keeps the familiar "camera-like" design of past models, but builds on it with a sleek new body and user interface, and a boatload of new features aimed at improving ease of use. With its aggressive pricing, attractive body, and selection of automatic and limited manual controls, the camera could be an interesting competitor. Read on for all the details!
Looking much like a traditional 35mm point-and-shoot camera, but with modern, sleek styling and an attractive brushed stainless steel "skin" wrapped around the front of a rubberized high-impact polycarbonate body, Hewlett Packard's Photosmart R707 offers a 3x optical zoom and a choice of automatic or some manual controls in a compact, user-friendly package. Measuring a mere 3.9 x 1.4 x 2.4 inches (99 x 35 x 60 millimeters) and weighing 7.4 ounces (210 grams) with the battery and SD memory card loaded, the Photosmart R707 is fairly light and compact, but a little too large for a shirt pocket. It will fit nicely in coat pockets, purses, and backpacks though. Covered in slightly rubberized charcoal-gray plastic body panels on all but the front and right sides (which have a thin skin of brushed stainless steel), the R707's body features clean, smooth lines and an elegant but modern look. A deep, curved recess in the lower front of the camera provides a solid hold for your right index finger when shooting, and a wrist strap comes with the camera, for added peace of mind. A built-in shutter-like lens cover conveniently opens whenever the camera is powered on, and the lens telescopes outward in a matter of seconds. The R707 features a 5.14-effective megapixel CCD, which produces high resolution images for making sharp prints as large as 11x14 inches even with some cropping, as well as lower resolution images better suited for email distribution. With its range of exposure options, 3x optical zoom, high resolution CCD, and excellent ease-of-use, the R707 is a versatile and capable performer.
The Photosmart R707 is equipped with a 3x, 8-24mm lens, the equivalent of a 39-117mm lens on a 35mm camera. This represents a range from a moderate wide-angle to moderate telephoto. Maximum aperture ranges from f/2.8 to f/4.9, depending on the lens zoom setting. Focus ranges from 1.6 feet (0.5 meters) to infinity in normal mode, with a macro setting ranging from 6 to 39 inches (14 to 100 centimeters). As well as standard and macro focus modes, the R707 also offers the ability to lock focus at infinity, and to set focus manually. An unusual feature of the R707 is "Focus Search Priority", which allows you to bias the autofocus to objects that are nearer to or further from the camera, should the focus area at the center of the frame include objects at different distances. A focus assist light is available to aid with focusing on nearby subjects under poor lighting conditions.
In addition to the optical zoom, the Photosmart R707 offers as much as 8x digital zoom. (I always remind readers though, that digital zoom inevitably decreases the overall image quality because it simply enlarges the central pixels of the CCD's image.) For composing images, the Photosmart R707 offers a 1.5-inch LCD monitor, as well as a small real-image optical viewfinder. Typically for a consumer digicam, the optical viewfinder is a little tight, showing only 85% of the final image area, but the LCD is quite accurate. The LCD monitor reports limited camera information, including camera mode, whether an SD card is installed in the camera, battery life, the number of available images, quality and resolution, and a set of focusing brackets. Icons on the LCD monitor also indicate any camera settings that have been changed from their defaults, and while the shutter button is half-pressed, the expected shutter speed and aperture are shown on the monitor.
When it comes to exposure, the Photosmart R707 offers a range of options, controlled by the Mode button on top of the camera. Main exposure modes include Auto, and Aperture Priority modes, with six preset Scene modes, plus a Panorama mode for shooting multiple images to be stitched into a single panoramic image on a computer, and the "My Mode" which lets you store and recall a group of preferred settings for later use. A Movie mode is available as well, but is accessed via a separate Video button regardless of the camera's current exposure mode. In Auto mode, the camera handles aperture and shutter speed, but allows the user to adjust all other exposure settings. Aperture Priority modes provide partial manual control, letting the user adjust the lens aperture while the camera selects the corresponding shutter speed. Aperture settings range from f/2.8 to f/8.4, with the actual maximum and minimum values depending on the lens zoom position. Shutter speeds range from 1/2,000 to 16 seconds, although shutter speeds slower than 1/60 second are not available except in Night flash mode. The six scene modes include Action, Landscape, Portrait, Beach & Snow, Sunset, and Document modes, for shooting in common, yet sometimes challenging, situations. Long exposures automatically employ a Dark Frame Subtraction noise reduction algorithm, which reduces noise by capturing a second image using identical settings, but without opening the shutter. This works well to remove the fixed pattern "stuck pixels" in longer exposures, but doubles the time needed to capture and process the image.
By default, the R707 employs a Center-weighted metering system, which reads the entire frame and places emphasis on the center to determine the exposure. Through the Record menu, however, you can opt for Average or Spot metering modes. Also located in the Record menu is an Exposure Compensation option, adjustable from -3 to +3 exposure equivalents (EV) in one-third step increments. An Automatic Exposure Bracketing feature captures three images with exposures varying between shots by 0.3, 0.7 or 1.0EV. Light sensitivity is adjustable to ISO values of 100, 200, or 400, with an Auto setting as well. White Balance options include Auto, Sun, Shade, Tungsten, and Fluorescent light sources, as well as a Manual setting for manually adjusting the color balance with a white card. The Record menu also offers Sharpness, Contrast, and Saturation adjustments, as well as a Color setting with Full Color, Black and White and Sepia color options. The Photosmart R707 features a built-in flash, which operates in Auto, Auto with Red-Eye Reduction, On, Off, or Night modes.
 |
Instant Share Help Menu |
 |
Image Advice Example |
Another nice touch is that the camera's Panorama mode can stitch together low-resolution versions of the images captured and display them as a single panoramic image, allowing you to preview the effectiveness of your panorama immediately (note that the final panorama must still be stitched together on your computer using the provided software, but this is still the first camera I've seen in a long time which lets you preview your panorama immediately, rather than viewing its component images separately).
The R707's Adaptive Lighting and Remove Red-Eye features also add greatly to ease of use. While similar effects can be achieved in an image editor such as Photoshop (and perhaps better effects, if you're well acquainted with image editing), these useful tools aim to correct two very common complaints in point and shoot photographs. Accessed through the Record menu, the Adaptive Lighting option (which offers two strength settings) simulates the effect of a fill flash by boosting brightness in shadow areas of images. I was surprised to see how well Adaptive Lighting worked, and how natural images captured with it looked. Of course, there's no free lunch, and the downside of Adaptive Lighting is that image noise is increased significantly in shadow areas that have been brightened. Still, I think most consumers would be pleased with the results produced by Adaptive Lighting.
The Remove Red-Eye tool in the Playback menu runs firmware in the camera which attempts to detect and remove the red discoloration in your subject's eyes, as often seen in portrait photographs taken with flash in a poorly-lit environment. This tool is completely separate from the camera's red-eye reduction flash mode, which attempts to minimize red-eye by firing a short burst of pre-flash to cause your subject's retinas to contract. I found that the Remove Red Eye tool usually did a fairly good job of finding and correcting for red-eye, although it occasionally incorrectly identified items such as reflections from jewelry for correction, and on one image repeatedly locked up the camera completely, requiring it to be powered off and on again. While it worked well in many cases, I wouldn't call the R707's Remove Red-Eye tool as much of a success as Adaptive Lighting.
In Movie mode (which isn't accessed via the Mode button, but rather by using a separate shutter release button called the Video button, exclusively for movie recording), the camera captures 320 x 240-pixel resolution moving images with sound. The recording time per segment is not limited except by battery life and available space on the SD memory card, and movies are captured with a frame rate of 30 frames per second. Like most digital cameras, the lens can't be zoomed while recording to prevent noise from the lens motor from affecting the sound track. Digital zoom is likewise not available in movie mode. While the lack of movie-mode optical zoom ensures optimal sound quality for movies, some users might have found the noise captured by the microphone is less objectionable than the noise of the optical zoom, and most digital cameras do allow use of digital zoom with minimal loss of quality given that the dimensions of the video itself are so far below the resolution of the camera's imager. The camera's Self-Timer mode provides two choices, both starting with a 10-second delay between the time the Shutter button is pressed and the time that the camera actually takes the picture, allowing you to get into your own shots. The second of the two Self-Timer modes captures two shots, with a delay of several seconds in between - useful in case somebody blinks in the first shot. The movie mode can be used in combination with the self-timer feature, for a ten second delay before the movie capture starts, regardless of which Self-timer mode is active. For shooting fast action subjects, the Photosmart R707's Burst mode captures a rapid series of three or four images, while you hold down the Shutter button, much like a motor drive on a traditional 35mm camera. Continuous-mode speed is pretty good, at 2.3 frames/second, again for up to four shots, the actual frame rate and number of images in a series will depend on the resolution setting, subject matter, and the amount of available memory space.
The Photosmart R707 stores its images in 32MB of internal memory (of which 27MB is available for storage), or alternatively on optional Secure Digital (SD) memory cards. (The camera also works with the slightly less expensive MMC cards.) I highly recommend picking up a high capacity card right away, so you don't miss any important shots. (These days, a 128 MB card represents a good tradeoff between capacity and cost.) Connection to a host computer for image download is via USB. The Photosmart R707 is a "storage-class" device, which means that it doesn't require any separate driver software for Windows 2000 and XP, or for Mac OS 8.6 and later. The camera utilizes a rechargeable L1812A Lithium Ion battery for power (HP's name for the NP-60 battery format), and a single battery and 3.3V AC adapter are included in the product bundle, allowing for in-camera recharging. Unlike most Lithium Ion-powered cameras, the R707 will also accept the recently launched single-use Duracell CP1 Prismatic battery - which as it becomes more widely available, could save you in a pinch when you're unable to recharge your batteries. The optional C8887A Photosmart R-Series camera dock is worth considering along with the camera, as it allows for one battery to be charging in-camera whilst another charges in a slot at the end of the dock, and also allows for both image transfer to a PC, and offers NTSC / PAL video output on your TV, with a remote control (included with the optional dock). As an alternative if you don't care for the video connectivity of the camera dock, the L1810A Quick Recharge Kit includes a charger, spare battery, travel pouch and camera case - which, given that the camera itself comes with a charger, would also allow you to have two batteries being charged simultaneously.
- 5.14- effective megapixel CCD.
- Real-image optical viewfinder.
- 1.5-inch, 120k pixel color TFT LCD monitor.
- 3x, 8-24mm lens, equivalent to a 39-117mm lens on a 35mm camera.
- 8x digital zoom.
- Automatic and Aperture Priority exposure modes, plus six preset Scene modes.
- Shutter speeds from 1/2,000 to 16 seconds.
- Maximum aperture f/2.8 to f/4.9, depending on lens zoom position.
- Built-in flash with five modes.
- 32MB built-in memory (27MB available for image storage).
- SD/MMC memory card storage.
- Images saved as JPEG files.
- Power supplied by included L1812A Lithium Ion rechargeable or optional Duracell CP1 Prismatic disposable batteries, or included AC adapter.
- HP Image Zone software (including HP Instant Share, HP Memories Disc Creator, and Arcsoft Panorama Maker 3.5), and USB drivers included for both
Windows and Mac platforms.
Special Features
- 320 x 240 pixel movie mode with sound recording, featuring separate "Video button" shutter release.
- Burst shooting mode.
- 10-second Self-Timer and double-shot Self Timer for delayed shutter release.
- Voice Memo mode for recording audio captions.
- White balance (color) adjustment with six modes, including a manual setting.
- Adjustable ISO with three sensitivity settings and an Auto mode.
- Average, Center-Weighted, and Spot metering options.
- Color, Saturation, Sharpness, and Contrast adjustments.
- Two-step "Adaptive Lighting " function boosts brightness of shadow areas in pictures, simulating fill flash
- "Remove Red Eye" function looks for and corrects red-eye in images during playback
- Panorama mode assists in lining up of multiple images for stitching into a single panoramic image on a computer, and offers a preview stitched panorama on the camera
- Extremely detailed help system featuring descriptions of menu items, external controls, and camera functions.
- Supports printing via USB to PictBridge compatible printers, as well as some HP Photosmart printers, some HP All-in-ones and USB-equipped HP Deskjet printers (cable included).
- USB cable for connection to a computer (driver software included).
Recommendation
With its relatively high 5.1 megapixel resolution, automatic and selected manual exposure
controls, "Adaptive Lighting" and "Remove Red-Eye" functions, plus the rest of its superb ease-of use features, the Photosmart R707 is a stylish, full-featured yet surprisingly
affordable compact digicam. Though the camera features some manual exposure
capabilities, its simplified user interface and available automatic modes make it
approachable for less-experienced novices who want to gradually learn more about
digital photography. A 5.14-effective megapixel CCD delivers good quality images, with
enough resolution to make sharp 8x10 prints, with a lower resolution option available
for email and other electronic uses. The R707 is compact enough for travel, and has enough exposure features to handle most situations. The R707 would make a good choice for anyone looking for a compact
digicam with ample features, that is truly easy to use, and available at an affordable price.
 Hewlett Packard's Photosmart
brand name covers a wide array of digital cameras designed to suit a wide range
of experience levels and price points, from entry level to models offering high
resolution and long zoom lenses. The newest addition to the pack is HP's Photosmart
R707. The R707 offers a range of exposure control options, a high resolution
5.1 megapixel CCD sensor coupled with a 3x optical zoom lens, and has an easy
to learn user interface, all at an affordable price. Shaped like a traditional
35mm point-and-shoot camera but with an emphasis on style, the R707 has a rubberized
high-impact plastic body with a deeply recessed grip for your index finger.
Wrapped around the front and right sides is a brushed stainless steel skin that
curves smoothly to give a sleek and sophisticated look. The R707 sports only
a handful of external controls, resulting in a user interface that should be
swift and easy to learn. Measuring 3.9 x 1.4 x 2.4 inches (99 x 35 x 60 millimeters),
the Photosmart R707 is probably slightly too bulky for shirt pockets, but should
slip into coat pockets and purses without trouble. The camera's plastic body
helps keep the weight down, despite the metal skin on the front, at 7.4 ounces
(210 grams) with the battery and SD memory card loaded. A wrist strap accompanies
the camera for peace of mind when shooting, but I'd recommend picking up a small
camera case to protect the finish of the charcoal grey plastic body panels when
traveling (the stainless steel front and right panels should offer good scratch-resistance,
although they do show fingerprints easily).
Hewlett Packard's Photosmart
brand name covers a wide array of digital cameras designed to suit a wide range
of experience levels and price points, from entry level to models offering high
resolution and long zoom lenses. The newest addition to the pack is HP's Photosmart
R707. The R707 offers a range of exposure control options, a high resolution
5.1 megapixel CCD sensor coupled with a 3x optical zoom lens, and has an easy
to learn user interface, all at an affordable price. Shaped like a traditional
35mm point-and-shoot camera but with an emphasis on style, the R707 has a rubberized
high-impact plastic body with a deeply recessed grip for your index finger.
Wrapped around the front and right sides is a brushed stainless steel skin that
curves smoothly to give a sleek and sophisticated look. The R707 sports only
a handful of external controls, resulting in a user interface that should be
swift and easy to learn. Measuring 3.9 x 1.4 x 2.4 inches (99 x 35 x 60 millimeters),
the Photosmart R707 is probably slightly too bulky for shirt pockets, but should
slip into coat pockets and purses without trouble. The camera's plastic body
helps keep the weight down, despite the metal skin on the front, at 7.4 ounces
(210 grams) with the battery and SD memory card loaded. A wrist strap accompanies
the camera for peace of mind when shooting, but I'd recommend picking up a small
camera case to protect the finish of the charcoal grey plastic body panels when
traveling (the stainless steel front and right panels should offer good scratch-resistance,
although they do show fingerprints easily).
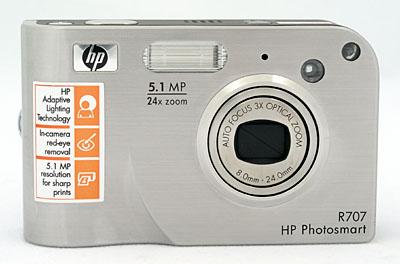
The front of the R707 is almost flat, with the exception of a very slight protrusion around the lens, and a deep recess at the lower right hand corner (when looking at the camera from the rear) which serves as a grip for your right index finger to gain purchase on. The R707's front panel is finished with a smooth "skin" of brushed stainless steel which wraps gently around the right hand side of the camera. When powered on, the lens extends approximately three quarters of an inch from the camera front. A shutter-like cover protects the lens, automatically sliding open when the camera is activated and closing again when the camera is turned off. There's thus no need for an easily-lost lens cap. Also on the front panel is the autofocus assist lamp (at the very top left of the camera), which doubles as an indicator lamp for the self-timer. Adjacent to this lamp is the small, circular optical viewfinder window. Continuing further right, the next item is the tiny single-hole grille for the camera's microphone. Finally, near the top center of the camera, just left of the HP logo, is the built-in flash strobe.
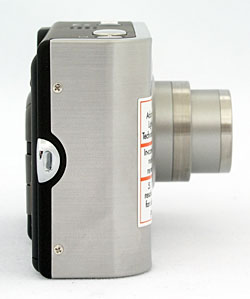
The right side of the R707 (as viewed from the rear), wrapped in the metal skin that curves around from the front panel, is almost perfectly smooth and featureless with the exception of a small eyelet for the included wrist strap.
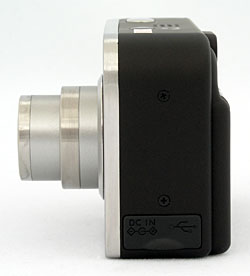
The opposite side of the camera, constructed of rubberized high-impact plastic, is likewise almost smooth and featureless, with the exception of soft rubber cover attached to the camera which protects the two connectors, bending aside to reveal them. The camera's USB and DC In connector terminals are located on the connector panel under this cover.
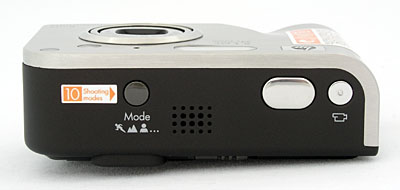
The Photosmart R707's top panel is smooth and uncluttered. A twenty-hole speaker grille, the camera's Mode button, the Shutter button, and the Video button (essentially a shutter button dedicated to recording videos) are all located on top of the camera.
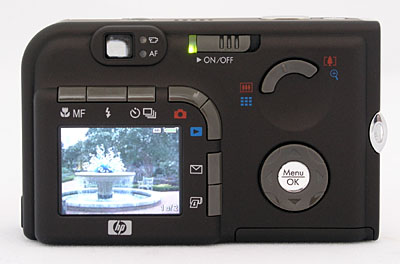
The remaining camera controls are all on the rear panel, along with the tiny real-image optical viewfinder and 1.5-inch color LCD monitor. The viewfinder lacks any form of dioptric adjustment, so eyeglass wearers will need to wear their glasses while using the viewfinder. It also doesn't have a particularly high eyepoint, so you'll likely find yourself having to press your eyeglass lens up against the back of the camera to see the full frame. To the right of the optical viewfinder are two small LEDs, the upper of which illuminates red when movies are being recorded. The lower LED lights solid green to indicate that the camera is ready to take a photo (shutter button half-pressed, focus and exposure locked, and flash charged if applicable). When focus lock can't be achieved, the flash isn't ready, or the camera is still processing the previous shot, this LED blinks green. If the camera has an error, both LEDs blink together. To the right of this is the Power/Memory LED and On/Off switch, a spring-loaded slider which turns the camera on and off. The Power/Memory LED indicates that the camera is on (solid green), writing an image to the internal memory or SD / MMC card (fast blinking green), turned off and charging (slow blinking green), or turned off (not lit).
Seven buttons curve around the top and right sides of the LCD display; the MF Focus button, Flash button, Timer / Burst button, Live View button, Playback button, HP Instant Share button, and Print button. The MF Focus button selects between the available focus modes - Normal Focus, Macro, Infinity or Manual Focus. The Flash button selects the flash mode, with choices being Auto, Auto with Red-Eye Reduction, On, Off, or Night modes. The Timer / Burst button accesses the camera's Burst mode and two Self-Timer modes (one of which captures one shot after ten seconds, and the other of which captures a shot after ten seconds, followed by another two seconds later). The Live View button turns on and off the LCD display in Record mode, with an information overlay showing certain camera settings that cannot be disabled. The Playback button switches the camera to Playback mode, where images and movies can be reviewed, and voice memos added to images. Pressing the Playback button a second time returns the camera to Record mode with Live View disabled; alternatively the Shutter button or Live View button can be half-pressed or pressed respectively to return to Record mode with Live View enabled. The HP Instant Share button is used to flag images for sharing once the camera is connected to a computer. Finally, the Print button is used to flag images for printing once the camera is connected to a computer.
To the right of the LCD and surrounding buttons is the Four-Way Controller with central Menu / OK button. The Four-Way Controller is used to navigate menus, scroll through images in Playback mode, and to pan around images when using the Playback zoom. The Menu / OK button calls up the camera's menu system, and acknowledges changes to menu options. At the top right of the camera's rear is a two-way Zoom rocker button, nestled around a circular indentation that helps your thumb keep a grip on the rear of the camera, and makes it easier to roll your thumb to reach either end of the rocker. The Zoom rocker controls the optical and digital zoom in Record mode (except for when recording movies, when zoom is not available), as well as controlling the playback zoom, and accessing the nine-image thumbnail view (by pressing the wide end of the rocker when not using the playback zoom).
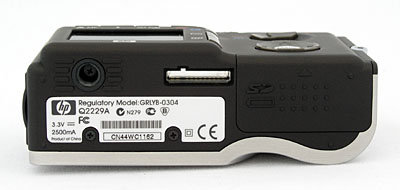
The R707's bottom panel is almost totally flat, with a plastic threaded tripod mount at the very rear left corner of the camera. This position is less than perfect for people interested in panoramic photography, as it is not centered under the lens and will contribute to parallax error when making panoramas; it also will not provide the optimum stability on a tripod given how close the mount is to two edges of the camera. The battery and SD / MMC card compartment is at the right rear of the camera, covered by a sliding door which, when pushed backwards, will pop open on a gently spring-loaded mechanism. The tripod mount is just far enough away from the battery / SD compartment to allow quick battery or card changes while working on a tripod. I always appreciate this, given the amount of studio work I do, and am glad that the battery and memory card slots are both accessible while working on a tripod. A sliding switch locks the battery in place, to prevent it from accidentally falling out when opening the compartment door. Also located on the bottom of the camera is a connector for the optional HP Photosmart C8887A camera dock, which is not protected by any kind of cover, so you'll want to be careful to avoid debris damaging the electrical contacts inside.
With only a handful of external camera controls and a well-organized LCD menu system, the Photosmart R707's user interface is straightforward and easy to grasp. The Mode button on the top panel controls the camera's main operating mode and the level of exposure control available. The R707's efficiently laid out LCD menu system is easy to understand and relatively quick to navigate. Given the camera's straightforward setup and user-friendly design, most users should be able to operate the camera right out of the box, referring to the manual only for more complex operations.
 Record-Mode
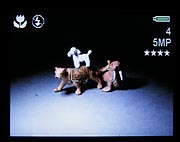
Viewfinder Display: In record mode, the R707 displays an information overlay
on the LCD screen or electronic viewfinder, which cannot be disabled. Information
shown includes exposure mode (except in Auto mode), capture menu settings (if
not default, including white balance, metering mode, ISO sensitivity, Adaptive
Lighting function, color mode, saturation, contrast, sharpness, exposure bracketing,
and date / time imprinting), exposure compensation (if a compensation adjustment
has been made), image size and quality setting, flash status (except in Auto
flash mode), burst mode, self timer, macro mode, manual focus, infinity focus,
number of shots remaining on the memory card or internal memory, battery life
remaining, and a set of focusing brackets. Aperture and shutter speed are reported
when the Shutter button is halfway pressed.
Record-Mode
Viewfinder Display: In record mode, the R707 displays an information overlay
on the LCD screen or electronic viewfinder, which cannot be disabled. Information
shown includes exposure mode (except in Auto mode), capture menu settings (if
not default, including white balance, metering mode, ISO sensitivity, Adaptive
Lighting function, color mode, saturation, contrast, sharpness, exposure bracketing,
and date / time imprinting), exposure compensation (if a compensation adjustment
has been made), image size and quality setting, flash status (except in Auto
flash mode), burst mode, self timer, macro mode, manual focus, infinity focus,
number of shots remaining on the memory card or internal memory, battery life
remaining, and a set of focusing brackets. Aperture and shutter speed are reported
when the Shutter button is halfway pressed.
 Playback-Mode
Viewfinder Display: In playback mode, the R707 displays the current image,
a battery gauge, and an indication of the current image number and how many
images are on the flash card or internal memory. A limited information display
can be called up through the playback menu. For still images, this offers a
display of the capture menu settings (if not default, including white balance,
metering mode, ISO sensitivity, Adaptive Lighting function, color mode, saturation,
contrast, sharpness, exposure bracketing and date / time imprinting), shutter
speed, aperture, exposure compensation (if a compensation adjustment has been
made), ISO sensitivity (duplicating the previous ISO icon if ISO was set manually),
image file name, file size, macro mode, flash mode, image size and quality,
and date. For movie files, the information display includes file name, file
size, date, and clip length. (An example of an info screen for a still photo
is shown as the last frame of the animated screen shot sequence above right,
against a blank photo, so you can see the text more clearly.)
Playback-Mode
Viewfinder Display: In playback mode, the R707 displays the current image,
a battery gauge, and an indication of the current image number and how many
images are on the flash card or internal memory. A limited information display
can be called up through the playback menu. For still images, this offers a
display of the capture menu settings (if not default, including white balance,
metering mode, ISO sensitivity, Adaptive Lighting function, color mode, saturation,
contrast, sharpness, exposure bracketing and date / time imprinting), shutter
speed, aperture, exposure compensation (if a compensation adjustment has been
made), ISO sensitivity (duplicating the previous ISO icon if ISO was set manually),
image file name, file size, macro mode, flash mode, image size and quality,
and date. For movie files, the information display includes file name, file
size, date, and clip length. (An example of an info screen for a still photo
is shown as the last frame of the animated screen shot sequence above right,
against a blank photo, so you can see the text more clearly.)
Pressing the up or down-arrow key on the Four-Way arrow pad adjusts the playback volume (even for images that have no attached audio). Pressing the right-arrow key when viewing the last image in the series, or the left-arrow key when viewing the first image in the series, calls up the Total Images Summary screen, listing the number of images on the flash card, the number of images which can be taken using the current settings, and the number of images marked for printing or sharing, as well as the remaining battery life. Through the playback menu you can also zoom in up to 140x (although at such a high zoom you're literally only seeing an area of about 19 x 14 pixels, even at the highest image quality) to check fine details, focus and framing, and can scroll the enlarged viewing window around the full image using the camera's arrow keys. There's quite a long pause when you first it the zoom toggle to zoom into an image, while the camera loads the image file into its working memory. Once that's done though, zooming in or out and scrolling around the enlarged image are very fast.
External Controls

Shutter Button: Almost flush with the camera's top panel near the front right corner (as viewed from the rear), this button
sets focus and exposure when pressed halfway, and fires the shutter when fully
pressed. In Playback mode, a half-press of this button returns the camera to Record mode with the LCD enabled (regardless of whether it was enabled before switching to Playback mode), and a full press returns to Record mode and captures an image immediately.

Video Button: To the right of the shutter button, and featuring a small nub on the surface to help your finger distinguish it from that button, the Video button sets focus and exposure and starts / stops video capture when fully pressed. Videos are recorded with sound, and neither optical nor digital zoom is available. In Playback mode this button returns the camera to Record mode with the LCD enabled (regardless of whether it was enabled before switching to Playback mode), and starts video recording immediately.

Exposure Mode Button: Located near the left side of
the camera (as viewed from the rear), directly above the center of the lens,
this button selects the camera's exposure mode. The following options are
available:
- Auto: This mode puts the camera in control of aperture
and shutter speed, the user retaining control over all other exposure variables.
- Aperture Priority (A): Here, the user controls the aperture setting, while the camera selects the best corresponding shutter speed.
- Action: Indicated on the LCD display by an CD display. Here, the camera uses a smaller lens aperture, and faster ISO speeds, so that both the background and foreground will be in sharp focus.
- Landscape: This mode is indicated by an icon of a pair of mountains on the Exposure Mode dial. Here, the camera uses a smaller lens aperture, so that both the background and foreground will be in sharp focus. Saturation and sharpness are also boosted to give the image more "snap".
- Portrait: An icon of a person's head indicates this mode on the LCD display. In Portrait mode, the camera employs a larger lens aperture setting, which decreases the depth of field. This produces a sharply focused image of the subject, in front of a slightly blurred background. Contrast, saturation and sharpness are all lowered to give more natural, pleasing skin tones.
- Beach and Snow: An icon of a palm tree and a snowman indicates this mode on the LCD display. In Beach and Snow mode, the camera uses positive exposure compensation, to stop the camera's metering system from being fooled by the bright foreground into giving an underexposed image.
- Sunset: An icon of a sun behind clouds indicates this mode on the LCD display. In Sunset mode, biases the camera's white balance and saturation to give a warm, colorful photo of the setting sun. The autofocus is set to start from infinity, and the flash is automatically disabled.
- Panorama: An icon of four joined images curving around to suggest a circle indicates this mode on the LCD display. In Panorama mode, the camera captures from two to five images to be stitched together horizontally, capturing images from left to right sequentially. After the first shot, a preview of the right edge of the previous image is shown on the left side of the screen as a semi-transparent "ghost" image, emphasizing high contrast lines while letting you see the current scene behind it. This is an interesting technique that is somewhat of a double-edged sword - photographing with high-contrast subjects at the edge of each image is very easy, but if there's not a lot of contrast at the join, there's very little guidance to help in lining up the join. A particularly unusual option on the R707 (described in the Playback menu section below) is the ability to preview the entire panorama as a single low-resolution stitched image fitted to the height of the camera's LCD display.
- Document: An icon of a sheet of paper indicates this mode on the LCD display. In Document mode, the camera employs high contrast, low saturation, and no flash to capture flat, textual or graphic items.
- My Mode: The final mode on the R707 is the My mode. In this mode, you can select from each of the camera's Capture menu settings, and opt to save a particular value for each setting, or have the setting reset when the camera is switched off. This is particularly useful for saving a group of settings you use in a common situation that isn't already covered by one of the existing scene modes - in a matter of a few button presses your preferred settings can be recalled for use.
![]()
Power Switch: Located on the rear of the camera, to the right of the optical
viewfinder, this slider powers on the camera and extends the lens when slid
to the right. Sliding it a second time powers the camera back off, and retracts
the lens again.

Macro / MF Button: Directly above the left-hand end of the LCD display, this button cycles through the available Focus modes in any Record mode. Options include Normal, Macro, Infinity, and Manual Focus. In Manual Focus mode, the Up-Arrow and Down-Arrow buttons control the focusing distance, with an unmarked scale showing the focusing range displayed on the LCD display or Electronic Optical Viewfinder. In Playback mode, this button still changes the record-mode setting, briefly showing the current mode full-screen in place of the currently reviewed image, before returning to Playback mode.

Flash Button: Directly to the right of the Macro / MF button, this
button controls the flash mode, cycling between
Auto, Auto with Red-Eye Reduction, On, Off, or Night
modes. Flash is not available in Video mode, or certain scene modes as described previously. In Playback mode, this button still changes the record-mode setting, briefly showing the current mode full-screen in place of the currently reviewed image, before returning to Playback mode.

Self-Timer / Burst Button: To the right of the Flash button, this button cycles through the available Self-Timer and Burst modes in any Record mode. Options include Normal, Self-Timer, Self-Timer - 2 Shots, and Burst. The Self-Timer option triggers a 10-second countdown after the shutter button is pressed, while the Self-Timer - 2 Shots option follows this with a second exposure two seconds after the first (if the flash is recharged in time). Burst mode captures images at a rate of 2.3 frames/second for up to four shots. In Video mode, only the Normal and Self-Timer options are applicable, and both Self-Timer options trigger simply a 10-second countdown, without the second shot if in Self-Timer - 2 Shots mode. In Playback mode, this button still changes the record-mode setting, briefly showing the current mode full-screen in place of the currently reviewed image, before returning to Playback mode.

Live View Button: Curving around the top right corner of the LCD display, this button enables or disables the camera's LCD display when in Record mode. In Playback mode this button returns the camera to Record mode with the LCD enabled (regardless of whether it was enabled before switching to Playback mode).

Playback Button: Curving around the top right corner of the LCD display to the right of and below the Live View button, this button switches the camera to playback mode, and brings up the most recently captured image for review. Pressing the button a second time returns the camera to record mode with Live View disabled. The Photosmart R707 is what is often referred to as a "shooting priority" camera, so half-pressing the shutter button when in playback mode will also return the camera to record mode, but with Live View enabled.

HP Instant Share Button: Located directly below the Playback button, this button is used to flag images for sharing once the camera is connected to a computer. In either Capture or Playback mode this button will pop up the Instant Share menu, allowing you to share the image with one of 34 predefined Instant Share destinations. These destinations are entered by connecting your camera to a computer over the USB connection, and running the bundled HP Photo & Imaging software. Each of the 34 destinations can be a single email address, a group of email addresses (referred to as a Group Distribution List), or an online album on a website (choices of album providers vary by region). On the PC platform, thumbnail images are emailed by the HP software, and recipients click on a link in the email to view the full-sized image on a website. On the Mac platform, the full sized images are emailed using your default email program.

Print Button: Located directly below the HP Instant Share button, this button is used to flag images for printing once the camera is connected to a computer. In Playback mode a prompt will pop up briefly allowing you to set a number of copies of the current image to be printed using the Up-Arrow and Down-Arrow buttons, from a minimum of 1 to a maximum of 99 copies. Unlike the HP Instant Share button, the Print button has no effect in Record mode.
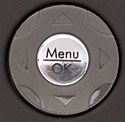
Four-Way Arrow Pad and Menu / OK Button: Located on the right-hand side of the camera's rear
panel, this set of five buttons serves as the camera's main navigational tool.
The four exterior buttons navigate through settings menus, moving the selection
up, down, left, or right. The center button acts as the "OK" button,
to confirm any changes, as well as calling up the Menu in the first place when pressed in either Playback or Record mode.
In Aperture Priority mode, the left and right keys adjust the camera's aperture, allowing only the maximum or minimum aperture at the current optical zoom setting; in other modes these keys have no function. In Manual Focus mode, the up / down arrow keys adjust the focal distance
of the lens; again these keys have no other function in Record mode.
In Playback mode, the right and left arrow keys scroll through captured images. The up / down arrow keys call up or dismiss the Total Images Summary screen, listing the number of images on the flash card, the number of images which can be taken using the current settings, and the number of images marked for printing or sharing. When an image has been enlarged, all four keys pan the view.

Zoom Control: Crowning the top right corner of the rear panel,
this two-way rocker button controls the optical and digital zoom in Record
mode. In Playback mode, upon selecting Magnify from the Playback Menu, this
button controls the playback zoom function, digitally enlarging the image
as much as 140x (although at such a high zoom you're literally only seeing
an area of about 19 x 14 pixels, even at the highest image quality). Note
that neither the optical or digital zoom are available in Movie mode.
Camera Modes and Menus
Record Mode: In Record mode, the camera can capture still images or videos with sound, with five groups of options (Capture, Playback, HP Instant Share, Setup and Help) available through the Record mode settings menu. The groups are arranged with a "tabbed" layout, allowing you to access Capture Menu (3 screens), Playback Menu (2 screens), HP Instant Share Menu, Setup Menu or Help Menu items in any camera mode by paging between tabs. The Exposure Mode button sets the exposure control mode, while the LCD menu provides the following exposure options (some options are not available in all modes). Options can either be cycled through on the menu screen with the left / right arrow buttons, or the OK button can be pressed to bring up a screen describing the specific option and allowing it to be altered, and all Capture Menu options also offer a Help screen describing them in more detail:
 Capture Menu
- EV Compensation: Allows the exposure compensation to be adjusted from -3 to +3 exposure equivalents (EV) in 1/3 EV steps.
- Image Quality: Adjusts the image size and compression levels. Options include 5MP ***, 5MP **, 3MP **, 1MP **, VGA **, or Custom. The custom setting allows you to select a specific resolution (5MP / 2.592 x 1.952 pixels, 3MP / 2,048 x 1,536 pixels, 1MP / 1,280 x 960 pixels, or VGA / 640 x 480 pixels) and a specific compression level (**** / Least Compression, *** / High Quality, ** / Medium Quality and * / Lowest Quality). Note that this means the highest resolution / quality combination is not available as a preset option, and must be selected manually through the Custom setting.
- White Balance: Adjusts the overall color balance of the scene. Options include Auto, Sun, Shade, Tungsten, Fluorescent, or Manual. The Manual white balance setting allows you to calibrate the white balance manually from a known white or neutral subject.
- ISO Speed: Sets the camera's sensitivity to Auto, 100, 200 or 400 ISO equivalents.
- AE Metering: Specifies the metering system to use. Options
include Average, Center-Weighted or Spot.
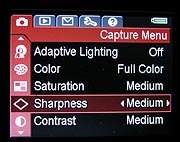 Adaptive
Lighting: Accesses the camera's Adaptive Lighting function, not to
be confused with the pop-up flash. "Adaptive Lighting" is HP's
name for a function of the camera's firmware which brightens shadow areas
of images, simulating the effect of fill flash (but with an attendant
increase in image noise in the boosted areas of the image). The effect
is similar to that of "dodging" specific areas of an image in
the photo studio. Options include Off, Low, and High - giving two possible
levels at which the Digital Flash function can be applied.
Adaptive
Lighting: Accesses the camera's Adaptive Lighting function, not to
be confused with the pop-up flash. "Adaptive Lighting" is HP's
name for a function of the camera's firmware which brightens shadow areas
of images, simulating the effect of fill flash (but with an attendant
increase in image noise in the boosted areas of the image). The effect
is similar to that of "dodging" specific areas of an image in
the photo studio. Options include Off, Low, and High - giving two possible
levels at which the Digital Flash function can be applied.
- Color: Chooses whether the camera records images in Full Color, Black and White, or Sepia tones.
- Saturation: Controls the level of image saturation, with choices
of Low, Medium or High.
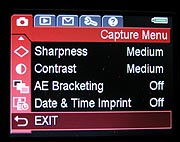 Sharpness:
Adjusts the in-camera image sharpening, with choices of Low, Medium or
High.
Sharpness:
Adjusts the in-camera image sharpening, with choices of Low, Medium or
High.
- Contrast: Controls the level of image contrast, with choices of Low, Medium or High.
- AE Bracketing: Enables or disables the camera's automatic exposure bracketing feature, which captures three images with varying levels of contrast. All three images are captured sequentially with a single press of the shutter button, and the LCD monitor remains blacked out from when the first shot is captured, until the last shot has been captured. This means that you'll have to be very careful to hold the camera steady, place it on a tripod, or watch through the viewfinder to ensure the camera does not move between shots if you need precise framing. Options are Off, +/- 0.3, +/- 0.7, or +/- 1.0, the latter three items indicating the step size between exposures, measured in Exposure Equivalent units (EV).
- Date & Time Imprint: As well as the date and time information that is always stored in the EXIF header of images, the R707 can also permanently record this information on the image itself, similarly to how 35mm point-and-shoot cameras can. This menu option allows you to opt to record the date and time information on the image if desired, with menu options being Off, Date Only, or Date & Time.
Playback Mode: This mode allows you to review captured images on the memory card, erase them, protect them, set them up for printing, etc. Pressing the Menu button in Playback mode displays the following options, and the other four menu groups (Capture, HP Instant Share, Setup and Help) can be accessed via their own tabs:
- Playback Menu
 Delete:
Deletes single or multiple images or video files, or formats the flash
card. Options in the resulting Delete menu are Cancel, This Image, Audio
Only, All Images, Format Card, or Undelete Last. An unusual option
for a digital camera, the Undelete Last function allows you to restore
the most recently deleted image (or, in the case of a panorama, the entire
set of images in the panorama). Note that with the exception of panoramas,
only the most recent single image can be undeleted though, and if another
image has been captured or the camera has been powered off since an image
was deleted, it will no longer be possible to restore it through the camera.
Still, this is a very cool option and one I'd like to see more manufacturers
offer, for a little additional piece-of-mind on that one fumble-fingered
day when you delete the wrong image. (Normally, in that instance you'd
need to stop writing images to your flash card until you got back to a
computer to restore the image, which could be troublesome if you don't
have additional flash cards with you!)
Delete:
Deletes single or multiple images or video files, or formats the flash
card. Options in the resulting Delete menu are Cancel, This Image, Audio
Only, All Images, Format Card, or Undelete Last. An unusual option
for a digital camera, the Undelete Last function allows you to restore
the most recently deleted image (or, in the case of a panorama, the entire
set of images in the panorama). Note that with the exception of panoramas,
only the most recent single image can be undeleted though, and if another
image has been captured or the camera has been powered off since an image
was deleted, it will no longer be possible to restore it through the camera.
Still, this is a very cool option and one I'd like to see more manufacturers
offer, for a little additional piece-of-mind on that one fumble-fingered
day when you delete the wrong image. (Normally, in that instance you'd
need to stop writing images to your flash card until you got back to a
computer to restore the image, which could be troublesome if you don't
have additional flash cards with you!)
- Remove Red Eye: Runs firmware in the camera which attempts to detect and remove from images the red discoloration in your subject's eyes, as often seen in portrait photographs taken with flash in a poorly-lit environment. This tool is completely separate from the camera's red-eye reduction flash mode, which attempts to minimize red-eye by firing a short burst of pre-flash to cause your subject's retinas to contract. I found that the Remove Red Eye tool usually did a fairly good job of finding and correcting for red-eye, although it occasionally incorrectly identified items such as reflections from jewelry for correction. (And one image repeatedly locked up the camera completely, requiring it to be powered off and on again. This only happened with one image out of all we tried, but an image should never be able to lock up a camera.)
- Image Advice: Attempts to suggest what may be wrong with pictures, for example suggesting the use of a tripod on long exposures, or the use of the Adaptive Lighting function on a high-contrast image. This function, which is in a way reminiscent of the stickers some photo labs place on poor photos with advice on how to avoid such mistakes next time around, helps users learn how to improve their photographs (and how best to utilize features of the camera which they might not otherwise realize were available to them). Very cool, here's a typical example.
- Image Info: For still images, this offers a display of the settings that were used to capture an image (if not default), including the capture mode, flash setting, all non-default capture menu settings, aperture, shutter speed, exposure compensation, ISO speed, whether an SD / MMC memory card is inserted in the camera, the file name of the current image, the file size of the current image, focus mode, video / audio clip length, whether a voice memo is attached, the total number of images stored on the camera, and the number of the current image in the order that images were captured.
- Record Audio: Allows you to record a voice memo clip of up to one minute to accompany the currently displayed image. The only counter provided counts up to show the length of audio recorded thus far, so you have to do a little mental arithmetic to judge how long you have remaining to record. Voice memos cannot be recorded for videos, and can only be recorded for the first image in a panoramic series recorded using the Panorama capture mode.
- Rotate: Rotates the currently-displayed still image 90 degrees clockwise (the process can be repeated to obtain 180 degree or 270 degree rotations). Only still images can be rotated, not video clips.
- Preview Panorama: An extremely unusual option (in fact, possibly the first that I've seen on a digital camera), this allows you to view a low-resolution image scaled to fit the height of the screen, that is assembled from a group of two to five images captured in Panorama mode as a single panoramic image. This allows you to check for obvious defects in the series that you might not notice when viewing them separately. Very cool!
HP Instant Share Menu: The following HP Instant Share menu options are accessible through both the Record and Playback modes, as a tab accessed from the Record and Playback menus. The provided HP software must be installed on your computer and the Instant Share function setup before it can be accessed for the first time:
- HP Instant Share Menu
 Share
All Images: Marks all images on the camera's internal memory or optional
SD / MMC memory card for sharing with the selected destinations.
Share
All Images: Marks all images on the camera's internal memory or optional
SD / MMC memory card for sharing with the selected destinations.
- Destinations: Each destination that you have setup in the camera shows as a menu item, either shown with or without a check depending on whether it is selected. Destinations can be email addresses or groups, or websites compatible with the camera.
- HP Instant Share Setup: Guides you through setting up the instant share function on your computer.
Setup Menu: The following options are accessible through both the Record and Playback modes, as a tab accessed from the Record and Playback menus:
- Setup Menu
-
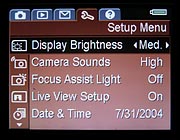 Display
Brightness: Offers a three-step adjustment to the LCD brightness,
trading off battery life for a more visible LCD display in bright ambient
lighting conditions. Choices are Low, Medium, or High.
Display
Brightness: Offers a three-step adjustment to the LCD brightness,
trading off battery life for a more visible LCD display in bright ambient
lighting conditions. Choices are Low, Medium, or High.
- Camera Sounds: Adjusts the volume of camera sounds, with options including High, Low or Off.
- Focus Assist Light: Enables or disables the bright orange focus assist LED located on the front of the camera. Options are Auto, which allows the camera to use the focus assist lamp when necessary, or Off, which prevents the focus assist lamp being used.
- Live View Setup: Enables or disables the LCD screen being turned on (ie. in Live View mode) when the camera is powered on. Choices are Live View On, or Live View Off.
- Date & Time: Sets the camera's internal calendar and clock.
- USB: Selects whether the camera should appear as a PTP imaging device or use the MSDC protocol to appear as a disk drive when connected to a computer via USB. Options are Digital Camera (PTP) or Disk Drive (MSDC).
- TV Configuration: Selects the video signal timing as either NTSC or PAL.
- Language: Changes the menu language to English, German, Spanish, French, Italian, or Dutch.
- Move Images to Card: Moves images from the camera's internal memory to an SD or MMC storage card. Only available when there is an SD / MMC card in the camera, and the internal memory contains at least one image. If not all images on the internal memory will fit on the SD / MMC card, a screen will appear explaining how many images can be moved. If no storage space is available on the card, the camera will warn you that the card is full. During the moving process, a progress bar is shown to indicate the current status.
- Reset Settings: Resets some or all camera settings to those initially set at the factory. A subsequent Reset Menu offers a choice of Cancel or Yes (all settings except for Date & Time, Language, TV Configuration and USB Configuration are restored to defaults).
-
Help Menu: The following Help menu items are accessible through both the Record and Playback modes, as a tab accessed from the Record and Playback menus:
- Help Menu
- Top Ten Tips: Ten common tips to help you get the most from the camera.
- Camera Accessories: Describes available accessories for the Photosmart R707, what they do, and how to obtain them.
- Camera Buttons: Describes the function of every button on the camera. For some buttons, a full description of functionality is given; for others, a brief description is given and the user is referred to the manual for more details.
- Using Shooting Modes: Describes the various capture modes available on the camera, what they do, and when they should be used.
- Recording Audio Clips: Describes how to record an audio clip or voice memo to be attached to an existing still image.
- Recording Video Clips: Describes how to record a video clip on the R707.
- Reviewing Images and Video: Describes how to view images and video clips that have been captured and are stored on the camera.
- Deleting Images: Describes how to delete images and video clips from the camera, how to format the camera's internal memory or flash card, and how to undelete the last image (or group of panoramic images).
- Sharing Images: Describes how to setup and use the HP Instant Share function.
- Transferring Images: Describes how to transfer images from the camera to a desktop computer over the USB connection.
- Printing Images: Describes how to print images by directly connecting the camera to a PictBridge or compatible Photosmart printer.
- Managing Batteries: Describes how to select, install, remove, and check on the camera's battery, and strategies for extending battery life.
- Getting Assistance: Describes where to go to obtain further assistance on using the camera.
- Camera Shortcuts: Describes some shortcuts that help make the camera easier to use.
In the Box
Packaged with the Photosmart R707 are the following items:
- Lithium Ion rechargeable battery.
- 3.3V AC adapter.
- USB cable for camera to PC connection.
- USB cable for camera to printer connection.
- Software CD with HP Image Zone software for Windows and Macintosh.
- Wrist strap.
- Operating manual and registration card.
- Large capacity SD memory card.
- Extra rechargeable battery.
- Fast charging kit or camera dock.
- Small camera case.
Recommended Software: Rescue your Photos!
Just as important as an extra memory card is a tool to rescue your images
when one of your cards fails at some point in the future. I get a lot of email
from readers who've lost photos due to a corrupted memory card. Memory card
corruption can happen with any card type and any camera manufacturer, nobody's
immune. A surprising number of "lost" images can be recovered with
an inexpensive, easy to use piece of software though. Given the amount of
email I've gotten on the topic, I now include this paragraph in all my digicam
reviews. The program you need is called PhotoRescue, by DataRescue SA. Read
our review
of it if you'd like, but download the program now, so you'll have it.
It doesn't cost a penny until you need it, and even then it's only $29, with
a money back guarantee. So download PhotoRescue
for Windows or PhotoRescue
for Mac while you're thinking of it. (While you're at it, download
the PDF manual
and quickstart
guide as well.) Stash the file in a safe place and it'll be there when you
need it. Trust me, needing this is not a matter of if, but when...
PhotoRescue is about the best and easiest tool for recovering digital
photos I've seen. (Disclosure: IR gets a small commission from sales of
the product, but I'd highly recommend the program even if we didn't.)
OK, now back to our regularly scheduled review...
Information on shooting speed, battery life, etc. can be found here.
See the specifications sheet here.
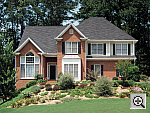
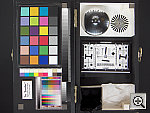
See our sample pictures and detailed analysis here. The thumbnails below show a subset of our test images. Click on a thumbnail to see the full-size photo.

|

|

|
| |
|
|
|
|
|
|
| |
|
|
|
|
|
|
| |
|
|


"Gallery" Photos
For those readers interested in a set of less "standardized" photos from the R707, we've put together a "photo gallery" of more pictorial shots captured with the R707.
Test Results
In keeping with my standard test policy, the comments given here summarize only my key findings. For a full commentary on each of the test images, see the HP R707's "pictures" page.
As with all Imaging Resource product tests, I encourage you to let your own eyes be the judge of how well the camera performed. Explore the images on the pictures page, to see how the R707's images compare to other cameras you may be considering.
Not sure which camera to buy? Let your eyes be the ultimate judge! Visit our Comparometer(tm) to compare images from the HP R707 with those from other cameras you may be considering. The proof is in the pictures, so let your own eyes decide which you like best!
- Color: Accurate color, but some consumers may prefer the brighter look of competing models. The HP R707 actually has significantly more accurate color than the majority of digicams on the market today, but that unfortunately may not be to its advantage. Most consumer digicams render colors anywhere from ten to twenty percent more saturated than they are in real life. While this isn't strictly accurate, most consumers seem to prefer the brighter-looking colors that result. By contrast, the HP R707's color is almost dead on the money across most of the spectrum, but its color look a little flat when compared to that of cameras with less accurate, pumped-up color. This will be a matter of personal preference, some users will like the HPs more accurate color, others will prefer the less technically accurate but more vibrant looking color that's more common in the marketplace.
- Exposure: Good exposure accuracy, good ability to hold onto highlight detail. "Digital Flash" works exceptionally well, at the cost of some increase in image noise. The R707 generally required less exposure compensation on difficult shots than other cameras I test, and it seemed to generally do a better than average job of holding onto detail in strong highlights. With is contrast adjustment set to the "low" position, its ability to hold highlight detail was truly excellent, but with a pretty noticeable reduction in color saturation as well. The real bonus is HP's unique "Adaptive Lighting" option, which uses sophisticated in-camera processing to brighten the shadows. This works very well in difficult lighting situations likely to be encountered by many consumers, but does incur some penalty in terms of significantly increased image noise in the areas that are lightened. Still, the overall effect is good, and I suspect will be very pleasing to most consumers.
- Resolution/Sharpness: High resolution, 1,350 lines of "strong detail." Anti-noise processing tends to lose subtle detail though. The R707 delivered maximum resolution befitting its 5-megapixel class on the "laboratory" resolution test chart. It started showing artifacts in the test patterns at resolutions as low as 600 lines per picture height, in both horizontal and vertical directions. However, I found "strong detail" out to at least 1,300 lines vertically, 1,350 lines horizontally. "Extinction" of the target patterns didn't occur until about 1,650 lines. In shots of real-world subjects though, I found the 707's images a little on the soft side, and lacking detail in areas of subtle contrast, apparently due to its rather strong anti-noise processing.
- Image Noise: Higher than average image noise and significant loss of subtle detail to anti-noise processing. While it has many strong points, the HP R707 seems to suffer from an image sensor with high noise levels. The camera's images show only slightly higher than average image noise in most shots, but a lot of image detail is traded away to achieve this. Areas of subjects characterized by subtly contrasting elements (hair is a good example) lose a lot of fine detail.
- Closeups: An average-sized macro area, but great resolution and detail. Flash has trouble up close though. The R707 performed well in the macro category, capturing a minimum area of 3.22 x 2.42 inches (82 x 62 millimeters). Resolution was very high, as the brooch, coins, and dollar bill all show strong, well-defined detail. The corners of the frame were rather soft though, and the softness extended quite a ways into the image. The R707's flash had trouble throttling down for the macro area, however, and overexposed the shot. - Plan on using external lighting for your closest macro shots.
- Night Shots: Good exposures even at the lowest light levels and good color, but high image noise The R707 produced clear, bright, usable images down to the 1/16 foot-candle (0.67 lux) limit of my test, at all three ISO settings. Color balance was pretty good with the Auto white balance option, with only minor color casts. The R707 would benefit greatly from a lower-noise image sensor though, as image noise was quite high at the ISO 200 and 400 settings, and moderately high even at ISO 100. On a positive note though, the R707 focused well down to the lowest limit of my test.
- Viewfinder Accuracy: A tight optical viewfinder, but very accurate LCD monitor. The R707's optical viewfinder proved a little tight, showing only about 85 percent frame accuracy at wide angle, and about 84 percent at telephoto. (This is about average accuracy among the digicams I test, but is less than what I consider ideal for consumer cameras.) The LCD monitor fared much better, showing about 99 percent frame accuracy at both zoom settings. Given that I like LCD monitors to be as close to 100 percent accuracy as possible, the R707's LCD monitor was close to perfect in that regard, but I'd like to see the optical viewfinder be a little more precise.
- Optical Distortion: High barrel distortion at wide angle. "Purple fringing" at wide angle, severe coma at telephoto. Geometric distortion on the R707 is a good bit higher than average at the wide-angle end, where I measured approximately 1.17 percent barrel distortion. The telephoto end fared a little better, as I measured approximately 0.2 percent barrel distortion. While chromatic aberration seems low, the wide angle images show a fair bit of what looks to be "purple fringing", a bright purple fringe around dark objects against bright backgrounds. At telephoto focal lengths, severe coma blurs the corners of the image badly, extending a fair ways into the image area. Overall, its lens appears to be one of the weaker elements of the R707's design. (It wasn't clear, there's a possibility that the sample of the R707 sent to us for evaluation had a CCD chip that wasn't seated properly. This could be the cause of the softness along the top edge of many of our test and sample shots. - So it's possible that retail samples could show better results. I'd advise checking carefully though, to see that the specific camera you purchase doesn't show this tendency, though.)
- Shutter Lag and Cycle Time: Shutter lag on the slow side of average, decent shot to shot cycle times. With lag times that range from 0.92-0.95 second, the HP R707's shutter response is on the slow side of average. (Average for a camera of this class is a range from 0.8-1.0 second, which is still too slow for a consumer digicam, in my opinion.) Cycle times are a little better, at 1.77 seconds/shot for up to four shots in rapid sequence. Continuous-mode speed is also good, at 2.3 frames/second, again for up to four shots.
- Battery Life: Average battery life. The HP R707 for some reason refused to operate from the lab-bench power supply I use to measure digicam power consumption with, so I couldn't perform my usual detailed measurements. A simple run-down test showed a worst-case run time of 100 minutes, in capture mode with the LCD turned on. Given that the R707 is very aggressive about turning its display off when not in use, actual run times will likely be a fair bit longer. Still, my usual recommendation that you purchase a second battery right along with the R707 stands: Digicam batteries very much obey Murphy's Law, always petering out at the worst possible moment.
| Free Photo Lessons | |
|

Related Links
More Information on this camera from...
DCViews:
HP R707 review

Follow Imaging Resource: