Ricoh RDC-6000Ricoh's inexpensive 2 megapixel digicam doubles as a USB webcam. (With optional software.)<<Shutter Lag & Cycle Time Tests :(Previous) | (Next): Camera Modes & Menus>> Page 8:Operation & User InterfaceReview First Posted: 1/9/2001 |
Operation and User Interface
We found the user interface on the RDC-6000 relatively straightforward, though very reliant on the LCD monitor. The image size and compression ratio are controlled by the "PIC" button on top of the camera. The Self-Timer and Flash mode adjustment buttons are also on top. The digital telephoto is controlled by the up and down arrow buttons next to the monitor, and the display on/off button is on the other side. The remaining exposure variables, such as Exposure Mode, ISO, Exposure Compensation, and White Balance must be accessed through the LCD-based menu system. We found the LCD menu system simple to navigate and reasonably efficient. (We found it odd though, that the exposure compensation adjustment is the last menu option on the second page. Fortunately, this isn't quite as awkward as it sounds, since you can get to the last menu entry by scrolling upfrom the first menu position, saving scrolling through all the other entries first. Still, we'd like the +/- exposure compensation control to be more readily available.) We were glad to see the inclusion of a small status display panel on top of the camera, which reports a variety of camera settings, including battery power and image quality. This helps save precious battery power by allowing you to work without the LCD monitor. Additionally, the control layout should accommodate one-handed shooting, though a couple of extra finger grips on the left side of the camera ensure a good hold when shooting with two hands.
Control Enumeration

Shutter Button: Located on top of the camera, in the center of the Mode dial, this button sets exposure and focus when depressed halfway. Fully depressing the button triggers the shutter. Pressing the shutter button also triggers some menu items while in the settings menu, such as the Erase All option of the Erase menu. When the Self-Timer is activated, pressing the shutter button begins a 10-second countdown before the shutter is fired.
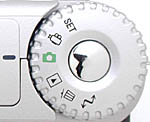
Mode Dial: Encircling the shutter button on the top panel of the camera, this large, notched dial selects the camera's operating mode. Options are:
 Set Mode: Displays the camera's Setup menu, which allows you to format the SmartMedia card, set the date and time, establish the automatic power and LCD off settings, as well as set the language and video format.
 Movie Mode: Sets the camera to record moving images without sound, for as long as the SmartMedia card has available space.
 Record Mode: Allows the user to record still images, either singly or continuously, as well as adjust the exposure settings and record modes.
 Playback Mode: Plays back the captured images on the SmartMedia card, and allows users to protect them from accidental erasure or set them up for printing on DPOF-compatible devices.
 Erase Mode: Calls up the Erase menu, which allows you to erase single images, all images, or selected frames.
 PC Mode: Sets up the camera for connecting to a computer via the USB or serial cables, and downloading images.

PIC Button: Positioned directly to the left of the Mode Dial, this button cycles through the available image size and quality settings, depending on the capture mode.

Self-Timer Button: Next to the PIC button, this button activates and deactivates the Self-Timer mode, which provides a 10-second countdown before the shutter is released.

Flash Button: The far left button on the camera's top panel, the Flash button controls the built-in flash operating mode. Options include Off, Auto, Forced, and Slow Synchro.
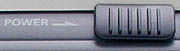
Power Switch: Positioned on the back panel of the camera, just over the top right corner of the LCD monitor, this notched, sliding switch turns the camera on and off.
![]()
Up/Down Arrow Buttons: Resting on the right side of the LCD monitor, these arrow buttons control the amount of digital zoom, with options for 2x, 3x, and 4x enlargement. In any settings menu, these buttons navigate through menu options. In Playback mode, these buttons allow you to scroll around within a captured image that has been enlarged on the LCD screen.
![]()
Enter Button: Located under the lower right corner of the LCD screen, this button cycles through information display formats in both Record and Playback modes. When making menu selections, this button confirms the selected option. On some menu options, such as the User Define White Balance setting and the Manual Focus mode, this button acts as the right arrow button, for making adjustments. In Playback mode, this button acts as the right arrow button when scrolling through captured images (and enlarged ones). This button also controls the amount of playback zoom once the menu option has been selected.
![]()
Menu Button: To the left of the Enter button, this one pulls up the camera settings menu in most modes. When playback zoom has been enabled, it acts as the left arrow key, for scrolling around within the enlarged image.
![]()
Cancel Button: Just beneath the lower left corner of the LCD monitor, this button backs out of menu selections and exits settings menus. In some menu selections, it acts as the left arrow button for making adjustments. In Playback mode, it doubles as the left arrow button for scrolling through captured images.

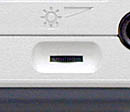
Display Button: Located on the left side of the LCD monitor, this button controls the LCD monitor display in both Record and Playback modes, turning it on and off. In Playback mode, when playback zoom has been enabled, this button controls the amount of playback zoom, up to 2x.
LCD Brightness Adjustment Dial: A very small black dial on the bottom panel of the camera, this controls the brightness level of the LCD monitor.

Follow Imaging Resource: