Ricoh RDC-6000Ricoh's inexpensive 2 megapixel digicam doubles as a USB webcam. (With optional software.)<<Operation & User Interface :(Previous) | (Next): Image Storage & Interface>> Page 9:Camera Modes & MenusReview First Posted: 1/9/2001 |
Camera Modes and Menus
Set Mode: Accessed by turning the Mode dial to the Set position, this mode pulls up the camera's Set-Up menu with the following options:
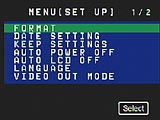 Format: Formats the SmartMedia card, erasing all images from the card (even protected ones).
- Date Setting: Sets the camera's internal date and time.
- Keep Settings: Preserves the camera's current settings after the power is turned off, so that they are immediately recalled when the camera is powered back on (instead of the factory defaults). Flash, Exposure Compensation, White Balance, Recording mode, Language, ISO Sensitifity, Focus mode, Auto Bracketing, Grid Template, Exposure Comensation, and Red-Eye Reduction settings can all be saved.
- Auto Power Off: Sets the period of inactivity before the camera shuts itself off. Choices are one, three, and five minutes, as well as Off.
- Auto LCD Off: Establishes the period of inactivity before the LCD monitor turns itself off to conserve energy (the camera remains active). Options are one, three, and five minutes, as well as an Off setting.
- Language: Changes the camera's menu language to English, German, French, or Japanese.
- Video Out Mode: Adjusts the camera's video out system to connect to either NTSC or PAL television sets.
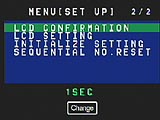 LCD Confirmation: Alters the amount of time that the captured image is displayed on the LCD monitor while being recorded. Times include, zero, one, two, or three seconds.
- LCD Setting: Determines whether or not the LCD monitor is automatically activated when the camera is turned on.
- Initialize Settings: Resets all the camera settings to their factory defaults.
- Sequential Number Reset: Resets the file numbering sequence.
Movie Mode: Marked on the Mode Dial with a miniature movie camera symbol, the Movie mode allows you to record moving images without sound for as long as the shutter button is held down. Actual recording times vary, depending on the amount of available SmartMedia space, as well as the file size and quality settings. All exposure variables are automatically controlled, and there is no settings menu available in this mode.
Record Mode: This mode is noted on the Mode Dial with a green camera symbol. Here, you can record still images with a variety of recording and exposure mode options available. Pressing the Menu button displays the following settings menu:
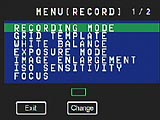 Recording Mode: Selects the camera's still capture mode, with options of Still (single green box), Text (single box with "A" inside), and Quick Shooting (multiple green boxes) modes.
- Grid Template: Activates a grid of dotted lines on the LCD monitor that divides the image area into thirds horizontally and vertically, to assist with framing images.
- White Balance: Sets the white balance mode to Auto, Daylight, Tungsten, Overcast, Fluorescent, User Define, or W/B Calibration modes.
- Exposure Mode: Places the exposure control in Program or Aperture Priority mode. Program puts the camera in charge of shutter speed and lens aperture, while Aperture Priority mode allows the user to set the lens aperture from f/2.8 to f/13 and the camera determines shutter speed based on that setting.
- Image Enlargement: Turns on the Image Enlargement mode, which uses an interpolation algorithm to produce 2,000 x 1,480-pixel resolution images (interpolating the CCD's data to nearly 3 megapixels).
- ISO Sensitivity: Adjusts the camera's ISO sensitivity level to 100, 200, or 400 ISO equivalents.
- Focus: Determines the camera's focus mode. Options are Auto, Macro, Area, 2.5m, Infinity, and Manual.
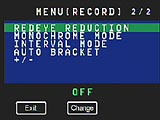 Red-Eye Reduction: Activates the Red-Eye Reduction flash mode, which fires a small pre-flash before the full flash to reduce the effect of red-eye.
- Monochrome Mode: Allows the camera to record images in either black-and-white or sepia monotones.
- Interval Mode (Time Lapse): Turns on the Interval photography mode to capture a series of images at set time intervals -- from 30 seconds to 180 minutes.
- Auto Bracket: The Auto Bracket function records three images at different exposure compensation levels: -0.5, 0, +0.5 EV increments.
- Exposure Compensation (+/-): Adjusts the exposure compensation from -2 to +2 EV in 0.25 EV increments.
Playback Mode: Entered by turning the Mode dial to the traditional playback symbol (a solid, right-pointing triangle inside a rectangular outline), this mode allows you to scroll through captured images on the SmartMedia card. You can also protect individual images, as well as set them up for printing on DPOF-compatible devices. The Playback settings menu is displayed by pressing the Menu button.
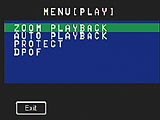 Zoom Playback: Allows you to "zoom" into a captured image, up to two times (2x), for closer inspection of details.
- Auto Playback: Starts an automatic slideshow playback of all captured images on the card.
- Protect: Write-protects individual images from accidental erasure, except from card formatting.
- DPOF: Sets up images for printing on DPOF devices. You can set images for standard or index prints, cancel the print order, or review the entire print order. You can also establish the number of prints to be made.
Erase Mode: Turning the Mode dial to the "trash can" symbol immediately displays the Erase menu on the LCD monitor:
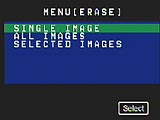 Single Erase: Erases the last image displayed in Playback mode, with an option to cancel.
- All Images: Erases all images from the SmartMedia card, except the protected ones.
- Selected Images: Pulls up an index display of the images on the SmartMedia card, to select individual frames for deletion.
PC Mode: The final stop on the Mode dial, PC Mode is marked with a crooked arrow symbol. This mode sets the camera for connection to a PC or Macintosh via the included USB or serial cables. Once connected, images can be downloaded from the SmartMedia card.

Follow Imaging Resource: