Make your wide-angle macro photos pop by mixing natural and artificial lighting (part 3 in a series)
posted Friday, November 15, 2013 at 5:02 PM EDT
Photography is, quite literally, writing with light -- and it's lighting that can make or break a shot. With wide-angle close-ups, your challenge is to get a balanced exposure in situations where the background is too light or too dark compared with the subject and the dynamic range of the digital camera cannot embrace it.
That short distance between the front element of your camera lens and the subject in a macro shot can prove quite problematic whether with natural light, with flash or a mixture of the two. Since I've been at this for many years now, I thought I'd share some of my experience and expertise with you to help you light your wide-angle close-up images perfectly using both natural and artificial light, as well as a few tricks.
A 24mm wide angle on a DX (crop-sensor) camera allows you sufficient space to use a flash -- maybe even one on the top of your camera.
Using ambient light and flash together
Let's think about natural lighting first. If you follow the old practice of working with a light behind you -- over your left shoulder -- you might find you're so close to the subject that the front of your lens, even without a lens hood, casts a shadow over the subject. The background might be perfectly lit but the subject is dark, revealing little or no detail.
If you consider using flash, the first option might be the pop-up flash on your camera -- but you are so close to your subject that it will only create a shadow from the lens front. The answer is to try off-camera flash, but the wide angle means the flashgun might creep into the edges of the picture. It's very easy to overlook.
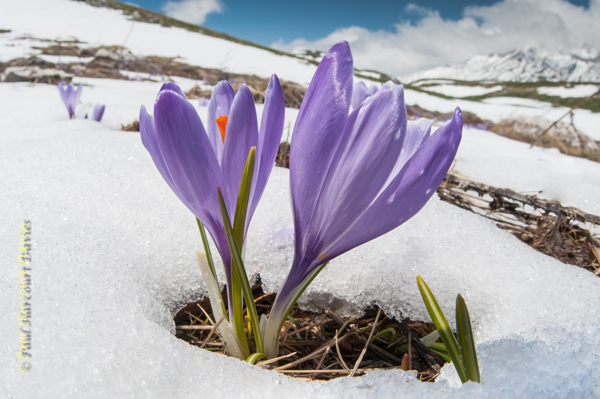
The snow around the crocus acted as a natural reflector and threw light into the foreground with no need for any other lighting.
With flash, the foreground might be well-lit but the background is dark because the flash does not reach it with sufficient power to illuminate it. You could try using a more powerful flash and diffuser but I far prefer balancing ambient light with the flash. The flash is controlled by the DTTL system of the camera and this illuminates the subject; natural light provides the background illumination. Wherever I can. I try and use natural light and often use reflectors to throw light into shadows. However, master the idea of balanced lighting -- flash and ambient -- and you get consistently good results.
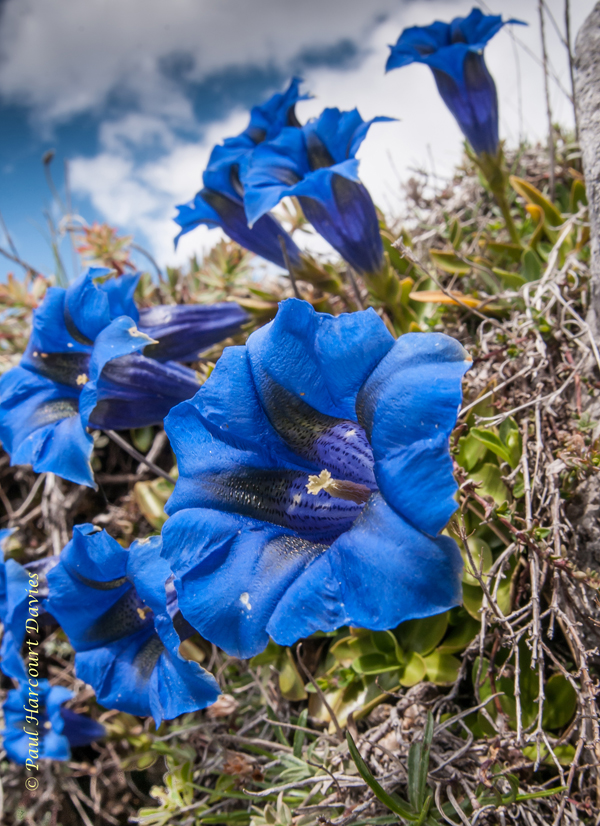
I spotted these trumpet gentians on the way up the Gran Sasso mountain (Abruzzo, Italy) and took a few shots as "insurance." I knew the sun would be better on the way down -- provided cloud cover had not increased. And it was, providing some frontal lighting and background illumination.
I have used my SB900 flash gun off-camera with a diffuser and it works well, and so does the Nikon R1C1 set with diffusers on the SU200 units. You have to experiment a bit to get a good balance between foreground and background light. I tend to use "manual" mode, where I can watch background exposure from the indicator line in the viewfinder and then adjust shutter speed and aperture to keep this at a stop or so below. The flash then gives the subject exposure; at close distances you often have to experiment to see if here, too, you need compensation (it might be too bright, or with diffusers a little dull). Digital cameras are wonderful for this since the LCD screen becomes your visual exposure meter.
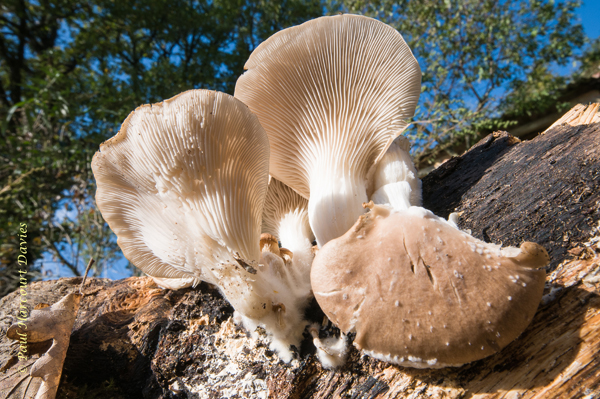
These Oyster mushrooms appeared on our log pile and had a little light thrown on them from below by a flash held off camera with slight under-exposure (-1 stop) dialed in. We ate them fried in butter with a little parsley and white wine!
I like the effect of a slightly under exposed background, but sometimes I opt for a perfectly exposed background and just use the flash to add a bit of punch to the colors -- setting it via the exposure compensation to a stop or so below the ambient exposure. It is a case of personal choice and so you need to experiment. Remember that working with lower shutter speeds, the air needs to be still to avoid subject movement and ghosting with the flash (two images -- a natural light one and a flash together). I have built some very simple devices for creating fill light that are little more than panels through which the lens front pokes and you light them from behind with a flash.
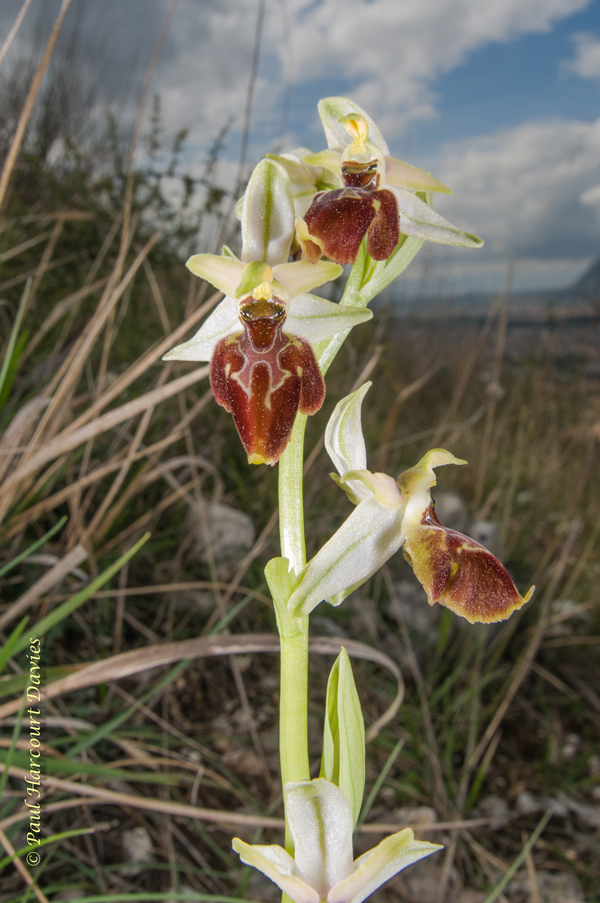
I used flash to illuminate the foreground in the way some news photographer’s work. It is dramatic but I would prefer a lighter background for these Tyrrhenian orchids.
Key situations to watch for
- Sometimes, there is so much of a background visible that you easily get "hotspots" with skies that are anything other than blue. Ultra-wide lenses demand patience to conquer the drawbacks. Try to keep white patches of sky out of frame -- you can break them up with trees but they are still way outside the latitude of exposure.
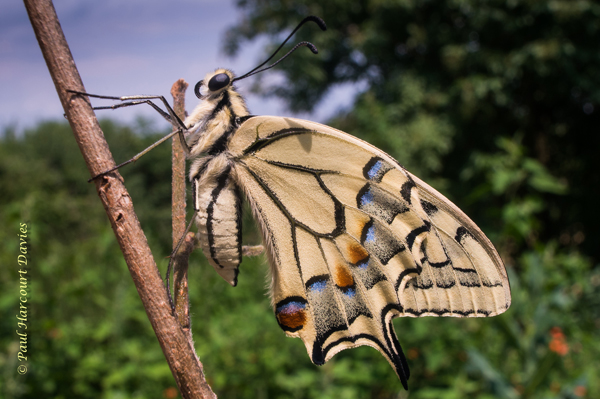
Here the balance of daylight and a hint of flash has worked and brought out the detail in the butterfly wings and given the colors some punch.
- The shadow of the lens and camera is sometimes difficult to eliminate if, in traditional fashion, you have the sun "over the shoulder" and you have just centimeters between you and your subject. So you move and get that right, but now there is too much sky with bright patches which can fool even a sophisticated exposure system.
If you see patches of sky through woodland trees it might be difficult to get a correct exposure of subject, background and this bit of bright sky. I tend to shift positions to eliminate the background but also get a shot I can work on later in Lightroom as I did with this.
- It's easiest to achieve close-ups photographed from slightly below. For example, insects above or on flowers with blue skies behind offer the ideal conditions. You see a lot of these compositions from photographers who shoot ultra-wide close-ups.
- Shadows like to creep into corners where you don't notice them (that is, until you've got it wrong a few times). If you use reflectors with ultra-wides and fisheyes, sometimes they, too, can sneak into the edges of your frame (as can toes and fingers!).

To show the gills beneath the cap of this Fly Agaric mushroom, I stood an SB900 flash nearby with a diffuser and balanced the exposure with the natural light from the background. Fungi are great subjects for mixed lighting for they do not blow in the wind!
- As long as those shadows are not too over-exposed, you can do some neat fixing in Lightroom with its incredible graduated filter tool.
- Try a mix of natural light (photograph against the sky, hard to avoid this anyway) and light the foreground with a touch of "flash." This can work well, but realize you run the risk of properly exposed sky, foreground and a mid-band of shadow. There is no panacea for this, unfortunately; each case has to be solved on merit. Luckily, you get a feel for it with practice.
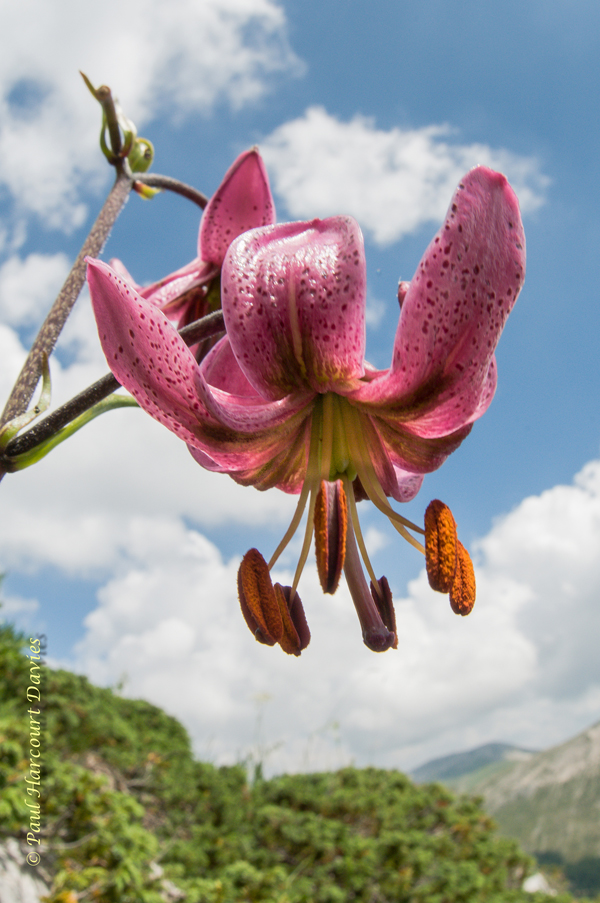
A Turk’s cap lilly against the sky needed some light from flash in the foreground. I got the sky exposed correctly first using manual adjustment and then added flash with the compensation set at a a stop under exposure.
A DIY approach to lighting wide-angle macros
So how do you create realistic lighting with artificial light sources? Illustrated below is a home-built lighting unit that works close-up with wide-angled and ultra wide-angle lenses of all sorts. It may not aesthetically pleasing in its prototype state but, since it works for me, it will probably stay like that for a while.
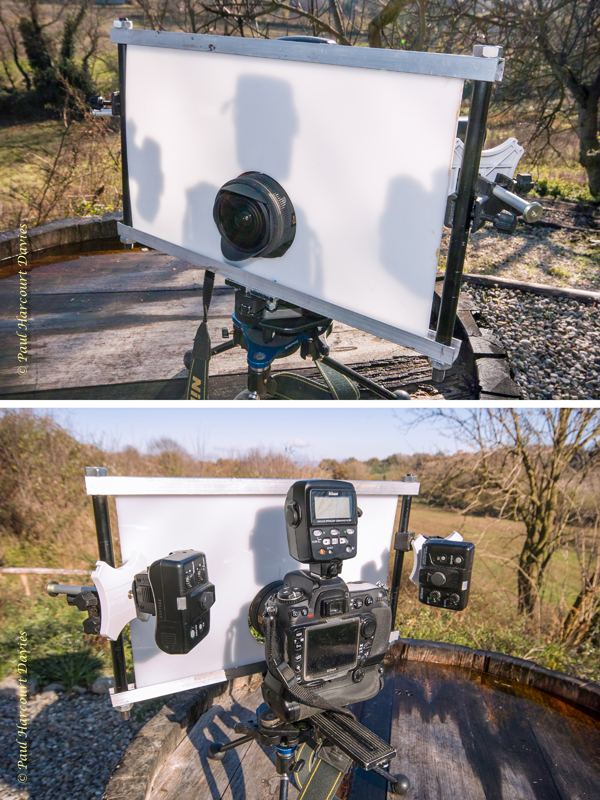
The upper image shows the principle of a white diffuser around the 15mm f/2.8 Sigma diagonal fisheye lens. Setting it just behind the lens means it won't enter the field of view and provides a soft diffused light on the subject. The lower image shows how the diffuser is built around my Nikon macroflash setup because that is what I had. More often now I use a more lightweight diffuser and hold a flash behind it. It's more portable.
It is not definitive and you might think of your own improvements. I have used my Nikon R1C1 lighting unit with it, but any flash can be held behind it, or just to the side so it casts light directly and via the panel.
When lighting wide-angled compositions at close quarters, you often have so much background you to have to balance background and flash on the subject. The biggest challenge arises with the lenses of widest angle of view -- such as those diagonal fisheye lenses. As mentioned previously, the horizontal angle of view with these lenses is not 180 degrees, so you can bring in lighting at the sides as long as you are careful to avoid flashes, etc., appearing in the frame.
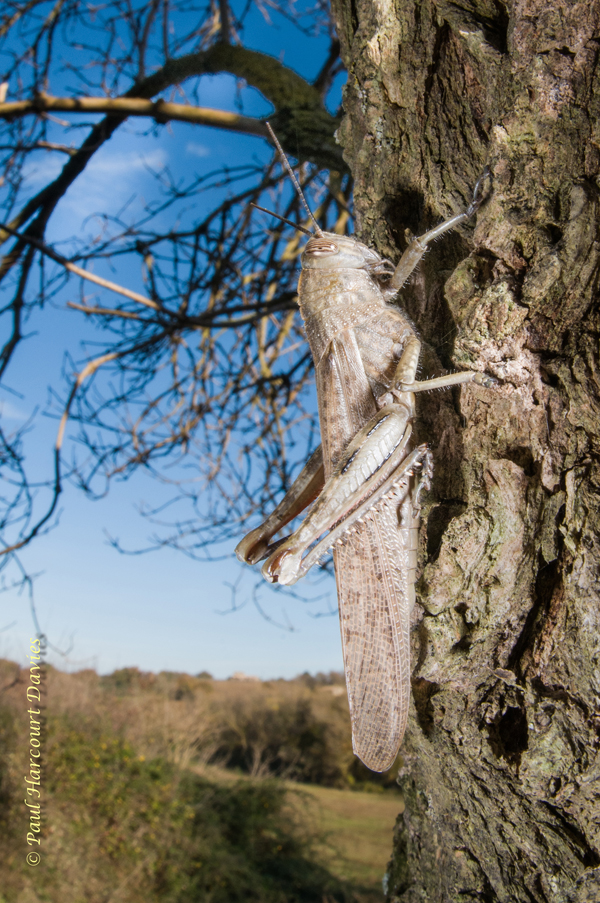
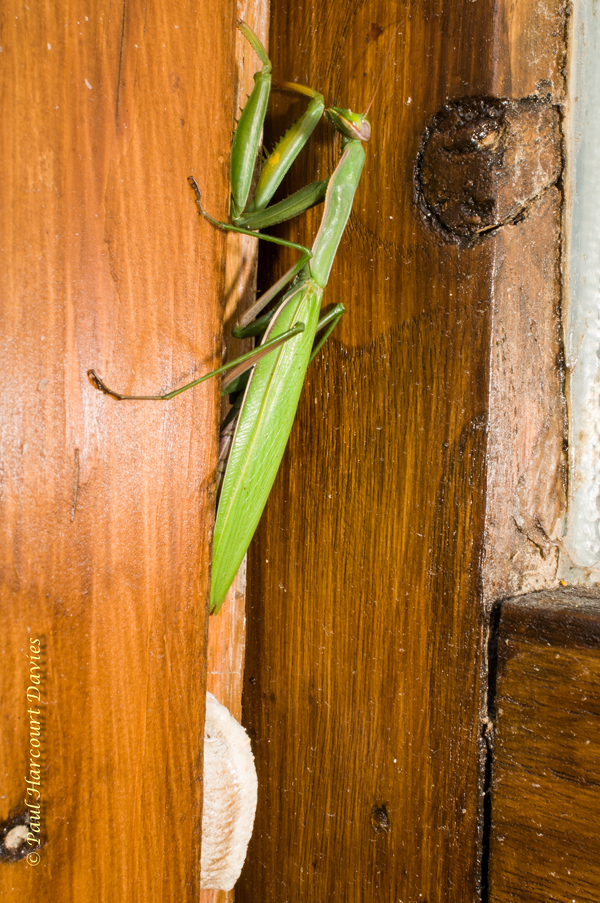
It was a warm day in winter and I found this Egyptian grasshopper sunning itself. An ideal subject for a field test of the flash unit I had made.
Surprisingly, macroflash units and even ring flashes work, and this approach can be used in conjunction with a white translucent Perspex (acrylic) off-cut through which the lens front pokes and you then light from behind. The circular hole was cut using a router as a "compass." The result is a panel of light created around the lens.
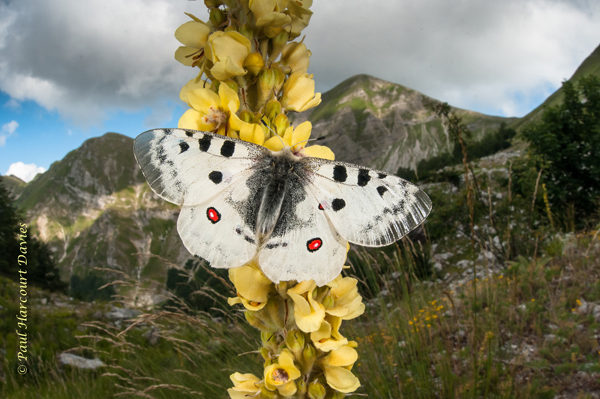
This was one of the most difficult wide-angle shots I have managed to get; this Apollo butterfly was highly active! It was the end of a five-day search and we were both tired and fidgety. I had to get within 9cm of the insect and held the twin flash from the Nikon R1C1 kit around my 15mm f/2.8 Sigma diagonal fisheye lens to get the shot.
The unit shown above also involved bits of tubes, clamps, aluminum angle and channel and an old rail from a Metz hammerhead gun -- items found in the home workshop. It is not definitive, it evolved to employ what I had available. The latest version is much simpler with a sheet of translucent envelope stiffener and a piece of orange drain pipe that conveniently fits around my 15mm lens.
Your local DIY supermarket may well have metal rods and channels for your own version. In the photograph you see how the camera plus lighting setup is not fixed to the lens so there's no strain put on it. The simple version is so light it doesn't matter.

The power of backlighting -- used correctly it makes the subject glow. If you allow the camera to give you the "correct" exposure those flowers could be dull for it "sees" them as neutral grey. I usually give from a half to one full stop over exposure. You’ll have to see what works for your camera.
The magic of backlighting
There is a little bit of lighting magic that can really lift your close-ups whether wide angle or more-conventional -- welcome to backlighting. For wide-angle shots, particularly those with floral subjects or leaves (in fact, anything translucent), some light behind a subject can make it literally glow. This is especially true of flowers, such as those that are cup-like (anemones) or tulips whose flowers are like goblets. Petals, most leaves and many insect wings tend to be translucent and the detail they carry, such as a network of veins, is revealed when light shines through them. Similarly, hairs are also delineated on edges of stems, as well as on insect legs and bodies.
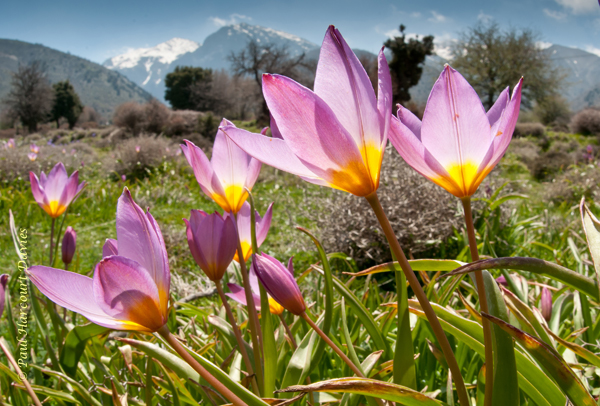
I had to wait for the sun to move out of frame so I could get the hint of snow-capped mountains in the background without flare spots. This was in 2011 in the White Mountains in Crete where in 1974 I saw these tulips first and knew what I wanted to do in life!
You can place a flash behind a subject, but with wide-angle work it is physically difficulty to hide it. What works best for me is shooting against the light without having the sun directly in the field of view. Otherwise, it can cause flare spots due to internal reflections from glass surfaces within the lens.
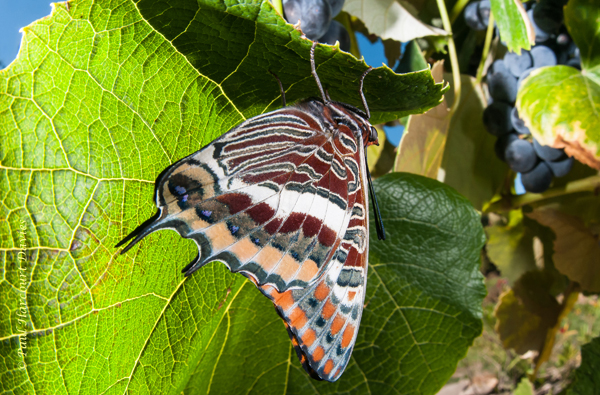
Here's a two-tailed Pasha butterfly feeding on the juice of overripe grapes. Sky behind, back-lit vine and a touch of flash bring out wing color and detail. It sounds complicated but you master the technique quickly.
HDR images involving flowers in the landscape are possible, but because I have often been working on open mountainsides in high places in Crete and Italy, there is seldom more than a millisecond's worth of still air. Waiting is a possibility, even a necessity, but flower stems, although elastic, do not always return to the same position for each shot in your sequence and that ruins register when images are combined.
It is a question of experiment and compensating exposure slightly. It is worth remembering that when a backlit flower is exposed normally, it looks dull as an exposure system tries to make it an average gray. You might find it better to over expose by about two-thirds of a stop if a flower dominates the field of view and you want to retain the "glow."
Lightroom and the Graduated Filter
Although I have used Photoshop from its very early versions, and have grown accustomed to its marvels (and idiosyncrasies), the most revolutionary and useful piece of software I have ever used is Adobe Lightroom. This is now my one-stop shop for a huge proportion of my workflow and the same goes for many nature photographers I know.
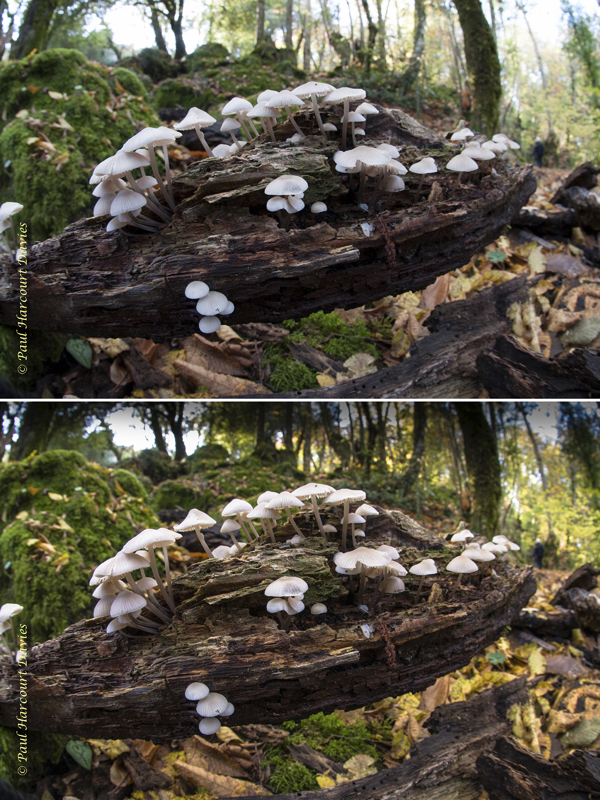
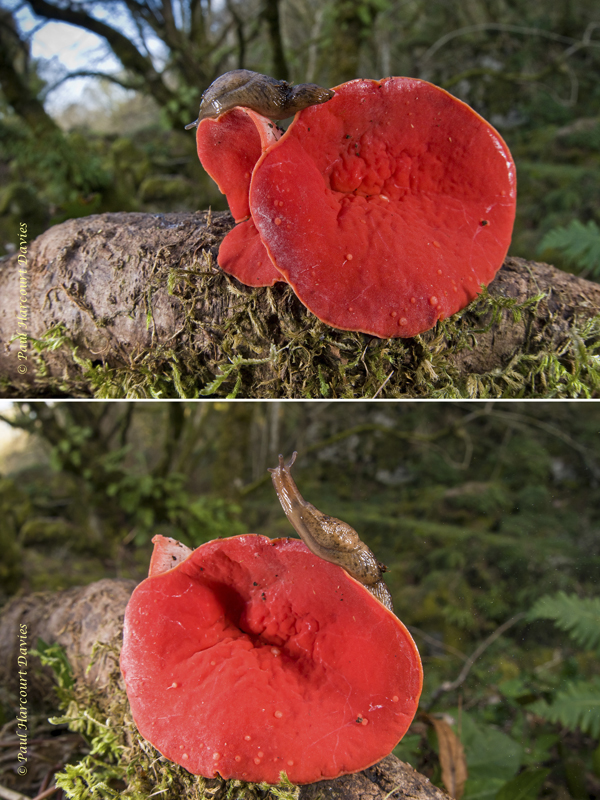
I must admit I seldom use ND filters anymore because Lightroom allows a very good level of correction. The unchanged image of fungi on a log is at the top. Using the graduated filter brought back some (but not all) color to the sky and the shadows control let me create a level of fill-light beneath the log.
For most of its users, Lightroom takes the pain out of filing and allows very rapid adjustment of images when you get a routine for using it. However, I want to sing the praises of a special bit of it in the develop panel -- the Graduated Filter in the toolbar just under the histogram. Lightroom does not make a great fuss of this and yet, for me, the way this works coupled with speed and ease, it's a godsend.
Conventional optical filters
With so much possible in post–production is there any point in carrying filters these days? I always divided filters into two categories -- those you often use and those you try once. In the first category, came polarizers, warm up filters, graduated neutral density filters. In the other category belong those filters described as "effects" filters: starbursts, color graduates (those awful tobacco filters), multiple image filters and so on, cliché after cliché. Truly, if you have the urge you can acheive much more creative and weird things in Photoshop.
Polarizers
Polarizers are useful in photography because light, when scattered or reflected (from non-metallic surfaces) is partly polarized. And these filters can be used to select or cut this light. Light travels as waves, and associated with those light waves is an electric field that varies at right angles to the direction of travel -- it is what is called a transverse wave. In "normal" light, the variation is in all directions perpendicular to travel with polarized light just one direction that's selected by the polarizer. We can think of the polarizer as a kind of molecular grid or gate through which the light passes. When the grid and the electric field are aligned everything passes through; when they are at 90 degrees (crossed polarizers) nothing gets through.
Polarizers are great for….
- Blue skies. The process of light scattering by molecules in the upper atmosphere creates a blue sky. This light is partly plane-polarized, and the effect is most pronounced when you stand at 90 degrees to the sun; face the sun and then turn through a right angle either to your left or right. The effect is dramatic. As a polarizer is turned, it deepens the blue and seems to show up wispy clouds you did not even know were there. It is great for those "inviting travel shots," but should be used with care. With a low-angled sun it can produce skies which are almost black. Call it nostalgia, but I still carry a circular polarizer.
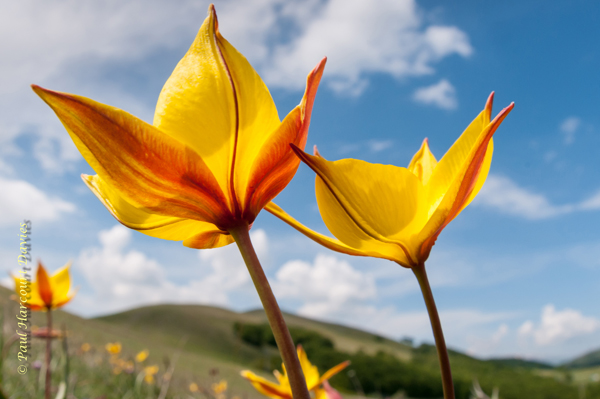
At one stage I used a polarizer almost as a lens protector -- it was always there. Now, I find I can get the skies I want without it, though occasionally I use it for old time’s sake as with these yellow tulips.
- Reflections from water. When light is reflected from all non-metallic surfaces, it is partly polarized. As you rotate a polarizer whilst looking into water, reflections are cut and you are able to look below the surface, especially if the light reaching you comes at about 53 degrees to the surface (the Brewster angle) where the effect is most noticeable. You can alter the effect to produce partial transparency when photographing rivers and streams. If you want to do the same with glass and cut surface reflections, you change the angle slightly (56 degrees) because the refractive index "n" (the bending power) of the light is different from that of water and that slightly affects the Brewster angle (θ). For those with a mathematical bent -- or even bent mathematically -- Tan θ = 1/n where n = refractive index. For normal glass this is 1.5, water 1.33
- Intensifying colors in nature. Surfaces of leaves, grass and flowers can all reflect light; careful use of a polarizer cuts down some of the reflected light and make colors appear more intense. This is especially good for large areas of vegetation in a landscape with a variety of greens. In bright light, the surface reflection from leaves makes then appear grey and a polarizer makes the colors seem far warmer. If you are trying to get a deeper blue to the sky and also effect water in a lake, you have to compromise because it is highly unlikely both will be polarized in the same direction.
Linear and circular polarizers
Circular polarizers are recommended for use with autofocus cameras since "linear" polarizers can affect the function of the autofocus system. These incorporate an extra layer -- a 1/4 wave filter -- that changes the "phase" of the light and allows the autofocus system to function. Polarizers are expensive, and if you use both autofocus and manual focus bodies, it make sense to standardize on circular polarizers. The problem I have found is that unless you pay a premium price for one of these bits of glass you get an unwanted side effect -- a color tint that changes from slight green to magenta as you rotate the filter
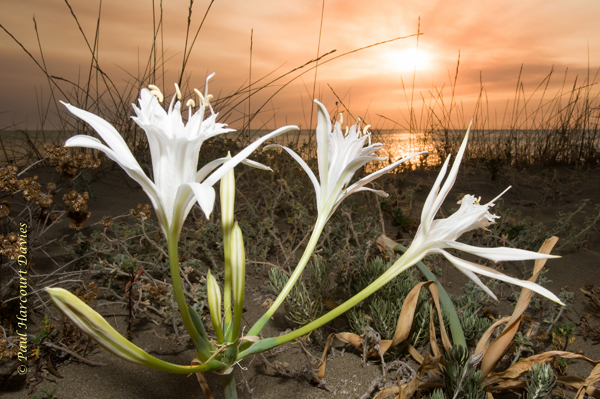
The sea daffodil or sand lily opens as the sun goes down. I set the camera to give the kind of exposure I like with sunsets -- I take exposure from a sky area adjacent to the sun and this gives underexposure that brings out the colors even before sunset. I had to experiment with a diffused flash used off camera but controlled via the DTTL system. It was set over a stop below but the flowers came out too dark so I played for a while with the compensation dial until I got it right.
Graduated neutral density filters
Whilst on the subject of filters I used to carry a set of Neutral Density (ND) filters when doing medium and large format film work, but no more. It was always tricky with smaller formats and you had to align horizontals. When the contrast difference between land and sky is too great a ND filter can help. I find in my work that the ND function in Adobe Lightroom's develop module is something that works amazing well -- and I can add several at different angles. Those expensive optical filters are now in what has become my museum cupboard, along with a series of film bodies in a variety of formats.
Paul Harcourt Davies is a long-time professional photographer, and an author of 19 books with a background that fuses technical and artistic elements to his life-long passion for photography of the natural world. We reviewed his e-book (that he co-wrote with frequent collaborator Clay Bolt): Wide-Angle Macro: The Essential Guide a few months ago, and we knew we wanted to share more of his insights and amazing images with our readers. (You can order a copy of the book here.) An experimenter and innovator by nature, he has long been on a mission through his writing and lectures to bring the techniques of macro photography to others. For the last 10 years he has been based in Umbria, central Italy, renovating an old farmhouse with a wild garden from where he organizes tours, workshops and much else.
Note: This is Part 3 in a series on Wide-Angle Macro Photography. Part 1 explains how wide-angle macro differs from traditional macro, and examines the approach and necessary equipment. Meanwhile, Part 2 looks at wide-angle macro tips and tricks including positioning, depth of field and more. Paul has also written a two-part series for us on Understanding Bokeh.