Photoflex First Studio Product Kit
 By MIKE PASINI
Editor
The Imaging Resource Digital Photography Newsletter
Review Date: April 2006
On the set, the table was laid out with classic silver and precious china. Gene Kester and his partner positioned their softbox above the scene to take some product shots -- but the supporting rod broke in their hands. The replacement rod was just as fragile, so they resorted to an improvised kludge of foam core, sheet metal and duct tape.
Gene was more than annoyed with the soft box he'd bought, so he talked to his buddy Scott Reeves. He made fiberglass rods and turned Gene's softbox design into reality. And, in a nutshell, that's how Photoflex was born.
DIGITAL LIGHTING | Back to Contents
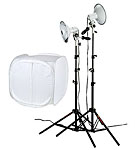
We reviewed Photoflex's digital version of that softbox, the Basic Digital Lighting Kit (http://www.imaging-resource.com/ACCS/PHF/PHF.HTM), some time ago. But recently the company introduced its LiteIgloo kit, a nylon tent and bundled the medium-sized one with a couple of lights and stands to make up the $249.95 First Studio Product Kit.
 |
| The Kit Includes two lamps and stands |
No question, we're Photoflex fans. The build quality is excellent and the products behave like they were designed by a photographer. They don't enjoy the engineering magic of something like the Zenon copy table (http://www.imaging-resource.com/ACCS/ZCT/ZCT.HTM), but they certainly do the hot light solution (as opposed to the strobe solution implemented in the Zenon) very well. And that has its advantages.
For comparison, we have a page of thumbnails from each (both unfortunately darker than the originals, thanks to the background we used):
- The Zenon thumbnails: http://www.imaging-resource.com/ACCS/ZCT/ZCTTHMB.HTM
- The First Studio thumbnails: http://www.imaging-resource.com/ACCS/FPK/FPKTHMB.HTM
BUDGET ALTERNATIVE? | Back to Contents
At PMA, we ran across Photo Studio In-A-Box from American Recorder (http://www.imaging-resource.com/EVENTS/PMAS06mrp/PMA.HTM). For just $99 you get a pair of 250-watt halogen lamps on stands, a tripod, a nylon diffuser screen and a travel carrier. The product is carried by Ritz camera stores and seems perfect for eBay sellers who want more professionally lit product shots.
 |
 |
|
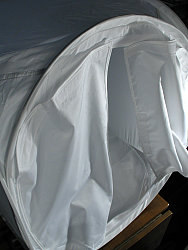
| The LiteIgloo Doors open |
A LiteStand Lightweight fiberglass |
|
We find it a little disturbing that we can't confirm the wattage of the lamps in this kit. They looked pretty dim at PMA, but looks are deceiving. The First Studio Product Kit lamps seem on the dim side to us, too -- at least for hand-held shooting. But at least they're incandescent, so you have a built-in white balance setting for them. A halogen lamp will need a custom white balance setting.
Build quality of the Photoflex kit is far superior as well. The nylon tent diffuses the light with a good deal more efficiency than the Box. And the light stands provide much more flexibility than the table-top stands in the Box.
 |
 |
|
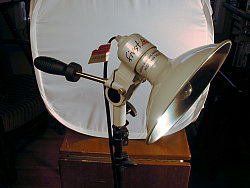
| A Lamp In protective housing |
Velcro Holds LiteIgloo 'doors' open |
|
In a word, the difference is whether you need amateur or professional equipment. If you want a simple solution you can put in the closet and use on the kitchen table, the Box will work. But if you want to shoot a variety of materials on a regular basis and hope to publish your work, move up to the Kit.
The rather large packing box contains a slightly smaller product box which itself holds the kit contents:
- A LiteIgloo, collapsed into a flat circle and housed in a black carry bag
- Two LiteStands
- Two FirstStar Lights, including two lamps, two reflectors (with attached power cords) and two swivels that attach to the LightStands
The lamps are themselves sealed in a glass envelope so you can actually touch them without shortening their lifespan. Each power cord includes an on/off switch and plugs into a standard household wall outlet.
Photoflex provides a very well illustrated, step-by-step lesson on using this kit, but they know what they're doing. We stumbled along to our own music for this review.
Assembly (and tear-down) is, as we've found with other Photoflex products, quick and easy. The unit stacks neatly into a corner, taking up very little space when not in use, an incentive to tear it down between shoots.
 |
| First Product Shot With the ironed white sweep |
As the stage for your product set, the LiteIgloo is the first thing to set up. Simply remove it from the carry bag and pry it apart to open it half way. Grab the frame from the inside corner, pull out and the LiteIgloo is fully opened.
You'll notice one side of the LiteIgloo has two flaps. That's the front, through which you can insert your camera's lens. Velcro holds the doors shut around the lens whether you position the lens at the top, middle or bottom of the opening. That bathes the front of the product in light, too. There are also Velcro pads to hold the doors open.
The LiteIgloo also includes both a blue and white sweep that attaches to Velcro tabs on the inside of the unit to create a seamless, infinite background. The blue sweep functions as a Chromakey background, easily dropped out in specialized masking programs to isolate the subject for inclusion in a montage. Both sweeps are folded and require ironing with steam. We used the synthetic setting to avoid melting the nylon. One side of the sweep is nylon and the other is a softer material. You can use either.
There are, in fact, a lot of options throughout this product. It's a very well thought-out unit with nothing missing.
Once you've positioned the LiteIgloo, it's time to set up the LiteStands.
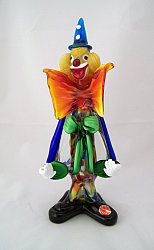
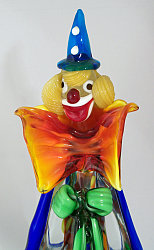
| A Reflective Object Of course, some things should shine. This glass clown only resembled itself when shot when one lamp sneaked through the front door (l). |
 |
 |
||
| Diffused light |
Direct light |
|||
Unlock the knob on the collar of the compact (25-inches when closed) LiteStands to spread the legs apart until the center column rises enough that the legs touch the ground. Then retighten the knob on the collar. The stands expand in three sections to get quite tall, but for this application, you only need them to flood the LiteIgloo, presumably at table height.
These are the same LiteStands used by the StarLight kit, by the way. Very reliable, easy-to-use units. You can even attach casters to the feet to roll the units around.
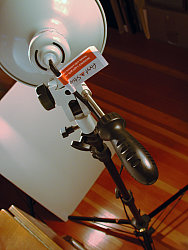
Attaching the reflectors to the LiteStands is the next step. The reflectors ship with a swivel that sits on top of the LiteStands, locked in place by a knob on its collar. You simply slide the reflector onto the swivel and tighten the other knob on the swivel to hold it in place. Then drop the combined unit onto a LiteStand and secure it with the collar knob.
The grip handle lets you position the reflector from side to side and up and down. Just twice about an eighth turn to the left to unlock it and back to lock it securely. Very quick.
Finally, with power off, screw the 250-watt lamps in the reflectors. Two of those sucks 500 watts out of your outlet, which is generally tolerable in most modern households.
Camera setup is straightforward. We were able to handhold shots with the aperture wide open and the shutter speed at 1/60 but a tripod will give you some flexibility. We thought about using the camera's built-in incandescent white balance setting (Auto gives a yellow tinge) but opted for a custom setting. Simple enough. But wait a second before you meter the scene.
You'll want to experiment a bit with setting the lamps to best illuminate your subject. While the Igloo diffuses the light, it doesn't completely confuse it. So setting one lamp on each side will evenly illuminate everything but setting them at the corners and at different angles and even moving one back a bit so it isn't at the same strength will all light your subject differently.
The advantage of this system in product lighting is that you can actually see the effect of these changes before you take a shot. Once you've got something you like, it's time to meter.
LIGHTS, CAMERA, ACTION | Back to Contents
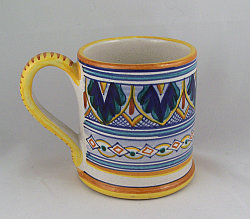
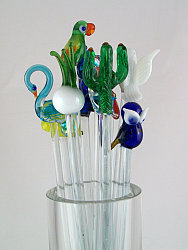
Since the Photoflex team did metal (something the Zenon does a bit better, we think), we thought we'd shoot some Murano glass. After a quick trip to Venice (we wish), we set up the LiteIgloo on a typing table with plenty of room around it.
 |
 |
|
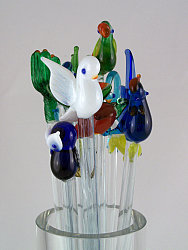
| But these glass swizzle sticks profited from the diffused light, which highlighted their shapes and color rather than cast confusing shadows and specular highlights. |
||
OK, that's a bit of a problem. The LiteIgloo is light, just a wire frame and some nylon. The wire frames are four circles that ring the sides of the LiteIgloo. Which means there is no base. This isn't much of a problem on a wide, flat surface, but the typing table is a little narrow to support all four wire frames and the LiteIgloo wobbles on it. Be sure you have all four wire frames hitting the ground -- or maybe even a lightbox.
The LiteStands are a real pleasure to work with. The telescoping poles are easily released and tightened and have enough range to get above the LiteIgloo. And the tripod feet can be narrowed if you're working in close quarters or extended out for more stability. You aren't confined to a certain configuration.
 |
 |
|
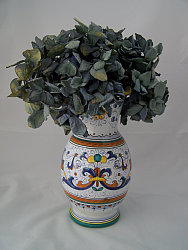
| And in this case, the foliage did _not_ darken the vase with its shadows. We raised the left lamp to shoot down on the scene (l) to add some volume to the vase. |
||
The lamps themselves couldn't be simpler. The biggest problem they gave us was finding the black on/off switch on the power cord. But since we shot with both all the time, we simply plugged them into a power strip and used its power button to turn the lights on and off. The big handles are a blessing, quickly unlocking or locking and letting you position the light exactly where you want it. Very nice.
We could have used more Velcro on the LiteIgloo, though, to hold open the doors in one or another semi-opened position. To use the Velcro on the sides, you have to completely open them up.
It's not a bad idea to set the white balance in your camera for incandescent or tungsten (unless you want to shift the color, of course). Reading exposure with a gray card isn't a bad idea either.
Center-weighted exposure metering is a good idea, too, unless you're using the darker Chromakey sweep. Metering the whole scene tends to lead to overexposure to knock down the white background a tone or three.
But the real fun of using this kit is manipulating the lights. We generally started with them both close in on the sides to give as full illumination as possible. But we backed one or both off a bit and raised one or the other or sent one backward or put them both on one side -- all to give some more flattering modeling of tone to the subject. And every subject was different.
We tended to shoot with a slow shutter speed (1/30 second) to get more f-stops to work with, but we weren't able to stop down much without resorting to a tripod. That really shouldn't be an issue for product shots; just use a tripod to get good depth of field.
We enjoyed using the Photoflex First Studio Product Kit from setup to making lighting variations. We'd like a couple more Velcro catches in front but that's about it. It's well designed, well built and easy to use. Photoflex is making it very easy to put together a nice set of lighting gear for the budding pro, but we think even amateurs will like how this kit flatters their subjects.