Monitor Calibration with the ColorVision Spyder2PRO
Review Date: July 2007
ColorVision's Spyder 2 Pro product is the one that we eventually settled on for in-house use here at Imaging Resource. It consistently did a good job calibrating the monitors we tried it with, seemed less prone to getting lost in the weeds with difficult-to-calibrate monitors, and also provides a good capability for matching multiple monitors to a common standard. No product is ever perfect, but we found the Spyder2PRO to be better than most and it offers a flexibility found in few other monitor calibration solutions. (It's worth noting though, that we found it almost impossible to precisely match CRTs to LCDs with any of the solutions we tried, and the Spyder2PRO ran with the rest of the pack in that respect.)
Our "reviews" of monitor calibration systems aren't reviews in quite the same sense that our camera reviews are. This is because, by their nature, we have no objective, absolute way to evaluate the quality of the calibrations the calibrators generate. All we can do is make subjective comparisons between how the screens look. While that has a little value, we're more than a bit leery of advising our readers based on purely subjective data. We'll make some references to calibration quality at the end of each review, but suggest that you take these comments with a large grain of salt. Unless we say that a calibrator is just out-and-out unsuitable, we recommend that you base your purchase decisions more on the features you need, what you can discern about ease of use from our write-ups, and on price.
All that said though, the Spyder2PRO colorimeter sensor does sport a feature that is (as far as we know) unique in the field, namely that it measures seven different colors, rather than just the usual red, green, and blue. This gives it a more complete picture of a display's colorimetric characteristics, which appears to be a significant help in calibrating LCD displays. (The considerably more expensive Gretag MacBeth EyeOne Pro is a true spectrophotometer, collecting data at many points across the color spectrum, but our admittedly subjective tests didn't find a noticeable advantage to the Eye-One Pro's finer-grained color measurements. To the contrary, we felt that the results of repeated calibrations were more somewhat consistent with the Spyder2PRO.)
For more on why you need monitor calibration if you're serious about digital photography, see our Monitor Calibration: Who needs it? article.
What does monitor calibration do?
When you "calibrate" a monitor, there are really three steps involved, characterization, correction, and profiling.
Characterization
This part of the process involves such things as determining:
- What colors are the red, blue, and green channels of the display?
- How does the light output of channel vary as the pixel value is changed from 0-255?
- What color are the pure grey values (equal RGB numbers, for instance 200/200/200 should be a light-medium grey, with no color tint to it.
Correction
Once the software knows how the display is behaving, it loads correction curves into the video card (or sometimes the monitor itself), to produce a smooth tone curve and neutral greys. This step also adjusts the monitor to the gamma setting and color temperature that you want. (The sRGB standard uses gamma 2.2 and a white point of 6500K.)
Profiling
With the display producing smooth tones and neutral greys, the software can create a color profile describing the display's color characteristics. Programs like Adobe Photoshop can use display profiles to compensate for the known quirks of a display device, and insure accurate color rendering.
The review below goes into quite a lot of detail on the calibration process, and our observations about it. Reading all that, you might come to the conclusion that monitor calibration is a long, involved process. Nothing could be further from the truth, it's actually quite straightforward, and takes only about 10 minutes for a full calibration. We hope to bring you a video soon, showing the process so you can see how easy it is.
The Process
With the above as background, let's take a look at how you go about performing a monitor calibration with ColorVision's Spyder2PRO. The examples here are all based on a Mac, but the same software works on PCs as well.
When calibrating a monitor, the first thing you have to do is to make sure that the sensor head is only seeing light from the display. The Spyder2 sensor is pretty well-shielded against ambient light, but it's still a good idea to dim the room lights, and make sure there's not bright light from an adjacent window splashing on the screen near the sensor.
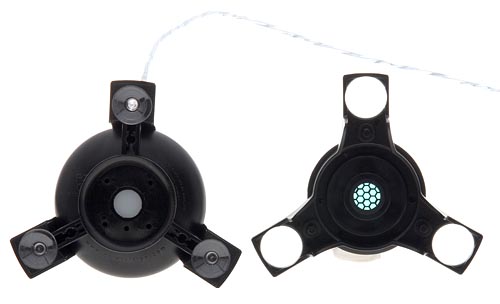
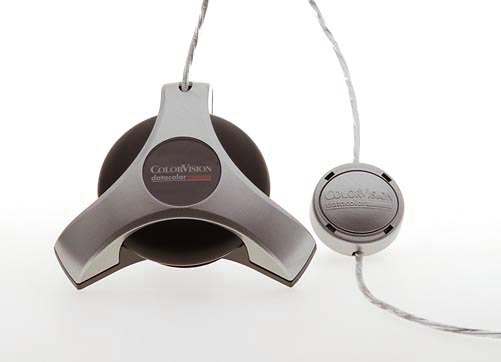
When calibrating a CRT screen, the Spyder2PRO is just stuck to the screen face via its attached suction cups. For LCD monitors, a baffle/filter assembly is attached to the front of the device. This presents soft felt pads to the face of the LCD, rather than suction cups, and the filter helps the sensor measure the colors from LCD panels more accurately. The photo above shows the underside of the sensor, with the LCD baffle/filter next to it.
Ok, we're ready to start!
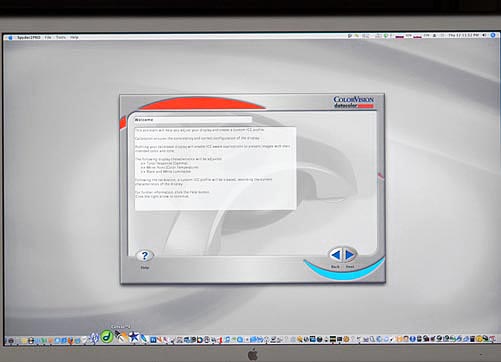
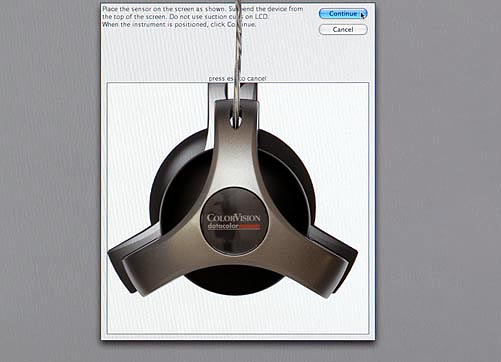
1) Welcome
This is the Spyder2PRO's initial welcome screen, shown on an Apple 23"
Cinema Display. There's not a lot to note here, but it does illustrate in passing
one of the few limitations we found in the Spyder's software. Unlike some competing
systems, the Spyder2PRO always places the calibration window in the center of
the display being calibrated. This might seem to make sense, since you're likely
to be most concerned about color rendering in the center of the display (if
there happens to be any non-uniformity across the screen face), but we found
it annoying when working with monitors that had on-screen menus for making contrast,
brightness, and color adjustments. With some monitors, the on-screen menus would
overlay the calibration window, interfering with the measurements. When this
happened, some steps of the process required us to move the Spyder, bring up
the on-screen menu, adjust the relevant control setting, dismiss the menu, and
then reposition the Spyder, for every adjustment. This made the calibration
cycle take longer than it might have, were we able to just shift the calibration
window an inch or two one way or the other, to avoid the monitor's menus. In
fairness, this really was only an issue on the initial calibration of s monitor,
since the monitor's controls generally don't have to be twiddled for weekly
recalibration checks. It's still an annoyance that we'd like to see ColorVision
fix in future versions of the Spyder's software though.
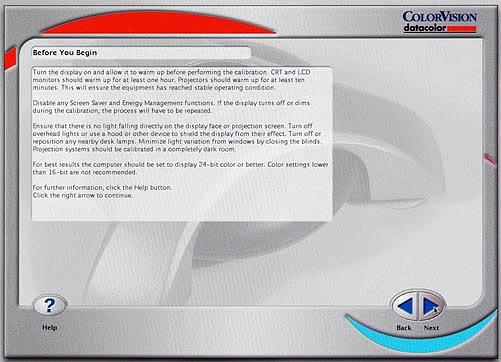
2) Before You Begin:
Before starting a calibration cycle, the software cautions you to make sure
your monitor is properly warmed up before proceeding. And yes, even LCDs need
to be warmed up. The backlights on many units shift color balance slightly as
the warm up, and the contrast characteristics of the liquid crystals themselves
also change somewhat with temperature. - So always be sure to leave your display
running with the screen-saver and power-saver mode disabled for 30 minutes or
so before a calibration run. It should go without saying, but you should also
check to make sure that your monitor is in full 24- or 32-bit color mode. (Some older/lower-grade
display cards drop to 16-bit color at their highest resolution settings, so
don't just assume that you're running in 24- or 32-bit color; check it explicitly.)
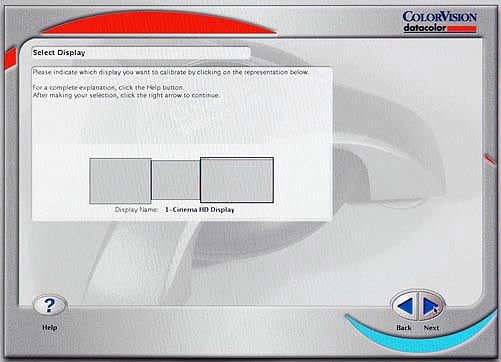
3) Select the display
One of the the Spyder2PRO's must-have features for us was that it can calibrate multiple monitors connected to the same computer. Some lower-end calibrators can only handle single monitor per computer, the one carrying the menu bar on a Mac, or the one with the Start menu on it in Windows. No such worries with the Spyder2PRO. (Note though, that under Windows, you must have a separate video card for each monitor you want to calibrate. While they support multiple monitors, dual-head video cards generally won't let you associate a separate profile with each monitor.)
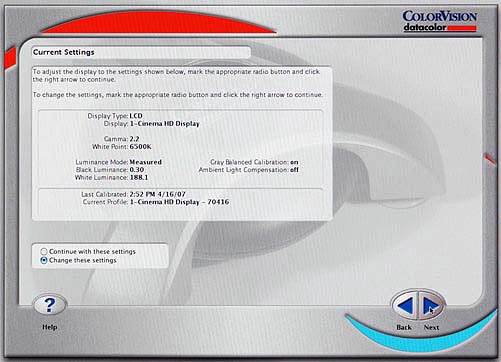
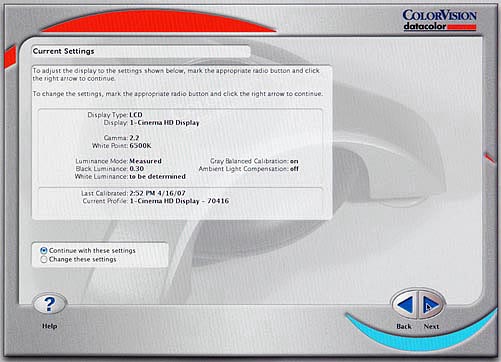
4) Current settings
If the selected monitor was previously calibrated with the Spyder2PRO, the software will display the last settings used, the date of calibration, the name of the profile, and the settings for Gamma, white point color temperature, Luminance Mode (more on this later), and the targeted Black and White Luminance values. It will also show whether you performed a Grey Balanced calibration or not, and whether you have the Ambient Light Compensation enabled. (More on these later as well.)
You can choose whether to continue with the previous settings, or to change them first. If you're just doing your weekly/monthly/whatever recalibration check, you'd leave these settings the same. For the sake of illustration here though, we'll suppose that we want to change the settings, so we can step through all the option screens.
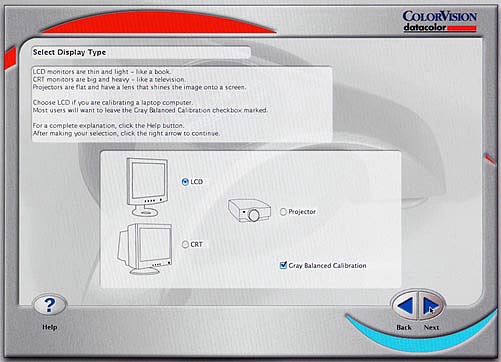
5) Select Display Type
Different display types have different adjustment options, and also place different demands on the calibration software. This screen is where you tell the software what type of display you're working with. (Note that the Spyder2PRO can handle projectors, as well as LCDs and CRTs.)
Note that calibrating LCDs is one area that really separates the different calibration systems from each other. Thanks to years of standardization, the phosphor colors used in CRT monitors are quite consistent from manufacturer to manufacturer. (There are a small number of different "standard" phosphor sets used, but within a given phosphor type, the color spectra tend to be very consistent.) For whatever reason, the color sets of LCDs were never standardized to the same degree. This means that accurate color calibration of LCDs requires much more detailed measurements of the color spectra of the red, green, and blue pixels. Low-end calibrators have only three sensors (red, green, and blue), and so are less able to measure and characterize subtle color differences between different LCD panels. The Spyder2PRO uses a 7-channel "spectrocolorimeter" that measures display performance in seven different color bands. This greatly improves its accuracy when calibrating LCD displays.
The Grey Balanced Calibration checkbox is really only relevant for calibrating projectors, as some projectors will yield better results if you have this turned off. For LCDs and CRTs though, you'll definitely want this enabled to provide the most accurate and color-neutral greyscale.
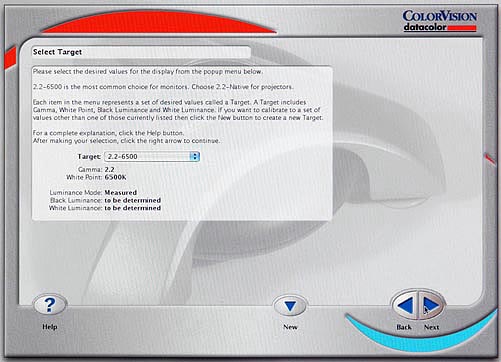
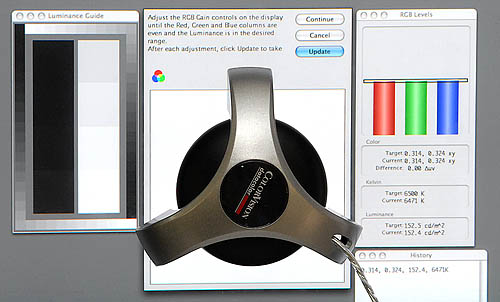
6) Select Target Values
This screen basically tells the software what you want your monitor calibrated to. A number of presets are available, but if you're like the vast majority of users, the "2.2-6500" preset is the one you'll want to use. These are the gamma and white point values for the sRGB color standard. (Note: Don't use the "sRGB" preset though, as that preset limits white luminance (brightness) to only 80 cd/m2, which would give you a rather dim screen.)
Real expert users can elect to create their own target setup, varying the gamma, tone curve (you can even edit the tone curves manually for each color channel, which might be helpful in matching the display to the characteristics of a non-color-managed photographic output device), white point (in either degrees Kelvin or actual CIE color coordinates), enable ambient light compensation, select luminance modes (measured or visual) and plug in specific values for white and black luminance if you're using measured mode.
Since we're going to be calibrating to a white point of 6500 Kelvin (a pretty good approximation of mid-day sunlight), you'll want to check and see if your monitor has any controls that might affect white point. Many monitors have a range of preset white point options available in their menus. If this is the case with your display, look for a setting that says 6500 Kelvin, as that'll at least get the monitor somewhere close to where you want it to end up. With smaller changes for the calibrator to make, you'll be that much more likely to get nice, smooth tonal rendition from the calibrated monitor.
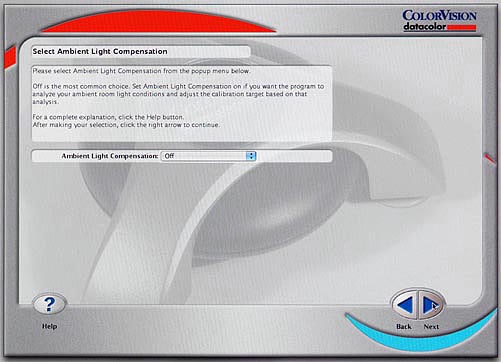
7) Select Ambient Light Compensation
This is a feature that seems to be sweeping the monitor calibration world of late, but it's one I don't personally favor. The idea is to have the Spyder's sensor look at the ambient light in the room, after which the software will make recommendations for how to change your target settings so the display will look right to your eyes, given all the light bouncing around the room. I guess that's OK if you have no options available for controlling the light levels in your work area, but if you're doing critical color work, it's crazy not to try to control the ambient lighting. Ideally, you want lighting that's on the dim side of normal relative to typical office illumination, and that approximates the 6500 Kelvin of your monitor screen. That will help you see the full tonal range of the images, and avoid having your color perception skewed by an overall color cast in the room lighting. My strong advice is to leave the Ambient Light Compensation option disabled, and to just make sure that you have a reasonable light level in your workplace.
| A side note about display brightness here: You'll want the display brightness to match the overall light level in your workspace. If you have a brightly lit room that you can't can't manage to make any dimmer, then by all means crank it up. If you have a better environment with dimmer lighting though, you probably don't want to run your display at its full brightness, at least in the case of many newer LCDs. I've seen proud LCD owners crank their screens up to the point that you almost need sunscreen to sit in front of them. In most cases, excessive brightness will only produce eye fatigue and interfere with your ability to discriminate shadow detail. Use a reasonable brightness level and your eyes will thank you. |
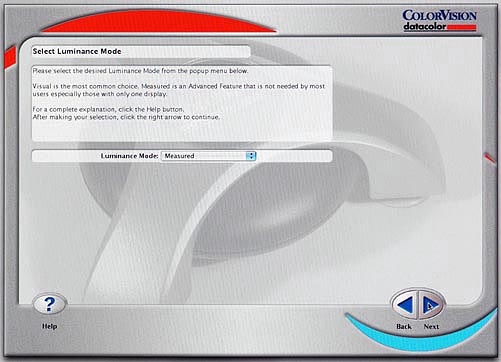
8) Select Luminance Mode
Your options here are Measured or Visual. If you're concerned about matching multiple monitors to each other, you'll want to use Measured, as it lets you set the black and white brightness levels of all your displays to the same values. If you're just working with a single screen, select Visual, as this will let you crank up the brightness of your display to whatever it's capable of (or whatever is reasonable for your working environment, see the sidebar above right).
I have three different monitors on my computer, so I'll be selecting Measured mode here.
9) Specify Luminance Values
(Sorry, I missed grabbing a screenshot for this one.) If you're matching multiple monitors, this is where you'd plug in the white and black luminance values you're aiming for. In this case, we'll leave them blank, since I'm not going to actually go into the details of multiple-monitor matching in this overview.
10) Current Settings
This brings us back to the current settings screen, now showing the various
options we've selected in the previous steps. We're now ready to perform the
calibration, so I've selected "Continue with these settings."
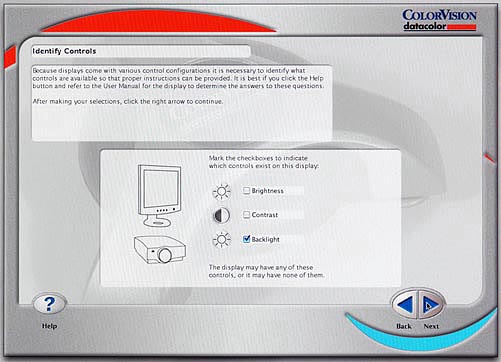
11) Identify Controls
Different displays have different controls available, this is the first of two screens where we tell the software what controls we have available to twiddle, so it'll know what adjustment steps to guide you through. My Apple Cinema Display has no brightness or contrast adjustments, only an overall brightness control that adjusts the backlight -- so I've only clicked on the "Backlight" checkbox.
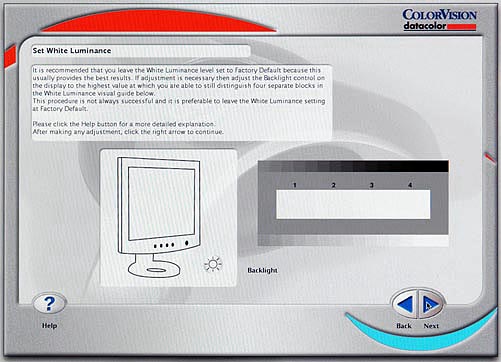
12) Set White Luminance
Here, the goal is to set the white luminance (overall brightness) to the highest level at which you can still see four white squares below the numbers. My Cinema Display tends to wash out the brightest highlights, regardless of the backlight setting, so there are only three distinct white levels visible on it at this stage anyway. I therefore just set the brightness to a level that's comfortable for my office environment. (Actually, I set it to a level that's comfortable, but that also can be matched by the old CRT that's the middle of my three displays.) If we were actually going through the full multi-monitor calibration workflow, this would just be a coarse adjustment that would be refined later through actual measurements by the Spyder2. If you're not matching specific luminance levels with other displays though, this is the last point at which you'll actually adjust the luminance.
If I'd told the Spyder2PRO software that I was calibrating a display with separate contrast, brightness, and backlight adjustments, this step might involve manipulating one or more of those controls as well. If the display had a contrast control, we'd see the same screen as above, only with the directive to adjust the contrast as appropriate. If the display had a separate brightness control, we'd get a second screen showing a series of very dark blocks, with the instruction to adjust the brightness level until we could just make out all four blocks.
It's important to note that ColorVision recommends leaving your display's controls at the manufacturer's default settings unless you need to correct an obvious problem. I've found this doubly true with LCD panels: At least with lower-end screens, if I fiddle too much with the controls at this stage of the calibration process, the display can end up operating so far from its nominal condition that it can be very hard to establish a good calibration for it.
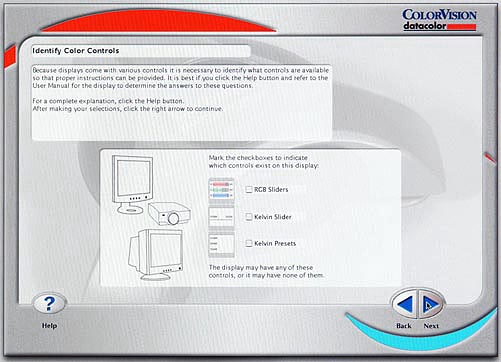
13) Identify Color Controls
This is the second screen where you tell the software what controls your monitor
has, this time controls having to do with color. Here again, my Cinema Display
has none of the options listed. As just noted though, I recommend a conservative
approach in twiddling the settings on LCD monitors, as that's often a recipe
for failure, or at least difficulty. (This isn't the case with CRTs though.
While I appreciate the svelte proportions of LCD monitors as much as anyone,
I really mourn the passing of CRTs for critical color work: The tonal rendition
of a good CRT easily surpasses that of all but the most extreme high-end LCD
screens.)
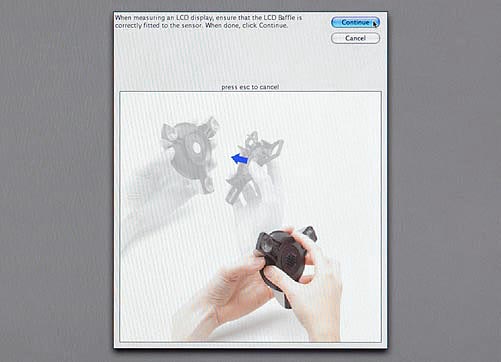
14) Make sure LCD baffle is attached
If you're calibrating an LCD screen, the software will remind you to check that
the LCD baffle is attached to the sensor body. This is a spacer that lifts the
Spyder's suction cups off the display surface, substituting instead a set of
three flat pads and a ring coated with a felt-like covering. This avoids the
suction cups leaving marks on the LCD's surface. The LCD baffle also inserts
a pale blue-green filter between the sensor and display surface that helps the
Spyder evaluate the color spectra of LCDs more accurately.
Counterweight for use with LCD screens
Since suction cups won't work on most LCD screens, the Spyder2 needs some other means of holding the sensor at the right position on the screen. Like a number of other calibrators, the Spyder2 comes with a small counterweight attached to its cable. On the Spyder, this weight is permanently attached, surrounding the cable, and slides up and down with moderate force. (I'd strongly recommend grabbing the cable next to the weight when you're sliding it, so as to not put excess force on the cable's attachment to the sensor puck or USB connector.) I liked this arrangement better than ones where the weight can be removed, as I found those harder to slide without pulling the weight loose. (This way, the weight will never get lost, either.)
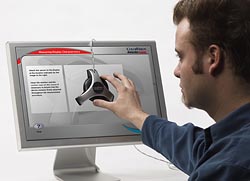
15) Place the sensor!
Alright, we're ready to calibrate! As noted above, if you're calibrating an LCD, make sure the LCD filter is attached to the sensor head, drape the weight down the back of the screen, and position the sensor head on the screen where indicated. A useful tip: Tilt your LCD screen so it's angled back at the top a little bit. This will help ensure good contact between the sensor and the face of the display.
For CRTs, you'll use the sensor head without the LCD baffle, and just stick its suction cups to the screen face. You'll want to make sure that they're clean, as any dust on the suction cups can cause them to lose their grip in the middle of the calibration sequence. Unlike some other devices we tested though, the Spyder's suction cups hold well if they're even moderately clean.
Don't worry if the image of the sensor is a little larger or smaller than the
sensor itself, that's just a normal consequence of differences in pixel sizes
and screen resolutions. You also don't need to obsess about getting the sensor
exactly centered, it's fine if it's off-center by a quarter inch or so in any
direction.
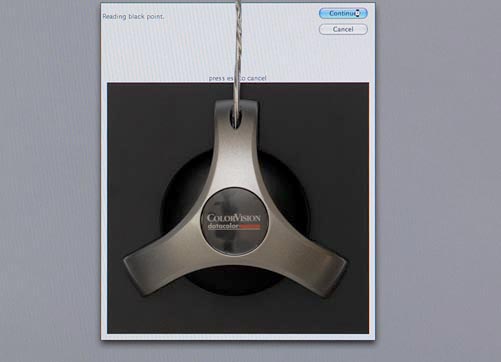
16) Reading black and white points, multiple color swatches.
The software will now start the calibration process, beginning with measurement of the black and white points, followed by a series of color swatches across the full range of brightness levels.
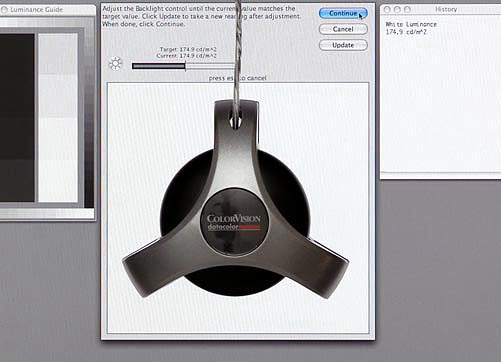
17) Adjust backlight for white point.
If we were trying to match this monitor to another, this is one place where
we might need to make an adjustment. Since we left the black and white luminance
boxes blank in the setup screens, the software just made the set point here
equal to the value it measured.
17a) Adjust color controls for white point (If color controls were selected)
I'm actually calibrating an LCD that has no color controls, but the photo above shows you the screen you'll get if you tell the Spyder2 that your display has separate R, G, and B adjustments. On most LCDs, you'll do best to avoid these, but on high-end LCD monitors and CRTs, the RGB adjustments shown here let you set the white point very precisely, leaving less work for the calibrator to do, which generally results in a better profile.
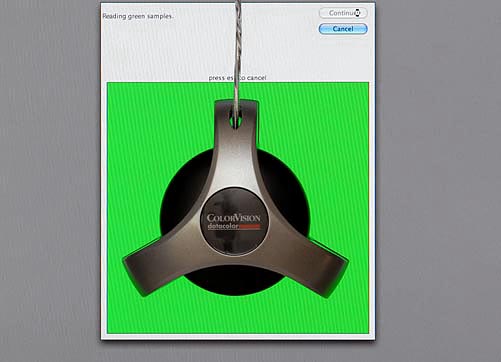
18) Reading black point, reading RGB samples again.
After the white point adjustment (if any), the software repeats the measurement
sequence, stepping through the full brightness range for each of the RGB primaries,
as the prior values may have changed after the white point adjustment. This
time, it also measures a series of gray samples as well, to insure that neutral
tones will remain neutral over the full range of output.
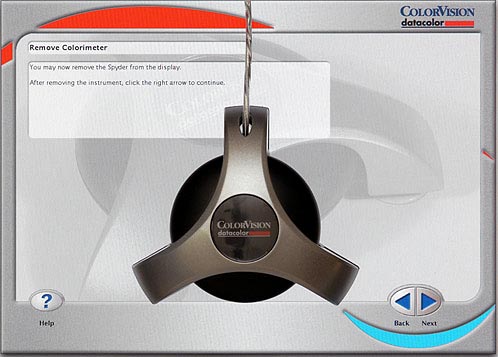
19) Remove colorimeter!
We're about done now...
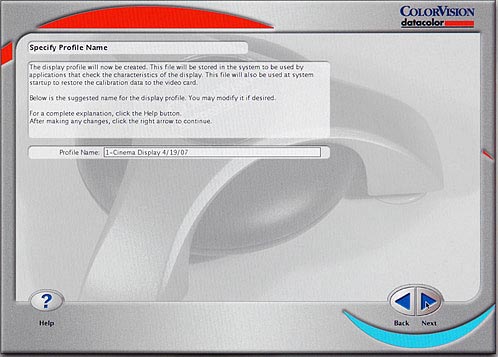
22) Name Profile
Give the profile some reasonable name - I usually append the current date to
the profile name so I'll know which profiles are the most recent, and so I can
also go back and check to see if the screen has changed significantly over time.
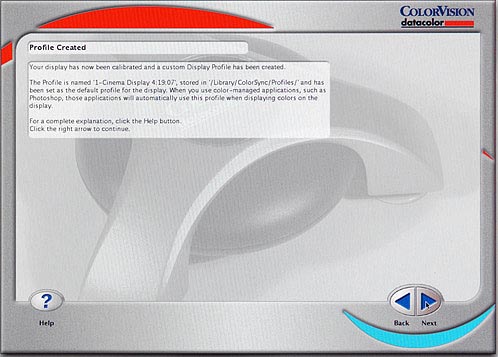
23) Profile Created
This is just a confirmation screen, saying that the profile has been created
and loaded into the system software.
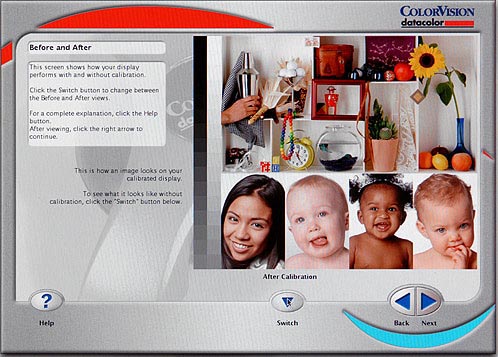
24) Before and After
After the calibration process is completed, the software shows you a sample
image with the calibration adjustments and profile applied. Click on the down-arrow
"Switch" button to see how the image looks with the monitor in its
uncalibrated state. (Roll your mouse over the image above to switch from "After"
to "Before" - You can see that the calibration eliminated a
cool cast the uncalibrated monitor showed.)
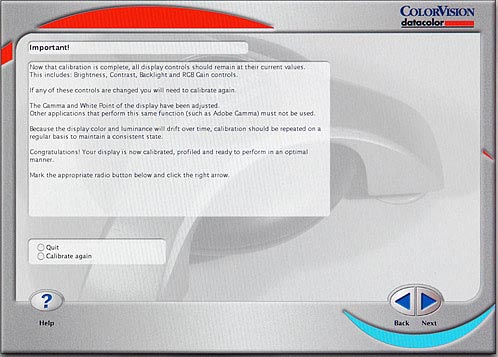
25) Quit or calibrate again, warning against changing settings.
It probably goes without saying, but for the calibration to remain valid, you need to leave the display controls at their current settings. DON'T use other apps like Adobe Gamma to fiddle with the video card settings, as that will invalidate the calibration you just did. Repeat calibrations periodically, to insure that your displays are always accurate. There's some debate about how frequently you should recalibrate. Some obsessive types insist on recalibrating every day, other people go months between calibrations. The most effective approach is probably somewhere between these extremes, perhaps once/week for CRT displays, once/month for LCDs.
Conclusion
| Pro: | Con: |
|---|---|
|
|
As noted at the outset, the ColorVision Spyder2PRO is the calibration solution that we settled on for use here at Imaging Resource after looking at a wide variety of solutions. We found that it did an excellent job of calibrating our monitors, handled multiple screens well, allowed us to calibrate multiple monitors on the same computer to a common standard, and seemed somewhat less prone to generating "wacky" calibrations when faced with difficult monitors. (Particularly with lower-end LCDs, some systems we tested would occasionally produce obviously wild-looking results with a given monitor, but then come back and generate a decent-looking calibration on the next run.) We also found the Spyder2PRO to be the most consistent from run to run, when we performed multiple calibrations on the same monitor. This gave us greater confidence in the accuracy of its calibrations. Bottom line, the ColorVision Spyder2PRO is a convenient, flexible and consistent system for display calibration, a solid answer for monitor calibration.
Imaging Resource has set up a deal for our readers with ColorVision, letting you buy a ColorVision Spyder2PRO at reduced prices. Your purchases through this link help support this site.
Postscript: Other Flavors of the Spyder2
Besides the full-on Spyder2PRO product that's reviewed above, ColorVision offers two lower-cost monitor calibration packages as well, both using the same sensor as the Spyder2PRO. Lower-end versions of the ColorVision Spyder2 provide fewer capabilities, but for readers with more modest requirements and only a single monitor, the trade-off may be worthwhile. Here's a comparison table showing all three monitor calibration options:
Spyder2 Feature Comparison
|
||||||||||||||||||||||||||||||||||||||||||||||||||||||||||||||||||||||||||||
If you can afford it, the ColorVision Spyder2PRO gives the most flexibility and bang for the buck, and is what we use here. If you only use a single monitor, and don't expect to add a second (or third), the Spyder2 Suite would be a good choice. The Spyder2 Express is very inexpensive, but we frankly think that most of our readers would be happier with at least the Suite version.
Of course, if you're content with the limitations of the Spyder2 Express, we certainly won't stand in your way. Here are PriceGrabber shopping links for the Spyder2 Express and Spyder2 Suite. Even the Spyder2 Express will be immeasurably better than trying to work with an uncalibrated monitor!