AND IT'S 26 PCT. MORE ACCURATE
Datacolor Spyder4 Goes
Beyond the Desktop
By MIKE PASINI
Editor
The Imaging Resource Digital Photography Newsletter
Review Date: January 2012
As our Adobe Carousel review pointed out, we're no longer living in front of one screen. Our options are extensive: desktop monitor, laptop, netbook, HDTV, projector, tablet, smartphone. All of them have screens on which we view the photos we've taken.
Hardware monitor calibration -- which is what Datacolor's Spyder is all about -- has always been important for achieving accurate color on your monitor and minimizing surprises from your output devices. But it hasn't been as widely adopted as its importance might suggest.
With the proliferation of screens, Datacolor is hoping its Spyder4, which can handle them all, will be as welcomed among consumers as it has been with pros. And for pros (and the serious amateur), the stakes have never been higher.
Who wants to see all their hard work blown up by an uncalibrated monitor? Nobody.
ANOTHER MODEL? | Back to Contents
But why a Spyder4?
Datacolor claims the new model, distinguished by its tuxedo black color scheme, is 26 percent more accurate on average with double-shielded color filters that improve its long-term stability. The company also notes they have improved consistency between units by 19 percent.
The software component adds a few wrinkles, too:
• Monitor Quality Analyzer in the Pro and Elite versions adds an advanced calibration accuracy test, monitor quality rating (we didn't score very high), display gamut graphing, Gamma and White Point test, support for CRTs and RGB balancing adjustments.
• Advanced Monitor Quality Assurance in the Elite version for uniform luminance and color graphic plus advanced multiple display tuing
• iPad/iPhone calibration with SpyderGallery
• SpyderTune in the Elite version
Otherwise we found the Spyder4 to be a very familiar friend with a full-spectrum 7-color sensor to read a variety of common displays.
We're a little less clued in about how the Spyder can calibrate so many devices but we promise to explain how it calibrates the iPad at the end of this review.
FOUR MODELS | Back to Contents
The Spyder4 is available in four models, distinguished primarily by the software capability so you can upgrade via Datacolor's Web site. We say primarily because the Express does not have the tripod mount of its siblings. All of them offer the SpyderProof interface and real-time profile and calibration checks. Here's where they differ:
The base $119 Express model is simplicity itself, using just one Gamma setting of 2.2 to match the human eye and Adobe RGB, one color temperature (6500K) and providing ICC 2 profile support. Read another way, those are all the things you don't have to worry about because they're set for you in the software.
The $169.99 Pro offers four Gamma choices (1.8, 2.0, 2.2 and 2.4) and four color temperatures (5000K, 5800K, 6500K and native) and supports ICC 2 and ICC 4 profiles. In addition, it can be used to calibrate multiple monitors and includes ambient light measurement plus a recalibration wizard.
The $249.99 Elite offers unlimited Gamma and color temperature options. While the other two models offer 64 patches for special targets, the Elite uses NTSC, PAL/SECAM, Cineon and L-Star targets. Both ICC 2 and ICC 4 profiles are supported as are all the other Pro features. The Elite adds front projection calibration, an expert console, custom b/w luminance control, a display history utility, StudioMatch, Gamma curve editing, L-Star workflow option, curves import function, SpyderTune and interactive gray balance.
With a paid upgrade from the Web site, you can also calibrate your HD TV with the TV HD version. We didn't explore this option.
Datacolor sent us its Spyder4 Elite to test.
Datacolor highlighted the features of the new unit:
Automated Color & Brightness Calibration. Spyder4Elite's simple, clear and automated process makes it straightforward to calibrate your displays to a reference condition. You can view and edit images with confidence on a display calibrated to show true-to-life colors and luminance adjusted for precise shadow/highlight detail.
Full-spectrum color sensor. Spyder4Elite's patented 7-color sensor improves upon colorimeters that use 3-channel RGB sensors. Each Spyder4Elite unit is individually tuned in the factory to accurately handle a variety of wide-gamut and normal gamut displays with ease.
Single sensor calibrates all your displays. Spyder4Elite works with your laptop, multiple monitors, front projector, television (with paid software upgrade on Web site), iPad and even iPhone. It works with LCD, LED, OLED, CRT, DLP and other display technologies. You can calibrate multiple displays connected to your computer. Spyder4Elite is unique in its ability to calibrate all your display devices to achieve greater consistency.
Improved accuracy and stability. The fourth-generation Spyder4Elite has double-shielded color filters for an even closer match to CIE color standards and improved long term stability. Average accuracy increased by 26 percent and consistency between Spyder units has improved 19 percent.
Fast Re-calibration Assistant. The "ReCAL" feature makes it quick and easy to recalibrate your display to compensate for changes that occur over time.
Adapts display to surrounding light. The lighting around you will affect image contrast and appearance. An additional sensor on the Spyder4Elite detects changes to surrounding light and adapts the display luminance accordingly.
Spyder4Elite software options for greater control. For greater control over color management Spyder4Elite provides additional features:
- StudioMatch enables visual fine-tuning of studio displays to match the way you see color.
- Built-in presets for video standards such as Cineon, NTSC and PAL. Color analysis of your display quality by plotting uniformity, color gamut and change over time, tone response and allowing comparison with other displays.
- Calibrate to professional workflow targets with L-Star tone response curve.
- Unlimited choices for gamma, white point, white luminance and black luminance.
- Iterative gray balance algorithm for the most accurate greys.
- Front projector calibration for color accurate presentations.
REQUIREMENTS | Back to Contents
System requirements have increased only modestly for both Windows and Mac users since the Spyder3, dropping Windows 2000 and Mac OS X 10.3 support.
Windows is supported for Windows XP 32/64, Windows Vista 32/64 and Windows 7 32/64.
Mac support includes MacOS X Panther (10.4), Leopard (10.5), Snow Leopard (10.6) and Lion (10.7).
You'll need a color monitor with at least 1024x768 resolution (although there's a 1024x600 netbook option) or front-projector TV, a 24-bit video card and a powered USB port.
The retail box contains:
- The Spyder4 colorimeter
- Suction cup for CRT displays
- Desktop cradle with metal tripod mount
- Spyder4Elite software CD
- Quick Start Guide and Warranty Card
The box claims a screen cleaner is included, but we didn't find one. Probably because Datacolor rushed this unit out to us in time for the launch.
The one-year warranty (two years in the European Union) covers defects in parts and workmanship during normal usage.
To calibrate an iOS device, you'll need a little more software from Datacolor, available at no charge to Spyder owners. We reviewed SpyderGallery just last month.
INSTALLATION | Back to Contents
Installation is pretty straightforward. You 1) install the software, 2) plug in the Spyder4 and 3) launch the software. The Quick Start Guide steps you through that, adding that after calibration.
But there are a couple of other things you might do before that. The first is to clean your monitor. The other thing is to let your monitor warm up. CRTs take about 30 minutes to stabilize while LCDs are ready in just a few minutes (but it doesn't hurt to wait half an hour). And make sure no direct light is falling on your monitor.
To hold the Spyder4 flat against the surface of your CRT, Datacolor provides a suction cup. It isn't necessary for an LCD, in which case you simply slide the weight on the USB cable to hang on the opposite side of the screen.
Finally, make sure you've disabled any screen saver. You don't want the calibration process interrupted by your screen saver just as the last measurements are being made.
During the software installation, Datacolor installs Spyder Utility as a Startup Item on your system. Spyder Utility makes sure your display profiles and their matching calibration data are loaded at startup for each calibrated display. It also checks that they are still in use (including the more stringent Spyder Certification standards, if applicable) during your session. And it optionally monitors ambient light levels, too, warning you if the light levels are too low and reporting generally what they are in its pulldown/popup menu. Spyder Utility's main job is to adjust monitor brightness to compensate for ambient light to the extent that's feasible.
Another part of the installation worth noting is the extensive HTML Help system. You can access it directly from within Spyder4Elite, the calibration program.
The age of your monitor is not an insignificant factor, to put it gently. Monitors in use for over five years may profit from calibration, but that doesn't mean they're capable of correctly displaying the full gamut of colors that a new monitor would. The Spyder's job is to measure what your monitor is doing and profile it so the specified color is displayed but if your monitor can no longer display that color (say the green gun is shot), no profile is going to make it display it.
CERTIFICATION | Back to Contents
Spyder Certification lets Spyder Utility check a number of conditions to confirm your monitor is within the parameters defined for certification or report which parameters are out of spec.
The parameters checked include:
- The profile assigned to the display by the operating system is a Datacolor Spyder-created profile
- That profile was created with Spyder Certification set to 'on'
- The LookUp Table (LUT) currently loaded in the video card is the LUT from that profile
- Ambient light conditions are the same as when the display was calibrated
- The display has been recalibrated within the time limit specified in the Spyder Utility's preferences
- The display has been run through full calibration within the time limit specified in the Spyder Utility's preferences
- The computer has been turned on for at least the time specified in the Spyder Utility's preferences
CALIBRATION & PROFILING | Back to Contents
After installing the Spyder software and connecting the Spyder itself to your USB port (a hub is fine), you're ready to calibrate and profile. There's no need to disable any currently active profile.
Calibration, as the extensive Help system explains, keeps your monitor in a consistent state so that it displays colors in the same way, day after day, month after month.
As noted in Imaging Resource's Spyder2 review, that involves determining:
- What colors are the red, blue, and green channels of the display?
- How does the light output of channel vary as the pixel value is changed from 0-255?
- What color are the pure grey values (equal RGB numbers, for instance 200/200/200 should be a light-medium grey, with no color tint to it.
Once the software knows how the display is behaving, it can correct it by loading correction curves into the video card (or sometimes the monitor itself), to produce a smooth tone curve and neutral greys. This step also adjusts the monitor to the gamma setting and color temperature that you want. (The sRGB standard uses gamma 2.2 and a white point of 6500K.)
With the display producing smooth tones and neutral greys, the software can create a color profile describing the display's color characteristics. Programs like Adobe Photoshop can use display profiles to compensate for the known quirks of a display device, and insure accurate color rendering.
It isn't hard to make the physical connection between the Spyder and your monitor. But what often isn't appreciated -- with any hardware calibration device -- is the consequences of the choices you make in the software itself. These can, frankly, invalidate the process.
That's why having a user-friendly calibration program is essential. A lot is made of the hardware but how you use the software can make or break the profile. A little confusion can lead to a disaster.
While the software component of Datacolor calibration is familiar to us, this version seemed a bit more polished and even friendlier with small illustrations (and a new popup Shortcut menu to zip to other functions) to go with the text descriptions.
But the process is the same consisting of the following steps (which are a bit more involved with the Elite model than, say, the Express model, which doesn't have all the following options to worry about):
- Identify your type of monitor: LCD, CRT, Laptop, Projector
- Identifu its make and model
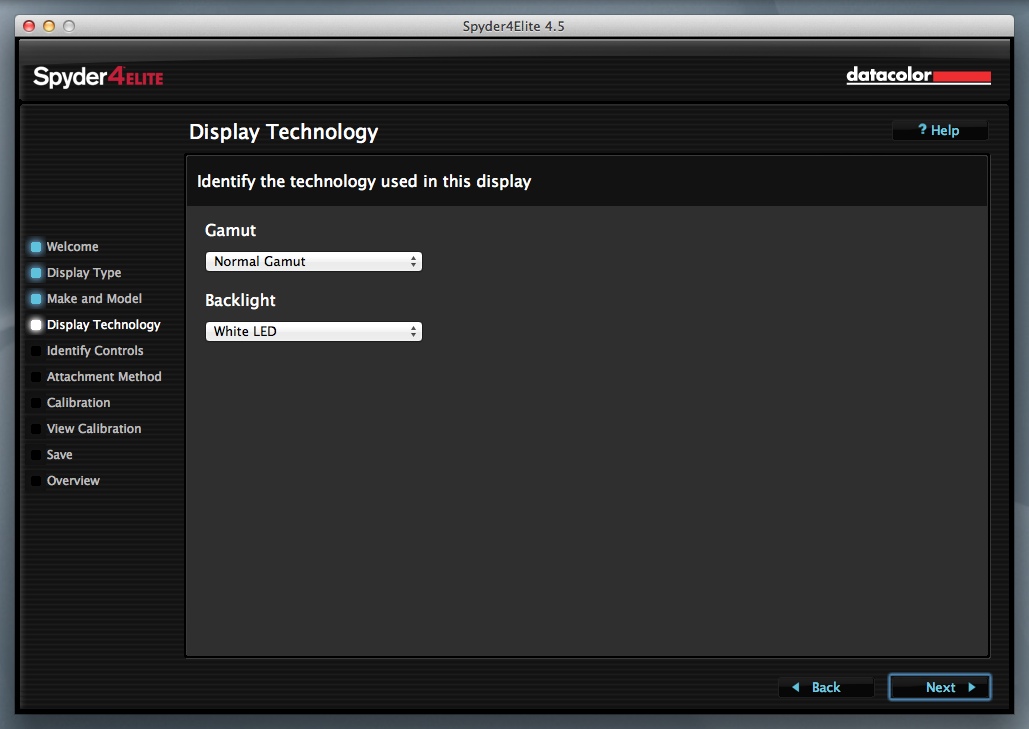
- Identify the technology used in the display (Gamut and Backlight, etc.)
- Choose your calibration settings for Gamma, White Point and Brightness
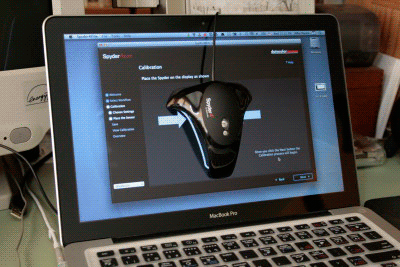
- Place the Spyder4 sensor over the target on the monitor
- Relax while the monitor displays a series of color and tone fields for the Spyder4 sensor to measure
- Name your profile and save it (it's automatically activated)
After which you can optionally check the improvement using SpyderProof and its 16 test shots or fine tune the changes with SpyderTune.
SPYDERPROOF | Back to Contents
After your profile has been created, the application displays the SpyderProof screen allowing you to compare your calibrated monitor to its uncalibrated state.
A series of 16 images in four groups are displayed. The four groups cover 1) saturation and contrast, 2) skin tones, 3) highlight and shadow detail and 4) black and white images. The Switch button lets you quickly compare the two states.
A final screen reminds you not to change the controls and to recalibrate on a regular basis.
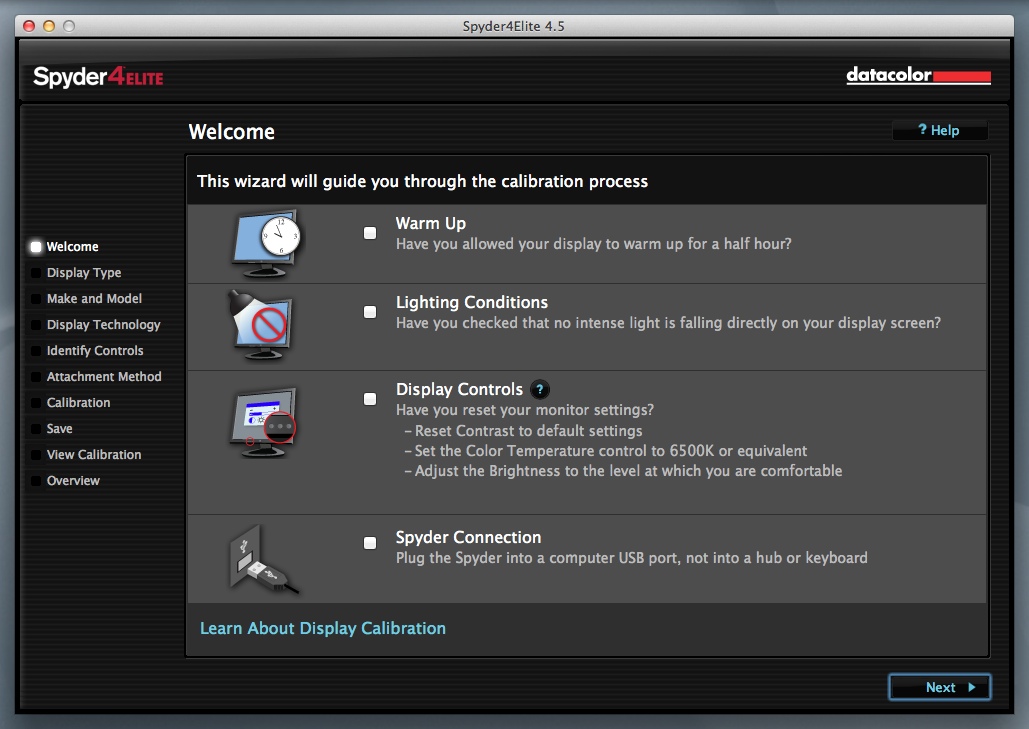
Welcome
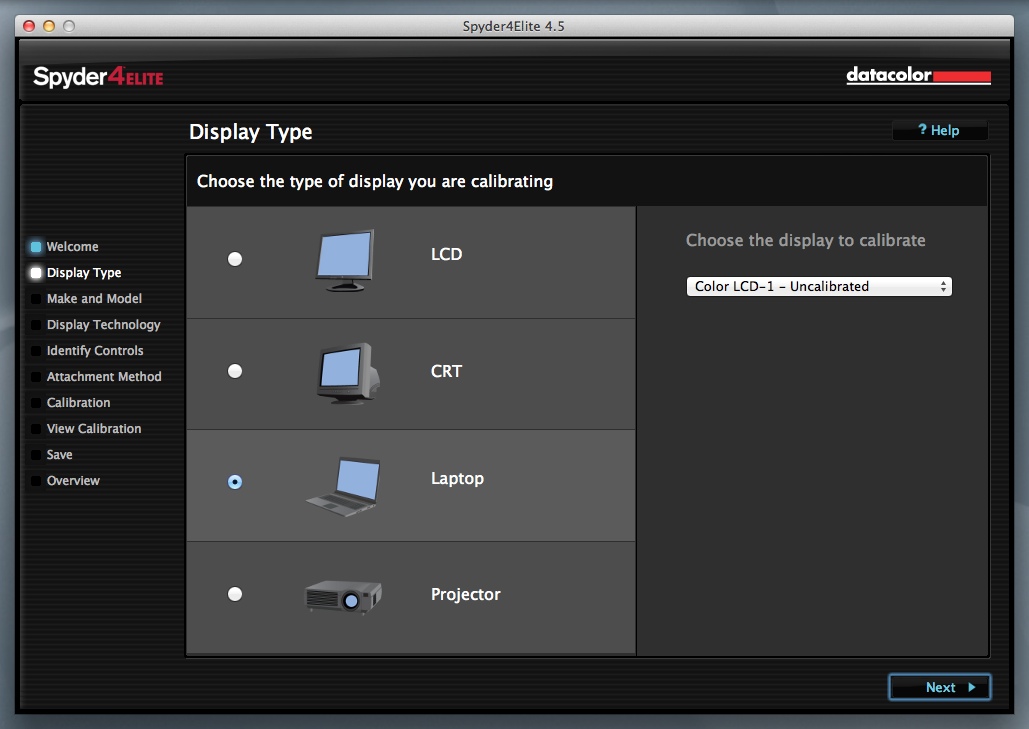
Display Type
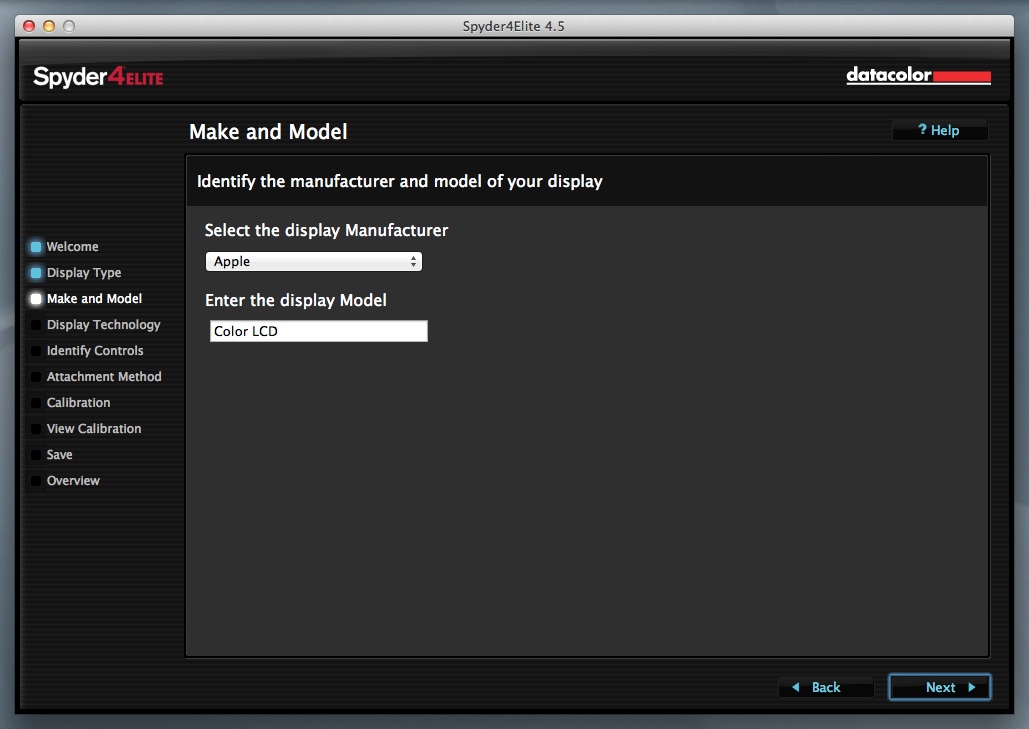
Make & Model
Display Technology
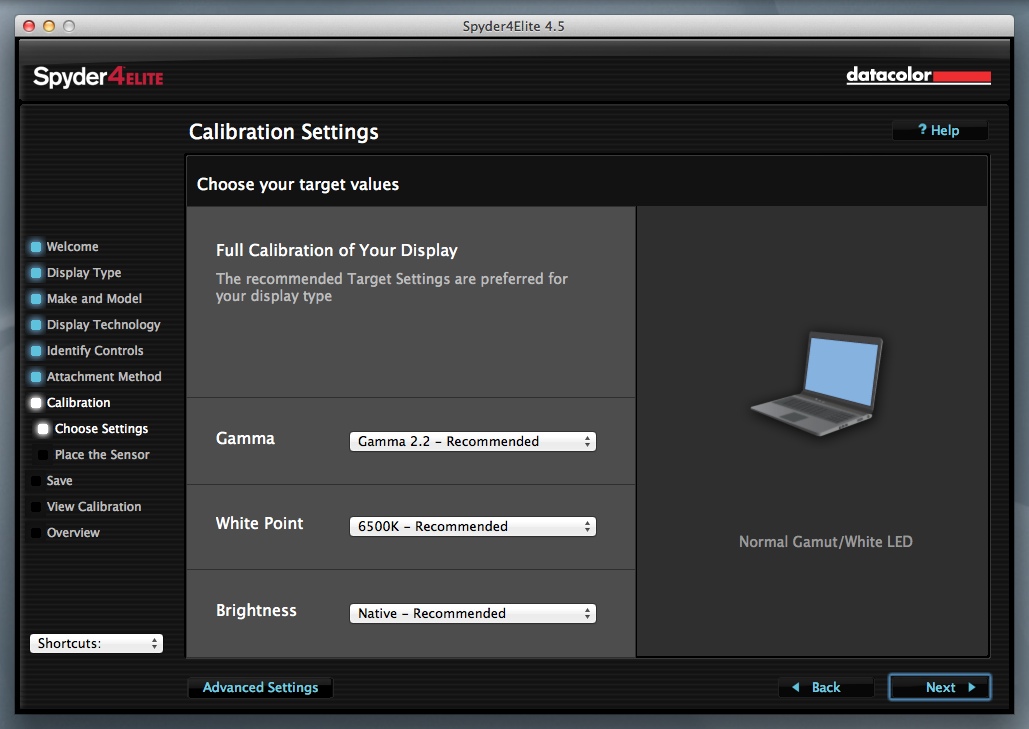
Calibration Settings
Measuring ...
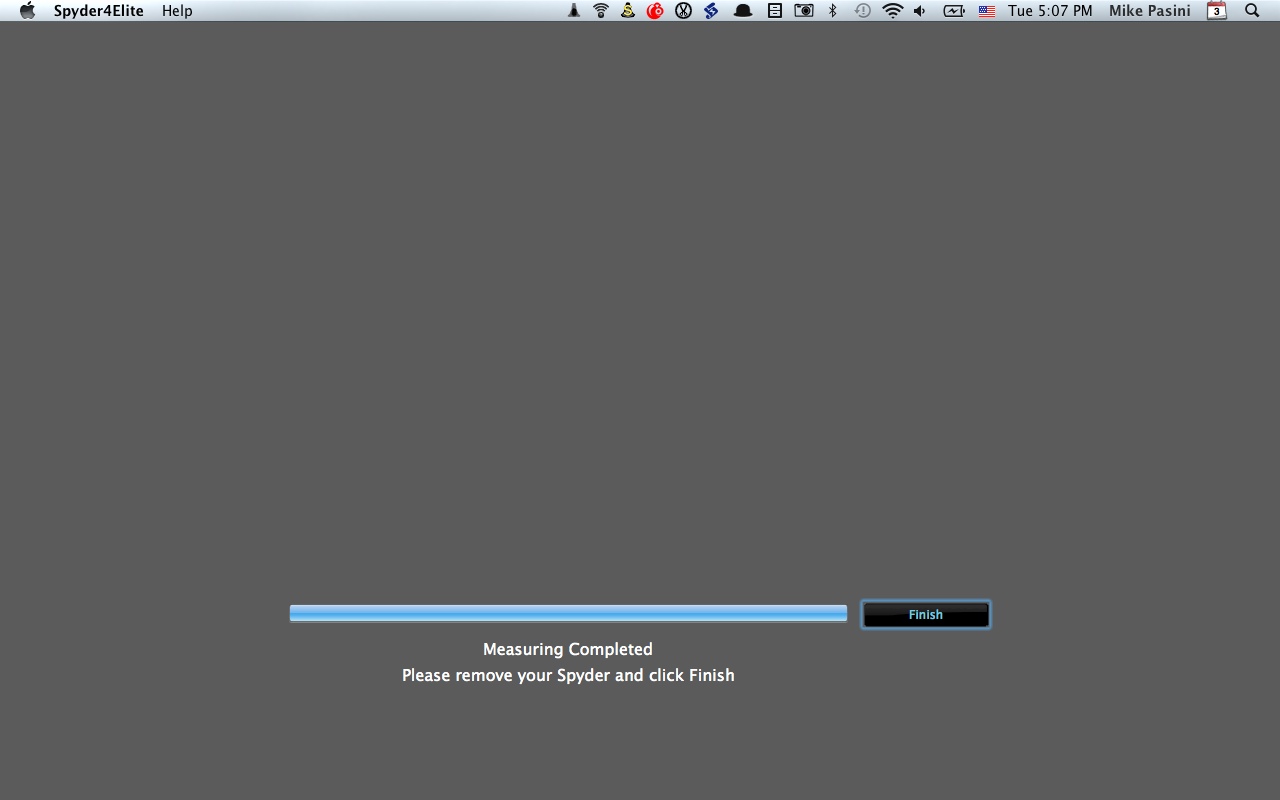
Measuring Complete
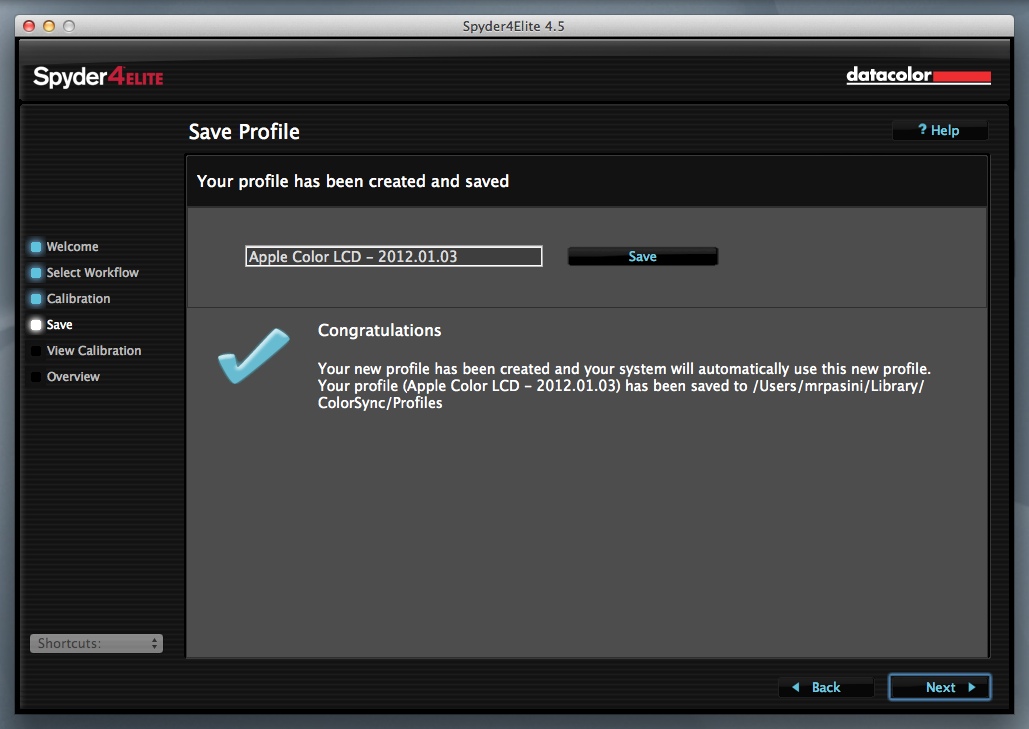
Save Profile
If your session with SpyderProof suggested a tweak or two to you, you can do that with SpyderTune.
The same set of 16 images is displayed but this time with blue-red and purple-green sliders for White Point adjustment, a lower-higher slider for Gamma and a lower-maximum slider for Brightness.
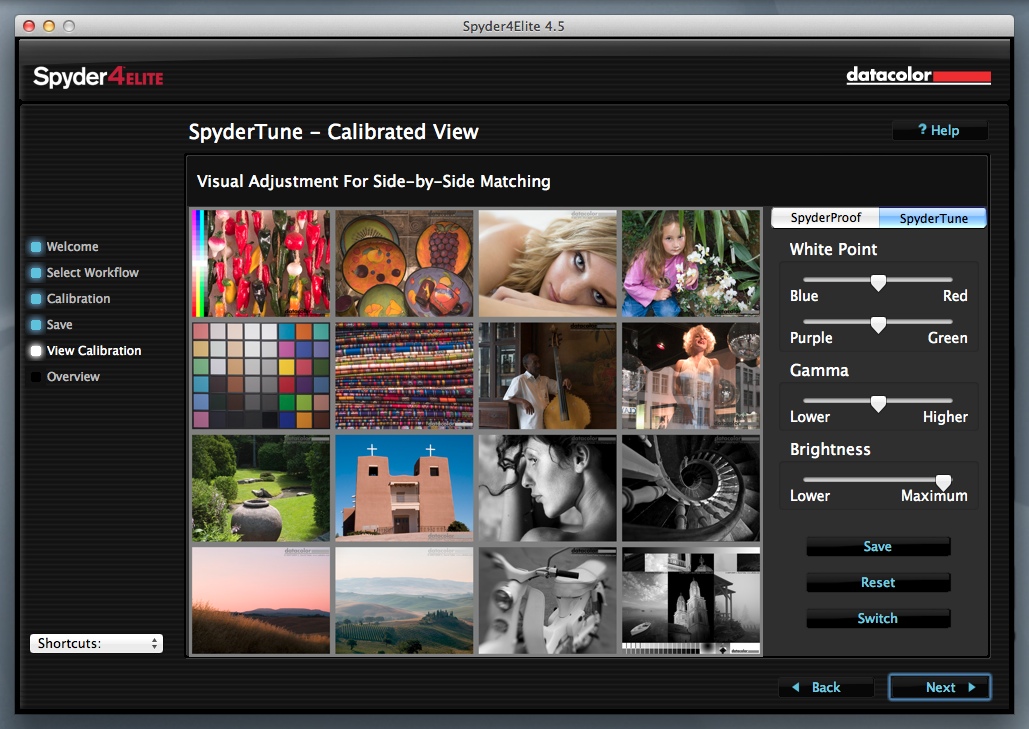
SpyderTune
ADVANCED ANALYSIS | Back to Contents
There is even some advanced analysis you can perform:
- Graph the display's color saturation
- Graph the display's tone response and white point
- Show the brightness, contrast and white point at different brightness settings
- Show the brightness, contrast and white point at different presets
- Map the uniformity of the display's brightness and color
- Analyze how accurately the monitor displays various colors
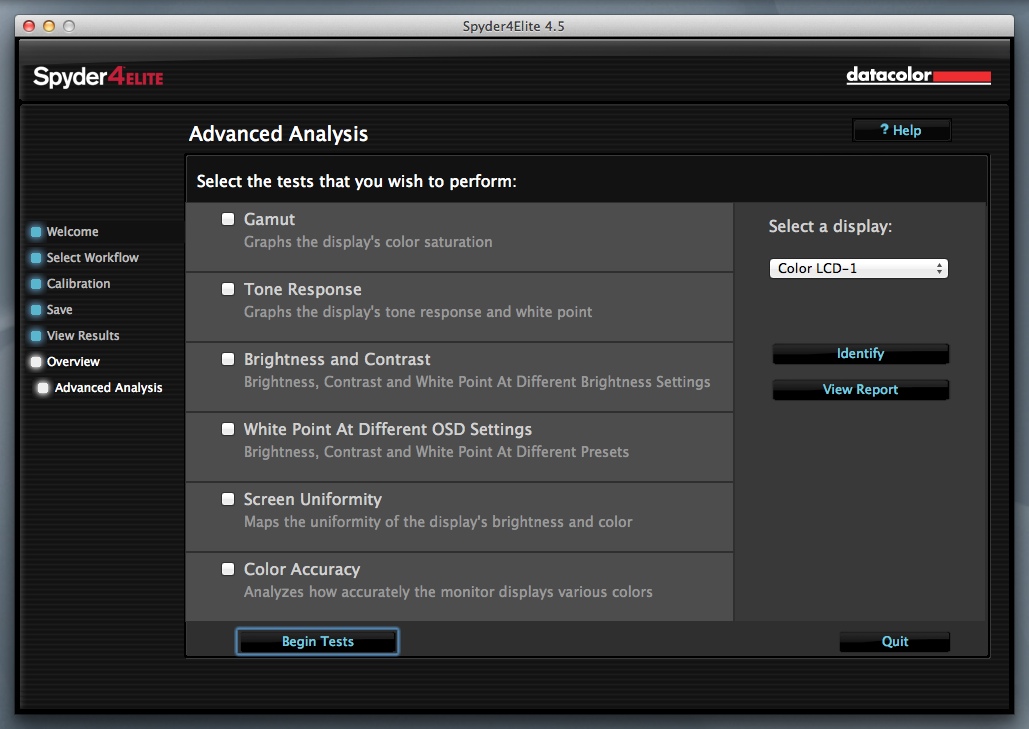
Advanced Analysis
EXPERT CONSOLE | Back to Contents
While the step-by-step guided process gets the job done quickly, Datacolor also provides an Expert Console that puts almost all of the targeting, calibration and profiling elements on one screen.
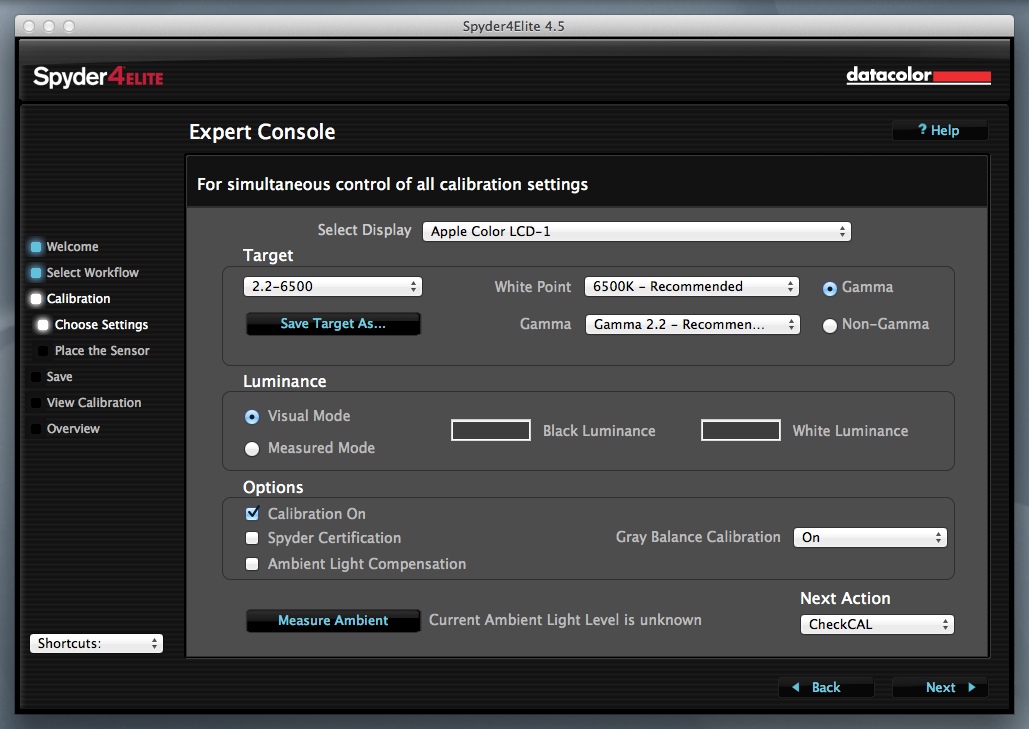
Expert Console
Datacolor recommends running the program automatically before using the Expert Console so the program knows the characteristics of the displays and to determine multiple display targets automatically.
Settings include Display to Calibrate, Target (gamma and white point), Target Luminance Values, Options (Apply Video Calibration, Certification, Ambient Light Check, Real Time Monitoring), Calibration and Profiling.
STUDIO MATCH | Back to Contents
The Studio Match function works in two ways: matching multiple displays connected to one computer or displays connected to multiple computers.
Unlike Macs, Windows computers may need a separate video card for each display of a multiple monitor setup. If your card can't store a unique calibration for each display connected to it, you'll need to have a separate card for each display.
Datacolor also warns that a perfect match (particularly between a CRT and LCD monitor) isn't the game. Studio Match will match the displays "as closely as possible."
After selecting the displays to match, you confirm the match settings of Gamma and White Point before measuring luminance and measuring the displays. The final step is to create the profiles.
AMBIENT LIGHT | Back to Contents
There are two schools of thought about compensating for ambient light. The first is that if you have to compensate for ambient light, you're in trouble. The second is, well, get real.
A shop that does color correction for prepress, for example, has long known it should be working in windowless rooms painted a middle gray with very dim ambient lighting. That ambient lighting won't change from hour to hour, no matter what the weather is. Monitoring ambient light might be useful in this situation only to point out, as the Spyder4 will, that the ambient light isn't the same as when the monitor was calibrated. Which could happen when the janitorial staff turns on the overhead fluorescent lights.
A home office, however, will find it hard to avoid a window or to employ a room darkening shade if the room is shared with guests or other family members. Here, adjusting the ambient light makes a difference. You aren't getting the best view of your image because the room is too bright to begin with, but you'll find the image isn't unreadable when you return in the evening to work on it.
In between these situations, there's quite a few of us. We may have space that is only used for image editing but more likely it's office space that could use a little illumination once in a while, too.
Monitor calibration, with all its jargon, can be intimidating. And providing a Help screen that defines the jargon into merely technical terms really doesn't help. We've often been further confused by some of the monitor calibration help we've gotten. And nothing turns you off faster than being confused.
We were impressed with Datacolor's HTML help system bundled with the Spyder3 and the new self-contained Help system is just as clear with sections for each topic like "Usual Setting," "The Purpose of This Step" and "The Long Answer." All of it clearly written and easy to understand without a degree in math.
SPYDERGALLERY | Back to Contents
Datacolor boasts that the Spyder is the only device that can calibrate an iPad. And with the Spyder4, it certainly hopes to expand that foray beyond the desktop, as we mentioned at the beginning of this review.

SpyderGallery
At press time we couldn't confirm how calibrating an iPhone works, but we suspect it isn't much different that running SpyderGallery on the iPad. Although we can't imagine how you calibrate an HDTV (perhaps manually adjusting the color controls according to the laptop software's recommendations).
But we did tell you last month how to calibrate an iPad with SpyderGallery.
Launch the iPad app (which is free from the iTunes iOS App Store). Then hunt down the desktop companion application SpyderGallery Desktop, install and launch it. With a Syder attached (a Spyder3 works fine but so did the Spyder4 when we tried it), tell the app to calibrate and a few minutes later you've got a profile on your iPad. SpyderProof will prove it to you.
No options to worry about, no questions to answer, no name to think up for the profile.
Unfortunately, as we lamented, other apps don't know about the profile, so it's of limited value. You can use the Viewer to access your system photo galleries but that's about it.
Everything the Spyder3 does, the Spyder4 does -- and better. The improved accuracy isn't something you can point your finger at, but it's significant. The reduced variation between models matters if you need a handful of these in different locations to confirm color.
I used the Spyder4 to calibrate an LCD laptop screen and an iPad. And I recalibrated them, too. I used the ambient monitor to adjust the laptop screen throughout the day. No issues.
Which is precisely the reason you calibrate your screens.