Fuji A500 Operation
With full automatic exposure control and only two manual adjustments available, the Fuji FinePix A500's user interface is straightforward and quick to grasp. There's no Mode switch this model, so all adjustments are made via the menu system. The menu is simple, but a bit slow and clumsy to navigate. With the camera turned on, a single push of the Menu/OK button brings up the four-option menu, which is fairly limited and quick to navigate using the combination of arrow and zoom rocker buttons. In Manual shooting mode, two additional menus are available to set EV and White Balance, though you still don't have access to aperture or shutter speed. All camera controls other than basic Flash and Macro mode selections are accessed through the LCD menu system, so you should have no trouble shooting with the Fuji A500 right out of the box.
Record-Mode Display
 The Fuji A500's LCD monitor reports very basic information in Record mode, including the shooting mode, resolution setting, number of available images, and a central autofocus target. It also reports the Flash mode, Macro mode and the Self-timer when activated. When necessary, warnings are displayed for battery level, auto focus and camera shake. Pressing the Display button enables an alignment grid, which divides the image area into thirds vertically and horizontally, for better framing of linear subjects. A second press eliminates the grid and all info, and a third press disables the Fuji A500's LCD monitor entirely.
Playback-Mode Display
 In Playback mode, the Fuji A500's main LCD display shows the file number and capture date for a few seconds. Pressing the Display button pulls up the nine-image index display. Using the Zoom rocker button, you can enlarge captured images as much as 4.1x, depending on the quality of image captured (4.1x for 5M and 3:2, 3.2x for 3M, and 2.5x for 2M).
Fuji A500 Modes and Menus
Still Record Mode: This mode allows the Fuji A500 to capture still images. Exposure is automatically controlled, although a "Manual" option in the settings menu increases the menu selections to include Exposure Compensation and White Balance. Pressing the Menu button displays the following options:
 Shooting Mode: Puts the camera into Auto, Manual, Portrait, Landscape, Sport, Night, or Movie modes.
- Quality: Sets the image resolution and quality to 5M(F) (2,592 x 1,944 pixels), 5M(N) (2,592 x 1,944 pixels), 3:2 (2,592 x 1,728 pixels), 3M (2,048 x 1,536 pixels), 2M (1,600 x 1,200 pixels), or 0.3M (640 x 480 pixels). Also shows approximately how many frames can be captured at each resolution with the installed card's remaining space.
- Self-Timer: Activates either the 2-second or 10-second Self-Timer, or disables the mode.
- Set-Up/LCD Brightness: Adjusts the LCD brightness, and offers a variety of Setup menu options.
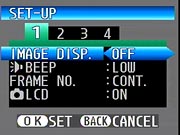 Image Display: Turns the post-image capture review screen on or off.
- Beep: Enables the camera's beep sounds, with options for Low, High, or Off.
- Frame Number: Sets the camera to number each successive image continuously from memory card to memory card, or to reset numbering with each new memory card.
- LCD: Turns the LCD monitor on or off. If on, the LCD monitor automatically comes on whenever the camera is set to the Still Image Record position. If off, you must enable the display via the Display button.
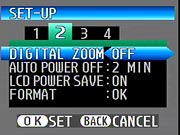 Digital Zoom: Turns the 5.2x Digital Zoom on or off
- Auto Power Off: Turns the power save option on or off. If on, you have the choice of a two- or five-minute delay before the camera automatically shuts off due to inactivity.
- LCD Power Save: When turned on, darkens the LCD monitor when camera is not used.
- Format: Formats the xD-Picture Card, erasing all files (even protected ones).
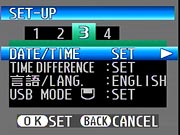 Date/Time: Sets the camera's internal clock and calendar.
- Time Difference: This option lets you set the time for another time zone. For example, when traveling, you can specify the time at home and for where you are, and the time difference is applied to captured images.
- Language: Sets the menu language to one of seven languages.
- USB Mode: Sets the USB mode to DSC or PictBridge. PictBridge mode allows connection to a printer, while DSC is for connecting directly to a computer.
 Video System: Assigns the video signal as PAL or NTSC.
- Discharge: Discharges rechargeable batteries fully, so that they can be recharged from the base level. (Do not use with alkaline batteries, as this will eliminate the charge entirely.)
- Reset: Resets all camera settings to their defaults.
 ISO: Lets you choose between ISO 100, 200, 400, and AUTO
- Exposure Compensation: (Manual mode only) Adjusts the overall exposure from -2.0 to +2.0 exposure equivalents (EV) in one-third-step increments.
- White Balance: (Manual mode only) Sets the white balance to Auto, Outdoors, Shade, Daylight Fluorescent, Warm White Fluorescent, Cool White Fluorescent, or Incandescent.
Playback Menu: Here, you can review captured images and movies, as well as manage files and set up images for printing. Pressing the Menu button displays the following options:
 Erase: Deletes the current frame, or all frames on the memory card.
- DPOF: Marks/unmarks frames for printing on DPOF devices, with an option to include a date and time overlay.
- Protect: Write-protects the displayed image, preventing it from being accidentally erased or manipulated (except via card formatting). Also removes protection, and offers options to protect or unprotect all images on the card.
- Option: Adjusts LCD brightness and launches the Setup menu.
 Playback: Enables an automated slide show of all the captured images on the memory card, with options for transition styles.
- Copy: Copies images from internal to external memory or vice versa.
- Trimming: Lets you crop an image and save it separately as a 3M, 2M, or VGA file, depending on the size of the crop.
 Fujifilm GFX 50S Review
 Fujifilm X-T3 Review
 Olympus E-M5 III Review

Follow Imaging Resource