Sony A900 Exposure Options
The Sony A900 offers all the exposure options you'd expect in a high-end prosumer SLR, plus a few Sony-specific options, and some nice increases in control over previous models. Available exposure modes include Program AE, Manual, Aperture Priority, and Shutter Priority modes with shutter speeds from 1/8,000 to 30 seconds available, as well as a Bulb setting for longer exposures. The x-sync speed for flash photography is also an impressive 1/250 second with the SteadyShot image stabilization disabled, or 1/200 second with it activated.
A very nice touch that's common on a lot of SLRs these days, yet welcome nonetheless, is that, while in Program AE mode, you can rotate either the front or rear control dials to select different combinations of aperture and shutter speed settings than those normally chosen by the autoexposure system. (That is, if the automatic program would have chosen 1/125 second and f/5.6, you could instead direct the camera to use 1/60 at f/8 or 1/30 at f/11, to get greater depth of field.) This is a very handy option for those times when you need some measure of increased control, but still want the camera to do most of the work for you. We personally use this capability more than Aperture- or Shutter-priority metering in our own shooting. An added wrinkle in the Sony A900 is that turning the front control dial sets the mode indicator to PS (program shift/shutter priority), while turning the rear control dial sets the indicator to PA (program shift/aperture priority), so you can take control of either shutter speed or aperture, letting the camera make the appropriate choice for the other variable.
Another feature that's also pretty common, but still very welcome is the electronic analog exposure display visible in the optical viewfinder data readout as well as on the rear-panel shooting display when the camera is in Manual exposure mode. This shows the amount the camera thinks an image will be over- or underexposed, based on the settings you have selected, and helps you find the best exposure for the subject.
Sony A900 ISO Range
ISO sensitivity ranges from 100 to 6,400, adjustable by pressing the ISO button on the right side of the top panel of the camera and then using the up/down arrow directions of the Multi-Selector, or either the front or rear control dial to select values from those shown on the rear display panel. The front control dial increments the ISO number in one-stop increments (a factor of two between readings), while the rear control dial adjusts in increments of 1/3-stop. The native ISO of the Sony A900's sensor is 200, but an ISO 100 option is available as a range extension for times when you need the slower shutter speeds ISO 100 would provide. Expect poorer tonality at ISO 100 though. Likewise, the maximum "normal" ISO on the A900 is 3,200, but an extended value of 6,400 is available, albeit with significantly higher levels of image noise.
At ISO settings of 1,600 and above, the Sony A900 gives you four choices for high-ISO noise reduction. This setting defaults to Normal; options of Low, High, and Off are also available. - And big kudos to Sony for listening to owners (and reviewers) and letting the Off option actually turn off noise reduction, at least in the RAW files (and apparently in the JPEGs as well). This is a huge benefit for those who want to use third-part noise reduction software on the A900's RAW file output, and brings the A900's RAW files in line with the philosophy of RAW files containing truly "Raw" data. For more discussion of this refer to the Sony A900 Noise Reduction tab of this review.
Sony A900 White Balance Options
White balance modes on the Sony A900 include Auto (usable from roughly 3,000K to 7,500K), Daylight (5,300K), Shade (5,300K), Cloudy (7,500K), Tungsten (2,800K), Fluorescent (no color temperature listed, since fluorescent light spectra don't translate well into Kelvin temperatures), and Flash (6,500K). Direct Kelvin temperature settings are also available, as is a Custom white balance option, for setting white balance from a white or grey card.
In most of the white balance modes, you can fine-tune the color in steps of about 10 mireds. You can use either the left/right arrow directions of the Multi Selector, or the rear control dial to make these adjustments. Adjustments in the + direction make the image more reddish; those in the - direction make it more bluish. We like this feature a lot, as we often wish we could use one of a camera's standard white-balance settings, but tweak it to be just a bit warmer or cooler than the default. To be sure, some experimentation is required to familiarize yourself with the impact of these "tweaked" white balance settings, but having them available is a big plus. In Fluorescent mode, the left/right arrows select between different types of fluorescent lighting, and no fine-tuning is available within each type.
In Kelvin white balance mode, the up/down directions on the Multi Selector adjust the Kelvin temperature, while the left/right directions step through simulated color filters, covering a range equivalent to that from Magenta 9 to Green 9 in the CC (Color Correcting) filter scale. Increments between steps are roughly equivalent to a CC number 5 filter.
As usual, Custom white balance is set by selecting Set from the Custom White Balance dialog screen, pointing the camera at a neutral white or grey card under the lighting you'll be shooting in, and then pressing the shutter button. If the white balance you've captured is good (the camera will warn you if it isn't), you'll be given an option to store it in one of three Custom White Balance registers.
You can also bracket white balance exposures (see the Autobracketing discussion below). Two options are available; Hi which shoots with steps of approximately 20 mireds between shots, or Lo, which shoots with steps of 10 mireds.
Sony A900 Metering Options
The Sony A900 offers three metering modes, selected via the Metering Mode lever on the back of the camera: Multi-segment, Center-Weighted, and Spot. The default Multi-segment metering mode takes readings throughout the image to determine exposure, using an array of 39 hexagonal segments covering the bulk of the frame, and one large 'segment' that covers the rest of the surrounding area. Center-Weighted gives precedence to the center of the image while reading the whole frame. Spot metering, useful for high-contrast subjects, bases the exposure reading on the very center of the image, letting you set the exposure based on a small portion of your subject. You can lock an exposure reading by pressing the AE Lock button on the back panel. Halfway pressing the Shutter button also locks both exposure and focus, but only in autofocus mode.
The A900's Exposure Compensation adjustment increases or reduces the overall exposure from -3 to +3 exposure equivalents (EV) in one-half or one-third step increments, in all exposure modes. An Auto Bracketing feature captures multiple shots with different exposure, white balance, or other parameters: See the section on Bracketing below for more details.
Sony A900 Drive Modes
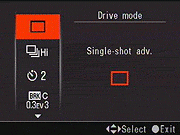 The Sony A900 offers a variety of shooting modes via the Drive button on the right side of the camera's top panel. Pressing this control brings up the Drive mode setup display on the camera's LCD, after which you can use the left/right and up/down arrows of the Multi Selector or the front and back control dials to make selections. The front control dial steps through the main modes, the rear control dial selects options within each mode.
Drive options include single shot, continuous shooting (high or low speed), self timer (options of 2 or 10 seconds), Continuous bracketing, Single Shot bracketing, White Balance bracketing, DRO mode bracketing, Mirror Lockup, and Remote Commander.
Sony A900 Bracketing Options
The Sony A900 offers an unusually wide range of bracketing options. There's of course the exposure bracketing found on most cameras, but the A900 goes a bit further than many. It offers step sizes of 0.3, 0.5, and 0.7 EV with either three or five shots in the bracket, but also offers a step size of 2.0 EV, with three shots in the bracket, for users interested in HDR (High Dynamic Range) photography. The A900 offers separate settings for continuous-mode exposure bracketing or single-shot bracketing. In both modes, the fact that you're bracketing is indicated in the viewfinder by a "br" indication, and by lines above the exposure scale showing what exposure biases are going to be used. In single-shot mode, each line disappears when its corresponding exposure has been captured. (Nice, you always know where you're at in an exposure series, if you get interrupted for any reason.) Bracketing order can be changed via an option on the Setup menu, the default being 0 > - > +, with an option to make it - > 0 - +.
White balance bracketing always involves 3 shots, one at the default white balance setting, one with the white balance "tweak" set to a more blue color cast, one with it set to a more reddish color cast. The WB Lo bracket option uses step sizes of 10 mireds, the WB Hi option uses steps of 20 mireds. White balance bracketing occurs only in single-shot mode, and there's no indication in the viewfinder where you are in the sequence. (That we could see, anyway.) The white balance bracketing is a nice feature, but we'd like to see more options for step size and (particularly) number of shots in the series. It'd be nice to be able to shoot a bracket of 5 shots in situations with tricky lighting. (And would be nice to do it in continuous drive mode too - see the parenthetical note two paragraphs down.)
The A900 also lets you bracket the effects of the Dynamic Range Optimizer (DRO) function, in three steps. As with the WB bracketing, Hi and Lo options provide greater or lesser amounts of bracketing, but it isn't clear how the steps compare to the manual adjustments available via the Quick Menu. As with WB bracketing, DRO bracketing is only available in single step mode, and there's no indication of where you are in the sequence.
(As a side note, we really wish that the single/continuous option could somehow be set up in parallel with WB and DRO bracketing: It'd be so much easier if you could just press the shutter and have the camera fire off 3 shots. Some cameras set bracketing separately from drive mode; we think that's the right way to do it: Let the user decide whether they want to shoot continuously or one shot at a time separately from the type of bracketing they're wanting to do.)White balance bracketing can occur in the same 3 or 5-shot brackets, with the step size between shots being either 1, 2, or 3 of the white balance "fine tuning" steps. (As noted above, each such step corresponds to 10 mireds of color-temperature adjustment except when in Fluorescent mode, which offers larger steps.) Normal white balance bracketing can thus cover a range from +/- 10 mireds (3 shots, 1 step each ) to +/- 60 mireds (5 shots, 3 steps of variation each).
Sony A900 Creative Style Options
The Creative Style menu has been a fixture on Sony SLRs for a while now, but the A900 takes the feature a couple of steps forward. The Creative Style option found on either the Quick menu (accessed via the Fn button and multi selector, or via the C (custom) button if the Creative Style menu has been assigned to it) or on the first screen of the Record menus offers a selection of presets for varying subjects, including Standard (faithful color reproduction), Vivid (increased contrast, saturation and sharpness), Neutral (reduced contrast and saturation), Portrait (optimized skin tones), Landscape (optimized daytime outdoor scenery), and Black & White.
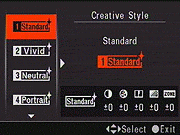 The six options just mentioned are available by default in the main Creative Style list. There are another seven options though, that can be swapped in for any of the six defaults. The screen shot at right shows this being done, the "Clear" style being substituted for the Standard one. With the Creative Style menu up, you can use either the multi selector or the control dials to move right (selecting the name of the style at the bottom of the right pane), then move up or down to step through the full list of creative styles available. Exit the Creative Style menu or just press the shutter button, and whatever choice was selected will remain.
The full list of Creative Styles is quite extensive. Besides the six named above, there are Clear (for "capturing images in a clear tone with limpid colors, suitable for capturing radiant light"), Deep (for "capturing images with deep and dense color expressions"), Light (for "capturing images with bright and uncomplicated color expressions, suited to capturing refreshingly light ambience"), Sunset (emphasizing the red colors of sunsets), Night View (reducing contrast to render night scenes more faithfully to the way our eyes see them), Autumn Leaves (highlighting red and yellow tones), and Sepia (monochrome, but with a brownish "sepia" color cast).
Within each Creative Style, you can adjust a number of imaging parameters, including contrast, saturation, sharpness, brightness, and something Sony calls "Zone". All the options seem pretty self-explanatory, but Zone is a little odd, and Sony doesn't give much of an explanation. The range of settings for Zone run from -1 to +2. It seems that Zone adjusts the A900's tone curve: Higher settings shift the image's histogram to the left, to prevent overexposure of highlights, while lower numbers seem to push it to the right, to prevent shadows from plugging.
Interesting to note is the way the Sony A900 lets you arbitrarily assign Creative Style options to the 6 preset "slots" is that you can have more than one of the slots occupied with the same basic preset, but with different tweaks applied to it. For instance, you could have two versions of Standard programmed into slots 1 and 2, with the first being the camera's default, but the second having contrast and saturation boosted one notch each, and sharpness dialed down. This makes it easy to create a number of different presets that uniquely suit your shooting style and subject matter, and be able to switch between them rapidly while shooting.
 Sony A900 Flash
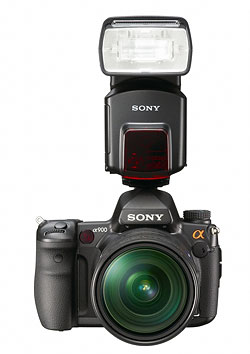
Thanks to its huge pentaprism, the Sony A900 has no built-in flash. (Sony felt it simply would have added too much bulk to an already large bulge on the camera's top. Plus, with some of the large full-frame lenses is likely A900 to be used with, a built-in flash would be bound to have problems with shadowing.) So the only option for flash on the Sony A900 is an external unit.
In that, you'll largely be restricted to Sony-brand flashes, at least if you want an intelligent flash that interacts with the camera's exposure system. (Although there are third-party units offering varying degrees of compatibility.) The Sony flash shoe is a proprietary design unlike the common hot shoe seen on other camera brands.
The good news though, is that Sony offers a good range of dedicated flash units, from the top of the line HVL-F58AM (seen at right, mounted on top of the A900) down to the entry-level HVL-F36AM (still not cheap at $199 list). Even better news is that all current Sony flash units have wireless capability, so you can combine them into complex lighting setups, with multiple off-camera flashes all controlled from the camera.
One of the more interesting design aspects of the new HVL-F58AM deserves mention. The heads on most external flash units tilt up and down for bounce operation off the ceiling for even illumination and also swivel to let you bounce the flash off a side or back wall for special lighting effects. But what about when you're holding the camera in portrait (vertical) orientation? The head that would previously tilt up to bounce off the ceiling will now only point to the side. You might be able to swivel it to point back up at the ceiling, but your control over the bounce angle won't be as good as when in normal landscape mode.
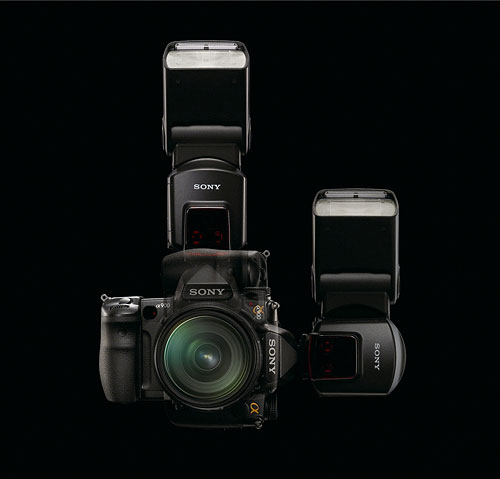
As shown above, the new Sony HVL-F58AM swivels in an entirely different way, with the whole head rotating in a plane parallel to the back of the camera. This lets it work the same way for normal ceiling-bounce operation, regardless of whether the camera is in landscape or portrait mode. Slick! (We expect to see other flashes copy this design at some point.)
The images above were taken from our standardized test shots. For a collection of more pictorial photos, see our Sony Alpha DSLR-A900 Photo Gallery .
Not sure which camera to buy? Let your eyes be the ultimate judge! Visit our Comparometer(tm) to compare images from the Sony Alpha DSLR-A900 with those from other cameras you may be considering. The proof is in the pictures, so let your own eyes decide which you like best!
 Fujifilm GFX 50S Review
 Fujifilm X-T3 Review
 Olympus E-M5 III Review

Follow Imaging Resource