Nikon Coolpix 5000Nikon moves into the 5 megapixel era with a new chip, new lens, and new body, but no retreat from the legendary Nikon feature set!<<Operation & User Interface :(Previous) | (Next): Image Storage & Interface>> Page 9:Camera Modes & MenusReview First Posted: 9/18/2001 |
Camera Modes and Menus
Shooting Mode: Unlike the Coolpix 995 before it, the 5000 doesn't have separate "auto" and "manual" modes. A rear-panel switch selects between shooting and playback modes, but the common"auto" and "manual" options in shooting mode are selected via "User Setting" option, rather than an external knob setting, as in the 995 and other Nikon cameras. - This is a little less straightforward, and I confess initially left me confused as to how to access all the exposure controls and sophisticated options the 5000 offers. (I had to actually look at the manual. The shame, the shame... ;-) See the notes on Shooting Mode Screen 1 below for more details on this. The shooting menu options are divided into three screens, with functions as described below:
Screen One
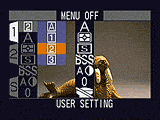 User Setting: When you first power the camera up, it's in a fully-automatic mode, and none of the sophisticated options are available.(They simply don't appear on the menu system at all.) In this mode, hitting the Menu soft key brings up the Setup menu, with User Setting highlighted as a default option. Selecting 1, 2, or 3 instead of the default A (Auto) enables full camera controls, showing the expanded menu system shown in the screenshots here. The three User settings let you save completely different camera setups that include such things as white balance, focus modes, metering modes, etc, and then rapidly switch between them. A good system overall, but I bet it'll stump a lot of new owners until they read the manual. The 995 had a User Setting option as well, but you didn't have to make an explicit selection to enable the camera's manual controls.
- White Balance: Displays a sub-menu with seven white balance options: Auto, White Balance Preset, Fine (Outdoors), Incandescent, Fluorescent, Cloudy, and Speedlight (flash balanced).
- Metering: Offers 256 Segment Matrix, Spot, Center-Weighted, and Spot AF Area metering options.
- Continuous: Offers six "motor-drive" options: Single exposure, Continuous High Speed, Continuous Low Speed, Multi-Shot 16, High Speed Sequence, Ultra-High Speed, and Movie. (See the Exposure section of this review for more information on each of these modes.)
- BSS: Turns the Best Shot Selector function on or off.
- Image Adjustment: Lets you alter the camera's tonal response, with options of Auto, Normal, More Contrast, Less Contrast, Lighten Image, and Darken Image.
- Saturation Control: Controls the amount of color saturation, and includes a black and white monochrome mode.
Screen Two
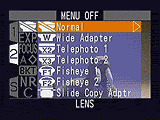 Lens: Sets up the camera's zoom and autofocus for use with Nikon's auxiliary lenses. Lets you select between Normal (built-in lens), Wide Adapter, Telephoto 1 (a 2x adapter), Telephoto 2 (a 3x adapter), Fisheye 1, Fisheye 2, and Slide Copy Adapter options to accommodate the specified accessory lens. The different options adjust various exposure and zoom setting options to best accommodate the chosen lens.
- Exposure Options: Controls the AE Lock function, as well as the maximum bulb exposure duration. (The default is one minute, and you can optionally set it to permit exposures as long as 5 minutes.)
- Focus Options: Selects between AF Area Modes (Auto, Manual, or off), Autofocus Modes (Continuous or Single AF), Focus Confirmation (MF, On, Off), and Distance Units (feet/meters) focusing modes.
- Image Sharpening: Adjusts the in-camera sharpening to Auto, High, Normal, Low, or Off.
- Auto Bracketing: Accesses the Auto Bracketing and White Balance Bracketing functions.
- Noise Reduction : Activates the Noise Reduction feature for shooting in low-light situations. Also enables "Clear Image Mode", for smoother tonal gradations and lower image noise when shooting lower-resolution images. (Note that Clear Image Mode" forces the camera to SXGA resolution if a larger image size was previously selected.)
- Reset All: Resets all the menu options to factory defaults (it also (fortunately) gives you an option to back out if you decide you want to).
Setup Screen
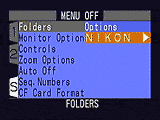 Folders:
Brings up a sub-menu that lets users create, delete, and rename image storage
folders in separate groups (much like the 990). This also lets users select
which folder images will be saved to.
Folders:
Brings up a sub-menu that lets users create, delete, and rename image storage
folders in separate groups (much like the 990). This also lets users select
which folder images will be saved to.
- Monitor Options: Displays a sub-menu to adjust both the brightness
and hue of the LCD monitor display, or change the display mode (options are
Monitor On, Review Only, Preview Only, Monitor Off).
- Controls: Customizes the controls of the camera. Options are Memorize,
Func, and AE-L/AF-L
- Memorize - Controls which settings made by the user remain in memory when the power is turned off. flash mode, focus mode, exposure mode, and exposure compensation can all be independently selected to be memorized, or reset to their defaults when the power is cycled.
- Func - Choose which of a variety of functions are assigned to the top-panel "Func" button. Functions available for assignment include user setting, focus mode, flash mode, white balance, and metering pattern.
- AE-L/AF-L - Lets you choose whether the AE-L/AF-L button locks exposure,
focus, or both.
- Zoom Options: Activates digital telephoto, also lets you select the
Fixed Aperture zoom option, which keeps the lens aperture at the same setting
as the lens zooms.
- Auto Off: Allows users to set the auto-off delay to 30 seconds, or
1, 5, or 30 minutes.
- Seq. Numbers: Turns the file numbering sequence option on or off,
as well as resets the current sequence.
- CF Card Format: Formats the CompactFlash card and erases all folders
and images (even protected ones).
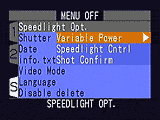
- Speedlight Option: Displays a sub-menu of flash adjustments. You
can adjust the flash intensity to +/- 2 exposure equivalents (EV) in one-third
step increments, as well as set up the internal and/or external Speedlight
options (both active or internal flash off). I applaud the inclusion of variable
flash power, but really dislike having it buried this deeply in the LCD menu
system. There's also a Shot Confirmation setting, which fires the flash at
low intensity after the shutter trips, as a way of letting your subjects
know the shot has been taken.
- Shutter Sound: Turns the shutter annunciator on or off.
- Date: Sets the camera's internal date and time.
- Info txt: Activates or deactivates the Information Text option, which
records a separate image information text file to accompany the images. The
text file includes information such as filename and exposure information.
(Handy for recording detailed exposure data!)
- Video Mode: Establishes the video format as NTSC or PAL.
- Language: Changes the menu language to German, English, French, or
Japanese.
- Disable Delete: Just what the name says: Disables deletion of photos, through any means, including the delete button or card formatting. (Very handy if you want to let an inexperienced user handle the camera, with your precious vacation photos on the memory card.)
Playback Mode: Accessed by flipping the rear-panel mode switch to the "Play" position, this mode lets you view captured images and movies. The right and left arrow buttons scroll through images while the zoom control magnifies the image, or lets you view an "index" display of 4 or 9 images at a time.The AF button becomes the Delete button for quick image deletion. Pressing the Menu button in this mode calls up the Playback settings menu:
Screen One
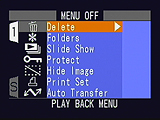 Delete: Erases the Selected Image, All Images, Print Set, or transfer marking. (A "Print Set" refers to the set of images currently marked for printing, using the DPOF (Digital Print Order Format), while transfer marking refers to images which have been marked for automated upload to your computer.)
- Folders: Lets you create, delete, or rename folders on the memory card, as well as select the playback folder from a list.
- Slide Show: Starts a slide show playback of all images in a folder and lets set the interval between frames (2, 3, 5, 10 seconds).
- Protect: Write-protects individual images from accidental erasure (except from card formatting).
- Hide Image: Hide selected images from the playback view.
- Print Set: Marks individual images for printing on a DPOF compatible device.
- Auto Transfer: Specifies whether the Nikon View software will automatically transfer files from the camera when connected.
Setup Screen
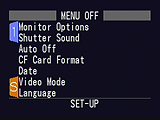 Monitor Options: Displays a sub-menu that allows users to adjust the brightness and hue of the LCD monitor display.
- Shutter Sound: Enables/disables the shutter annunciator.
- Auto Off: Allows users to set the auto-off delay to 30 seconds, or 1, 5, or 30 minutes.
- CF Card Format: Formats the CompactFlash card and erases all folders and images.
- Date: Sets the camera's internal date and time.
- Video Mode: Selects either NTSC or PAL video timing.
- Language: Changes the menu language to German, English, French, Japanese, or Spanish.

Follow Imaging Resource: