The "Corduroy Effect"
By Dave Etchells
This section of our review refers to a phenomena that affected a number of early production samples of the D200. It seems that the problem has now been fully addressed by Nikon, as current production models don't seem to manifest the problem. (It's not clear what Nikon did to fix the issue, whether it was simply a matter of a firmware and calibration tweak, or whether it required changes to the circuitry or sensor. If your camera manifests this problem, contact Nikon service: You'll have to ship your camera to them, but they've been successfully addressing the issue for some time now.)
While this problem is apparently no longer an issue in current production, we've left this report attached to our review, for the sake of owners of early production samples who may only recently have encountered the problem. (It's generally only triggered by a very limited range of subject and exposure parameters.)
------------------------------
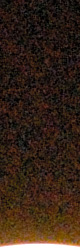
 In his User Report, Shawn mentioned mentioned that there was one qualifier in his otherwise high praise of the Nikon D200. The issue has to do with what has been called "banding" by various users who've encountered it, but which I've chosen to refer to as the "corduroy effect" -- The term "banding" in the past has been more commonly applied to quantization effects in images (also called posterization), which is a very different phenomena than we're seeing in the D200. With the D200, the effect most often manifests as alternating light and dark streaks extending on either side of significantly overexposed objects against medium-dark backgrounds. The streaks are oriented across the narrow dimension of the frame, and are two pixels wide. The crop at right shows a 1:1 crop from a frame showing the worst-case instance we've been able to generate in our test lab.
I admit to having somewhat mixed feelings about discussing this issue here to the extent that I'm about to: As best as we can tell, the effect only occurs under a specific and very limited set of exposure conditions, and many D200s on the market in fact may not show the effect at all. By devoting as much coverage to it as we are, we may be making a bigger deal of it than it deserves. Bottom line though, while it may be a non-issue for many photographers, we felt it important to let our readers know as precisely as possible the range of conditions under which the problem may occur, so everyone can (a) decide for themselves whether it would be an issue relative to their own tastes, shooting style, and typical subjects, and (b) know how to trigger it in their own cameras, so they can determine to what extent it manifests or not in their particular units.
As I write this (19 January, 2006), Nikon is looking very closely at images that we've sent them to determine what's going on and what might be done about it, but we haven't yet heard their response. We'll of course pass along to our readers anything we hear from Nikon.
Keeping in mind the forgoing caution that this may be more molehill than mountain, here's what we currently know about the effect and the very specific conditions under which it occurs:
- It is very ISO-dependent, invisible (in the cameras we've seen at least) at ISO 100, becoming more prominent up to about ISO 400, and then diminishing again at higher ISO levels.
- It is most commonly triggered by a moderately-sized area of significant overexposure (more than 1.5-2 stops beyond the level that produces luminance values of 255) Small catchlights don't seem to trigger it. More extreme overexposures (more than about 5 stops beyond being blown out) don't seem to trigger it either.
- There needs to be a dark but not totally black area immediately adjacent to the overexposed area. (We found it most easily in areas with luminance levels between about 40 and 120.)
- There needs to be a fairly crisp, abrupt edge between the overexposed region and adjacent darker area.
- The effect is much more visible in images processed from NEF files through Nikon Capture 4 than in images captured as in-camera JPEGs.
- There's quite a range of variation between cameras. Some may show it , others may not, even under "worst case" conditions.
- In at least one instance we've seen on the internet, a faint pattern of alternating stripes covered the entire frame, even in areas far from any significant light overload. (This was a night shot with a fairly long exposure, but we don't know the specifics of the exposure.) Thus far, this appears to be a relatively rare occurrence.
- There may be some sensitivity to the color of the light and type of light source. We've seen the problem manifest with both strobes and compact fluorescent lights, but weren't as successful at triggering it with ordinary incandescent lighting. Pointing the camera at the sun (or a strong reflection of it) also didn't produce the effect. Most cases that we observed involved very yellow-hued highlights, but we can't say conclusively that it might not occur with other colors as well.
We showed an example of the effect above, here's another look at it, this time comparing an in-camera JPEG with a JPEG created from a NEF file by processing in Nikon Capture 4. All controls in Capture 4 were left at their default values, and the image was saved using the "excellent" quality setting.
(Note that all the shots of the light bulb below were captured with the AF Micro Nikkor 60mm f/2.8 D lens. The same exposure level was used for all shots, corresponding to 1/80 sec and f/8.0 at ISO 400. All crops are 1:1 from the original ~10 megapixel image. Depending on your CRT's resolution, the images below are probably about twice life-size relative to a 13x19 inch print.)
| D200 "corduroy" artifacts JPEG vs NEF (ISO 400) |
|
 |
|
| In-camera JPEG "Optimal Quality" setting (JPEG) |
Converted from NEF Capture 4, all settings default saved at "excellent" quality (JPEG) |
The subject in these shots is a compact fluorescent bulb that's in the stairwell going down to our test studio. The camera was focused on an edge of the bulb from a distance of about eight feet. The color temperature of the bulb measured 3100K on my Minolta color meter. (Just in case it matters to anyone, the bulb in question is a Panasonic EFG23E28 23-watt globe light.)
As I noted above, the scope of the effect can vary quite a lot from camera to camera. The first sample of the D200 we received (serial number 0014) showed it to a much lesser extent than did a second sample (serial number 8487). The images below show the differing behavior of these two cameras, under identical shooting conditions. (ISO 400, 1/80 at f/8.0, Auto white balance.)
| D200 "corduroy" artifacts Variation between cameras (Identical exposure, ISO 400, auto WB, both processed from NEF) |
|
 |
|
| Serial Number 0014 (JPEG) (NEF) |
Serial Number 8487 (JPEG) (NEF) |
As you can see, while camera 0014 shows the problem slightly, you really have to squint to see it, even under worst-case conditions like these.
As I mentioned earlier that the effect seems to require both a significant overexposure across a noticeable area. In the shots above, the exposure parameters used were about 2.5 stops up from the level that would have just blown out the bulb, and the globe of the light bulb covered about 510 pixels vertically in the area from which the crop was taken. We began seeing the effect at an exposure level 1.5 stops up from the beginning of saturation, but not at levels lower than that. Interestingly, with very strong overexposure (somewhere around 5 stops past being blown out), the effect virtually disappeared. We also didn't find any evidence of it in specular highlights in portrait subjects' eyes from studio flash units.
As I also noted, the effect is very dependent on ISO. At ISO 100, neither camera we tested showed the effect under any shooting conditions we threw at it. As we increased the ISO, the effect appeared and became more prominent, until about ISO 400. Continuing to increase the ISO beyond that point significantly reduced the effect, most likely due to the more aggressive action of the camera's high-ISO noise reduction.
| D200 "corduroy" artifacts Variation with ISO (All processed from NEF, all from camera s/n 8487) |
|||||
 |
 |
 |
 |
 |
 |
| ISO 100 (JPEG) (NEF) |
ISO 200 (JPEG) (NEF) |
ISO 400 (JPEG) (NEF) |
ISO 800 (JPEG) (NEF) |
ISO 1600 (JPEG) (NEF) |
ISO 3200 (JPEG) (NEF) |
The examples we've shown above represent a somewhat artificial example. It's useful because it clearly illustrates the problem with a very well-controlled and repeatable subject. What about a more typical shooting condition, with catchlights on a real subject.
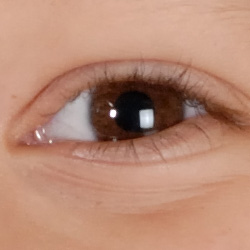
To explore this, Shawn shot a few photos of his daughter Anna holding one of her beauty-pageant trophies with his studio strobes. We figured that this would be a good example of the very common situation where a specular surface in the scene reflects a "catchlight" image of the light source directly back into the lens. (And before everyone points it out, no, you probably wouldn't ever be shooting portraits at ISO 400 under studio strobes. - The idea here was simply to shoot a more natural subject with a good range of tonal values and varying patterns of light and dark.)
| Studio strobe lighting ISO 400, processed from NEF Camera s/n 8487 |
|
| As Shot, From NEF (JPEG) (NEF) |
+0.43 EV Medium-High Sharpening From NEF (JPEG) |
 |
 |
 |
 |
 |
 |
 |
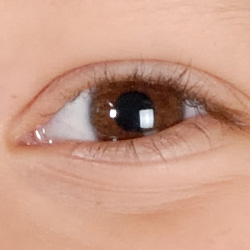 |
| Without tweaking the exposure or sharpening, the effect is visible but only if you know what to look for. Here, we can see a slight streaking in the folds of the trophy figurine's dress. The streaks from the larger of the two highlights on the figurine's sash cover a smaller area, but are a bit easier to see. No streaking at all can be found from the smaller highlights in Anna's eyes. | As you might expect, boosting exposure accentuates the effect, and sharpening makes the edges of the artifacts more visible on-screen. This version of the image was processed from the same NEF, but with an exposure boost of +0.43 EV and Medium-High sharpening applied. (All crops are 1:1 by the way, no scaling up or down has been applied.) |
The shot above shows that the effect can appear in "normal" subjects containing specular highlights, provided that the camera in question is one that's manifesting the behavior, and that you're shooting at ISO 400. I'll add my standard admonishment here about the importance of actually printing images to evaluate them, rather than just squinting at things at 200% on a CRT. When we printed these shots on our Canon i9900 "reference" printer, the striations weren't really visible until we hit a print size of 13x19 inches. There, they could be picked out fairly easily by a trained eye, but the average person viewing the print would probably be able to see them only if they were explicitly pointed out. (I couldn't see them at all until I was squinting at the image from a distance of about 8 inches -- not exactly the typical viewing conditions for a 13x19 inch print.)
Each prospective user will have to decide for themselves whether this is an issue or not: I'm sure there will be (even more) heated debate on this topic across the Internet in the weeks/months to come. Some will claim that all of the above is just an absurd level of nit-picking, while others will consider it a critical flaw. Even between Shawn and I, there's a difference of opinion. For my own shooting, I'd be perfectly content with a camera like serial number 8487, although knowing that a few of my shots might show miniscule artifacts would probably bother the perfectionist side of me. (Even though the chance of seeing this in any of my shots would probably be well under 0.01%.) If I had a camera like serial number 0014, I'd not give it the slightest thought. Shawn maintains that either camera would bother him if he'd just spent $1,700 for it. I don't dare say whether the majority of users would feel as either I or Shawn do, but will note that our experience has been that you really have to go looking for the phenomena to see it, and have to shoot at just the right ISO and lighting conditions to trigger it at all.
Footnote: What causes this?
Before closing out this section, I'll address this just to head off the inevitable emails: What is it about the Nikon D200 that produces this artifact? In order to clock the data off the array fast enough to produce its 5 frames/second full-resolution shooting speed, the D200's sensor engineers went with a design that reads out the data from both sides of the array simultaneously. Alternating pairs of columns of pixels are read out from side A or side B of the array. Under normal exposure conditions, both sets of readout circuitry are very well matched, producing a seamless final image. Under conditions of extreme light overload though, either the sense amps are slow to recover after the overload, or a there's small loss of charge transfer inefficiency (or some second-order effect involving the clamping circuitry that prevents charge blooming). Regardless of the precise cause, a severe light overload can affect nearby pixels in the same column, as the data is clocked across the array to be read out. Darker pixels following a large number of overloaded ones will be rendered as slightly lighter. If all the pixels were read out in the same direction, there'd be a slight smearing of the highlight on one side, but the effect would probably be slight enough that most users would dismiss it as lens flare of some sort. On the D200 though, because alternating pairs of columns are read out in opposite directions, pixels subject to the smearing effect are seen right next to pixels being read out in the opposite direction that haven't been affected by a light overload. The result is the pattern of alternating stripes that we've seen above.
Footnote: Can it be fixed?
As noted in the foreword to this section above, the good news is that Nikon's service organization appears to have been completely successful in eliminating this problem from cameras that exhibited it. Affected cameras have to be shipped to Nikon for repair (in other words, it's not as simple as a firmware change), but to our knowledge, such repairs have been entirely successful.
 Fujifilm GFX 50S Review
 Fujifilm X-T3 Review
 Olympus E-M5 III Review

Follow Imaging Resource