Panasonic G1 Image Quality
Color
Saturation & Hue Accuracy
Good color and hue accuracy overall, with only minor oversaturation of strong reds and blues. Some issues with orange through yellow, though.
 |
| In the diagram above, the squares show the original color, and the circles show the color that the camera captured. More saturated colors are located toward the periphery of the graph. Hue changes as you travel around the center. Thus, hue-accurate, highly saturated colors appear as lines radiating from the center. Click for a larger image. |
Saturation. The Panasonic G1 pushes reds and blues a fair bit, and dark greens slightly, while undersaturating lighter greens, cyans and oranges, but it doesn't oversaturate as much as most consumer DSLRs. The average saturation level is 104.9%, a 4.9% oversaturation, less than that of many competing consumer cameras. Most consumer digital cameras produce color that's more highly saturated (more intense) than found in the original subjects. This is simply because most people like their color a bit brighter than life.
Skin tones. Here, the Panasonic G1 also did well, producing natural-looking skin tones, though just slightly on the pinkish side. Where oversaturation is most problematic is on Caucasian skin tones, as it's very easy for these "memory colors" to be seen as too bright, too pink, too yellow, etc.
Hue. The Panasonic G1 did push cyan toward blue, red toward orange, and orange toward yellow. Shifts were relatively slight, but the net result is that colors in the orange through yellow range are less clearly delineated from each other than they would be with a camera having better hue accuracy. The yellow-toward-green shift was also slight, but a bit more apparent in strong yellows in our test images. Nonetheless, overall accuracy was still pretty good. (The blue to cyan shift is very common among the digital cameras we test; we think it's a deliberate choice by camera engineers to produce better-looking sky colors.) Hue is "what color" the color is.
Saturation Adjustment
The Panasonic DMC-G1 lets you adjust the image saturation, contrast, and sharpness in five steps each. As can be seen below, the saturation adjustment was pretty subtle. We usually argue in favor of more subtle adjustments for saturation on the cameras we test, the Panasonic G1 goes a bit too far in that direction; we'd like to see a bit wider range here.
| Saturation Adjustment Examples | ||
 |
 |
 |
| -2 | 0 | +2 |
The table above shows results with the default as well as the two "extreme" saturation settings. Click on any thumbnail above, then click again to see the full-sized image.
 |
 |
 |
| See full set of test images with explanations See thumbnails of all test and gallery images |
||
Sensor
Exposure and White Balance
Indoors, incandescent lighting
Very good performance: Slightly warm cast with Auto, very warm with Incandescent, good color with the Manual and 2,600 Kelvin white balance settings. Average positive exposure compensation required.
 |
 |
| Auto White Balance +0.3 EV |
Incandescent White Balance +0.3 EV |
 |
 |
| Manual White Balance +0.3 EV |
2,600 Kelvin +0.3 EV |
Indoors, under normal incandescent lighting, color balance was just slightly warm with the Auto white balance setting, though the Panasonic G1 did much better than most digital SLRs in this regard. (While slightly warm, results with the Auto setting are quite acceptable, and many users will in fact prefer a slightly warm look in situations like this, to better represent the mood of the original lighting.) Results with the Incandescent setting were much warmer; the Incandescent setting looks like it might be adjusted to match professional studio lighting, a little odd for a decidedly consumer camera model. The Manual setting produced the most accurate results, though the 2,600 Kelvin setting wasn't far off the mark either, being just slightly cooler. The Panasonic G1 required an average amount of positive exposure compensation here, at +0.3 EV. Overall color looks good, though the blue flowers look a touch purplish, probably due to the DMC-G1's tendency to punch up reds a little. ((Many digital cameras reproduce the blue flowers here with more of a purplish tint, so the Panasonic G1 actually performs a little better than average here.) Our test lighting for this shot is a mixture of 60 and 100 watt household incandescent bulbs, a pretty yellow light source, but a very common one in typical home settings here in the U.S.)
Outdoors, daylight
Bright colors overall, though a tendency toward high contrast under harsh lighting. Slightly below average exposure accuracy.
 |
 |
| Auto White Balance, +0.7 EV |
Auto White Balance, Auto Exposure |
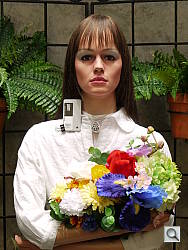
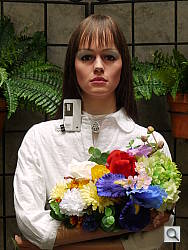
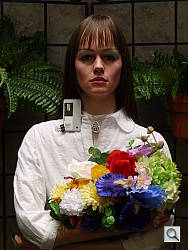
Outdoors, the Panasonic Lumix DMC-G1 performed pretty well, with good color but moderate overexposure in the outdoor far-field house shot. The Panasonic DMC-G1 required a bit more than the average amount of positive exposure compensation (+1.0 EV) to keep facial tones bright on the "sunlit" portrait test, but that resulting so many blown highlights that we opted for the +0.7EV shot for our sample image here. That left the model's face a little dark, but there were still a lot of blown highlights in her shirt. Default contrast is on the high side, but fortunately, there's a contrast adjustment to help compensate. Overall, good results here, especially when the contrast setting is turned down (see below), but we'd be happier if the camera had gotten closer to the optimal exposure setting on its own.
See full set of test images with explanations
See thumbnails of all test and gallery images
Resolution
Very high resolution, 1,700 ~ 1,800 lines of strong detail.
 |
 |
| Strong detail to 1,800 lines horizontal Camera JPEG |
Strong detail to 1,700 lines vertical Camera JPEG |
 |
 |
| Strong detail to 1,800 lines horizontal SilkyPix processed RW2 |
Strong detail to 1,800 lines vertical SilkyPix processed RW2 |
 |
 |
| Strong detail to 1,800 lines horizontal 2X target, Camera JPEG |
Strong detail to 1,700 lines horizontal 2X target, Camera JPEG |
 |
 |
| Strong detail to 1,800 lines horizontal SilkyPix processed RW2 |
Strong detail to 1,800 lines vertical SilkyPix processed RW2 |
 |
 |
| Strong detail to 1,900 lines horizontal ACR processed RW2 |
Strong detail to 1,800 lines vertical ACR processed RW2 |
Our laboratory resolution chart revealed sharp, distinct line patterns down to about 1,800 lines per picture height horizontally, and about 1,700 lines in the vertical direction in camera JPEGs. Extinction didn't occur until about 2,700 lines horizontally and vertically (results from 2X target are multiplied by 2). We weren't able to extract much more resolution by processing the G1's RW2 files using SilkyPix, but SilkyPix did hold definition in the target lines a bit better than the camera's own JPEG conversion did, boosting the vertical resolution to about 1,800 line, but making the target lines more distinct at all high frequencies. Adobe Camera Raw (version 5.2) was able to extract out a bit more resolution on the horizontal axis, at close to 1,900 lines, but matched SilkyPix on the vertical axis. Use these numbers to compare with other cameras of similar resolution, or use them to see just what higher resolution can mean in terms of potential detail.
See full set of test images with explanations
See thumbnails of all test and gallery images
Sharpness & Detail
Good sharpness overall, though slight edge-enhancement artifacts on high-contrast subjects. Moderate noise suppression visible in the shadows.
 |
 |
| Good definition of high-contrast elements with some visible sharpening artifacts. |
Subtle detail: Hair Noise suppression tends to blur detail in areas of subtle contrast. |
Sharpness. The Panasonic G1 captures fairly sharp images overall, though a few edge enhancement artifacts are visible on high-contrast subjects such as the branches in the crop above left. Edge enhancement creates the illusion of sharpness by enhancing colors and tones right at the edge of a rapid transition in color or tone.
Detail. The crop above right shows some moderate noise suppression artifacts in the darkest areas of the model's hair, smudging individual strands together, though quite a few strands are visible in the lighter shadows. Noise-suppression systems in digital cameras tend to flatten-out detail in areas of subtle contrast. The effects can often be seen in shots of human hair, where the individual strands are lost and an almost "watercolor" look appears.
RAW vs In-Camera JPEGs
As noted above, the Panasonic G1 produces fairly sharp in-camera JPEGs using the kit lens. As is almost always the case, quite a bit more detail can be obtained from carefully processing RAW files than can be seen in the in-camera JPEGs. The Panasonic G1's JPEGs are quite good straight from the camera, but it's surprising how much more detail is visible after processing in a good RAW converter. Take a look below, to see what we mean:

In the table above, mousing over a link at the bottom will load the corresponding crop in the area above. As of this writing (early November, 2008), Adobe Camera Raw (ACR) doesn't yet support the Panasonic G1, so all we have to compare with is the SilkyPix software that's bundled with the G1. SilkyPix appears to be a very sophisticated RAW processor that provides lots of control over the image processing it performs. In the crops above, we dialed up the sharpness setting in its demosaicing control panel somewhat, and then used the "Emphatic Sharpness" preset on its sharpening panel. We also applied unsharp masking at the output stage, with an intensity of 100% and radius of 0.3 pixel.
SilkyPix's processing is far from speedy; it busied-out both CPUs on my dual-core 2.3 GHz Mac G5 for a good 20-30 seconds to process each file. The results were quite impressive though, with very good color (ACR's color often leaves something to be desired, unless you develop custom profiles for your camera) and really excellent detail. As noted, it's far from a speedy package to work in, but it does offer batch processing, and patience in learning its settings will be rewarded. (As you can see above, though, SilkyPix's default exposure and color settings did result in a rather different tone curve and sky color, when compared with the original camera file.)
Update 11/25/08: Added ACR 5.2 converted RAW file. Mouse over the links to compare crops, and click the link to download the full image.
ISO & Noise Performance
Low noise up to ISO 400, moderate to high at higher ISOs.
|
Default High ISO Noise Reduction
|
 |
 |
 |
| ISO 100 | ISO 200 | ISO 400 |
 |
 |
 |
| ISO 800 | ISO 1600 | ISO 3200 |
The Panasonic G1's images are quite clean at ISOs 100 and 200; no complaints here. We start to see a very fine, tight "grain" pattern at ISO 400, but detail is still pretty good, with just a bit of chroma noise creeping into the shadows. The grain is slightly more evident at ISO 800, there's more chroma noise and detail starts to suffer due to noise reduction. At ISO 1,600, we see additional detail loss, purple and yellow blotches, and subtle signs of some horizontal banding in shadow areas. At ISO 3,200, noise grain is much courser and blurring stronger, resulting in a noticeable drop in detail with more obvious horizontal banding. Overall, we were impressed with the Panasonic G1's high-ISO performance: It seems that Panasonic has learned a few new tricks for noise processing, as the G1's high-ISO images are markedly improved over those of the earlier DMC-L1, despite the G1's smaller pixels, and are generally better-looking than we've come to expect from Four-Thirds format cameras in the past. (Olympus' new E-520 does pretty well too, but it has somewhat larger pixels and a coarser grain to its noise patterns.)
Extremes: Sunlit and low light tests
High resolution with good overall detail, but somewhat high default contrast and limited dynamic range. Good low-light performance, but metering and autofocus struggled at bit at lower light levels.
 |
|
 |
| +0.3 EV | +0.7 EV | +1.0 EV |
Sunlight. The Panasonic Lumix DMC-G1 struggled a bit with the deliberately harsh lighting of this test, as contrast was a little high at its default setting, and the dynamic range seemed limited. Although we liked the tones in the model's face better at +1.0 EV with the default contrast, we preferred the +0.7 EV exposure overall, as the +1.0 EV shot left so much of the shirt blown out. Depending on the photographer, you could lean one way or the other, pros and advanced users would want to shoot darker, to hold highlight detail. For those DMC-G1 owners that are going to want to just print an image, the +1.0 image would probably produce a better-looking print with little or no tweaking. The bottom line though, is that the G1 had difficulty with the wide dynamic range of this shot.
Because digital cameras are more like slide film than negative film (in that they tend to have a more limited tonal range), we test them in the harshest situations to see how they handle scenes with bright highlights and dark shadows, as well as what kind of sensitivity they have in low light. The shot above is designed to mimic the very harsh, contrasty effect of direct noonday sunlight, a very tough challenge for most digital cameras. (You can read details of this test here.)
Contrast Adjustment
As mentioned previously, the camera's limited contrast adjustment was at least some help in handling the harsh lighting.
|
Minimum Contrast
|
|
 |
 |
| Contrast set to lowest, +1.0 EV |
Contrast set to lowest, Auto Exposure |
At its lowest contrast setting, the Panasonic G1 did a better job of preserving highlight detail, maintaining fairly natural-looking skin tones, and holding more in the shadows, but the limited dynamic range makes it perform a bit below average in this regard.
| Contrast Adjustment Examples | ||
 |
 |
 |
| -2 | 0 | +2 |
The shots above show the results of the minimum, default and maximum contrast settings. While you can see the extremes, it's pretty hard to evaluate small differences in contrast on small thumbnails like these, click on any thumbnail to go to the full-size image. That said, like the Saturation adjustment, the control for Contrast is a bit subtle in its effect. It seems to basically leave the strongest highlights alone, and then apply a proportional boost to tones as it moves down the tone curve. To make the most of it in a shot like this, you'd want to drop the exposure to hold the highlights and then apply a good slug of contrast reduction (probably the maximum, the steps are pretty small).
The Panasonic G1's contrast adjustment helps a little with the strong highlights here, but we'd really like to see more steps of this size, to cover a slightly greater range. - And even with the lowest contrast setting, the dynamic range isn't terribly impressive: While dropping the exposure slightly helped the highlights, and the contrast adjustment opened up the shadows somewhat, the camera still struggles with the deliberately harsh lighting. (Which means it will also have issues with strong, direct sunlight.)
| Intelligent Exposure Examples | ||
 |
 |
 |
| Low at +0.3 EV | Standard at +0.3 EV | High at +0.3 EV |
 |
||
| Off at +0.3 EV | ||
 |
 |
 |
| Low at 0 EV | Standard at 0 EV | High at 0 EV |
 |
||
| Off at 0 EV | ||
Panasonic's iExposure
The above shots are examples of Panasonic's Intelligent Exposure (or iExposure) at work. There are three levels of iExposure available: Low, Standard and High, plus Off. The results here were a little unexpected; not so much in terms of what the function was doing as in how it varied when varying the settings from low to high.
To its credit, even with no exposure compensation at all, the Standard and High settings produced quite decent exposures with this very harsh lighting. The Low setting was the surprise: Its results were almost what we would have expected from the High setting: Shadows were opened up considerably, while highlights were either left alone or held back a little. The result is a little unnatural, kind of like using too much of the highlight/shadow tool in Adobe Photoshop. Standard and High appeared to boost the highlights some as well, producing more local contrast, but also losing detail in some of the highlights.
With a positive exposure compensation setting of +0.3 EV, though, the Intelligent Exposure control seemed to blow out the highlights about equally with all three active settings (low/standard/high). It did significantly brighten the shadows, and we suspect consumers would be happier with results from any of the three settings than they would be with the default exposure.
While this is only a very limited test of Intelligent Exposure's abilities, we think it will be welcomed by many consumers, as it takes some of the burden for adjusting exposure compensation off the shoulders of the user.
| Face Detection | ||
 |
 |
|
| Off at 0 EV | On at 0 EV | |
Face Detection
Just like most Point & Shoot cameras these days (and some DSLRs in Live View mode), the Panasonic G1 has the ability to detect faces, and adjust exposure and focus accordingly. The G1 does it automatically in Intelligent Auto (iAuto) mode, when a Portrait scene mode is selected, or when Face Detection AF mode is selected. As you can see from the examples above, it really works, as the image with face detection enabled is better exposed for the face, however we'd prefer a slightly higher exposure as the mannequin's face is still a touch dim. Panasonic says the system can detect up to 15 faces in a scene, though we did not test that claim.
| 1 fc 11 lux |
1/2 fc 5.5 lux |
1/4 fc 2.7 lux |
1/8 fc 1.3 lux |
1/16 fc 0.67 lux |
1/16 fc 0.67 lux NR=-2 |
1/16 fc 0.67 lux NR=0 |
1/16 fc 0.67 lux NR=+2 |
|
|---|---|---|---|---|---|---|---|---|
| ISO 100 |
1.6 sec f3.5 |
2.5 sec f3.5 |
5 sec f3.5 |
15 sec f3.5 |
30 sec f3.5 |
30 sec f3.5 |
30 sec f3.5 |
30 sec f3.5 |
| ISO 200 |
0.8 sec f3.5 |
1.3 sec f3.5 |
2.5 sec f3.5 |
8 sec f3.5 |
15 sec f3.5 |
15 sec f3.5 |
15 sec f3.5 |
15 sec f3.5 |
| ISO 400 |
0.4 sec f3.5 |
0.6 sec f3.5 |
1.3 sec f3.5 |
4 sec f3.5 |
8 sec f3.5 |
6 sec f3.5 |
8 sec f3.5 |
8 sec f3.5 |
| ISO 800 |
1/5 sec f3.5 |
0.3 sec f3.5 |
0.6 sec f3.5 |
1.6 sec f3.5 |
4 sec f3.5 |
4 sec f3.5 |
4 sec f3.5 |
4 sec f3.5 |
| ISO 1600 |
1/10 sec f3.5 |
1/6 sec f3.5 |
0.3 sec f3.5 |
1 sec f3.5 |
2 sec f3.5 |
2 sec f3.5 |
2 sec f3.5 |
2 sec f3.5 |
| ISO 3200 |
1/20 sec f3.5 |
1/13 sec f3.5 |
1/6 sec f3.5 |
0.5 sec f3.5 |
1 sec f3.5 |
1 sec f3.5 |
1 sec f3.5 |
1 sec f3.5 |
Low light. The Panasonic DMC-G1 performed reasonably well in our low light test, capturing acceptably bright images down to the lowest light level we test at, at all ISO settings. This equates to about 1/16 the brightness of average city street lighting at night, so the DMC-G1 should be able to take well-exposed photos in almost any environment you can see well enough to walk around in. The G1's metering at these low levels wasn't very reliable though, as can be seen from the somewhat uneven exposures. Color balance was pretty good, though. The G1 offers 5 levels of noise reduction. We show results for the lowest light level at -2 (min.), 0 (normal) and +2 (max.) values in the three columns at the right-hand side above. Noise is low to moderate below ISO 800. At ISOs 800, 1600 and especially 3200, noise is rather high compared to most DSLRs these days, with some horizontal banding detectable in darker areas.
The camera's autofocus system was able to focus on the subject almost down to the 1/8 foot-candle light level unassisted, which isn't quite as good as most DSLRs. The DMC-G1 does have an autofocus-assist light option, which should help in darker situations as long as the subject is within range and has sufficient contrast.
How bright is this? The one foot-candle light level that this test begins at roughly corresponds to the brightness of typical city street-lighting at night. Cameras performing well at that level should be able to snap good-looking photos of street-lit scenes.
NOTE: This low light test is conducted with a stationary subject, and the camera mounted on a sturdy tripod. Most digital cameras will fail miserably when faced with a moving subject in dim lighting. (For example, a child's ballet recital or a holiday pageant in a gymnasium.) Digital "SLRs" like the Panasonic G1 do much better than point & shoots, but you still shouldn't expect a quick autofocus lock with moving subjects. (A useful trick is to just prop the camera on a convenient surface, and use its self-timer to release the shutter. This avoids any jiggling from your finger pressing the shutter button, and can work quite well when you don't have a tripod handy.)
Output Quality
Print Quality
Great print quality, good color, sharp 13x19 inch prints from camera JPEGs, 16x20 inch ones from RAW files. (Even 20x30 prints from RAW are very usable for wall display.)
 The Panasonic G1's printed output is really impressive, but to get the best results, you really need to work from its RW2 RAW files. In-camera JPEGs are a little soft looking, due in part to conservative in-camera sharpening, but likely also in part to noise-reduction processing, even at low ISO settings. SilkyPix (the RAW processing software bundled with the Panasonic G1 - Adobe Camera Raw doesn't support it yet) reveals noticeably more fine detail, particularly in areas of subtle subject contrast. Sharpening the in-camera JPEGs helps some, but never brings out the detail in lower-contrast regions that SilkyPix finds in the RW2 files.
Working from RAW files, we felt that 20x30 inch prints would be entirely acceptable for display at any normal viewing distance: If we got up close and squinted, they were a little soft, but at normal viewing distances of more than a foot or so, they looked crisp and very detailed. The in-camera JPEGs might pass as 20x30s if viewed from a little distance, but looked entirely fine at 16x20, and sharp indeed when printed at 13x19.
ISO 800 shots made really great looking 13x19 inch prints, just slightly soft, and with a little chroma noise to be seen in the shadows. (A good third-party noise reduction program would likely make short work of the little we saw.) ISO 800 prints at 11x14 inches were tack-sharp. At ISO 1,600, we felt that 8.5x11 was really as large as most people would like to print, but that will depend a lot on the subject matter of your photos: ISO 1,600 images with more fine detail and fewer shadow areas would likely look just fine at 11x14. Increasing the noise reduction setting to +2 decreases both luminance and chroma noise, but some soft chroma still remains in shadows. Still, we suspect most users would be satisfied with the resulting 11x14 inch prints. At ISO 3,200, chroma noise becomes much more of an issue, making even 5x7 inch prints problematic if they have much shadow area. - But if you crank the noise reduction setting up to +2, 5x7 inch output looks pretty good, albeit still with some chroma noise visible in the shadows, which is visible even in 4x6 inch prints. (We'd definitely not push them to 8.5x11 output.)
Part of what makes the Panasonic G1's high-ISO shots print so well is that what noise is there is very fine-grained, so it tends to drop out quite nicely in the printing process. Looking at its images under high magnification, in areas were there's lots of subject detail (so the anti-noise processing will be dialed back somewhat), it's apparent that Panasonic has opted to leave a fair bit of fine-grained luminance noise in the final images, rather than trying to flatten it out. This can make parts of its images look rough when you're pixel-peeping at 100% or larger on-screen; but when printed, the images look great, with plenty of detail, and only modest amounts of noise.
We also found the Panasonic G1's prints very appealing when it came to color. Colors were bright and attractive, without appearing overdone. If there was any weak point, it might be in the G1's handling of colors in the yellow to yellow-green portion of the spectrum. Yellows were shifted slightly toward green, while the yellow-greens were shifted a bit toward yellow. The net effect wasn't anything like a glaring problem, it's just something we noticed in the colors of the embroidery threads in our Still Life target.
All in all, very impressive print quality from a little camera; The verdict is clear, you no longer have to carry a full-size SLR to get excellent print quality.
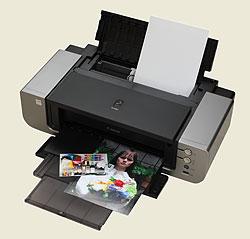
Testing hundreds of digital cameras, we've found that you can only tell just so much about a camera's image quality by viewing its images on-screen. Ultimately, there's no substitute for printing a lot of images and examining them closely. For this reason, we now routinely print sample images from the cameras we test on our Canon Pro9000 studio printer, and on the Canon iP5200 here in the office. (See the Canon Pixma Pro9000 review for details on that model.)
 Fujifilm GFX 50S Review
 Fujifilm X-T3 Review
 Olympus E-M5 III Review

Follow Imaging Resource