Sigma DP1 Exposure
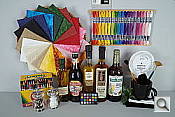
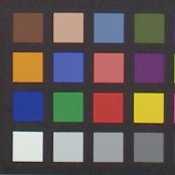
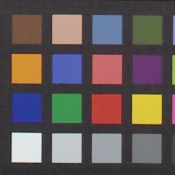
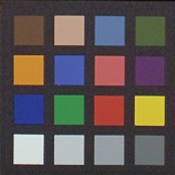
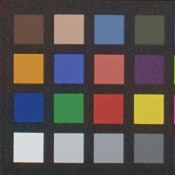
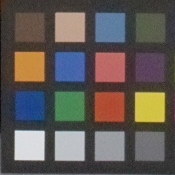
Color
Saturation & Hue Accuracy
Generally accurate but fairly muted color. Slightly green color cast in some shots.
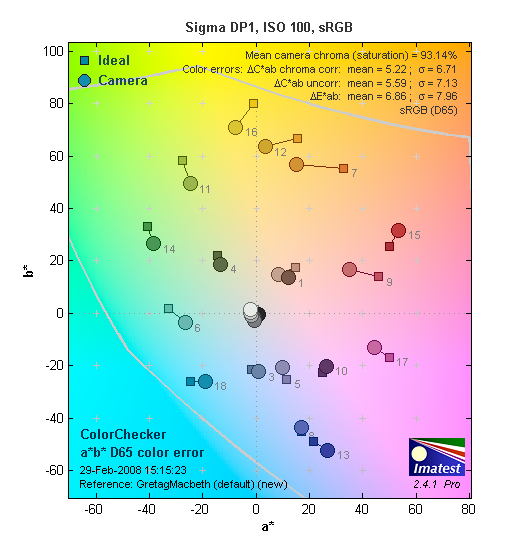 |
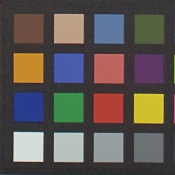
| In the diagram above, the squares show the original color, and the circles show the color that the camera captured. More saturated colors are located toward the periphery of the graph. Hue changes as you travel around the center. Thus, hue-accurate, highly saturated colors appear as lines radiating from the center. |
Saturation. The Sigma DP1 oversaturates some blues and reds, but undersaturates most other colors. While some may find the colors muted, even washed-out, they are more realistic than many cameras. Most consumer digital cameras produce color that's more highly saturated (more intense) than found in the original subjects. This is simply because most people like their color a bit brighter than life.
Skin tones. Caucasian skin tones from the DP1 were pretty good, though slightly flat and pale in most cases. Where oversaturation is most problematic is on Caucasian skin tones, as it's very easy for these "memory colors" to be seen as too bright, too pink, too yellow, etc.
Hue. The Sigma DP1 showed a few small color shifts relative to the correct mathematical translation of colors in its subjects, but had pretty good accuracy overall. Most noticeable in the plot above was a shift in orange toward yellow. You can also see a small shift in white towards green, resulting in a greenish cast that unfortunately gets stronger towards the edges of some images, as can be seen in our Multi Target shot. Hue is "what color" the
color is.
Saturation Adjustment
The Sigma DP1 has a total of eleven saturation settings available, five above and five below the default saturation. You'd think this many steps would cover a wide range of saturation levels, but the difference between each step is very subtle, which means the range isn't very much at all.
| Saturation Adjustment Examples | ||
 |
 |
 |
| -5 | 0 | +5 |
The table above shows results with the default as well as the two extreme saturation settings. Click on any thumbnail above, then click again to see the full-sized image or visit the Samples page to see more of the 11-step saturation series (DP1OUTSAT01.JPG - DP1OUTSAT11.JPG).
 |
 |
 |
| See full set of test images
with explanations See thumbnails of all test and gallery images |
||
Sensor
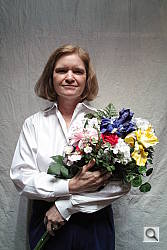
Exposure and White Balance
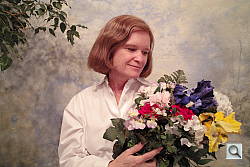
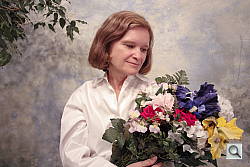
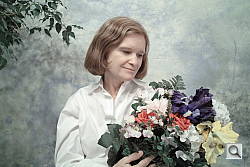
Indoors, incandescent lighting
Warm results with Auto and Incandescent settings, greenish cast with Manual White Balance. Average positive exposure compensation required.
 |
 |
| Auto White Balance +1.0 EV |
Incandescent White Balance +1.0 EV |
 |
|
| Manual White Balance +1.0 EV |
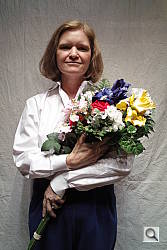
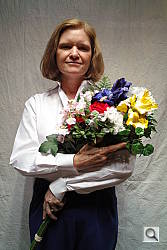
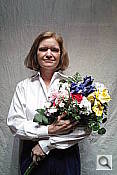
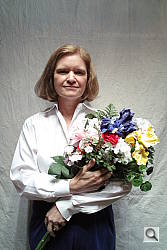
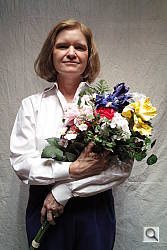
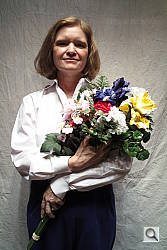
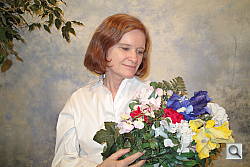
Indoors, under normal incandescent lighting, color balance was very warm with the Auto white balance setting, with a strong, reddish tint. The Incandescent setting was better, but also on the warm side, with more of a magenta tint. The Manual setting produced a very cool, flat result, with a yellow-green cast and washed-out colors in Marti's hair, skin and in the flowers. In the end, we preferred Incandescent setting the best. The Sigma DP1 required an average amount of positive exposure compensation here, at +1.0 EV. Despite the warm cast, overall color with the Incandescent white balance setting looks reasonable, though the blue flowers appear very purple. (Many digital cameras reproduce these flowers with a dark, purplish tint, so the Sigma DP1 performs about average here.) Our test lighting for this shot is a mixture of 60 and 100 watt household incandescent bulbs, a pretty yellow light source, but a very common one in typical home settings here in the U.S.
Outdoors, daylight
Slightly flat colors overall, with a tendency toward a warm cast and high contrast under harsh lighting. About average exposure accuracy.
 |
 |
| Auto White Balance, +0.7 EV |
Auto White Balance, Auto Exposure |
Outdoors, the Sigma DP1 tended toward a warmer color balance, and overall color was slightly flat. The DP1 performed about average in terms of exposure, requiring slightly less than the typical amount of positive compensation we're accustomed to seeing for the "Sunlit"outdoor portrait, but overexposing the house shot at default exposure. The DP1's default contrast is a little high, producing washed-out highlights and dark shadows under the deliberately harsh lighting of our portrait test shown above left. The camera's contrast settings do help to tame the highlights and shadows though (see below), but not as much as we'd like.
See full set of test images with explanations
See thumbnails of all test and gallery images
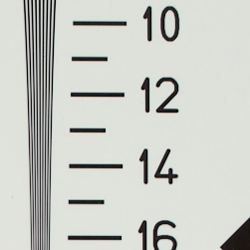
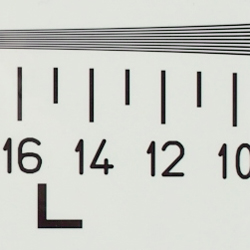
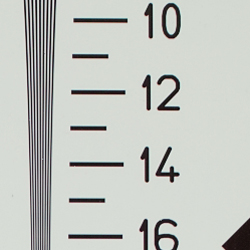
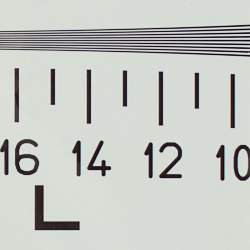
Resolution
High resolution, ~1,200 lines of strong detail from in-camera JPEG, about the same from processed RAW file.
 |
 |
| Strong detail to 1,200 lines horizontal Camera JPEG |
Strong detail to 1,200 lines vertical Camera JPEG |
 |
 |
| Strong detail to 1,200 lines horizontal Photo Pro processed X3F |
Strong detail to 1,200 lines vertical Photo Pro processed X3F |
Our laboratory resolution chart revealed sharp, distinct line patterns down to about 1,200 lines per picture height both horizontally and vertically. Extinction didn't occur before the 2,000 line limit of our chart, but a few of the lines do merge, from nine down to seven at 2,000. This is testament to the unusual nature of the Foveon sensor inside the Sigma DP1, as it currently takes an 8-megapixel camera with a bayer-pattern sensor to avoid complete extinction at 2,000 lines. When processing the DP1's X3F files using Sigma's Photo Pro (version 3.2.0.1007) raw converter, we got about the same resolution (perhaps slightly less, due to more sharpening artifacts), so the camera is doing a good job here. Use these numbers to compare with other cameras of similar resolution, or use them to see just what higher resolution can mean in terms of potential detail.
See full set of test images with explanations
See thumbnails of all test and gallery images
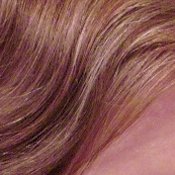
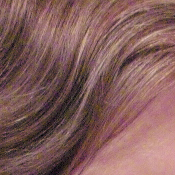
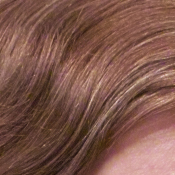
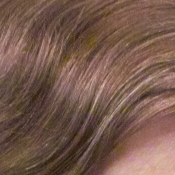
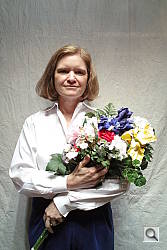
Sharpness & Detail
Sharp, detailed images overall, with very low edge-enhancement artifacts on high-contrast subjects. Some minor noise suppression visible in the shadows at base ISO.
 |
 |
| Excellent definition of high-contrast elements, with just slightly visible edge enhancement. |
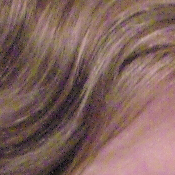
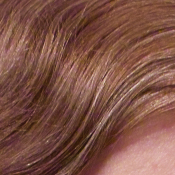
Subtle detail: Hair Noise suppression tends to blur detail in areas of subtle contrast, though detail remains strong in the darker parts of Marti's hair here. |
Sharpness. The Sigma DP1 captures sharp, detailed images overall, with very few edge enhancement artifacts visible on high-contrast subjects such as the crop above left. Edge enhancement creates the illusion of sharpness by enhancing colors and tones right at the edge of a rapid transition in color or tone.
Detail. The crop above right shows some minor noise suppression in the darkest areas of Marti's hair, though quite a few individual strands are visible in the lighter shadows. The camera's overall response here is better than average at base ISO. Noise-suppression systems in digital cameras tend to flatten-out detail in areas of subtle contrast. The effects can often be seen in shots of human hair, where the individual strands are lost and an almost "watercolor" look appears.
RAW vs In-Camera JPEGs
As noted above, the Sigma DP1 does a very good job at balancing between sharpness and visible sharpening artifacts in camera JPEGs. Processing RAW files with Sigma's Photo Pro resulted in just slightly improved detail and color at low ISOs, however dramatic improvements at higher ISOs.
In the table above, mousing over a link at the bottom will load the corresponding crop in the area above. Examples compare in-camera Fine JPEG to RAW file processed through Sigma's Photo Pro (version 3.2.0.1007) software. The latest version of Adobe Camera Raw (4.4.1) at the time of writing does not support the Sigma DP1.
Update: Added Adobe Camera Raw 4.6 conversion, with USM=250%, radius 0.3 sharpening applied.
ISO & Noise Performance (In-Camera JPEGs)
Low image noise at ISO 100, moderate to high noise at higher ISOs. Color errors and loss of saturation at higher ISOs as well.
| Portrait ISO Series | Still Life ISO Series | 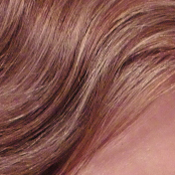 |
 |
| ISO 100 | |
 |
 |
| ISO 200 | |
 |
 |
| ISO 400 | |
 |
 |
| ISO 800 | |
The Sigma DP1 produced low image noise at ISO 100. Noise at ISO 200 was low to moderate, with brighter noise pixels and discoloration noticeable in shadow areas. The DP1 begins to struggle at ISO 400. Though detail is still good, there is much higher noise, a reduction in overall saturation, and more obvious magenta/green color blotches in darker areas. As expected, ISO 800 is worse, with further desaturation of color, a lot of chroma noise and blotchinesss, and a noticeable loss of detail. Even solid colors such as those in the color patch above have blotches of other colors at ISOs 400 and 800. A rather disappointing performance for a camera with a relatively large sensor, but perhaps an unfortunate side-effect of the stacked RGB photosites in a Foveon design, poor in-camera image processing or both. As always, see the Print Quality section below, to find out what the recommended maximum size print is at each ISO setting.
ISO & Noise Performance (RAW mode)
Much better noise results with processed RAW files, though greenish shadows and reduced saturation still present at higher ISOs.
| Portrait ISO Series | Still ISO Life Series | 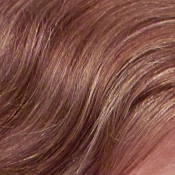 |
 |
| ISO 100 | |
 |
 |
| ISO 200 | |
 |
 |
| ISO 400 | |
 |
 |
| ISO 800 | |
There's not a lot of difference between processed RAW files and in-camera JPEGs at ISO 100, but at ISO 200 and above, results from RAW files are much improved. Noise is lower, there is better detail, and there is a less dramatic shift in overall color balance. Sigma's software is does a much better job than the camera at reducing noise while hanging onto fine detail at higher ISOs. Unfortunately, the problems of reduced saturation and greenish shadows remain at ISO 400 and especially ISO 800. There's also some color bleeding and slight vertical banding at ISOs 400 and 800. Still, if you plan on shooting at higher than the base ISO, using RAW really pays off with the DP1.
Extremes: Sunlit and low light tests
High resolution with strong overall detail, but high contrast with strong highlights. Mediocre low-light performance, limited by slow lens, insensitive autofocus, 15 second maximum exposure and high ISO noise.
 |
|
 |
| +0.3 EV | +0.7 EV | +1.0 EV |
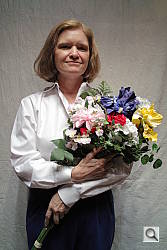
Sunlight:
The Sigma DP1 produced high contrast with slightly washed-out highlights and deep shadows under the harsh lighting of the test above. Shadow detail is limited, thanks to noise that smudges detail in the strong shadows. Marti's face was a little dim at +0.3 EV so we preferred the image with +0.7 EV of exposure compensation, while +1.0 EV resulted in far too many clipped highlights for our tastes. Be sure to use fill-flash in situations like the one shown above; it's better to shoot in the shade when possible.
Contrast Adjustment
We really like it when a camera gives us the ability to adjust contrast and saturation. It's even better when those adjustments cover a useful range, in steps small enough to allow for precise tweaks. While the Sigma DP1 provides lots of adjustment steps (eleven), the range is somewhat limited, especially on the low contrast side.
|
Minimum Contrast
|
|
 |
 |
| Contrast set to lowest, +0.7 EV |
Contrast set to lowest, Auto Exposure |
At its lowest contrast setting, the DP1 did a reasonably good job of preserving highlight detail, maintaining fairly natural-looking (if a bit pink) skin tones in out outdoor portrait shot, but it still produced deep shadows. The far field house shot still has some lost highlights with the contrast turned all the way down. The DP1 captures good color outdoors, though again, just slightly muted and on the warm side.
| Contrast Adjustment Examples | ||
|
 |
 |
| -5 | 0 | +5 |
The table above shows results with the default as well as the two extreme contrast settings. While you can see the extremes, it's hard to really evaluate contrast on small thumbnails like these, click on any thumbnail to go to the full-size image, or visit the Samples page to see more of the 11-step contrast series (DP1OUTCON01.JPG - DP1OUTCON11.JPG).
Because digital cameras are more like slide film than negative film (in that they tend to have a more limited tonal range), we test them in the harshest situations to see how they handle scenes with bright highlights and dark shadows, as well as what kind of sensitivity they have in low light. The shot above is designed to mimic the very harsh, contrasty effect of direct noonday sunlight, a very tough challenge for most digital cameras. (You can read details of this test here.)
| 1 fc 11 lux |
1/2 fc 5.5 lux |
1/4 fc 2.7 lux |
1/8 fc 1.3 lux |
1/16 fc 0.67 lux |
|
|---|---|---|---|---|---|
| ISO 100 |
4 sec f4.0 |
8 sec f4.0 |
13 sec f4.0 |
15 sec f4.0 |
15 sec f4.0 |
| ISO 200 |
2 sec f4.0 |
4 sec f4.0 |
6 sec f4.0 |
13 sec f4.0 |
15 sec f4.0 |
| ISO 400 |
1 sec f4.0 |
2 sec f4.0 |
3.2 sec f4.0 |
6 sec f4.0 |
15 sec f4.0 |
| ISO 800 |
0.5 sec f4.0 |
1 sec f4.0 |
1.6 sec f4.0 |
3.2 sec f4.0 |
6 sec f4.0 |
Low light. Limited by its 15 second maximum exposure and relatively slow f/4.0 lens, the Sigma DP1 struggled a bit with our low light test. It was able to capture usable images down to only about 1/4 foot-candle at its lowest sensitivity setting (ISO 100). The DP1 needed ISO 400 to capture a bright image at the lowest level we test (1/16 foot-candle), where there is quite a bit of noise in the form of random green and magenta pixels in darker areas of the target. There are also a few hot pixels to contend with at higher ISOs. Color balance looked pretty good with the Auto white balance setting at lower ISO settings, but noise gave images a greenish cast at higher ISOs. The camera's autofocus system also struggled in low light, only able to focus on the subject to just below the 1 foot-candle light level unassisted, and the DP1 does not have an AF illuminator to assist. Keep in mind that the longer shutter speeds here demand the use of a tripod to prevent any blurring from camera movement. (A useful trick is to just prop the camera on a convenient surface, and use its self-timer to release the shutter. This avoids any jiggling from your finger pressing the shutter button, and can work quite well when you don't have a tripod handy.)
How bright is this? The one foot-candle light level that this test begins at roughly corresponds to the brightness of typical city street-lighting at night. Cameras performing well at that level should be able to snap good-looking photos of street-lit scenes.
NOTE: This low light test is conducted with a stationary subject, and the camera mounted on a sturdy tripod. Most digital cameras will fail miserably when faced with a moving subject in dim lighting. (For example, a child's ballet recital or a holiday pageant in a gymnasium.) For such applications, you may have better luck with a dSLR camera, but even there, you'll likely need to set the focus manually. For information and reviews on dSLRs, refer to our SLR review index page.
Flash
Coverage and Range
Weak flash with somewhat uneven coverage. Slightly above-average positive exposure compensation required.
 |
|
| 28mm equivalent | |
 |
 |
| Normal Flash, +1.3 EV | Slow-Sync Mode, +1.0 EV |
Coverage. Flash coverage was a bit uneven at wide angle, with moderate fall-off in the corners of the frame. Indoors, under incandescent background lighting, the Sigma DP1's flash required a slightly above-average positive exposure compensation of +1.3 EV for a reasonably bright image. The camera's Slow-Sync flash mode produced more even results at +1.0 EV exposure setting, albeit with a stronger yellow-orange cast from the room lighting.
ISO 100 Range. The Sigma DP1's flash range is only rated to 4.92 feet at ISO 100, while our standard flash range test starts at 6.0 feet, so we didn't shoot our usual flash range series.
| Manufacturer-Specified Flash Range |
|---|
 5.0 feet ISO 100 |
Manufacturer-Specified Flash Test. The Sigma DP1's flash range is rated with a Guide Number of 6 meters at ISO 100. That works out to about 4.92 feet at maximum aperture, which is f/4.0. In the shot above, the DP1 seems to perform almost as well as Sigma says it will, producing a usable (albeit slightly dim) exposure at the rated distance with its ISO set to 100.
Note: Our standard test method for flash range uses a fixed setting of ISO 100, to provide a fair basis of comparison between cameras. With the above test, we're also looking at whether their stated specification rings true.
Output Quality
Print Quality
Great print quality, good color, sharp 11 x 14-inch prints.
 The Sigma DP1's printed output is unusual for a 4.6-megapixel camera. JPEG printed results follow a predictable route. Starting at 13x19 inches, ISO 100 images are too jaggy to be acceptable. Though you can still see jaggies if you look closely, detail at 11x14 is quite good at just a foot away. This remains true at ISO 200, and though ISO 400 images are soft at this size, and chroma noise is creeping into the shadows, results are still quite good. Noise becomes negligible at 8x10. ISO 800 images are sharp at 8x10, but larger blobs of chroma noise have crept into the shadows and darker areas. This again diminishes at 5x7.
RAW results are quite different, with high quality showing at 11x14 inches from ISO 100 to ISO 800. Though luminance noise is present at 400 and 800, the output looks quite natural. Since I used Sigma Photo Pro's default settings, color fades slightly as you move up the ISO ladder, but this can be tweaked in the SPP's settings. It's significant that you can print 11x14-inch images from ISO 800, this 4.6-megapixel digital camera's highest setting.
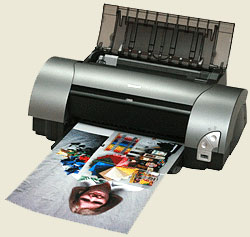
Testing hundreds of digital cameras, we've found that you can only tell just so much about a camera's image quality by viewing its images on-screen. Ultimately, there's no substitute for printing a lot of images and examining them closely. For this reason, we now routinely print sample images from the cameras we test on our Canon i9900 studio printer, and on the Canon iP5200 here in the office. (See the Canon i9900 review for details on that model.)
The images above were taken from our standardized test shots. For a collection of more pictorial photos, see our Sigma DP1 Photo Gallery .
Not sure which camera to buy? Let your eyes be the ultimate judge! Visit our Comparometer(tm) to compare images from the Sigma DP1 with those from other cameras you may be considering. The proof is in the pictures, so let your own eyes decide which you like best!
 Fujifilm GFX 50S Review
 Fujifilm X-T3 Review
 Olympus E-M5 III Review

Follow Imaging Resource