Olympus EVOLT E-510 Design
With a burly grip and a good set of controls, the Olympus EVOLT E-510 is a true digital SLR, with full manual and semi-automatic controls, yet its automatic options are friendly to novices. Featuring an interchangeable lens mount, a host of exposure controls, and 18 Scene modes, the E-510 is among the smaller semi-pro SLRs on the market. The Olympus E-510 is set apart by its Live View LCD display, refined and simplified since the E-330. The optical viewfinder is a true optical viewfinder, but you also have the option of enabling the LCD monitor's Live View mode, which offers a view that digicam owners have grown accustomed to. A plastic body surrounds the E-510's aluminum die-cast chassis, which weighs in at 1.7 lbs, (775 grams) including the lens, CF card, and battery. Measuring 5.4 x 3.6 x 2.9 inches (138 x 91 x 74mm), the Olympus E-510 is not quite jacket-pocketable like its brother the E-410.
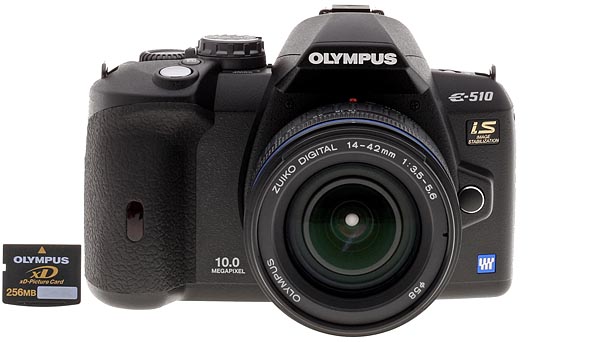
The front of the Olympus E-510 features the lens mount, self-timer LED / IR remote sensor window, and the lens release button. The good-sized handgrip is covered with a textured, leathery material that clings to your fingers as they wrap around the camera.

Visible on the right side of the camera is the Compact Flash and xD-Picture Card compartment. The media compartment opens from the rear panel, with a hinged, hard-plastic door that snaps shut securely. You can also see the camera strap lugs jutting out from the top deck.
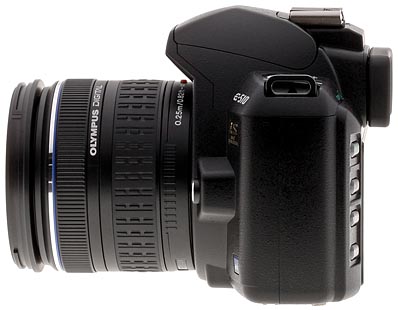
The opposite side of the E-510 has no controls, but the left camera strap lug is visible from here.
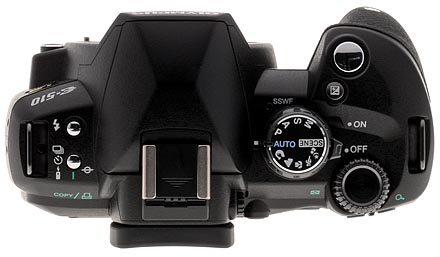
The Olympus E-510's top panel has quite a few controls on it, including the Shutter button, EV button, Power switch, Pop-up flash button, Remote control/self-timer/continuous shooting mode/copy/print button and the Mode and Control dials. Also on the top panel are the pop-up flash unit and external flash hot shoe. The viewfinder diopter adjustment wheel is visible to the right of the viewfinder. A small blue LED flashes when the camera is powered on, indicating that the SSWF (Super Sonic Wave Filter) is operating to remove dust from the sensor.

The rest of the Olympus E-510's controls are on the rear panel, and are clearly and logically laid out. A series of buttons lines the left side of the 2.5-inch LCD monitor, and includes the Playback, Erase, Menu, and Info buttons. Just above the top right corner of the LCD monitor is the AE Lock / AF Lock / Protect button. To the right of the LCD is the Live View button and the Image Stabilizer button. To the upper right hand corner are the the Function button and the Autofocus Frame button.
The four-way arrow pad in the lower right corner serves multiple functions depending on the camera's operating mode. A small OK button rests in the center of the Arrow Pad. The optical viewfinder eyepiece is surrounded by a rubbery cup to protect eyeglasses, and features a dioptric adjustment dial on its right side to correct the view. Also on the rear panel is a small red LED next to the memory card compartment door that lights whenever the camera is accessing the card (meaning you shouldn't remove the memory card). Below the four-way arrow pad is the shared USB/Video Out connector compartment. The compartment is protected by a flexible, rubbery flap tethered to the camera.
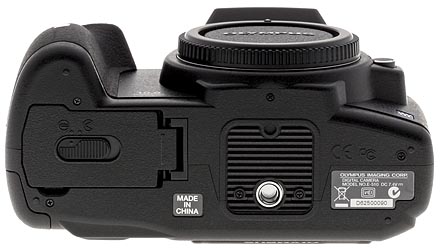
The bottom of the camera has the battery compartment cover and a metal screw-mount tripod socket. Depending on your tripod head, The tripod socket may be just far enough from the battery compartment to allow battery changes when mounted on a tripod. The battery compartment door features a sliding lock to keep it (and the battery) in place, and a latch holds the battery in place inside the compartment.
Olympus EVOLT E-510 External Controls

Shutter Button: Located on the top of the grip toward the front, the Shutter button sets focus and exposure when pressed halfway and triggers the shutter when fully pressed.
![]()
Exposure Compensation Button: Below the Shutter button, this button adjusts the overall exposure compensation from -5 to +5 EV in 1/3-step increments. In Manual exposure mode, this button sets the lens aperture when pressed while turning the Control dial.
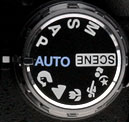
Mode Dial: Protruding up from the top panel, this dial controls the camera's main operating mode. Choices are Manual, Shutter Priority, Aperture Priority, Program, Auto, Portrait, Landscape, Macro, Sports, Night Scene, and Scene.

Power Switch: Jutting out from under the Mode dial toward the right, this switch turns the camera on and off.

Control Dial: To the right of the Mode dial is the Control dial, which adjusts a wide variety of settings when turned while pressing control buttons. Changes are usually reflected on the LCD panel.
In Playback mode, this dial controls digital enlargement of captured images up to 14x when turned toward the right. The dial also accesses the four, nine, 16, and 25 image thumbnail index display modes, as well as a calendar display, when turned to the left.
![]()
Flash Release Button: Located on the top deck left of the pop-up flash compartment, this button releases the pop-up flash. The flash can pop-up if needed in Auto or some Scene modes.
![]()
Live View Button: Near the top right corner of the LCD monitor, this button controls the E-510's Live View mode. Press once to turn on Live View, which draws a live image from the camera's main sensor, and press again to return to the optical viewfinder. With Manual focus active, you can use Live View's "Enlarged display" mode to enlarge a portion of the frame by either 7x or 10x so that you can fine tune focusing with the lens's manual focus ring.

AE Lock / AF Lock / Protect Button: Adjacent to the right side of the optical viewfinder, this button locks the exposure and/or flash setting in any record mode. In Live View mode, this button is the only way to prefocus the E-510, as half-pressing the shutter button does not perform this function.
In Playback mode, this button enables or removes write protection from an individual image.

Drive / Copy / Print Button: On the left of the camera's top deck, this button controls the drive mode in just about any exposure mode. Options are Single-Frame, Sequential, 12- or two-second Self Timer, and two Remote Control modes: one with no delay, and the other with a two-second delay.
In Playback mode, this button lets you copy image files between xD-Picture Cards and CompactFlash cards or Microdrives. You can also direct print from the camera to a PictBridge-compatible printer by pressing this button when the E-510 is connected to the printer via USB.

Four-Way Arrow Pad and OK Button: Made up of four buttons arranged in a circle around a central OK button, the Arrow Pad controls many of the camera's operations. In Record mode, the controller brings up shortcut menus for White Balance, Autofocus, ISO, and Metering. Pressing the OK button while in Record mode turns the Control panel into a quick menu. Using the four arrow keys you can navigate through the items on the Control panel. Once the desired control is highlighted, you can either turn the Control dial to change the setting, or press the OK button to go to that item's menu screen.
In Playback mode, the left and right Arrows move forward or backward through the pictures stored on the card. Up and down arrows jump through the images 10 frames at a time. All four are used to scroll around portions of the zoomed image in Zoom Playback mode.
In the menu system, the Arrow buttons navigate through menu screens and select settings, while the OK button confirms choices.
![]()
Playback Button: The first button in a series lining the left side of the LCD monitor, this button switches the camera to Playback mode. The E-510 is a "shooting priority" camera, so you can return to capture mode either by pressing the Playback button again, or by pressing the Shutter button.
![]()
Erase Button: Next in line below the Playback button, this button lets you erase the currently displayed image, with a Yes/No confirmation screen.
![]()
Menu Button: Directly below the Erase button, this button calls up the settings menus in any camera mode. Pressing it when the menu is active also backs out of menu screens one level at a time.
![]()
Info Button: The final button in the series left of the LCD monitor, this button changes the Control panel display mode from Basic to Detailed. A second press turns the Control panel display off.
In Live View mode, this button changes the onscreen information display. Screens are Information on, Info on + Ruled Lines Display, Info on + Histogram, Info display off, and Enlarged display (where the 10x zoom focus-assist mode is available).
![]()
Diopter Adjustment Dial: On the right side of the viewfinder eyepiece, this dial adjusts the optical viewfinder's optics to accommodate eyeglass wearers. Settings range from -3.0 to +1.0.

Lens Release Button: Right next to the lens mount, at about the 3 o'clock position (viewed from the front), this button releases the lens from its mount when pressed, so you can rotate it counter-clockwise and remove it.
![]()
IS Button: Just above the Live View button, the IS button brings up the Image Stabilizer menu. Options include Off; IS 1, which stabilizes in four directions; and IS 2, which stabilizes in only the vertical direction (used while panning to follow an object).
![]()
Function Button: Just under the Control Dial is the Function button which can be set to the function of your choice, including: One-touch White balance, Test picture, My Mode, Preview, and Live Preview.
![]()
Auto Focus Frame Selection Button: Right of the Function button, the AF Selection button can be used to choose one of the three AF points, or let the camera choose.
 Fujifilm GFX 50S Review
 Fujifilm X-T3 Review
 Olympus E-M5 III Review

Follow Imaging Resource